


How to import an existing database to SQL Change Automation
The Visual Studio extension of SQL Change Automation (SCA) allows you to adopt a migrations-first approach to database source control and deployment. There are a number of different ways teams can get started with SCA, in Visual Studio, and chere I’m going to show to get up and running when there is already an existing development database.
This post outlines the steps I take using the Community version of Visual Studio 2017, and the same is possible with the Professional or Enterprise versions of 2015 and 2017. If you’re using Visual Studio 2012 or 2013, you’ll need an earlier version of the tool, which you can find a link to in the documentation.
#1 – Create your SQL Change Automation project
After installing SQL Change Automation, you’ll see a new SQL Change Automation Project template in the SQL Server section of Visual Studio.
Select it and give it an appropriate name and a location, remembering to check the Create directory for solution and Add to Source Control options. Click OK and SCA will create the new project.
#2 – Add a baseline scripts folder
When I import the database, I want to import the current state into one folder and then have additional folders to capture ongoing changes. To support this, I create a folder specifically for holding the baseline scripts.
In the Solution Explorer of Visual Studio, right-click on the Migrations folder and add a new folder called 1.0.0:

#3 – Choose your options
Now that we have our new project folder structure set up, it’s time to select the options. Right-click on the project in the Solution Explorer and select Properties:

Here, you’ll see a whole collection of options for configuring the project, and the following are the settings I typically use:
Target platform – I set this to the earliest SQL Server version I want to deploy to.
Output types – This will ultimately depend on how you wish to deploy your changes to your target environments. I’m a big fan of Octopus Deploy and, if you have it available, there is fantastic integration between SQL Change Automation projects and Octopus. Alternatively, you can use a SQLCMD package which will also include everything you need to deploy your changes.
Programmable Objects – I always set this to Import into separate script files, which allows the project to treat different changes in different ways.

The real power of the SCA approach is that it allows you to customize the way changes are made to the database by capturing incremental change scripts at development time. This is great for objects like tables and also for data changes, but when it comes to changes to programmable objects, like stored procedures, it’s only the final definition of the object that matters.
Choosing this option for the project allows the tools to use the best mechanism for the particular change you’re trying to make.
Offline Schema Model – This is another option I always turn on. While it’s great, for deployment purposes, to have captured the incremental change scripts over time (as mentioned above), it can make it difficult to look back historically and see the state at a given point and how a given object has changed through different versions.

This option results in a collection of create scripts representing objects that are source controlled alongside change scripts, providing a point-in-time snapshot of the database state to refer to.
Semantic Versioning – Earlier we created a new 1.0.0 folder to hold the baseline scripts that represent the current development database. To use this folder structure, set the option by checking both boxes:

#4 – Import your existing development database
Now it’s time to link your new project to your existing development database. In this case, the database is on a local SQL Server instance:

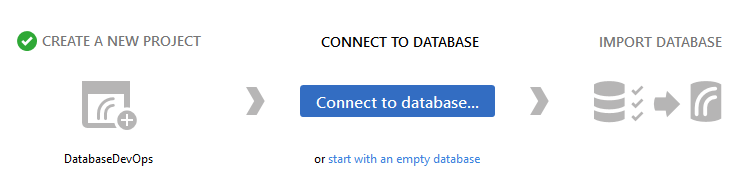
In the SQL Change Automation window, click Connect to database and browse to the development database you want to import:
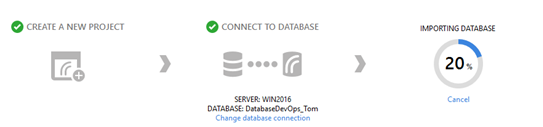
Click the Import database button and the progress will be shown in the window.
Once complete, you should have new subfolders for the Programmable Objects and Schema-Model. These contain the create scripts for each of the objects, and the new script file in the 1.0.0 folder represents the initial schema setup script.

It’s a good idea at this point to rename the initial script in the 1.0.0 folder to something more meaningful, while keeping the numeric prefix:

#5 – Add static data to your project
Sometimes, you might want to add reference or static data to your project. You can do this by refreshing and then expanding the Object Type list in the SQL Change Automation window. Locate the table objects that contain the data you want to include, such as CountryCodes, right-click on the table name, and select Include Table Data.
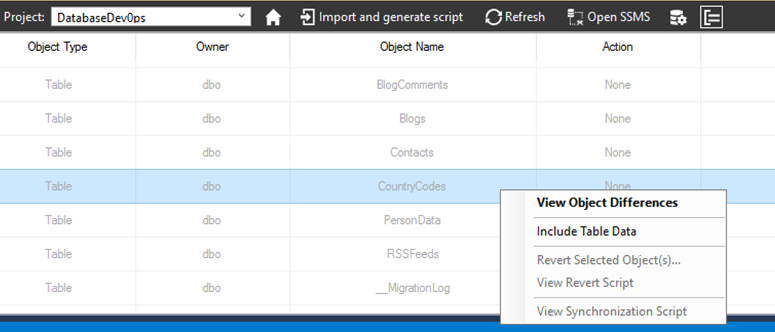
Click Refresh (View Data) when prompted, and finally click Import and generate script to add the static data script to the folder. It’s also a good idea here to rename it to something more meaningful:

#6 – Create a new change scripts folder
Finally, before committing everything to source control, I create a new folder ready to hold the first of my change scripts that will be used when a deployment takes place. To do this, repeat the process in step 2 and create a folder called 1.0.1 in the Migrations folder.
Summary
SQL Change Automation allows you to take a migrations-first approach to database source control and deployment, and includes the ability to import an existing database. It’s a relatively easy process to set up and, once you follow the six steps outlined above, you can start making changes to your database and capturing them in a SQL Change Automation project so that you’re all setup to have safe and reliable deployments.
Tools in this post
You may also like
-

Article
Database Continuous Integration with the Redgate SQL Toolbelt and Azure DevOps
Alex Yates shows how to set up automated processes for SQL Server database source control, build and continuous integration using Redgate SQL Toolbelt, Git and Azure DevOps
-

Article
Static Data and Database Builds
Whichever way you wish to ensure that a database, when built, has all the data that will enable it to function properly, there are reasonably simple ways of doing it. Phil Factor explains the alternatives.
-
Article
Overcoming Database DevOps Challenges: Part 1
As part of our research for the 2021 State of Database DevOps report, we asked 3,000+ recipients what they consider to be the greatest challenge when integrating database changes into a DevOps process. According to the respondents, these are the most important challenges facing database professionals when introducing DevOps practices to database development. Three of
-
Article
SQL Change Automation 4.0: Collaborative Database Development Across Visual Studio and SQL Server Management Studio
SQL Change Automation's Development component for developing new databases and modifying existing databases, using migrations, now integrates directly into SQL Server Management Studio as well Visual Studio. It allows teams to collaborate effectively during development, regardless of their preferred IDE, and in a way that integrates easily with common build/integration servers and release management tools.
-
Article
Designing an automated database deployment process: case study
In my previous article, How to design an automated database deployment process, I wrote about the steps companies and organizations should take to introduce automation to their database deployments. In this article, I’m going talk about the challenges I faced when I embarked on my own automation journey. Prior to joining Octopus Deploy, I was


