


Database Development in Visual Studio using SQL Change Automation: Getting Started
SQL Change Automation (SCA) is a tool designed to help you automate and optimize the way you develop, build, test, and release SQL Server databases, including integration with source control. In this article, the first in a short series, I'll show you how a team can use SQL Change Automation in Visual Studio to do development work on an existing database.
Pre-Requisites
There are a couple of requirements to follow along with this tutorial:
- Visual Studio installed (VS 2017 used here) with the SQL Change Automation plugin
- Git installed
- SQL Server Management Studio
A version control system is highly recommended, and this article will use Git, but any version control system compatible with Visual Studio will work. SQL Server Management Studio is optional as the SQL Server Object Explorer in Visual Studio can be used instead.
This will be a Brownfield development project, to upgrade an existing database, so you'll need a SQL Server instance and database with existing objects (creation script for my sample database is here)
Creating a Project
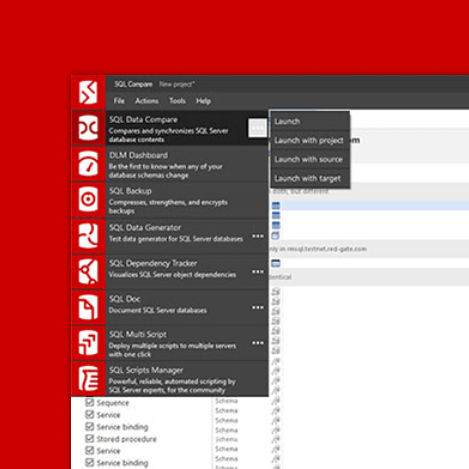
SCA is a plug-in for Visual Studio that creates a new SQL Change Automation project type. To begin database development, startup Visual Studio and use the File – New – Project menu to create a new project.
You'll see the usual list of Visual Studio project templates. Most of these are grouped by languages, though the exact list will depend on which templates you have installed. You do have the option to search for online templates as well.
You'll find the SQL Change Automation Project in the Other Languages group, beneath the SQL Server item. You can see this in the screenshot below, with the SQL Change Automation project type selected. Give the project a name and choose a location for it. I called mine simply "SQLChangeAutomation" and put in my local user Repos folder.
I also selected the option to create a directory for the solution and create a new Git repository in this location.

Figure 1
Once I click OK, SCA will create the project for me and set up a simple solution with several folders, which you can see in solution explorer. If you are adding this project to an existing solution, it will appear as part of that solution, alongside any other projects that already exist.
The Migrations folder will contain our set of database migration scripts, each one describing a distinct change to the database. The team can control the order in which these run, but by default they will run in the ordering that they appear. Each is numbered and named by SCA, but they can be renamed if needed.
The Pre-Deployment and Post-Deployment folders each contain a default script that SCA creates. We will not examine those scripts in this article but, for example if this were a greenfield project, and so the database did not exist, the pre-deployment script creates the database. These scripts can be customized as needed.
![]()
Figure 2
When you create an SCA project, it automatically launches a wizard that will help you set up the new project.
Establish database connections
The first task is to establish a connection to the local development database where you will perform development and, optionally, to a deployment target database to which you'll deploy those database changes.
If you needed to bring the copy of a database on a test server, or any other downstream environment, up to date with development changes, then you'd make that the deployment target. A developer won't (or shouldn't) have a connection to the Production database, which might be the ultimate deployment target, and perhaps not to databases in environments such as QA. In such cases, it would be the DBA's job to review and deploy changes to these environments.
For the time being, we don't need a deployment target as we're just going to set up an SCA project for our local development database, so we'll just connect to the local development database; it's easy to add a target later, once we're ready.
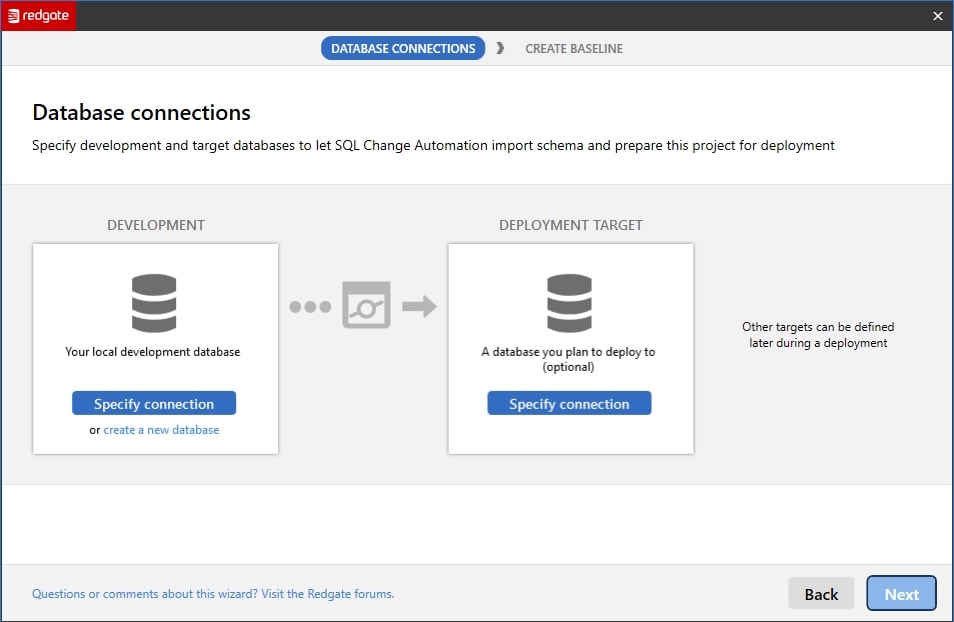
Figure 3
You can use the "create a new database" link if you are starting a greenfield project, but in this case, I connect to an existing database using the Specify Connection button. This launches us into the VS connection dialog. It shows a list of recent connections that you can edit, by clicking "Show Connection Properties", or you can create a new one. I've created a connection to my local SQL Server instance to the SQLChangeAutomation database.

Figure 4
Verify the connection and click OK to return to the database connections dialog, with your instance and database listed.
Create a baseline (optional)
The next step in the wizard is to create a baseline, which is a script that represents the current state of the database as it exists right now. The baseline script is the first migration that contains the CREATE scripts for all objects in the database. If you're deploying changes to a target, the baseline will define the state of all existing objects in the target database. However, since we haven't chosen a target, we get a reminder that we'll need to create a baseline, either manually or from a target database, before we can deploy the project.
![]()
Figure 5
All we need do at this stage though, is just click Finish on this dialog, and the project will be created.
Importing changes to database objects
Immediately after completing the wizard, we'll see the SCA pane, showing the SQL Server instance and database name, for the local development database, and the SCA project listed in the lower left. (open the SCA pane from the View menu, if you don't see it).
Refreshing the SCA project
The main part of the SCA pane contains a Refresh button and clicking it prompts SCA to inspect the local database, to import any changes into the SCA Project.
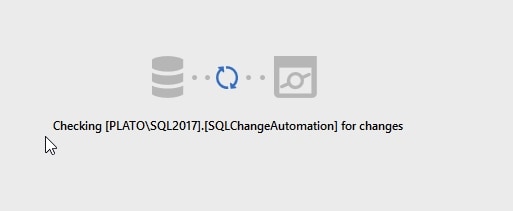
Figure 6
Since this is a new SCA project for an existing database, all the database objects will need to be imported. The import will contain the code to create all objects that exist in the development database but do not exist in the SCA project. If we refresh later in our development process, the import will also alter any that have changed, and drop any objects that exist in the project but do not exist in the development database. The objects are also added to the offline schema model, a current representation of state of each object.
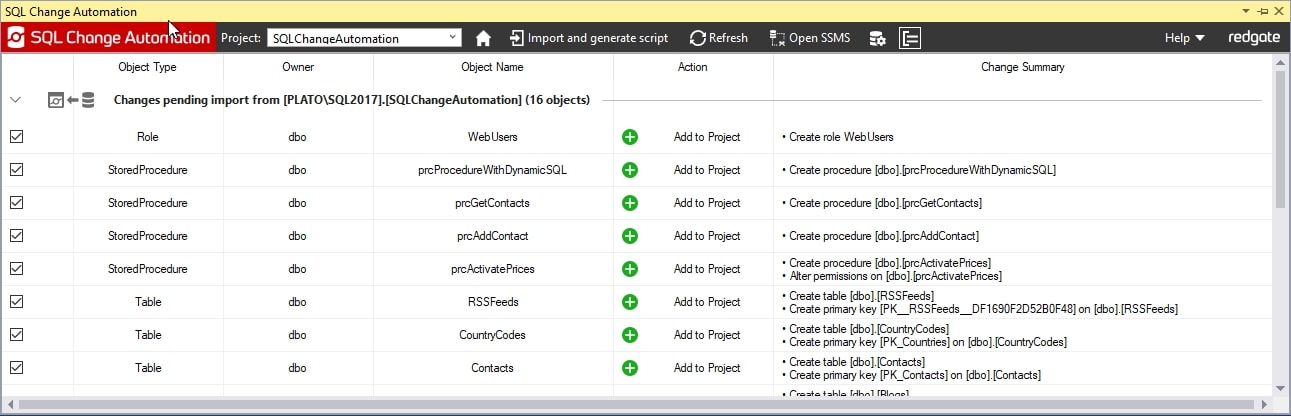
Figure 7
We can sort the columns of the display by each column header. This allows us to see all object types together, objects owned by the same user, and so on. The Change Summary column on the right contains a summary of what will be scripted for each object. Some objects have multiple scripts, such as the line for creating the dbo.RSSFeeds table. This contains the table create script and the ALTER script for the PRIMARY KEY. Basically, this is describing the individual build scripts for each of these objects.
The shadow database
If you connect SSMS or VS to the SQL Server instance hosting your development database, at this point, you'll find that it now has a "shadow" database, denoted by _xxx_SHADOW. The xxx represents the username of the individual running Visual Studio. The shadow database can be moved to other instances (or LocalDB) and renamed. That process is described in the SCA documentation.
Initially this database is just a copy of the model database plus the basic change tracking tables and views needed by SCA (a migration log table and schema snapshot table, and a view).
In the future, each time we click Refresh, SCA uses the SQL Compare engine to compare the shadow database to our development database and check the state of each object. If there are any differences in the development database, SCA generates a migration script that will apply the proposed changes. SCA will also use this database later, to verify the migration scripts.
Generate the migration scripts
If we click the Import and generate script link, in the top menu in the SCA pane, SCA will perform several tasks, all of which you can see reflected in the Visual Studio Solution Explorer for the project, as well as in the SCA project directory that you specified in Figure 1.
In the Migrations folder, SCA has created a single migration script that will contains the creation script for all the tables. The migration script is a file that follows the naming convention, XXX_yyyymmdd-hhmm_YYY.sql, where XXX is a number indicating the order in which the script will run, followed by the system timestamp at time of script creation, followed by the user name of the person running Visual Studio (YYY).
Lower down, you'll see that the Programmable objects folder now contains the DDL code for the various stored procedures, views and functions and in the Schema-Model folder, you'll see the scripts for all the table and types (user-defined data types, XML Schema collections), organized by schema. There is also a Security folder, where our users and roles are scripted.
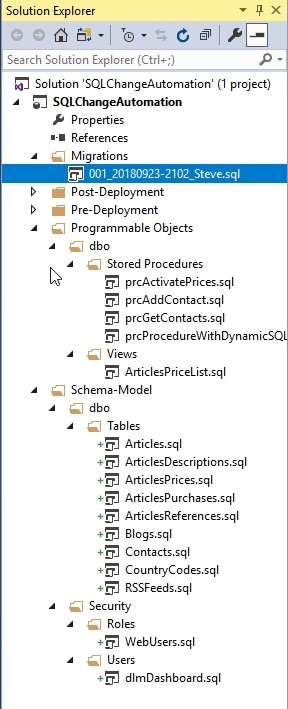
Figure 8
The last item to examine is the SCA pane where you will see that our objects are still listed, though now grayed out.

Figure 9
There is a new message below the title, which notes that our migrations were imported We have a link to the scripts as well. If we click the link, we’ll see a summary of the objects imported, as shown below.
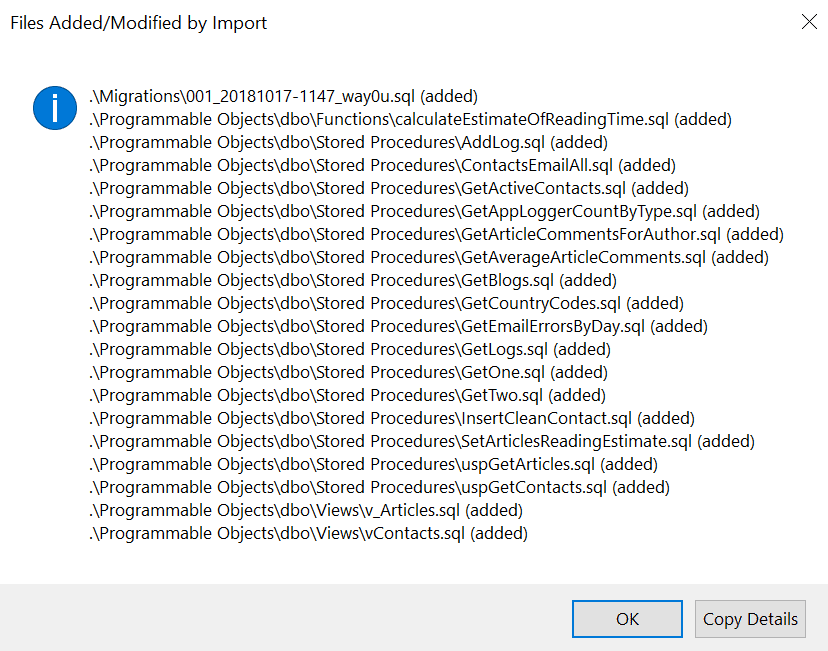
Figure 10
We also see a button that tells us that we need to Refresh again, but this time to Verify Scripts.
Verifying the Migration Scripts
The purpose of this step is to validate the migration scripts and object code to ensure they can run successfully to upgrade the previous version of your database. SCA verifies the migration scripts by running them against the shadow database, which represents the prior version of the database (i.e. the empty database, in this case). All the migration scripts and programmable objects are executed on this copy of our database, and if an error occurs, then our scripts are invalid. Since these scripts were generated by SCA, they will be valid. If you edited the scripts, then they may or may not be valid. You may also, on some databases, run into trouble with unsupported objects (see https://documentation.red-gate.com/display/SCA3/Script+verification).
When we click Refresh (Verify Scripts), the build verification process runs and then you should see a message in the SCA pane that all our objects are identical.
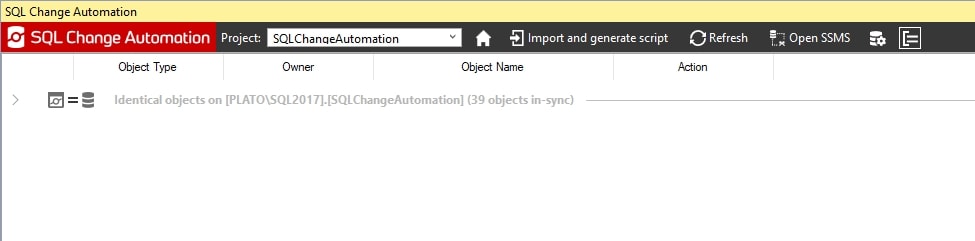
Figure 11
If you re-examine the shadow database, you'll now find that SCA has executed all migration scripts and programmable object changes on this database, so you'll see all the tables, stored procedures, and other objects.
Committing the changes to source control
At this point, we have a valid project and can make changes. However, since we've imported our database, we want to commit our changes.
Open Team Explorer in VS and choose the Changes tab to see a list of our files. These are the project file, the migration script, and the various schema model code scripts.
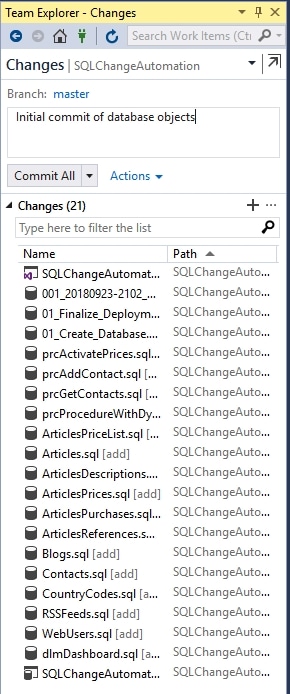
Figure 12
We can enter a commit message and click Commit All to commit all these changes to the developer's local source control repo.
Making Database Changes
At this point, I will make two database changes: creating a table and altering a stored procedure. I'll illustrate two different workflows to make the changes. First, I'll use VS to create a new script to create the table, and then deploy it to the dev database. Then I'll do the same but with SSMS.
However, there are other ways to perform database development with SCA, which will be covered in another article.
Making database changes in Visual Studio
Open SQL Server Object Explorer in Visual Studio, expand your instance and development database, right-click the Tables folder and choose Add New Table.
This opens the Table Designer at the top and a code panel to enter TSQL, at the bottom. I am comfortable with T-SQL, so I'll enter this code at the bottom:
|
1
2
3
4
5
6
|
CREATE TABLE [dbo].[ErrorLog]
(
[ErrorLogKey] INT IDENTITY(1,1) NOT NULL CONSTRAINT ErrorLogPK PRIMARY KEY
, ErrorLogDate datetime DEFAULT SYSDATETIME()
, ErrorLogMessage VARCHAR(MAX)
)
|
The Table Design GUI above syncs with my code, so I can see my table. Click Update at the top of this tab.
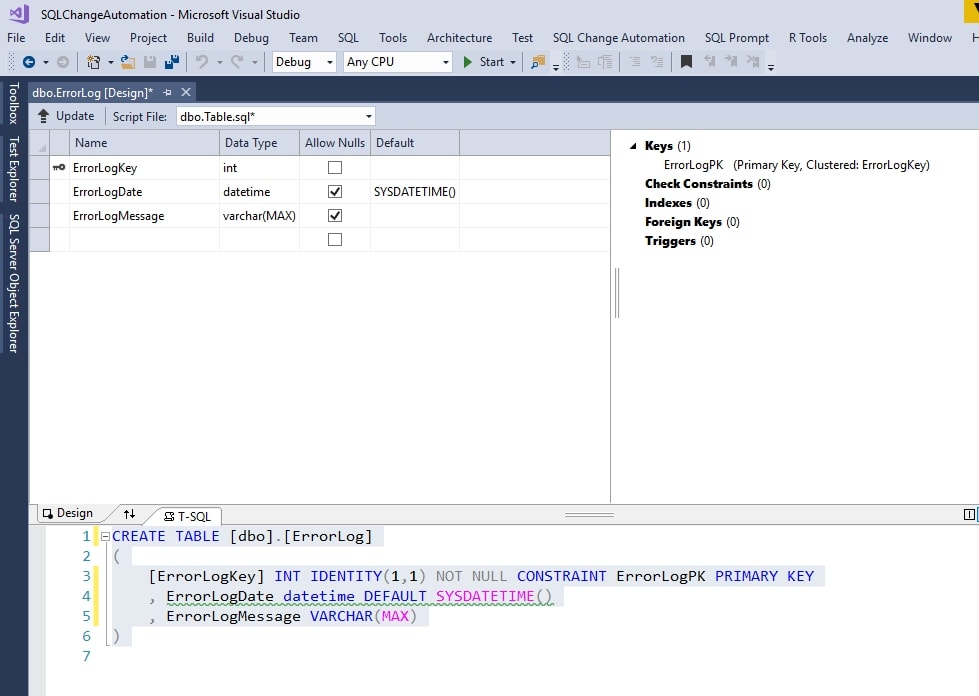
Figure 13
This gives me a dialog to preview the update. I can either just generate and save the script to the SCA project (Generate Script) or update the development database directly (Update Database). I choose to generate the script, which creates the new script in VS.
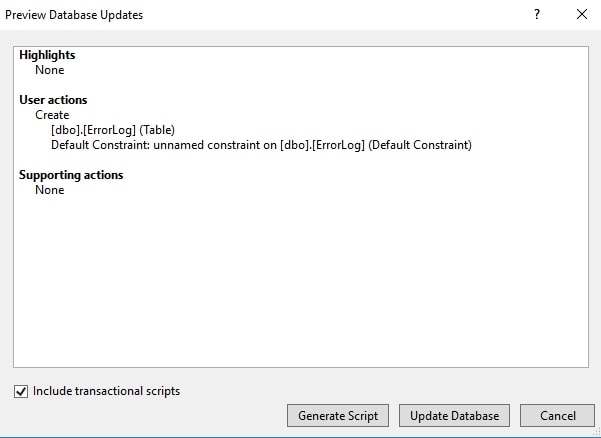
Figure 14
Clicking Generate Script creates my second migration script, and it contains my table code along with a few other items. In the image below, note that I have a script starting with 002 in my Migrations folder in Solution Explorer.
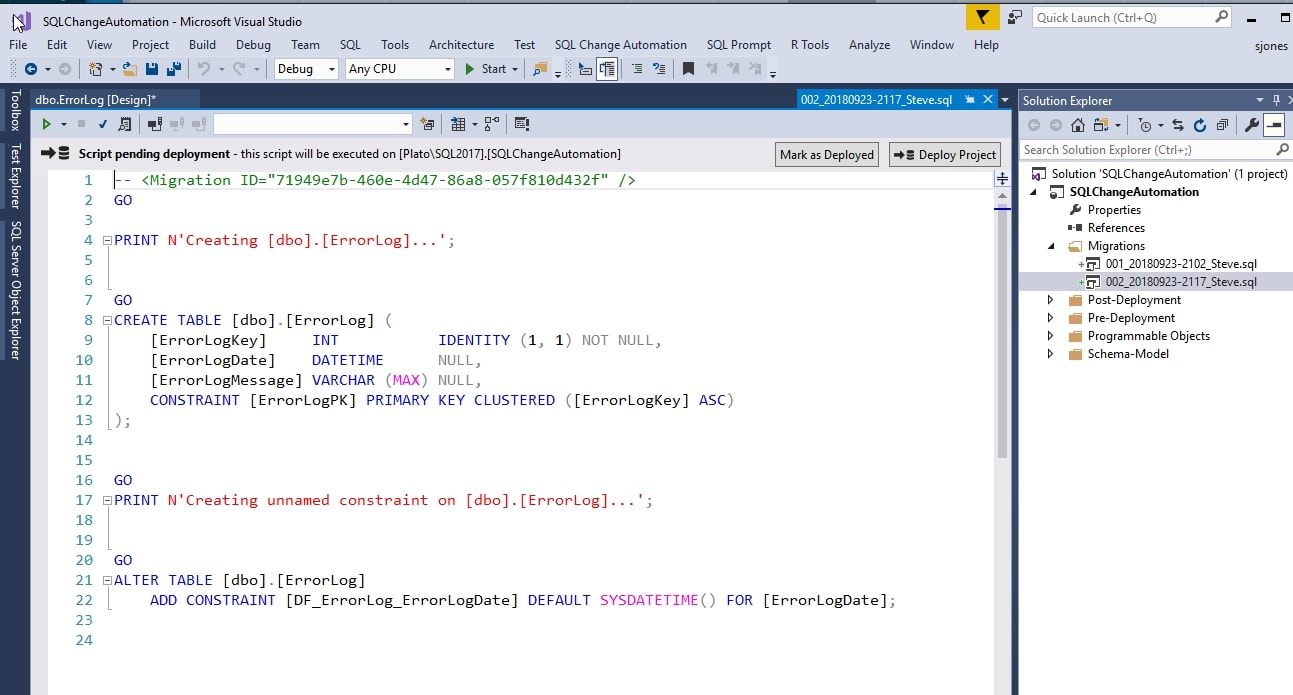
Figure 15
The script code has a commented Migration ID at the top, which is a tracking GUID that ensures that this script is only deployed to a target database one time. This should not be edited in any way.
Below that we have the table creation code, split into two sections, first creating the table and then altering it to add the DEFAULT constraint. This is the preferred method for writing the code, as is the move of the PK constraint to a separate line, but I could edit this code back to my original T-SQL, if I preferred. The PRINT statements describe what is taking place, which is useful for logging during deployments.
You will two buttons at the top: Mark as Deployed and Deploy Project. When I chose to generate the script, the code was not executed on my development database. If I were to refresh the list of tables in the Object Explorer, I would not see the object.
The choice of what to do here depends on how I want development to proceed. If I wanted to paste this code into a query window and manually execute it, I can do that. In that case, I'd want to click Mark as Deployed, which would update the tracking table in my database that this code had already been executed. SCA tracks the execution of each migration script to ensure each is executed only once, which ensures accurate deployment of all my scripts.
Here, I want SCA to execute this code on my database, so I'll click Deploy Project. Once I do that, the project is built and deployed to my database. The Output panel should open in VS and log changes. Once this is complete, you should see something to this output.
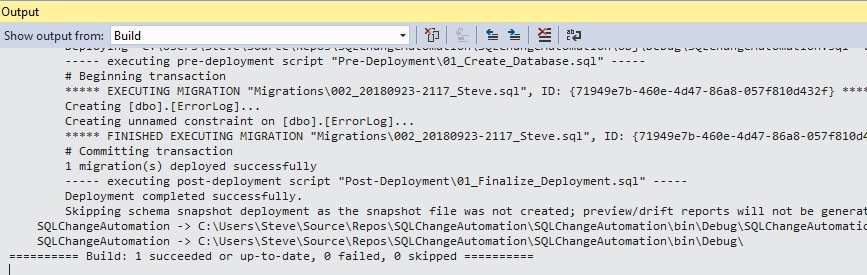
Figure 16
Note that the execution was successful, and that the migration script beginning with 002 was executed. This means that SCA evaluated all my migration scripts and chose to run only the previously-unexecuted migration scripts against my database. In this case, that is only the 002 migration script. SCA also updates any changed programmable objects, of which I had none at this time.
Having synced my SCA project and development database, I can commit the changes in the SCA project to source control. In Team Explorer, I choose Changes, enter a comment and commit the code which adds the migration script, along with a new script file in the schema model, to my source control project folder.
Making database changes in SSMS
Let's now create a stored procedure. I can do this in a query window in either VS or SSMS, and I will choose SSMS to show how this works. Since many database developers do prefer to work in SSMS, this is an option that is available.
In a new Query Window in SSMS, I will connect to my instance and database and enter the code below and click Execute to create this stored procedure.
Figure 17
I return to Visual Studio and open the SCA pane. I click refresh to check the database and I will see that a new stored procedure has been created. SCA has detected that I added that object and has listed this as a pending change.
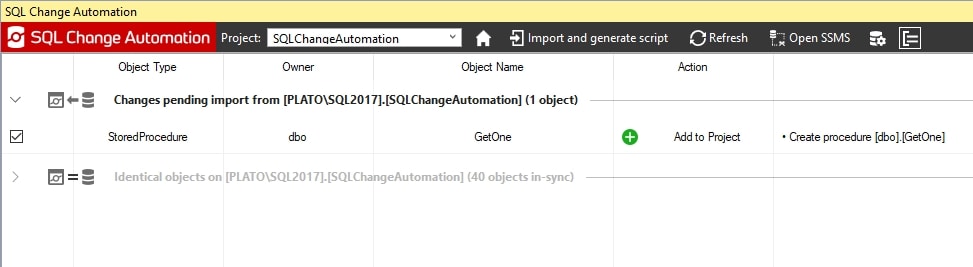
Figure 18
When we refresh our SCA pane, it compares our development database with the shadow database to detect changes. Since we've changed objects in the development database, the comparison with the shadow database shows those changes. Our new stored procedure appeared in the SQLChangeAutomation database, but not in the SQLChangeAutomation_Steve_Shadow database, so this was shown as an object to import.
I need to click Import and Generate script to import this into my project and then Refresh (Verify Scripts) to verify the migration and run it, as described previously. Once we import the change, it is added to the Shadow database. The request to refresh is to ensure that we haven't changed anything else in the development database. This will also allow us the choice of importing some changes and not others into a migration script. This refresh, import, refresh process allows us to choose what changes are captured into each migration script and ensures we don't forget about any changes.
In VS Solution Explorer, the Programmable Objects folder for the project shows the new stored procedure. I can double click the file to open the code in the left pane. SCA has added a wrapper that ensures this is an idempotent script and a few settings for consistency.

Figure 19
As with my table, I'll commit these changes in Team Explorer.
Conclusion
SCA is designed to let you develop your database code alongside other application code in Visual Studio. An SCA project is a first-class project like any other Visual Studio project type and allows you to use the Solution Explorer, Team Explorer, and other Visual Studio tools to save and commit your code to a VCS.
SCA isn't limited to making changes in VS, as we have shown that SSMS can be used as well. The process of making changes, refreshing your SCA project, importing changes, and then refreshing the project again provides a methodical way of capturing database changes as they occur. Since your migration scripts are replayed in the same order as they are created in downstream databases, this provides a more reliable method of deploying database changes.
There are many more options and features of SCA. This is a flexible development tool that allows you to work as you prefer, while giving you several options that help track and manage team development and complex database changes.
Hopefully, it will help you change the way you work with a database, making database development more effective and efficient, but still using the tools and workflow you are used to using.
Look for other articles that cover different aspects of how to get the most out of your SCA projects.
This document contains proprietary information and is protected by copyright law.
Copyright © 2026 Red Gate Software Limited. All rights reserved
Tools in this post
You may also like

Article
Checking for Database Drift using Extended Events and Redgate Monitor
Phil Factor uses Extended Events and a Redgate Monitor custom metric to detect when the metadata of a database has 'drifted', meaning that a database object has been created, deleted or modified outside of the official change management process.

Article
SQL Change Automation with PowerShell Scripts: getting up-and-running
Provides a PowerShell automation script that will build a SQL Server database from the scripts in source control, document the database and then deploy it as a NuGet package, using it to update the schema of a live database.

Article
Deploying Data and Schema Together with SQL Compare or SQL Change Automation
You want to use SQL Compare or SQL Change Automation (SCA) to create or update a database, and at the same time ensure that its data is as you expect. You want to avoid running any additional PowerShell scripting every time you do it, and you want to keep everything in source control, including the data. You just want to keep everything simple. Phil Factor demonstrates how it's done, by generating
MERGEscripts from a stored procedure.Article
How SQL Clone and SQL Change Automation enable seamless Database Branch Switching
Learn how SQL Clone and SQL Change Automation, used together, now allow you to branch your database in Git as quickly and simply as your code.
Article
Deploying Multiple Databases from Source Control using SQL Change Automation
How to automatically build multiple test databases, from source control, and then fill them with standard test data sets, using SQL Change Automation, BCP and some PowerShell magic.

Article
Deploying schema changes to multiple databases using the SQL Compare command line
How do you push out the schema changes to ten copies of the database on ten different servers, as part of a deployment?
Loading comments...