Allowing for manual checks and changes during database deployments
SQL Change Automation enables users to make database changes to production safely and efficiently using PowerShell cmdlets, which can be integrated easily into any release management tool. This article will show you how to automate database deployments safely, by using SQL Change Automation from within PowerShell scripts, and how a deployment script for a release can be checked and amended as part of the process.
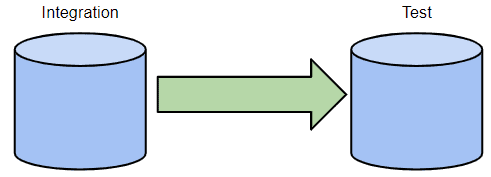
Deploying schema changes directly from one database to another
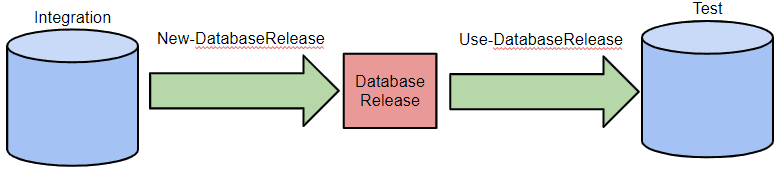
The first and simplest example I’m going to consider is that of using SQL Change Automation (SCA) PowerShell cmdlets to deploy schema changes from one database (the source) to another (the target) to make the target have the same schema as the source. Imagine you’ve successfully run all integration tests on a new database version and now want to bring each of your test databases up to the new version. Put simply, you want to make every Test copy of the database the same as the Integration database.
You can achieve this running the following PowerShell script, with the Integration database as the source each time, and the target being a Test database. Any schema objects that only exist in Integration will be created in Test, any that only exist in Test will be removed, and any objects that are different in Test will be modified to match what’s in Integration. The script will do its best to preserve the existing data in the target while making schema changes, but it may not be possible and if so, you’ll get a warning.
|
1 2 3 4 5 6 |
Import-Module SqlChangeAutomation $integration="Server=IntServer;Database=AdventureWorks;" $test="Server=TestSvr;Database=TheDatabase;" $release = New-DatabaseReleaseArtifact ` -Source $integration -Target $test Use-DatabaseReleaseArtifact $release -DeployTo $test |
Let’s examine this script to see what’s going on. First, the two variables, $integration and $test, just contain the connection strings. By assigning these to variables, we can re-use them in calls to subsequent cmdlets in the script, which is a common pattern in all the examples here.
You can, if you prefer, use the New-DatabaseConnection cmdlet to specify the connection details to the two databases and assign the connection object to the variables. The output of the New-DatabaseConnection cmdlet is a Database Connection object that contains the connection details for a SQL Server database. See: Simple SQL Change Automation Scripting: Connections, iProjects and Builds.
We’ll use the New-DatabaseReleaseArtifact cmdlet to create the database release object. There are two required parameters to this cmdlet:
- The new database state after deploying the release should be specified with
-Source. In this case, we specify$integration, i.e. the Integration database, since it represents the new database state that we want to deploy to production. - The current state prior to deploying the release should be specified with
-Target. In this case, we specify$test, i.e. the Test database, since it has the currently deployed database state that is going to be updated.
The output is a Database Release object, assigned to the $release variable, which we can then use to update the schema of the Test database to match that of the Integration database. If all your test databases are at the same version, you can use the one release object for all of them. Otherwise, each ‘target’ (each separate version of the Test database that needs to be at the new version) has its own release artifact, which contains everything required to migrate the database from the current version to the required version.
Internally, the New-DatabaseReleaseArtifact cmdlet uses the SQL Compare engine to compare the two databases and auto-generate a deployment script (sometimes called a migration script), which is just a SQL script designed to apply the changes required to ‘migrate’ the Test database to the new version, described by the integration database, in this case. The Database Release object is essentially a wrapper for that SQL script, though as well see later, it also contains more.
The final step is to deploy the Database Release object to the Test database, using the Use-DatabaseReleaseArtifact cmdlet. This cmdlet executes the deployment script (called Update.sql) against the target Test database. The upshot is a ‘one-way synchronization’, so that the schema of the Test database now matches that of the Integration database.
However, given that SCA provides a Sync-DatabaseSchema cmdlet that will perform this operation in single step, why did we choose to do this with two separate cmdlets? Simple. The release object will convert any target database of a particular version to the source’s version. If you have a test cell containing several copies of the database all at the previous level, you’d only need one Update.sql in one release object, and this would be a lot quicker than using the Sync-DatabaseSchema cmdlet.
Also, while SCA will always be able to migrate the schema metadata, if it can’t guarantee to preserve the data, and by separating the process into two steps, we have a workflow that gives the opportunity to change the script to add any necessary migrations.
Once the deployment script has been created, there is no further SQL Compare magic required to apply it to a database. In this example, the Use-DatabaseReleaseArtifact cmdlet simply executes the auto-migration script against the target database. You could achieve the same result by writing out the deployment script to a .sql file and then using SSMS to execute the script against the Test database. Incidentally, you can export the script to a file using the following PowerShell.
|
1 |
$release.UpdateSql | Out-File C:\Work\Update.sql |
This first example isn’t a particularly revealing use case for SCA, because actually there’s more going on in the release object that is a crucial part of what SCA offers. To give you a hint, I would suggest a change to the previous script, as follows:
|
1 2 3 4 5 |
$integration="Server=IntServer;Database=AdventureWorks;" $test="Server=TestSvr;Database=TheDatabase;" New-DatabaseReleaseArtifact -Source $integration -Target $test | Use-DatabaseReleaseArtifact ` -DeployTo $test -SkipPreUpdateSchemaCheck -SkipPostUpdateSchemaCheck |
There are two changes here. Firstly, as we’re not too concerned with preserving the data, I’ve eliminated the unnecessary $release variable by piping the Database Release object directly from the New-DatabaseReleaseArtifact cmdlet to the Use-DatabaseReleaseArtifact cmdlet (this prevents the Database Release from “leaking” into the rest of your script). Secondly, the -SkipPreUpdateSchemaCheck and -SkipPostUpdateSchemaCheck parameters eliminate some checks that are unnecessary in this simple use case. Hmm! What could be going on with these “schema checks”? We’ll find out in due course.
Setting up a staging server
The process described till now is fine if you just need to update some test databases to the latest version because the preservation of the existing data is of less importance, but when it’s time to release to staging and from there to production, more checks and more visibility is required.
You will need to be confident of preserving data, so it becomes more important to separate the use of the SQL Compare engine to generate a deployment script, from the execution of that script to migrate the target database to the new version. We can use SCA to auto-generate a migration script and store it in a “Database Release” object, which we can then export, check any warnings, review the SQL migration script, and add in any necessary code to do the occasional complicated migration of the data that comes from the more extreme revisions of the database’s table design. It can then deploy that object to the target as a separate step.
We also need a staging database. There are many ways in which the Production database can be copied to the Staging database, and many potential problems. The ideal approach would be to create a backup of the Production database and restore it to the Staging database. This method is outside the scope and capability of SCA, and sometimes this approach simply isn’t possible, perhaps because the Production database is located remotely or is simply too large for a backup and restore to be practical. As an alternative, SCA can use a clone of the production database as the source.
However you do it, the bottom line is that you need to somehow get the Staging database to match the Production database as closely as possible. The more similar they are, then the greater your confidence that, if the Database Release works on the Staging database, it’s going to work on the Production database too.
Exporting a Release artifact to review the SQL migration script
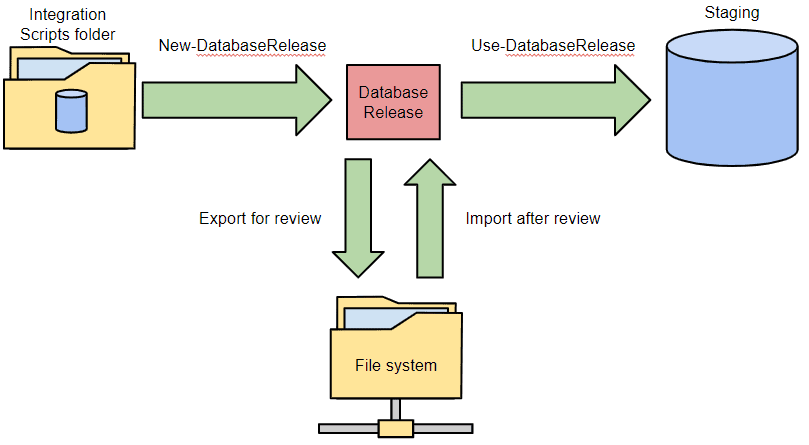
All examples so far have simply created, and then immediately used, the release artifact. However, once the New-DatabaseReleaseArtifact cmdlet has created a Database Release, a sensible DBA will typically want to review the migration script before applying it to a staging database. This is especially true if the process has generated any warnings. The best way to allow for a review varies according to which release management tool you’re using, but it typically involves exporting the Database Release to disk, so that a DBA can more easily examine its contents, and modify the script to preserve the data, if that is necessary. After the review, the Database Release will then be imported by a subsequent script. So now the process looks like this:
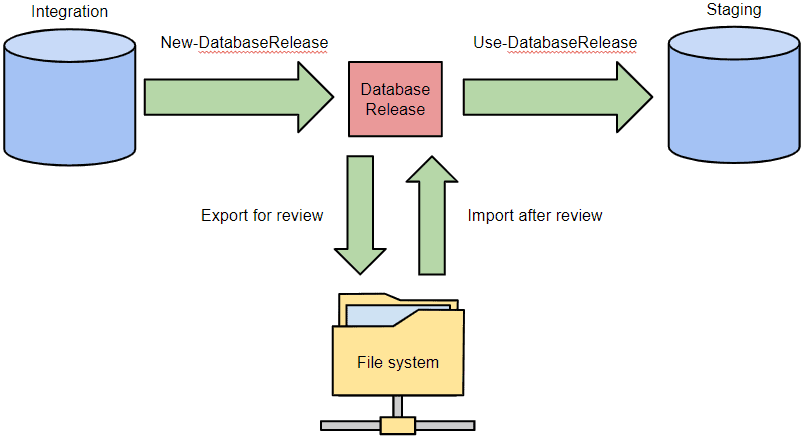
As the review by the DBA may take some time, the whole process is divided into two separate scripts. Here’s the first PowerShell script that creates and exports the Database Release for review:
|
1 2 3 4 5 6 7 |
# generate the migration script for Integration -> Staging and export it # Define all the variables used in the script. $releasePath = 'C:\Work\MyDatabaseRelease' $integration = "Server=IntServer;Database=AdventureWorks;" $staging = "Server=StagingSvr;Database=TheDatabase;" $release = New-DatabaseReleaseArtifact -Source $integration -Target $staging Export-DatabaseReleaseArtifact $release -Path $releasePath |
This will export the Database Release to a folder named C:\Work\MyDatabaseRelease. This folder will contain several items. Right now, the most interesting item is the C:\Work\MyDatabaseRelease\Update.sql file, which is the migration script that the DBA would like to review. The Export-DatabaseReleaseArtifact cmdlet can also export the Database Release to a zip archive file rather than a folder if that turns out to be more convenient. To do this, simply specify an export path that ends with .zip, such as C:\Work\MyDatabaseRelease.zip.
Deploying a database release to staging
Once the DBA has approved the script, here’s the second PowerShell script that subsequently re-imports the Database Release (only necessary if a change has been made to the script) and then applies it to the staging database.
|
1 2 3 4 5 |
# Import release artifact and use it $staging = "Server=StagingSvr;Database=TheDatabase;" $releasePath = 'C:\Work\MyDatabaseRelease' $release = Import-DatabaseReleaseArtifact -Path $releasePath Use-DatabaseReleaseArtifact $release -DeployTo $staging |
What’s in a Database Release?
Okay, so at this point it should be clear that a Database Release is more than just a migration script. Let’s look at it in more detail. An exported Database Release folder typically contains the following items:
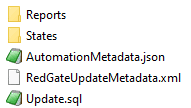
The most obvious item is the migration script itself, which is the Update.sql file. For the purposes of this article, the RedGateUpdateMetadata.xml file is not especially interesting (it’s where we store information from the exported Database Release object that doesn’t have a natural home anywhere else in the exported folder). What about the Reports and States folders?
Reports sub-folder
The Reports sub-folder contains the following items:
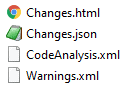
Changes.html contains an interactive report that contains information about all of the changes between the Source and target database schemas, similar to the reports that can be generated by SQL Compare. Changes.json provide the report in JSON format.
CodeAnalysis.xml contains the results of running a set of code analysis checks to verify that the source code doesn’t have any obvious mistakes. SCA runs these checks automatically when creating the release artifact.
Warnings.xml contains a list of the warnings that were generated by the SQL Compare engine when the two databases were compared to create the update script. This file isn’t particularly easy on the eyes, though it’s amenable to automated processing.
|
1 2 |
[xml]$warnings=Get-Content -path "$releasePath\reports\warnings.xml" $warnings.warnings.warning|foreach{write-warning "$($_.severity) severity - $($_.'#text')"} |
Conversely, the Changes.html file is much more readable, but is difficult to process in an automated manner.
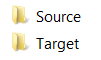
States sub-folder
The States sub-folder contains two scripts folders that represent the Source and Target database schemas. In the earlier example, the Source represents the Integration database state and the Target represents the Staging database state.
Why does SCA need to store both the target and source schemas?
The copies of the Source and Target schemas are present to support some built-in safety checks in SCA. Specifically, the Use-DatabaseReleaseArtifact cmdlet uses these to perform sanity checks against the deployment target database both before and after the Update.sql migration script is executed.
Before executing the Update.sql script, the Use-DatabaseReleaseArtifact cmdlet will compare the deployment target database and the Target schema to ensure they are equivalent. If the schemas don’t match, the cmdlet will raise an error and refuse to execute the script. This guards against running a deployment that doesn’t account for any schema changes that may have occurred directly on the target Production database between the time the Database Release was created and the time it is being applied (i.e. during the time when the DBA was reviewing the update script). It also guards against accidentally applying the Database Release to the wrong target database!
After the migration script is executed, the Use-DatabaseReleaseArtifact cmdlet will compare the updated deployment target database and the Source schemas to make sure that they are equivalent. If the schemas don’t match, again the cmdlet will raise an error. In this case, it’s too late to prevent any changes to the database, but it is worthy of further investigation, possibly leading to a decision to roll-back the changes. This guards against any changes made to the Update.sql script, perhaps during the DBA’s review, that prevent it from entirely updating the Target schema so that it matches the Source schema, but which do not cause a SQL Error.
These safety checks, while useful, can be disabled if necessary, as we saw earlier, using the -SkipPreUpdateSchemaCheck and -SkipPostUpdateSchemaCheck parameters of the Use-DatabaseReleaseArtifact cmdlet.
Talking of safety checks, the process of checking that the data is preserved is out of the scope of SCA.
Exporting a release artifact using a database scripts folder as the source
If you’re using SQL Source Control to develop your database schema, alongside your application, then instead of using a database for the –Source parameter of the New-DatabaseReleaseArtifact cmdlet, you can use the source-controlled database scripts folder directly. You can also use a scripts folder created in SQL Compare, perhaps because the Integration database may not be directly accessible from the location you are running SCA. In this case, the process now looks like this:
The only change that needs to be made is to the -Source parameter of the New-DatabaseReleaseArtifact cmdlet. Instead of database and a connection string for the Integration database, we just specify the path of the scripts folder, like this:
|
1 2 3 4 5 6 |
#Generate and export the release artifact containing the migration script for Integration scripts folder -> Staging $scriptsFolderPath = 'C:\Work\MyDatabaseScriptsFolder' $staging="Server=StagingSvr;Database=TheDatabase;" $releasePath = 'C:\Work\MyDatabaseRelease' $release = New-DatabaseReleaseArtifact -Source $scriptsFolderPath -Target $staging Export-DatabaseReleaseArtifact $release -Path $releasePath |
After review, we import the release artifact and use it, as described previously.
Exporting a release artifact using a NuGet package as the source
If you’re using SCA as part of Continuous Integration for your database development, then instead of using an Integration database or a database scripts folder for the -Source parameter of the New-DatabaseReleaseArtifact cmdlet, you can use a NuGet package generated by SCA
For example, you can export an SCA build artifact to the file system as a NuGet package. We haven’t covered the database build phase of SCA in this article, but any delivery to production is likely to entail distinct build and release phases, and this article explains how SCA builds work: Simple SQL Change Automation Scripting: Connections, iProjects and Builds. Once we have the build package exported, we are then no longer reliant on the contents of the source directory, meaning that access to source control can be restricted.
In fact, the Database Release object can use any zip archive file that contains within the archive a database scripts subfolder in the db\state folder of the ZIP. However, NuGet has the advantage that it can’t be subsequently modified. This gives you a measure of confidence that what you build and tested is what’s being released.
In this case, the process now looks like this:
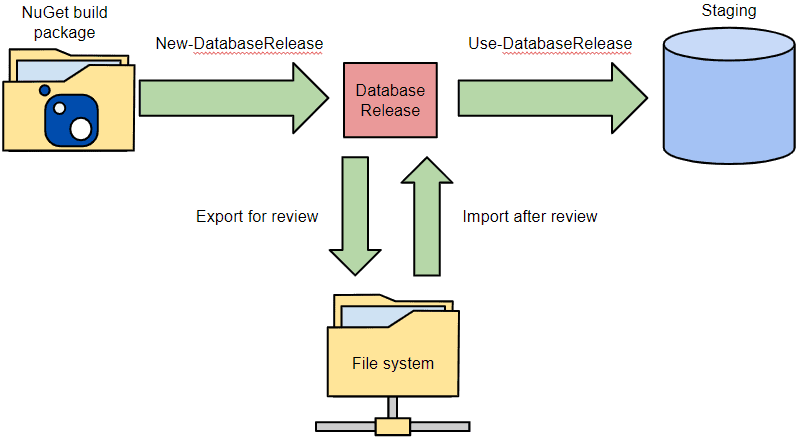
Again, the only change is to the -Source parameter of the New-DatabaseReleaseArtifact cmdlet. We are using as Source the path to our NuGet package and creating a release object by comparing the staging database with it. This release object is then exported to the release path in the file system, as before:
|
1 2 3 4 5 6 |
# Generate and export the release artifact containing the migration script for NuGet package -> Staging $nugetFilePath = 'C:\Work\MyDatabasePackage.nupkg' $staging = "Server=StagingSvr;Database=TheDatabase;" $releasePath = 'C:\Work\MyDatabaseRelease' $release = New-DatabaseReleaseArtifact -Source $nugetFilePath -Target $staging Export-DatabaseReleaseArtifact $release -Path $releasePath |
All the ways we’ve discussed of producing and exporting the release artifact rely on the fact that Staging is a copy of Production, so that we can be confident that if the deployment succeeds on Staging, it will do so on Production too. However, it’s not always possible for the Staging database to be an identical copy of the Production database. Sometimes you just have to get as close as you can. In such cases, we can use the following variation of the above script:
|
1 2 3 4 5 6 |
$nugetFilePath = 'C:\Work\MyDatabasePackage.nupkg' $staging = "Server=StagingSvr;Database=TheDatabase;" $production = "Server=prodSvr;Database=TheDatabase;" $releasePath = 'C:\Work\MyDatabaseRelease' $release = New-DatabaseReleaseArtifact -Source $nugetFilePath -Target @($production, $staging) Export-DatabaseReleaseArtifact $release -Path $releasePath |
By passing both databases in a list to the -Target parameter, the New-DatabaseReleaseArtifact cmdlet will perform a check prior to creating the Database Release, comparing the two databases to make sure that they are identical in all the ways that actually matter to the migration script. It checks that you can subsequently use the release object for both staging and production. If they aren’t the same, then all your work in testing the migration script is wasted
After this, we import the release artifact and use it, as described previously, to deploy to Staging.
Deployment of a database release to Production
In the previous example, the process comprised 3 steps from Development to Staging.
- Create a copy of the Production database on the Staging server, by deploying its schema to a Staging database or (better) restoring a backup or creating a masked clone (as supplied by SQL Clone).
- Create and export a Database Release, based on the staging database as the target and the new database schema as the source, in the form of a database, scripts folder or NuGet package. The DBA reviews and, if necessary, alters the migration script
- Import the new Database Release artifact and apply it to the Staging database.
Having performed the dry runs against a Staging database, the DBA will want to validate that the Staging database was correctly updated and that it functions correctly. If so, the final extension of this process is delivery of the changes to production
|
1 2 3 4 5 |
# Import release artifact and deploy it to production $production = "Server=ProdSvr;Database=TheDatabase;" $releasePath = 'C:\Work\MyDatabaseRelease' $release = Import-DatabaseReleaseArtifact -Path $releasePath Use-DatabaseReleaseArtifact $release -DeployTo $production |
Summary
This article has demonstrated some key features of SCA running within PowerShell. The basic operations are:
- Use
New-DatabaseReleaseArtifactto create a Database Release - Use
Export-DatabaseReleaseArtifactto export the Database Release to disk for an external review. - Use
Import-DatabaseReleaseArtifactto import the Database Release after the review. - Use the
Use-DatabaseReleaseArtifactto deploy the release to a target database.
If you’re interested in trying out SQL Change Automation, download and install a free trial. Then start playing with the cmdlets in your own PowerShell scripts. Finally, start thinking about how to integrate it into your own Release Management process.
Tools in this post
You may also like
-

Article
Build and fill a database using JSON and SQL Change Automation
Phil Factor demonstrates how to export data from a database, as JSON files, validate it using JSON Schema, then build a fresh development copy of the database using SQL Change Automation, and import all the test data from the JSON files.
-
Article
SQL Code Analysis from a PowerShell Deployment Script
This article shows how to define SQL code analysis rules using SQL Prompt and them run them automatically from a PowerShell script, displaying the detected code issues in a handy HTML report.
-
Article
You just Build It don't you? 12 Common Database Build Blockers
Database deployments, like the sheep of exasperated hill-farmers, often find strange and unexpected ways to self-destruct. Phil Factor describes the most common things that can go wrong, and how a reliable automated database build process can prevent messy accidents.
-

Article
Handling Tricky Data Migrations during State-based Database Deployments
This article demonstrates how to use a 'state' approach to database source control, when the nature of the database changes cause you to hit difficulties with migrating existing data. These difficulties happen when the differences are such that it is impossible for any automated script to make the changes whilst preserving existing data.
-
Article
Questions about SQL Change Automation that you were Too Shy to Ask
Phil Factor takes on tricky SQL Change Automation questions about database builds, migrations, deployments and releases.