Database CI and automated deployment with Jenkins: a Step by Step Tutorial
This post has now been updated by Alex Yates to reflect the latest software. Read the new post.
First things first: at the original time of writing (October 2013) I was not a developer; I was a tech sales guy. I helped customers get started with database continuous integration (CI) and deployment. When I wrote this piece I hadn’t used Jenkins before. However, I got it working in less than an hour and documented the process. Here’s a step by step tutorial on how to set up SQL Server continuous integration with Jenkins for yourself.
The point is that CI reduces your feedback loop such that changes that cause errors and break the build are caught as soon as they are committed to source control. Additionally, it is very easy to automate unit or integration tests. While CI started with application code you should apply the same principles to databases by automating your standard deployment tool to deploy your source control commit to a CI database.
In this 3-step walk-through, I will explain how to get the acknowledged benefits of CI for your databases.
Before you start, here’s what you need:
In my case I do everything locally on my own laptop (I was preparing a POC) but you can set things up as you like. In either case, these are the tools and components you’ll need to have in place:
- A SQL Server that you can connect to.
- SQL Source Control (Redgate tool) to connect your database to a source control repository. I’m using Tortoise SVN which is open source. (Database source control is a prerequisite for database CI. If you don’t source control your DB already you should sort that out first. If you work in SSMS, SQL Source Control will make versioning your database trivial.)
- DLM Automation v1.1 or later for the Redgate command line tools. (You can use the free 14-day trial to follow this tutorial.)
- And, finally, the latest build of Jenkins CI (open source) which you can get from the Jenkins website.
This post assumes that you already have SQL Source Control set up with SVN and that you broadly understand how it works. If you have these bits and pieces installed and in place, you’re ready to follow in my footsteps!
Step 1: Create a new job in Jenkins CI
- In Jenkins click New Job (top left) and give it a name, something like “[MyDatabase] build”, and select the radio button to “Build a free-style software project”.
- Add the location of your source control repository where it says “Repository URL”. For example, I used file:///C:/SVNRepository/SimpleTalk/Database, which I copied from the Tortoise SVN repo browser.
- Finally set up a build trigger. The easiest way is to set it up to poll your SVN repo once a minute (copy five stars (* * * * *) into the text field). In time you may want a push trigger to improve performance but this is a quick way to get started.
Step 2: Adding SQL CI (sqlCI.exe)
You have two options:
- Put the SQL CI command line tool and associated files (part of DLM Automation) into source control, or
- Put the SQL CI command line tool and associated files on each Jenkins node that you plan to use for database builds. (If you are just getting started with Jenkins your only node is the machine where you have installed Jenkins.)
In either case follow these steps:
- Install the DLM Automation product on each node you plan to use for database builds and fire it up. Click the Open Folder button for SQL CI.
- Run the dependency installer on each node.
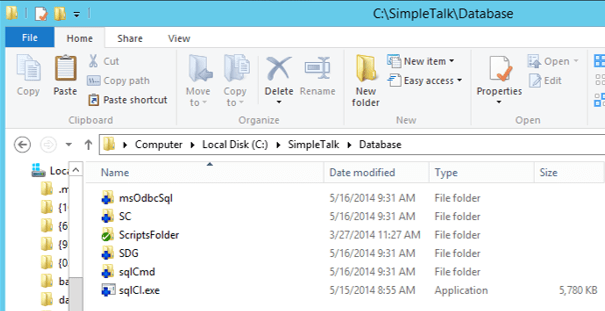
- If adding SQL CI to source control, go up a layer in your file system from where you found the dependency installer, to C:/Program Files (86x)/Redgate/SQL Automation Pack 1/sqlCI. Copy the entire contents into an SVN checkout alongside your database scripts (see below). Then add and commit all the files.
Step 3: Configure your job
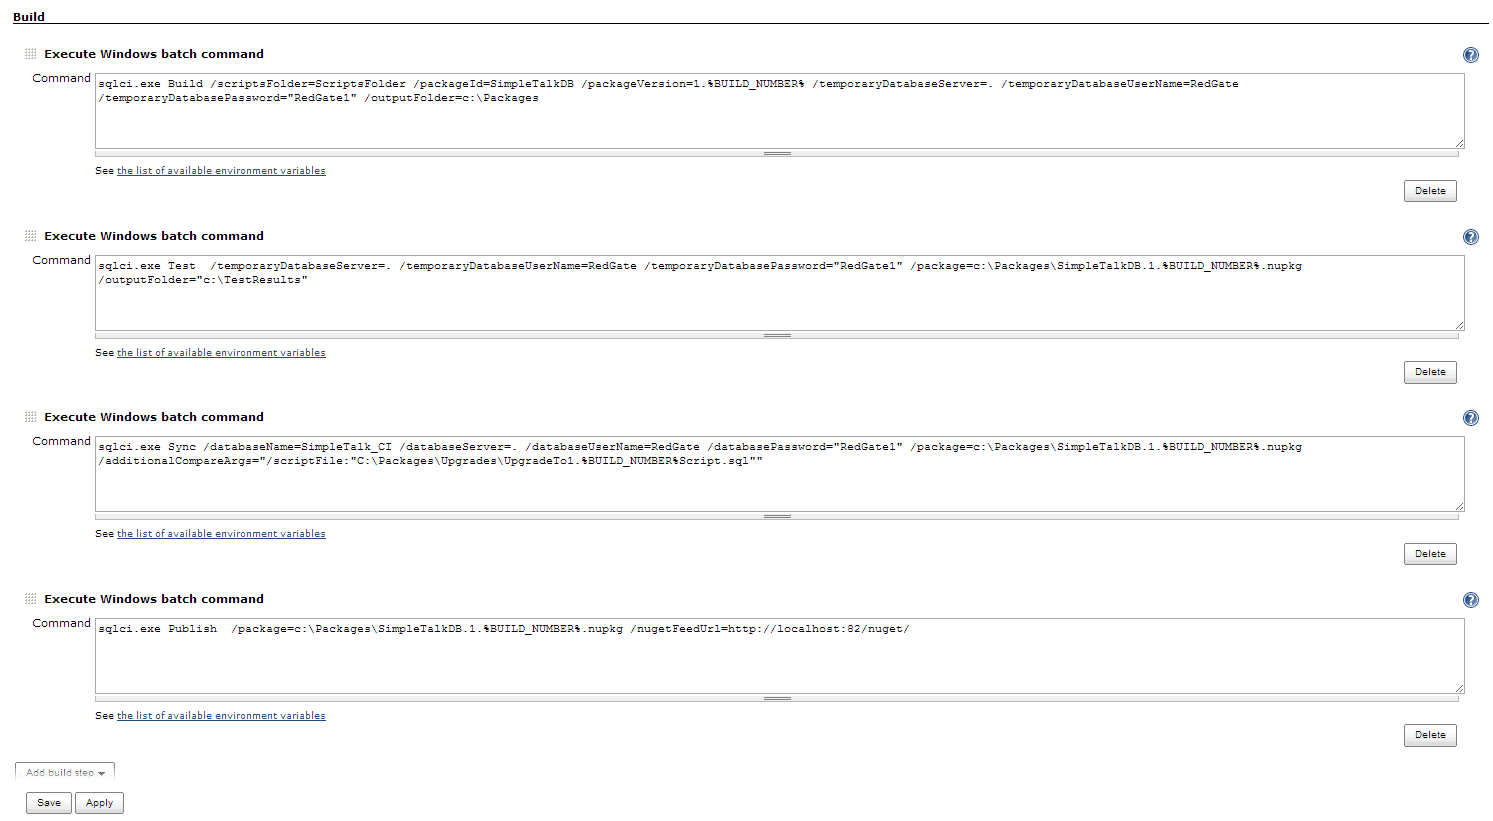
In Jenkins add four build steps, each using the option “Execute Windows batch command”. In each step you are going to call sqlCI.exe which we put into source control or onto your Jenkins nodes in step 2. For troubleshooting, you can find the official syntax documentation here.
The four steps are as follows:
Build – This takes your source code, builds a scratch database from it either on localDB or on a temporary server to validate your source code, and then deletes the database because you don’t want to fill up your SQL Server instances with test databases.
Note: if you use SQL Server features that are not supported on LocalDB you will have to specify a SQL Server instance where the database can be built.
The build step also creates a NuGet package on disk that contains your source code. This can be re-used for your tests and deployments for consistency.
Add this command. This assumes that sqlCI.exe is in the head of your source code checkout and that it is next to a directory called ‘ScriptsFolder’ which contains your database scripts created by SQL Source Control. If sqlCI.exe is on the Jenkins node or in a sub-folder of your Jenkins source code checkout or your database scripts have a different relative path from sqlCI.exe (see /ScriptsFolder=…) you’ll need to tweak this command appropriately:
|
1 |
sqlci.exe Build /scriptsFolder=ScriptsFolder /packageId=NewCIPackage /packageVersion=1.%BUILD_NUMBER% /temporaryDatabaseServer=***** /temporaryDatabaseUserName=***** /temporaryDatabasePassword="*****"/outputFolder=c:\Packages |
You’ll need to create the output folder yourself. All the ‘temporary’ switches are optional. If not specified SQL CI will use localDB as opposed to a full SQL instance. If only /temporaryDatabaseServer is used Windows Auth will be used by default.
Test – This will run your unit tests and create a report in the junit.xml format. Only do this step if you use SQL Test or tSQLt to unit test your database. If you don’t use either you should, and this is why:
|
1 |
sqlci.exe Test /temporaryDatabaseServer=*****/temporaryDatabaseUserName=***** /temporaryDatabasePassword="******" /package=c:\Packages\NewCIPackage.1.%BUILD_NUMBER%.nupkg |
In order to view the test results in the Jenkins UI you should install the Jenkins JUnit add-in. You will also need to set a post-build action to ‘Archive the artifacts’ and tell it what you want the report to look like. If unsure, *.xml is fine.
Sync – This will update an existing test database based on the contents of the NuGet package (i.e. it will automatically deploy your database). This step will uncover potential deployment problems with the code you committed to source control. For example, sqlCI.exe will warn you if it is going to drop any data as part of the upgrade or if the deployment fails because there are invalid objects in source control that cannot be deployed. Also, it allows you to keep an integration environment always in sync with the latest successful build:
|
1 |
sqlci.exe Sync /databaseName=My_CI_database /databaseServer=***** /databaseUserName=***** /databasePassword="*****" /package=c:\Packages\NewCIPackage.1.%BUILD_NUMBER%.nupkg |
If you would like to save the upgrade script simply add the argument below to the command above. This raises all sorts of questions about what you want the before state of the upgrade to be. Do you want to create a new upgrade script every build that you can chain together for deployments or would you like to add some steps to restore a production backup, for example, on your target database before the sync step so that each upgrade script can be used as a deployment script by itself? But I won’t crack open that chestnut here:
|
1 |
/additionalCompareArgs="/scriptFile:"C:\Packages\Upgrades\UpgradeTo1.%BUILD_NUMBER%Script.sql"" |
Publish – If the steps above pass, the Publish step will publish your NuGet package to a NuGet feed, from which Octopus Deploy or some other Release Management tool could pick it up and deploy it to your other environments. If you would like to learn how to configure automated deployment with SQL Release and a release management tool there are a bunch of walk-throughs here.
|
1 |
sqlci.exe Publish /package=c:\Packages\NewCIPackage.1.%BUILD_NUMBER%.nupkg /nugetFeedUrl=***** |
When done you should have something that looks a little bit like this (click image to see full view):
And that’s that. Now commit something to source control and see if it works. If not check the build log to troubleshoot it. If you get it working first time you did better than me on my first attempt! It took me four or five builds before everything worked and I started to see sunny builds. 🙂
It’s worth making a note that you must run ‘Build’ once as the first step (since this creates your package). After that it is up to which of the other steps are appropriate for your projects. You can run ‘Test’, ‘Sync’ and/or ‘Publish’ as many times as you like and in any order – or not at all – your choice.
It isn’t that hard and doesn’t take that long to set up in practice. Now you can catch mistakes early using Jenkins and DLM Automation, and if you set up automated deployment using a release management tool you’ll easily be able to deploy your databases throughout your pipeline.
Are you interested?
As I mentioned at the beginning, my job is to help customers set this stuff up. You can also read more about my experiences on my personal blog. If you need any help getting set up you can reach me through the DLM team email (dlm@red-gate.com) and I’ll be happy to help.
This post was first published on the futureofdeployment.com blog. Future blog posts from the team on deployment and continuous delivery will appear on the Redgate blog in the DLM category.
Tools in this post
You may also like
Blog
Building the Foundations for AI Readiness
Blog
Redgate Flyway Product Updates – January 2026
Blog
DevOps 101: Unlocking the value of frequent deployments
Blog
5 tips for achieving continuous delivery
Product article
Moving from application automation to true DevOps by including the database
Blog