Comparing and Syncing Data using SQL Data Compare Command Line
Robert Sheldon demonstrates how to start automating data comparisons between two databases, from the Windows command line or PowerShell. With a single command, you can easily compare and sync data such as test data sets, or static data used for reference or lookup purposes.
During database development, the team will need a way to keep the latest development database updated with any changes in static/reference data, or to automatically sync data across multiple test databases to ensure consistent test results.
To implement the syncing operation, you can create a script that runs whenever it’s necessary to update the data. This might be part of a scheduled operation or kicked off on-demand when data needs to be changed. The script can include a SQL Data Compare CLI command that carries out the comparisons and synchronizations.
Before you deploy the script, however, you should first build and test the CLI command, running it against two test databases to ensure you get the correct results. To demonstrate how this works, I walk you through that process in this article, providing examples of how to compare and sync two test databases with similar schemas but different data.
Getting started with the SQL Data Compare CLI
SQL Data Compare is a tool for comparing ‘static’ data in a source database and a target database, and then generating a ‘sync’ script that will make the data in the target the same as it is in the source. Although mainly used for comparing low volume, static data sets, you can also compare and sync transactional data sets as long as they’re relatively small, or they’re large but have a relatively small number of different rows. It supports SQL Server 2008 and later, as well as Microsoft Azure SQL Database and SQL Server on Amazon RDS.
The SQL Data Compare installation includes a command-line interface (CLI) that provides many of the same features as the GUI, which I’ve described in a previous article Using SQL Data Compare to Sync Reference Data, while offering a valuable alternative for quickly comparing databases, automating updates, scheduling operations, and deploying multiple databases. You can run the SQL Data Compare CLI directly from a Windows or PowerShell command prompt or call it from a script or compiled language. The CLI executable, SQLDataCompare.exe, is located in the SQL Data Compare installation folder. On my system, this is the following folder:
C:\Program Files (x86)\Red Gate\SQL Data Compare 14\
You can add the installation folder to the Windows PATH environment variable to make it easier to run the utility at a command prompt without having to specify the folder.
Data Compare CLI on Linux (beta)
You can also use the CLI on Linux. delivered through a Docker container, which you can access through Docker Hub. Linux support is still in beta at time of writing.
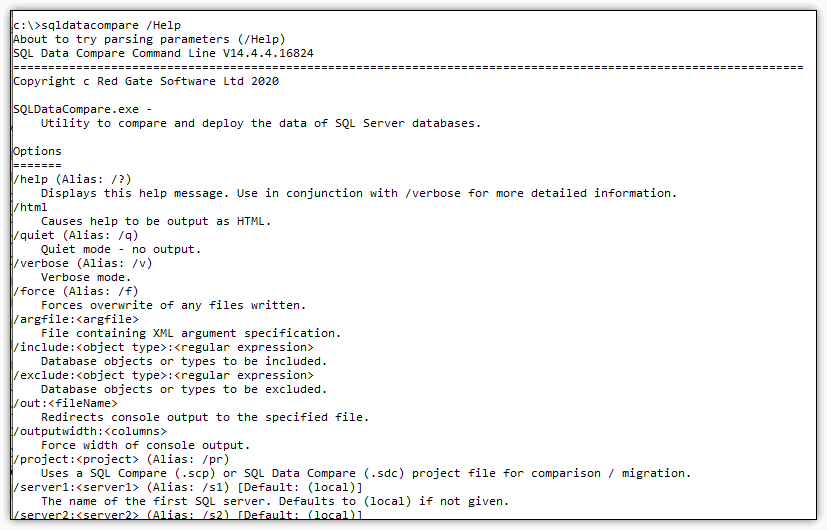
To run a CLI command at a command prompt, just specify the name of the utility, sqldatacompare, followed by one or more switches (parameters). A good way to check whether you can run the CLI is to create a command that uses the /Help switch:
sqldatacompare /Help
The following figure shows part of the results, which includes details about each switch available to CLI commands, a description of what it does, and its alias.
You can specify multiple switches when you run a command. For example, the following command adds the /Verbose switch to return more detailed help-related information:
sqldatacompare /Help /Verbose
You can also specify that a command’s output be saved to a file, rather than being displayed in the console. For example, the following command adds the output to the help.htm file and saves the file to the C:\DataFiles\SqlDataCompare\ folder:
sqldatacompare /Help /Verbose /Html > "C:\DataFiles\SqlDataCompare\help.htm"
The command now includes the /Html switch, which instructs the CLI to format the output as HTML. This is followed by a right arrow (>), which tells the CLI to redirect the output to the specified file. In this case, the file path is enclosed in quotes; however, those are necessary only if the path contains spaces and, in those cases, will ensure that the utility can still read the command correctly.
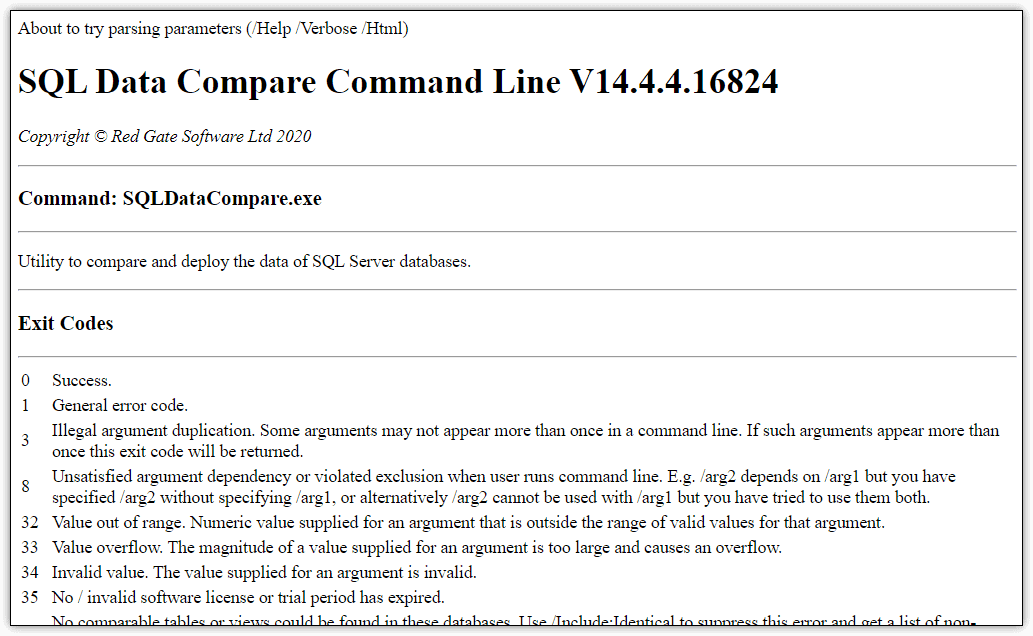
Normally, you can specify switches in any order within a command. However, when you use an arrow to redirect the output, you must specify the arrow and path at the end of the CLI command. The following figure shows part of the results in the help.htm file. Notice that the information includes the exit codes, which is a result of using the /Verbose switch.
That’s all there is to running a CLI command. The trick is to make sure you get the switches right. With that in mind, let’s look at how to compare data in two databases.
Comparing two SQL Server databases
To keeps things simple for this article, the databases are in a single SQL Server instance, but the process is the same regardless of where the databases are housed. In this case, the goal is to compare and sync specific tables in two tests databases: Widget3 and Widget4. (You can download the script for creating the databases and adding sample data here.)
When comparing two databases, you use the /Database1 switch to specify the source database and the /Database2 switch to specify the target database. If the databases are hosted on named SQL Server instances, you must also include the /Server1 switch for the source instance and the /Server2 switch for the target instance.
The following command compares the Widget3 database (source) and Widget4 database (target). On my system, both databases are in the same SQL Server instance, so the /Server1 and /Server2 switches take the same argument (localhost\SQLSRV17A):
sqldatacompare /Server1:localhost\SQLSRV17A /Database1:Widget3 /Server2:localhost\SQLSRV17A /Database2:Widget4
As noted earlier, you can specify ‘shortcut’ aliases for many of the command line switches, so the following command is equivalent to the previous:
sqldatacompare /s1:localhost\SQLSRV17A /db1:Widget3 /s2:localhost\SQLSRV17A /db2:Widget4
The command specifies the four switches needed to connect to the two databases and compare the objects within those databases. If a switch takes an argument, you should include a colon before the argument itself, as in /db1:Widget3.
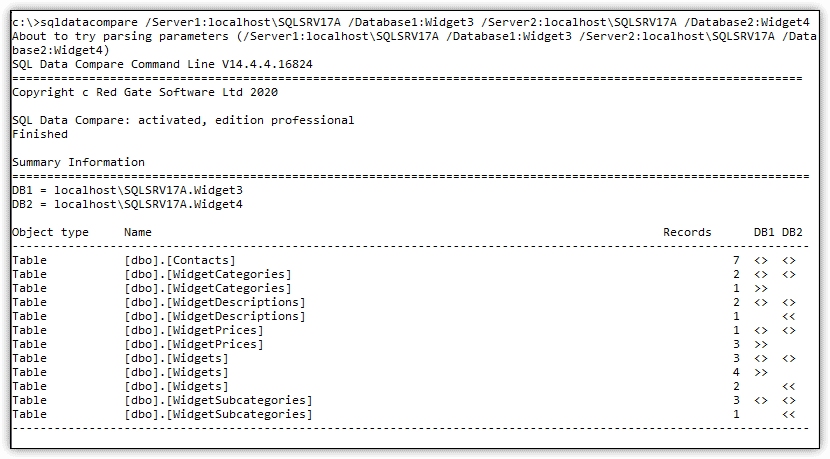
When you run the command, the CLI will compare all objects in the two databases. Because our test databases include only tables (no user-defined views or other objects), it compares only the tables, returning the results shown in the following figure.
The comparison results include the Records, DB1, and DB2 columns, which provide specific details about the comparison:
- The
Recordscolumn shows the number of rows to which each entry applies. - The
<>arrows in theDB1andDB2columns indicate that the compared tables contain the same rows but include different data. - The
>>arrows in theDB1column indicate that the source table contains rows that are not in the target table. - The
<<arrows in theDB2column indicate that the target table contains rows that are not in the source table.
For example, The Widgets tables include three rows that are different, four rows in the source table that are not in the target table, and two rows in the target table that are not in the source table.
Notice that the results include no details about rows that have the same data. In fact, several tables contain identical rows, including the WidgetReferences tables, which is not listed in the results because all rows are the same.
To include information about identical rows, you need to add the /Include switch to your command (there is no alias for this switch) and specify Identical as its argument, as shown in the following example:
sqldatacompare /s1:localhost\SQLSRV17A /db1:Widget3 /s2:localhost\SQLSRV17A /db2:Widget4 /Include:Identical
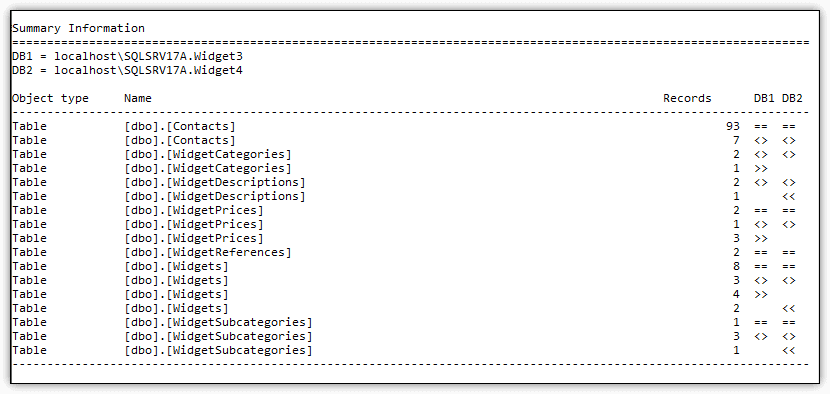
Now the command returns more complete results, including information about the WidgetReferences tables, as shown in the following figure.
The CLI uses double equal signs (==) in both the DB1 and DB2 columns to indicate that the compared rows have identical data. For example, the WidgetReferences tables include two rows of identical data, and the Contacts tables include 93 rows.
Comparing specific tables
You can also use the /Include switch to compare only certain tables in your databases, rather than all of them. When the switch is used in this way, its argument is made up of two parts: the type of SQL Server object (such as table or view) and the name of the object. For the examples in this article, the only object types we’ll be using is table.
Be careful when specifying object names when you use the /Include switch. For instance, if you want to compare only the Widgets tables, you might try the following command:
sqldatacompare /s1:localhost\SQLSRV17A /db1:Widget3 /s2:localhost\SQLSRV17A /db2:Widget4 /Include:table:Widgets /Include:Identical
The /Include switch specifies the table object type as the first part of the argument and the Widgets object name as the second part. Unfortunately, the CLI compares both the Widgets tables and the WidgetSubcategories tables, rather than just the Widgets tables, as shown in the following figure.
The CLI does this because it’s looking for any table whose name contains the term widgets (the arguments are not case-sensitive in the CLI, so Widgets gives the same results as WidgetS). This approach works fine if there is only one table with the specified name or if you want to return all tables with similar names. For example, if you specify widget (singular) as your argument, the CLI will return information about six of the available seven tables in the database, because they all contain the term widget.
In some cases, this will be fine, but often you’ll need to be more precise when specifying tables. One method for doing this is to add an /Exclude switch to your command. This way, you can exclude specific tables, while letting the /Include switch compare the other matching tables.
Another and often simpler option is to enclose the table name in square brackets to limit the results to the specific table. For example, you might try the following command:
sqldatacompare /s1:localhost\SQLSRV17A /db1:Widget3 /s2:localhost\SQLSRV17A /db2:Widget4 /Include:table:[Widgets] /Include:Identical
This time, however, the command returns information about all the tables in databases, just like it does when you don’t provide the extra /Include switch. The reason for this is that the CLI interprets the switch’s argument as a .NET regular expression, often resulting in unexpected comparisons. To get around this, you must also escape each bracket with a backslash, as in the following command:
sqldatacompare /s1:localhost\SQLSRV17A /db1:Widget3 /s2:localhost\SQLSRV17A /db2:Widget4 /Include:table:\[Widgets\] /Include:Identical
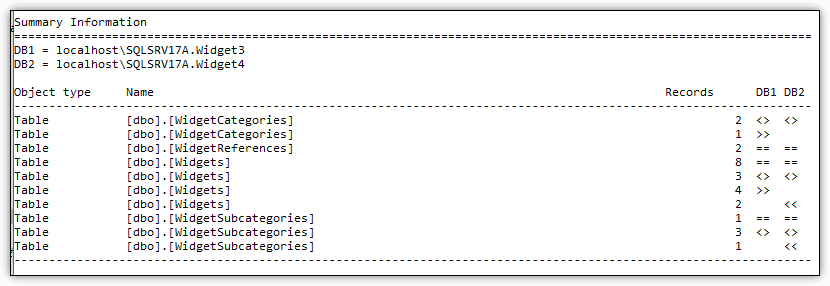
Now the command returns only information about the Widgets tables, as shown in the following figure.
If you want to return information about other tables as well, you can add more /Include switches. For example, if you want to include the Widgets, WidgetSubcategories, WidgetCategories, and WidgetReferences tables, you can run the following command:
sqldatacompare /s1:localhost\SQLSRV17A /db1:Widget3 /s2:localhost\SQLSRV17A /db2:Widget4 /Include:table:\[Widgets\] /Include:table:WidgetSubcategories /Include:table:WidgetCategories /Include:table:WidgetReferences /Include:Identical
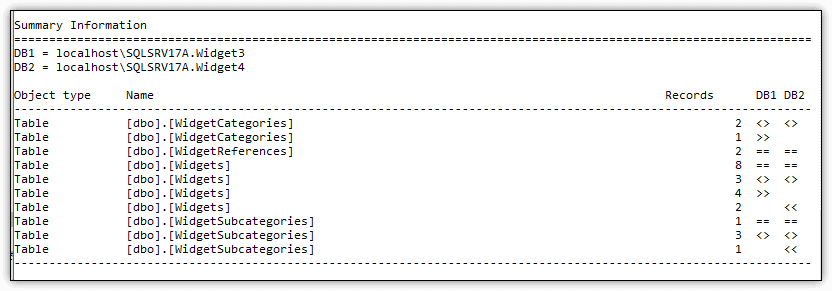
It’s not necessary to enclose the other table names in square brackets because they’re unique within the database. As you can see in the following figure, the command now returns information about all four tables.
When you start specifying individual tables in this way, the command can quickly become unwieldy. Fortunately, the CLI provides a method for shortening your list of tables. You can use a single /Include switch to specify all four tables in one argument, as in the following example:
sqldatacompare /s1:localhost\SQLSRV17A /db1:Widget3 /s2:localhost\SQLSRV17A /db2:Widget4 /Include:table:\[Widgets\]^|WidgetSubcategories^|WidgetCategories^|WidgetReferences /Include:Identical
To define an /Include switch in this way, you must use a pipe character (|) to separate the table names and use a caret character (^) to escape the pipe character, giving you the ^| combination. The statement returns the same results as the previous example, despite the different syntax.
If you’re running these commands in PowerShell, you must use a backtick (‘) characters to escape the pipe character, as in the following example:
|
1 |
sqldatacompare /s1:localhost\SQLSRV17A /db1:Widget3 /s2:localhost\SQLSRV17A /db2:Widget4 /Include:table:\[Widgets\]'|'WidgetSubcategories'|'WidgetCategories'|'WidgetReferences /Include:Identical |
Outputting table comparison information
Sometimes you’ll want to save the results of your comparisons to a file, such as when returning more information than can be easily viewed within the console. One method for redirecting the output to a file is to add an /Out switch to your command, specifying a file path for its argument, as shown in the following example:
sqldatacompare /s1:localhost\SQLSRV17A /db1:Widget3 /s2:localhost\SQLSRV17A /db2:Widget4 /Include:table:\[Widgets\]^|WidgetSubcategories^|WidgetCategories^|WidgetReferences /Include:Identical /Out:"C:\DataFiles\SqlDataCompare\CompareOutput.txt"
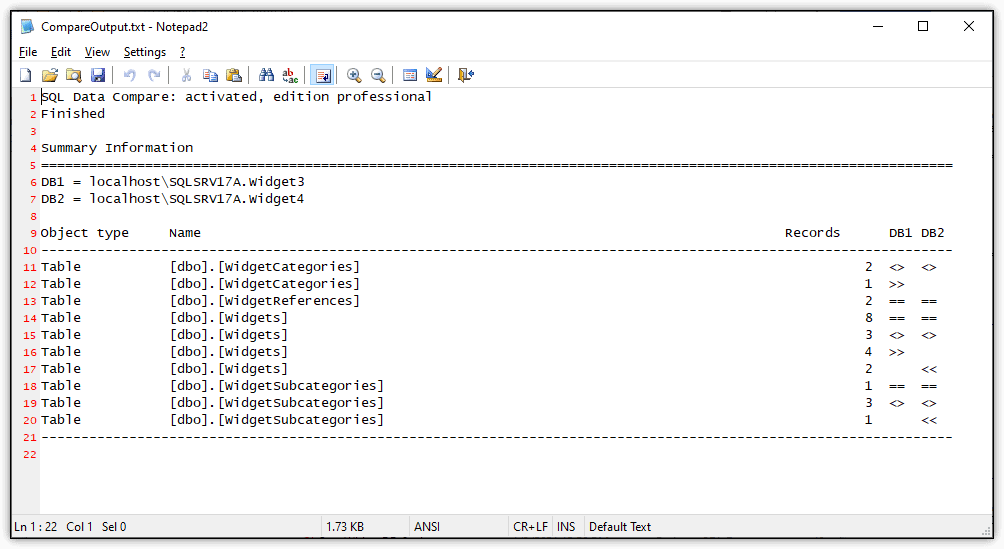
The command outputs the comparisons to a file named CompareOutput.txt. Once again, I enclosed the file path in quotes, although it’s not really necessary since there are no spaces. After I ran the command, I opened the file in Notepad2 to verify the results. As you can see in the following figure, the file includes all the information that you would normally see in the command prompt window.
One thing to be aware of when using the /Out switch is that the CLI will generate an error if the file already exists. You can get around this by also including the /Force switch, which will cause the CLI to overwrite the existing file. However, another and simpler option is to use the right arrow, as you saw in an earlier example:
sqldatacompare /s1:localhost\SQLSRV17A /db1:Widget3 /s2:localhost\SQLSRV17A /db2:Widget4 /Include:table:\[Widgets\]^|WidgetSubcategories^|WidgetCategories^|WidgetReferences /Include:Identical > "C:\DataFiles\SqlDataCompare\CompareOutput.txt"
If the file already exists when you run this command, the CLI will simply overwrite its contents. In some situations, however, you might want to append the file instead of overwriting it, in which case, just replace the single arrow with double arrows (>>), and it will keep adding the results to the end of the existing content, each time you run the command.
Syncing data between two tables
Until now, the focus of this article has been on comparing the tables within two databases, but you can also synchronize the tables at the same time, by adding the /Synchronize switch (alias: /sync) to the command:
sqldatacompare /s1:localhost\SQLSRV17A /db1:Widget3 /s2:localhost\SQLSRV17A /db2:Widget4 /Include:table:\[Widgets\]^|WidgetSubcategories^|WidgetCategories^|WidgetReferences /Include:Identical /Synchronize
The command first performs the comparisons and then updates the target tables accordingly. When you run the command, the CLI returns the comparison results to the console, as they existed prior to the syncing operation. The following figure shows the information returned by the command. These are the same details you saw earlier when comparing the four tables.
After the syncing operation has been carried out, the data in the target tables should be identical to the data in the source tables. To confirm that the tables were properly synced, you can rerun the previous command or run the command that preceded it, copied here for your convenience:
sqldatacompare /s1:localhost\SQLSRV17A /db1:Widget3 /s2:localhost\SQLSRV17A /db2:Widget4 /Include:table:\[Widgets\]^|WidgetSubcategories^|WidgetCategories^|WidgetReferences /Include:Identical
As the following figure shows, the four tables have been synchronized, with all rows now identical.
When you’re ready to start scripting and automating your CLI commands, the /Synchronize switch can make it quick and easy to update multiple databases and ensure that the targeted tables all contain the same data.
Simplifying command line automation
When you start automating regular development tasks, you’ll want a simpler way to provide all the required switches that define how the comparison should be performed. Often these parameters will vary from database to database.
Let’s explore two ways to do this: using project files or using XML argument files (ArgFiles).
Working with SQL Data Compare project files
If you’ve worked with the SQL Data Compare GUI, you likely know that you can save your settings to a project file, which is assigned the .sdc extension. You can set up the project in the GUI, edit the options as necessary, save it, and then call it from the CLI, making it easy to automate comparisons and data syncs. In the same way, you can create a project when using the CLI by adding the /OutputProject switch (alias: /outpr) to your command.
If you want to try this out, you might need to recreate your target database first, if you just synced your tables. The easiest way to do this is to rerun the SQL script you used originally to create the databases. That way, you’ll be starting with a clean slate.
After that, you can use the CLI to create a project based on the Widget3 and Widget4 databases. The following example demonstrates how this works:
sqldatacompare /s1:localhost\SQLSRV17A /db1:Widget3 /s2:localhost\SQLSRV17A /db2:Widget4 /Include:table:\[Widgets\]^|WidgetSubcategories^|WidgetCategories^|WidgetReferences /Include:Identical /OutputProject:"C:\DataFiles\SqlDataCompare\CompareWidgetDBs.sdc" /Force
C:\DataFiles\SqlDataCompare\CompareWidgetDBs.sdc
When defining the /OutputProject switch, you can specify whatever file path you want. Just be sure to enclose the file path in quotes if it includes spaces. You should also include the /Force switch, which tells the CLI to overwrite the file if it already exists.
After you create the project, you can use the CLI to run it whenever necessary. You can also run other projects, whether you create them in the CLI or the GUI. To run a project, add the /Project switch to your command and specify the target folder and file, as shown in the following example.
sqldatacompare /Project:"C:\DataFiles\SqlDataCompare\CompareWidgetDBs.sdc"
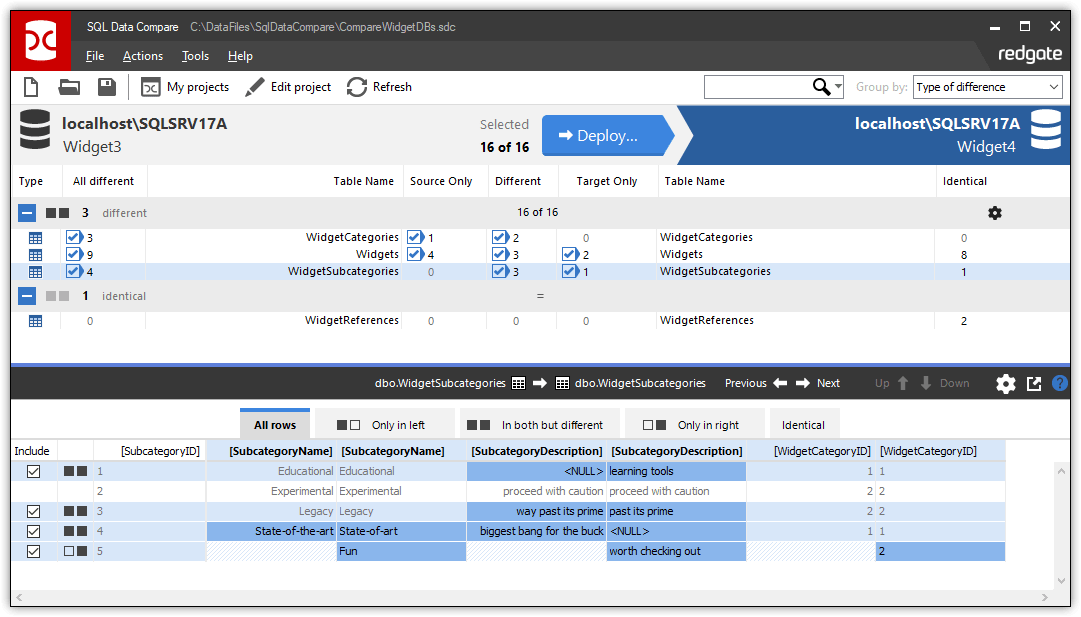
It’s also worth noting that you can open and run a CLI-created project in the SQL Data Compare GUI, just like you can a project created with the GUI. The following figure shows what the CompareWidgetDBs.sdc project looked like on my system, after I ran a comparison.
The WidgetSubcategories table is selected in the top window, and the bottom window shows details about that comparison, providing a visual overview of how the row data differs. For a more complete discussion about how information is presented in the GUI, refer to my previous article on SQL Data Compare.
Defining switches in an XML file
The second option is to save your switch definitions to an XML argument file (Argfile), which has the advantage that you can automatically generate an XML argfile for each task (you can see Using the SQL Compare command line with Argfiles for more details and the principles are exactly the same for SQL Data Compare).
Before I show you how this work, you’ll need to recreate and repopulate your target database if you just synced the tables. Now let’s revisit one of the commands we used to compare and sync the data. I’ve copied it here as a reference only. Don’t run it or you’ll need to recreate your target test environment:
sqldatacompare /Server1:localhost\SQLSRV17A /Database1:Widget3 /Server2:localhost\SQLSRV17A /Database2:Widget4 /Include:table:\[Widgets\]^|WidgetSubcategories^|WidgetCategories^|WidgetReferences /Include:Identical
The first step is to create the XML file. As part of this process, you need to translate the command switches to XML syntax. You also need to add a couple other elements. To show you what this looks like for the preceding command, open a new file and add the following XML:
|
1 2 3 4 5 6 7 8 9 10 |
<?xml version="1.0"?> <commandline> <server1>localhost\SQLSRV17A</server1> <database1>Widget3</database1> <server2>localhost\SQLSRV17A</server2> <database2>Widget4</database2> <include>Table:\[Widgets\]|WidgetSubcategories|WidgetCategories|WidgetReferences</include> <include>Identical</include> <Synchronize /> </commandline> |
All you’re doing here is transposing the switches to XML elements and enclosing them in a element. The switch names become the XML tags, and the arguments become the values within those tags. For example, the /Database1:Widget3 switch becomes the Widget3 element.
If a switch doesn’t take an argument, you can express it in the XML as a self-contained begin and end tag, as in <Synchronize />. In addition, you must start the file with the <xml> tag, which includes the version=”1.0“ attribute.
After you’ve added the XML to the file, save it to a location that you can access from the command prompt. On my system, I used the following file and folder:
C:\DataFiles\SqlDataCompare\CompareWidgetDBs.xml
With the XML file in place, you can then access it within a CLI command using the /Argfile switch, as shown in the following example:
sqldatacompare /Argfile:"C:\DataFiles\SqlDataCompare\CompareWidgetDBs.xml"
When you run the command, the utility compares the four tables and synchronizes the data in the target tables, just like it does when you ran the original command. To verify that the data is now identical in the source and target tables, you can run the following command:
sqldatacompare /s1:localhost\SQLSRV17A /db1:Widget3 /s2:localhost\SQLSRV17A /db2:Widget4 /Include:table:\[Widgets\]^|WidgetSubcategories^|WidgetCategories^|WidgetReferences /Include:Identical
All rows in all four tables should now have identical data.
Making the most of the CLI
Being able to build and run the same projects from either the GUI or CLI offers you a great deal of flexibility for performing comparisons and synchronizing data. You can, for example, build a complex project in the GUI and then use a CLI command to schedule and automate your database updates. For example, you might want to automatically sync the data in two test databases, a development database and staging databases, or other database combinations.
Command line licensing
Automations that use SQL Data Compare command line on a machine that is the ‘server’ (such as a Build or CI Server) in a deployment pipeline need Redgate Deploy or SQL Toolbelt licenses. For full details, see the Changes to distribution of command line page of the documentation.
As a next step, you can start to investigate how to automate schema and data comparison comparisons, together. See How to deploy a database plus static data using SQL Compare and SQL Data Compare for a simple example, or for something more versatile: Using SQL Compare and SQL Data Compare within a PowerShell Cmdlet.
