Simple Steps in SQL Change Automation Scripting
Phil Factor demonstrates the bare essentials of SCA PowerShell scripts that can form the basis for an automated process for database delivery or help improve your current process.
The SQL Change Automation (SCA) PowerShell cmdlets provide several ways to build and release a database, depending on what you need. SCA was designed around the requirements of development teams that were engaged on a wide range of databases and were rapidly delivering database changes to production. Its PowerShell cmdlets are versatile and bend to the way your team works, rather than vice-versa.
The common principle is that the build package represents the unchangeable revision of the software, and that the build should contain the scripts, properties and documentation for the release. This lessens the potential confusion about exactly what is being assessed, checked, tested and documented in order that the software can be delivered into production.
By providing the means of packaging the release, it also makes workflow systems, toolchains and build servers easier to integrate into the system and allows the source to be inspected by team members, and used to provision databases, without needing direct access to source control.
I’ll demonstrate the different routes to building and releasing a database, or updating an existing database, from source control. I’ll also highlight the cmdlets available for various useful build tasks, such as performing static code analysis or generating documentation. My hope is that this will make it easier for those getting started with SCA to understand how best to integrate these tasks into existing delivery processes.
Build or update a database directly from source
You may not initially need all the functionality that SCA provides. It is often better to get something up-and-running quickly. As a first step, let’s build a database from object-level source.
Firstly, prepare a database source directory. This can be a directory with a single build script in it, or a collection of build scripts, or a neatly organised set of object-level scripts, with each type of object in its own directory. If you source control your database using SQL Source Control or SQL Compare, you’ll get the latter. However, you can also use the output of an SSMS Tasks | Generate Scripts scripting to try this out. We’ll give you SCAScriptingSimpleSteps to get you started, but here is a typical directory.

In SSMS, create a new target database on your SQL Server instance on which you wish to do the build.

Now, in PowerShell, execute this, changing the various details to something meaningful according to your file and server setups. If you’re using Windows authentication, you can leave the User Id and Password blank.
|
1 2 3 4 5 |
Import-Module SqlChangeAutomation <# -------Synchronize the empty database as the target --------#> Sync-DatabaseSchema ` -Source 'C:\Projects\GitHub\Adeliza' ` -Target "Server=MyServer;Database=MyDatabase;User Id=Phil;Password=MyPassword;" |
Listing 1
This should run without an error and produce on the target a MyDatabase database that is identical to the database in source control. This script is hardly magical except for the fact that if your source was a collection of object-level files, then SCA (which uses the SQL Compare engine) would have executed them in the right object dependency order. There is always a chance that you’d need to add a feature to the target server or add a directive to the cmdlet, to get this to work. This is certainly true of AdventureWorks2016, because it used the FTS feature, so you would need to add a -SQLCompareOptions directive of NoTransactions, and you’d need to install the Full Text Search feature.
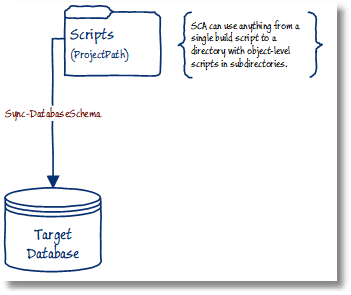
We can represent this simple “build or update directly from source” (SCABuildFromSource) deployment, using a single sync-DatabaseShema cmdlet, as follows:
SCA allows this giant leap from source code to database on the assumption that you are happy to run its auto-generated synchronisation script, and that you will run your own checks. It would normally be expecting to create a build artifact, followed by a release artifact, because this gives you a lot more feedback and reporting.
Create a build artefact and a release artifact to create or update a target database
A build artifact is just a snapshot of the source code that is stored in a way that can’t be subsequently changed. Along with this is the name, version and documentation for the revision. This is handy if you need to be confident that all the SQL Server instances that are involved in the deployment pipeline are going to be at the same revision level. It also gives you access to a lot of useful information about the build. It also means you can quickly archive and retrieve any historical builds for test purposes.
Create the build artifact
To start off we’ll create the build package, or build artifact (IBuildArtifact) as SCA calls it, and save it as a file. Be sure not to place any SCA artifacts within the source control project folder. For example, if you’re using SQL Source Control and you link your database to the Scripts folder, in this example, don’t store also the SCA artifacts within that folder.
|
1 2 3 4 5 6 7 |
<# -------Create a build artifact from source control --------#> ' MyFilePath\pubs\scripts'| New-DatabaseProjectObject | #wrap up the script and create a build artefact New-DatabaseBuildArtifact -PackageId 'Pubsnew' -PackageVersion 1.1.0 ` -PackageDescription 'pubs scripts' | # and save it as a file Export-DatabaseBuildArtifact ` -Path " MyFilePath\pubs" |
Listing 2
Now we have the build all wrapped up in a file, it can be published to the team so they can all see the same code for the project. We’ve saved it as a file, but alternatively we can save it on a local NuGet server.
An iBuildArtifact objects can contain useful information for team-working including the project name, description of the package, schema documentation , scripts folder and build version.
Create the release artifact
From this build artifact, or package, we can create a release artifact (iRelaseArtifact) for every target database, to update each target to the same revision (v1.1.0, in this case).
For each target database, we run this script:
|
1 2 3 4 5 6 7 8 9 10 11 12 13 |
<# -------Create a release artefact from a build package --------#> $iReleaseArtifact=New-DatabaseReleaseArtifact ` -Source "MyFilePath\pubs\Pubsnew.1.1.0.nupkg" ` -Target "Server=MyInstance;Database=Adeliza;User Id=Phil;Password=MyPassword;" Export-DatabaseReleaseArtifact $iReleaseArtifact ` -Path "MyFilePath\pubs\Release110" # Manually review the deployment resources # Use the database Release to deploy to the target Use-DatabaseReleaseArtifact $iReleaseArtifact ` -DeployTo "Server=MyInstance;Database=Adeliza;User Id=Phil;Password=MyPassword;" ` -SkipPostUpdateSchemaCheck $iReleaseArtifact.ReportHtml>"MyFilePath\pubs\Release110\BuildReport.html" start "MyFilePath\pubs\Release110\BuildReport.html" |
Listing 3
We can represent this “build and release” delivery workflow (SCABuildAndRelease) as follows:
Notice that we’ve used the Export-DatabaseReleaseArtifact cmdlet to save the release artifact in a disk directory. That means that anyone in the team can check on what was done and repeat it. It isn’t necessary for the build.
Code analysis checks
One of the ways SCA helps you spot problems as early as possible is that when creating the release artifact it automatically runs a set of code analysis checks to verify that the source code doesn’t have any obvious mistakes.
The final lines of listing 3 use the iReleaseArtifact object to output the HTML report that the New-DatabaseReleaseArtifact cmdlet generates, detailing how the release went.
If you want to run a customized set of rules, you can select Manage Code Analysis rules from the SQL Prompt menu, within SSMS, configure which rules you want enabled or disabled, and then save your settings by clicking Save as…, changing the file location to a shared folder and clicking Save. You then supply the Code Analysis Settings file to the New-DatabaseReleaseArtifact cmdlet through the ‘-CodeAnalysisSettingsPath‘ argument.
The SQL Code Issues tab of the report shows the result of the code analysis check (in this case just the default check) on the source.

Verifying the build (iProject artifact)
We’ve now approached the task in two different ways. The first way, just using Sync- DatabaseSchema, was the “I’m feeling lucky” approach. After all, what could go wrong? With complex updates, quite a bit. Deployments are more reliable if you do as many checks as you can before you create the release, or even the build, so that you can find errors as early as possible. In many projects, the build of the project can take several hours overnight and so the sight of a failed build, with red crosses instead of ticks, becomes something to avoid. Our second approach was more structured and allows us to introduce these checks.
As well as performing code analysis, as described above, we can also check that it is going to build successfully before we actually do the build, as follows:
|
1 2 3 4 |
<# -------Check that the source can be built, and produce a iProject object --------#> $iProject=Invoke-DatabaseBuild ` -InputObject "MyFilePath\pubs\scripts" ` -TemporaryDatabaseServer "Server=MyInstance;User Id=Phil;Password=MyPassword;" |
Listing 4
Rather than simply create a new database build artifact, as we did in Listing 2, we use Invoke-DatabaseBuild, to do the build ‘unofficially’, just so we don’t break the build once we have a version number, and so on. The by-product of this, an iProject object, then gives us another source, and another route, to creating the build artifact, this time from a validated build, as shown in Listing 5.
|
1 2 3 4 5 6 7 8 |
<# -------Create a iBuildArtifact object from a iProject object --------#> $buildArtifact = $iProject | New-DatabaseBuildArtifact ` -PackageId 'Pubs' ` -PackageVersion 1.1.0 ` -PackageDescription 'pubs scripts' $buildArtifact | Export-DatabaseBuildArtifact -Path "MyFilePath\pubs" |
Listing 5
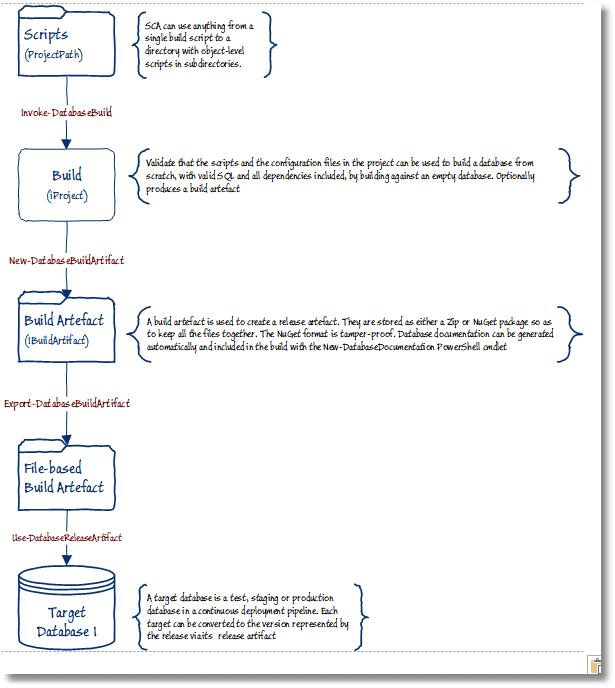
You would then use this build artifact to create and deploy the release artifact, as described in Listing 3. Here is the workflow diagram for a release from a verified build (SCAVerifiedBuild):
Create a release artifact directly from source and use it to create or update a target database
SCA aims to accommodate as many ways of working as possible, so you will often find that there are several ways to do what you need to do. Here, for example, is a way of ‘releasing’ a database directly from a source directory. In this case, you don’t need to create a build package, and there are no workflow requirements. You might do this, for example, if you need a database for testing purposes that represents what is currently in the scripts.
|
1 2 3 4 5 6 7 |
<# -------Synchronize a Target database from source control --------#> $iReleaseArtifact=New-DatabaseReleaseArtifact ` -Source "MyFilePath\pubs\scripts" ` -Target "Server=MyServerInstance;Database=Adeliza;User Id=Phil;Password=MyPassword;" Use-DatabaseReleaseArtifact $iReleaseArtifact ` -DeployTo "Server=MyServerInstance;Database=Adeliza;User Id=Phil;Password=MyPassword;" ` -SkipPostUpdateSchemaCheck |
Listing 6
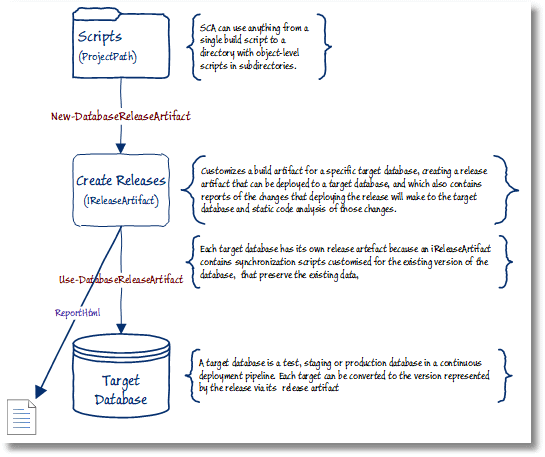
Here is the workflow diagram for a release direct from source (SCAReleaseFromSource), which hopefully shows what is going on here:
Unless you are doing ad-hoc testing or bug-hunting there are implications of skipping the build process. By using the iBuildArtifact object, SCA makes it more difficult to get confused by what is or isn’t in the database version. The iBuildArtifact object is taken from source control but can be used even when there is no direct access to the source directory. It also means that, if someone changes a file in the source directory after the build is initiated, it doesn’t affect the build. There is, effectively, a snapshot of the source that is used by all components.
The broader landscape
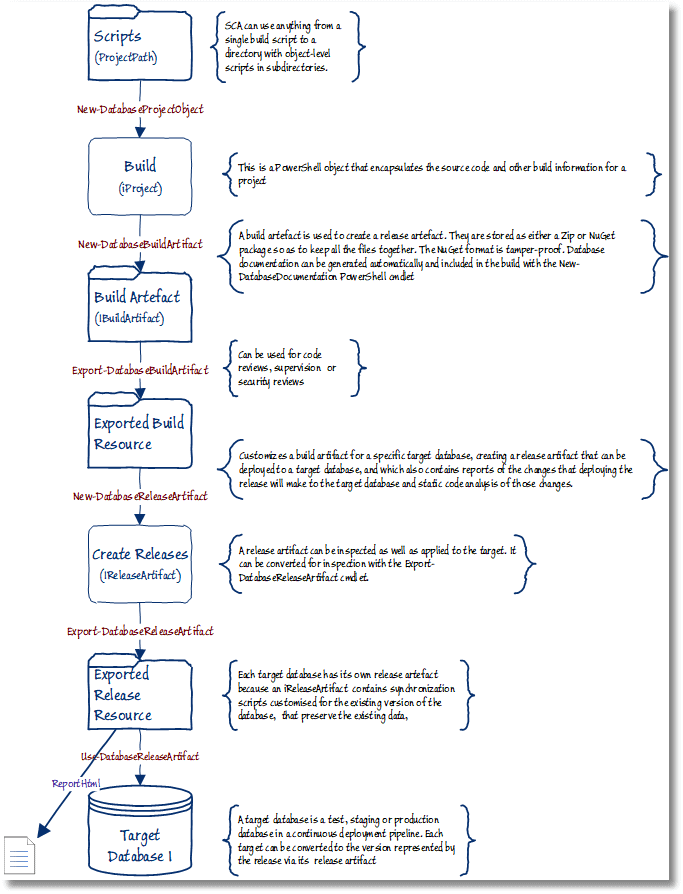
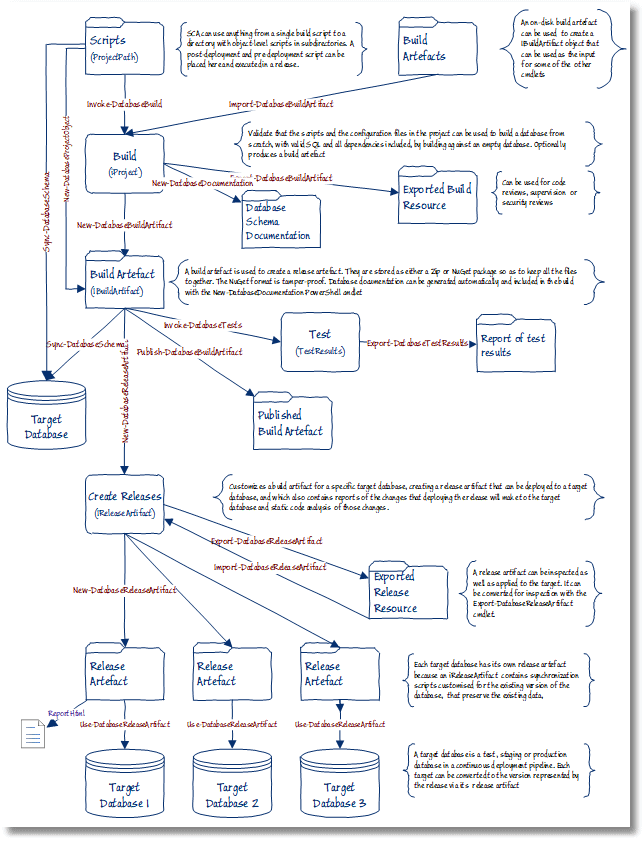
Following is a SCA cmdlet landscape diagram (SCACmdletLandscape) that represents most of the operations that are possible in SCA. It is by no means complete, since there are many routes (arrows) that aren’t shown, just the highways. For example, I haven’t shown the example above that bypasses the build process entirely by building a release straight from source code.
Conclusions
SCA tries very hard do accommodate itself to the way you work now and provides the versatility to follow you on your journey towards rapid integration and releasing. It also allows you to introduce develops processes to encourage wider team-working and accommodate to automation toolchains. Together with other PowerShell features, such as SMO, (the sqlserver module) there are few database build and release tasks that can’t be automated.
On the downside, SCA is quite hard to get started with. It has its own slightly bewildering vocabulary and its use of packages, essential for remote provisioning and workflow, is a culture shock for some of us. However, the point of this article is to show that if you don’t need particular features, you can still make use of the stuff that you need, and then progressively adopt the other features when you’re ready, or if you have a database project that requires them.
