The ‘Right to be Forgotten’ and Data Masker for SQL Server
The right to be forgotten is one of the main features of new data protection legislation across the globe. Under Article 17 of one such piece of legislation in Europe, the GDPR, individuals have the right to have personal data erased from all systems and data the company may be storing about them. Similarly, in the USA the California Consumer Privacy Act will require companies to respond to requests for data access, deletion and portability within 45 days.
While there may be many pieces of unstructured data littering our systems that hold customer data, perhaps one of the hardest problems to tackle is the erasure of personal information from our structured data, and how we also handle database backups. whenever we need to restore this information either back into Production or other environments.
In some cases, we may be able to simply remove a user from the database manually or by other means on an ad-hoc basis. But where we have important data referentially depending on these contacts e.g. order history, which we may be using for analytics or other important workflows, it is not possible to do so.
So how do we “redact” user information, while maintaining database integrity, especially where we may restore sensitive data over the top of this redaction?
For the purposes of this article I’m going to be using an example of my Forums-Redgate-Com database, specifically the Contacts table, as the target to tackle with the right to be forgotten:
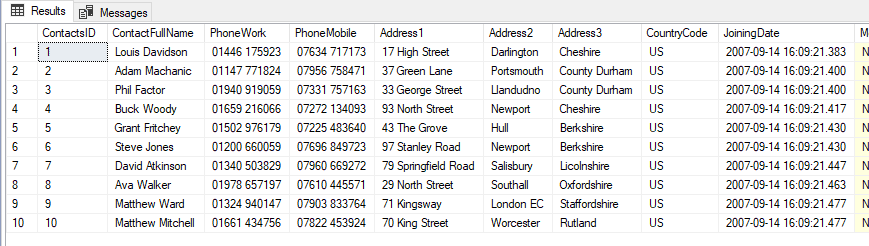
Figure 1: The top 10 rows of the Contacts table
Approach
There are several approaches we can take to tackling this problem. The first such solution is never restoring from a backup that was taken prior to receiving the request to be forgotten. This in itself is the least ideal workflow because it renders all prior backups useless and effectively means we can just delete them.
The second approach is to write a script and maintain this moving forward that we run against environments once the backup has been restored:
|
1 2 3 4 5 6 7 8 9 10 11 12 13 14 15 16 |
UPDATE dbo.Contacts SET ContactFullName = 'REDACTED', PhoneWork = 'REDACTED', PhoneMobile = 'REDACTED', Address1 = 'REDACTED', Address2 = 'REDACTED', Address3 = 'REDACTED', CountryCode = NULL, JoiningDate = NULL, ModifiedDate = NULL, Email = 'REDACTED', Photo = NULL, LinkedIn = 'REDACTED' WHERE ContactsID IN (ADD CUSTOMER_IDs HERE); |
But this approach also has several drawbacks. We are only running a SQL script and in case of audit it is generally preferred to have some kind of log or report that demonstrates what steps were taken to comply with the request. It would also be beneficial to have something that we can programmatically keep updated instead of having to maintain a full “Right to be Forgotten” script in the future.
The first step we should take is to have a central list of which users have requested the right to be forgotten. By keeping a list of not-personally-identifiable identifiers, like Customer_IDs, we can easily update this as and when new requests come in. This could be in the form of a CSV file, a table in a database or however else we can securely store it. For this example, I have created a simple table on a separate database:

Figure 2: The table of forgotten Customer_IDs
From here we can use Redgate’s Data Masker for SQL Server to define a masking set which will redact all users that appear in this table:
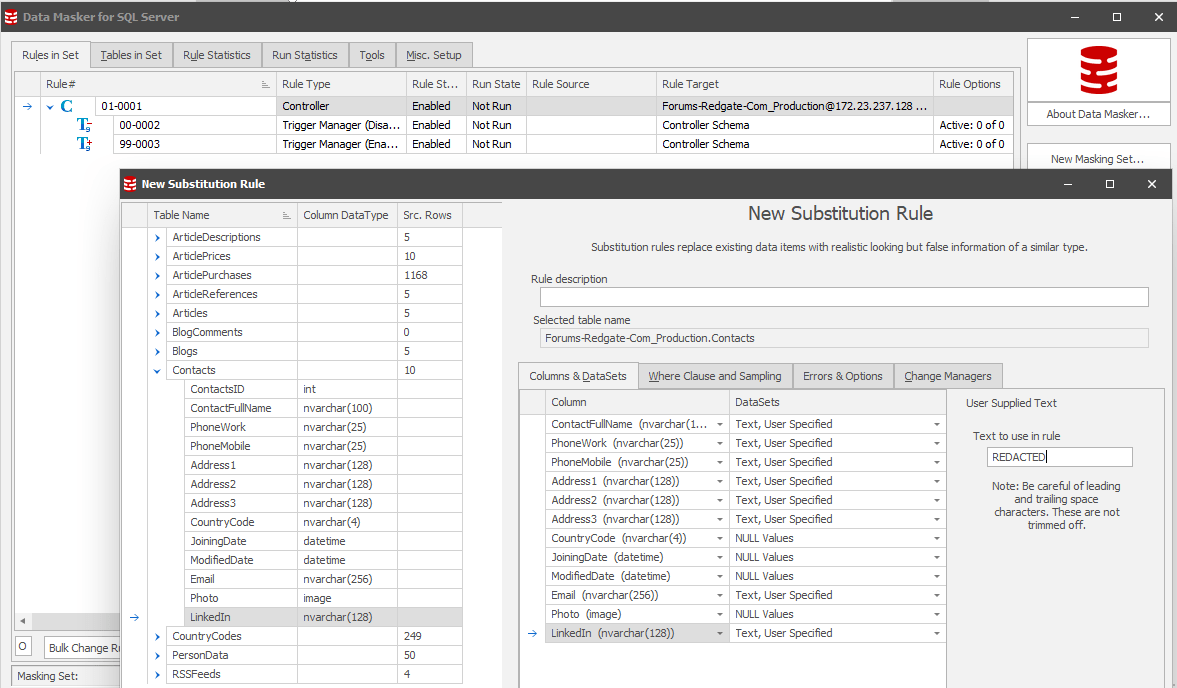
Figure 3: We have defined a new substitution rule for the Contacts table to carry out a similar operation to the code we wrote above
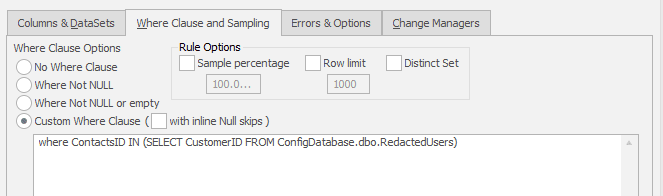
Figure 4: Next we apply a SQL WHERE clause to fetch the redacted IDs from the relevant table. This could be from another database as in this example or could have been loaded into the database programmatically as part of the restore job.
Now we can update the RedactedUsers table and if we go to run the Data Masker tool it will carry out the redaction for us. In this case, let’s try ContactID number 6:
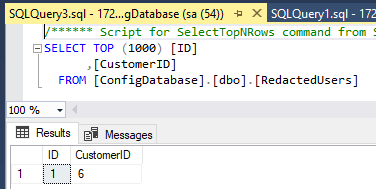
Figure 5: Customer 6 has requested the right to be forgotten
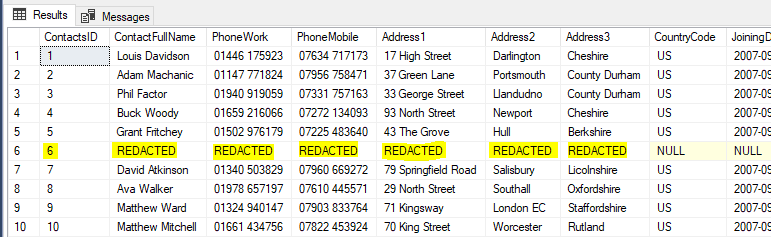
Figure 6: After the run of the masking rules we can see only the relevant row has been redacted
Data Masker outputs reports as part of every masking operation and we can see below that as part of this run only one row was processed., As we know that there is only one row in the “Right to be Forgotten” table with 12 columns to be redacted, we know that the masking has completed successfully.

Figure 7: An extract of the Data Masker Masking Report
Now that we have the foundation of our redaction process, all that is left to do is automate it as part of a restore. In this case, we can script out the calling of the Data Masker command line and call it as part of the SQL Agent job:
start/wait "" "C:\Program Files\Red Gate\Data Masker for SQL Server 6\DataMasker.exe" "C:\Users\chris.unwin\Documents\Data Masker(SqlServer)\Masking Sets\RedactForgottenUsers.DMSMaskSet" -R -X
This means that once the database is restored to a state before we initially redacted the information, we can then immediately redact it again (but we can also just maintain the list of forgotten users, in this case we’ve added rows 2 and 5 over time):
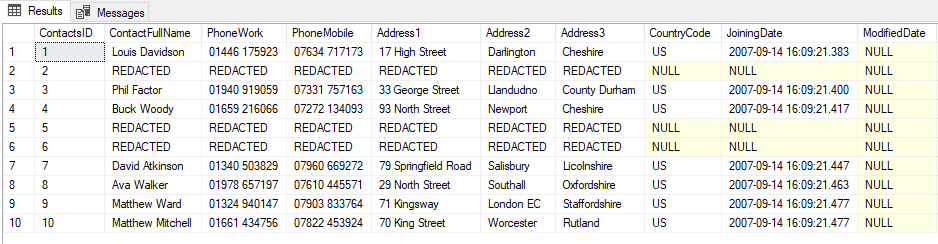
Figure 8: Result of the redaction after running the command line for Data Masker after restoring
Conclusion
In summary, there are many ways we can handle actioning the “Right to be Forgotten” when it is requested, whether this is handling the update manually, scripting the change or using Redgate’s Data Masker for SQL Server to achieve the end result with the level of logging and reporting we would like to retain for audit purposes.
The goal is always to ensure that we are compliant with the necessary legislation, yet we can respond to requests we receive with the lowest possible overhead both to the data subject and our own teams. The solution outlined in this article is one such approach to achieve this.
Tools in this post
Data Masker
Shield sensitive information in development and test environments, without compromising data quality
You may also like
-

Article
SQL Provision adds fully integrated data masking
Karis Brummit announces SQL Provision, which combines SQL Clone's fast, lightweight database copying and centralized management of provisioning, with Data Maskers's ability to obfuscate sensitive or personal data, prior to distribution.
-

Webinar
POPIA- Key challenges
-
Article
How to automatically provision sanitized data using SQL Clone, Data Masker and PowerShell
Chris Unwin describes a strategy, using data masking, cloned databases and PowerShell, which will allow you to sanitize data before provisioning test or development environments.
-

Webinar
Sichere und schnelle Datenbankkopien bereitstellen
In diesem Webinar stellen wir Ihnen Redgates Strategie zur Bereitstellung sicherer Datenbankkopien vor – mit Fokus auf Datenschutz durch realitätsnahe Datenverschleierung. Erfahren Sie, wie Sie Daten effizient katalogisieren, maskieren und klonen, um Sicherheitsstandards einzuhalten und gleichzeitig die Benutzerfreundlichkeit zu wahren.
-
Webinar
Tipps und Tricks zur Datenbanküberwachung
Join Solutions Engineer, Marko Coha, for this online workshop, and find out how to deliver secure and fast database copies using Redgate solutions.
-

Article
Managing Data Masking Rules in Larger Teams using Source Control
What if you have several people in the team who are responsible for data security across your databases, and they need to work together to develop and maintain the data masking configurations, which must then be applied consistently as part of an automated provisioning process? How should they do it? The solution turns out to be simple: source control.


