How to automatically provision sanitized data using SQL Clone, Data Masker and PowerShell
Chris Unwin describes a strategy, using data masking, cloned databases and PowerShell, which will allow you to sanitize data before provisioning test or development environments.
National and regional legislation, as well industry standards, dictate what an organization can and can’t do with sensitive data, as well as how it needs to be handled, audited and protected. In addition, the General Data Protection Regulation (GDPR) tightens up enormously the requirements for storage, handling, processing, disclosure and erasure of personal information about any EU citizen.
Fines for breach of GDPR regulations are enforceable as of May 2018, and are promised to be ‘dissuasive’ in size. This has brought the topic sharply to the attention of all organizations that handle any Personally Identifiable Data (PII) and Protected Health Information (PHI).
Whether an organization is a Data Controller or Data Processor, it needs to discover and classify any personal data it stores or uses as part of its various data processes, and then take appropriate technical measures to ensure that the data is protected.
This article describes a strategy, using data masking, cloned databases and PowerShell, which will allow you to sanitize data before it is copied or moved, for example from a production environment into testing or development environments.
Protecting data outside the production environment
Most of the time, during development and testing work, developers don’t need to work with real production data. Unit testing, for example, is served well by creating standard data sets that throw in the occasional troublesome name, or bizarre integer value, to flush out bugs.
Of course, there are many advantages to being able to test against real, or at least very realistic, data. Most developers will appreciate the difficulty of trying to troubleshoot a production bug that cannot be reproduced in any other environment. It is especially difficult to track down the exact cause when the application is distributed across complex, interconnected systems, comprising several technology stacks, and relies on a database that could run to many TB in size.
It helps to be able to eliminate as many variables as possible. Is the issue caused by some special characteristic of the data, in production? One way to prove or disprove this is to capture a data set from the production environment and load it into testing or development environments. With the data in test and development matching as closely as possible what’s present in production, the team will also be able to flush out many data-related bugs much earlier in development, and will gain confidence that their test results will reflect the behavior observed on deploying their changes to production.
This is all fine if you’re working with public data, but what if some tables contain data that is personal, identifiable, or is in some other way sensitive or private? Either you need to generate that data, rather than copy it, or you need a data masking or obfuscation strategy, which will prevent unauthorized access of this data, by replacing, anonymizing or removing sensitive pieces of information.
However, if you need to copy several terabytes of data to each of the required test and development servers by restoring a backup, while also sanitizing any personal and sensitive information, by running data cleansing scripts, then your database provisioning process will be long, slow and require a large amount of extra storage space.
SQL Clone, Data Masker for SQL Server, and PowerShell
Using SQL Clone and Data Masker for SQL Server, you can provision copies of production data, quickly, while still protecting personal and sensitive information.
SQL Clone allows you to rapidly spin up copies of a database, for development and testing purposes. It creates one image, which is a point-in-time representation of your source SQL Server database, and from this image you can create many database copies, or clones. Each clone takes up only tens of megabytes of disk space, and creating each clone takes seconds, rather than hours (see Getting started with SQL Clone for more details of how this works).
Data Masker for SQL Server allows you to set up a set of ‘masking rules’ to apply to any PII and PHI in your database. It also allows you to synchronize these changes between tables, across servers and even between SQL Server databases.
The key to understanding how these tools can work together lies within PowerShell; SQL Clone has a full set of cmdlets that allow you to create and remove images and clones, and Data Masker’s command-line interface can be called as part of this process. To set up the provisioning and masking process through PowerShell, follow these steps:
1. Discover and classify the data
Complete your own internal due diligence to discover what data you’re going to be providing to your teams and classify this data – What data is the most sensitive? Where is it? Which data elements could be used to personally identify the data subject (either by itself or by correlation with other data), or to place that subject at a specific place at a certain time?
Based on this, figure out what level of masking or data removal/generation you need for the various classifications of data in your database.
2. Establish the data protection rules using Data Masker
Feed this information into Data Masker for SQL Server. Data Masker allows you to predefine different types of rules (such as substitution or shuffle) on how each column and row should be anonymized. These rules run in sequence (or concurrently based on your rule dependencies) and form your masking set, which should be created in line with the columns and rows of data you have discovered in your tables.
In the following example, I am using a simple substitution rule in my masking set to replace the title, first name, middle name and last name in the Person table of the AdventureWorks database.
The substitution rule is specified by selecting the columns from the table to be masked and then selecting the correct data set (pre-populated in Data Masker or user-defined) to replace them with substitution values.
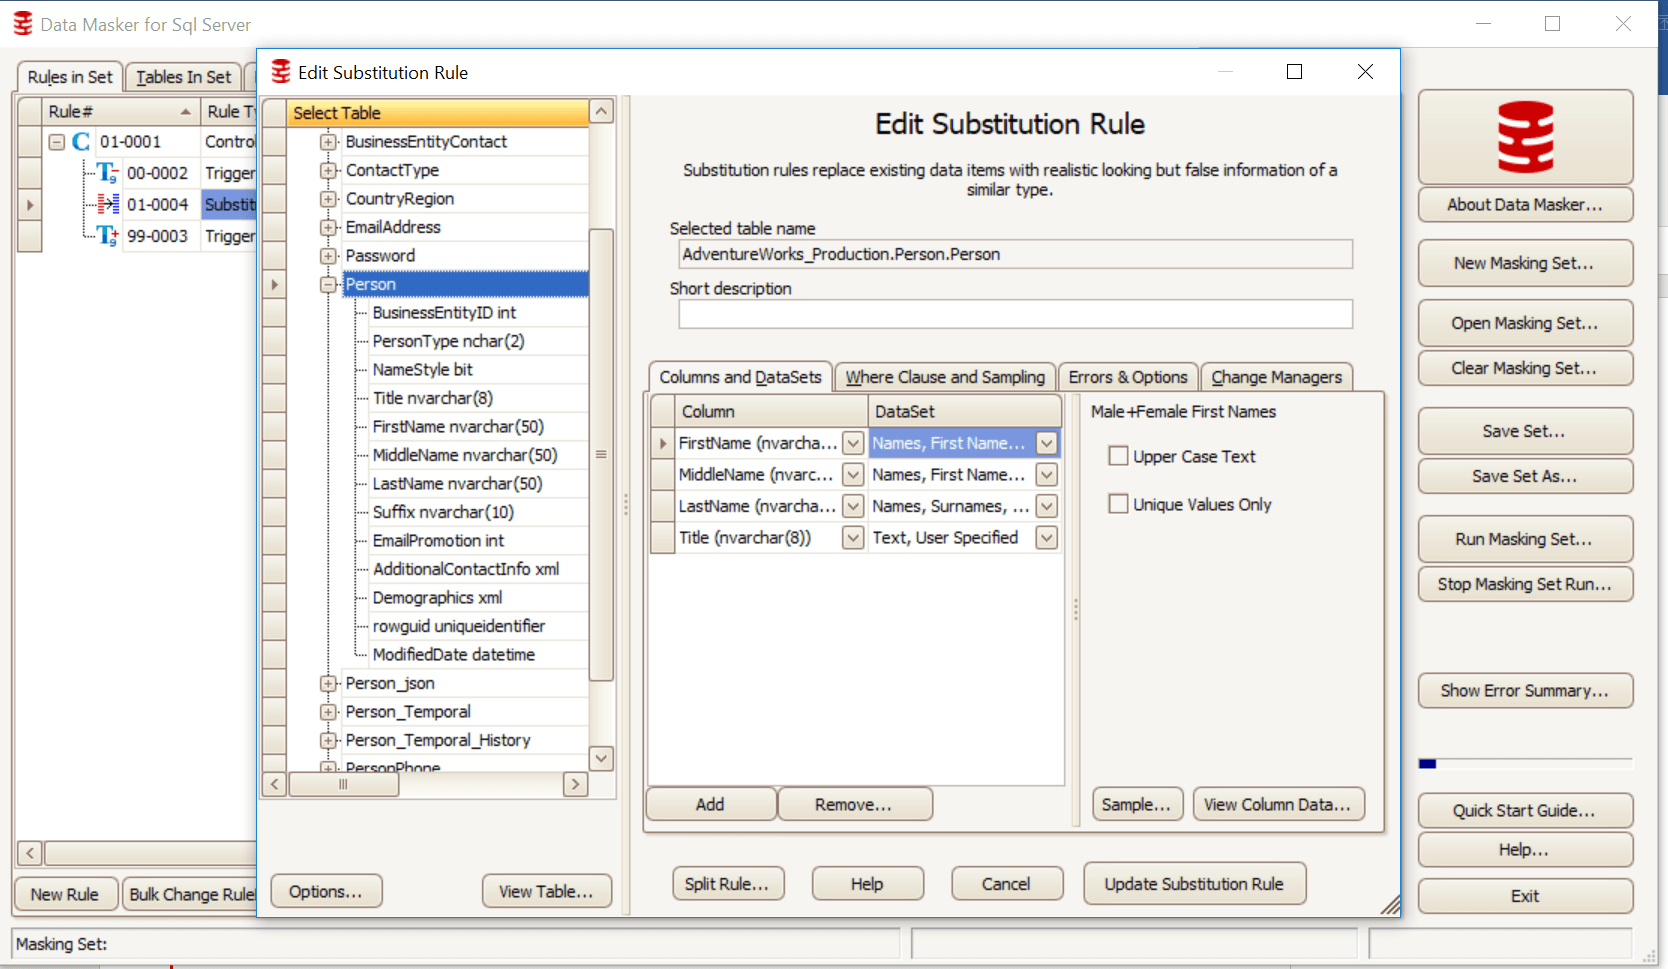
Figure 1
Figure 2 shows the substitution rule, as it appears in the masking set. Triggers are disabled, the substitution rule is run against Person.Person and, once masking is completed, triggers are re-enabled.

Figure 2
3. Automate database provisioning with PowerShell and SQL Clone
We use the PowerShell cmdlets with SQL Clone to set up a basic provisioning process.
All cmdlet references for SQL Clone can be found on our documentation site.
For this example, we will be using the cmdlets to connect to SQL Clone, set the locations of the Image and any clones, and the naming convention. The PowerShell code in Listing 1 provides the basis of the overall provisioning process, into which we can integrate our chosen data masking workflow.
|
1 2 3 4 5 6 7 8 9 10 11 12 13 14 |
# Connect to SQL Clone Server Connect-SqlClone -ServerUrl 'YOUR CLONE SERVER ADDRESS AND PORT HERE' # Set variables for Image and Clone Location $SqlServerInstance = Get-SqlCloneSqlServerInstance -MachineName 'YOUR MACHINE NAME HERE' -InstanceName 'YOUR INSTANCE NAME HERE' $ImageDestination = Get-SqlCloneImageLocation -Path 'YOUR FILESHARE HERE' # Set names for developers to receive Clones $Devs = @("Chris", "Sam", "Cassi", "Becky", "Matt") # Create New Image New-SqlCloneImage -Name 'AdventureWorksImage' -SqlServerInstance $SqlServerInstance -DatabaseName 'AdventureWorks_Production' -Destination $ImageDestination | Wait-SqlCloneOperation $Image = Get-SqlCloneImage -Name 'AdventureWorksImage' # Create New Clones for Devs $Devs | ForEach-Object { # note - '{' needs to be on same line as 'foreach' ! $Image | New-SqlClone -Name "AdventureWorks_Dev_$_" -Location $SqlServerInstance | Wait-SqlCloneOperation } |
Listing 1
a. Choose the data masking workflow
It is at this point you can implement your chosen workflow for masking. There are two basic approaches, either deploy all clones from a masked image (using method 1 or 3 below), or deploy unmasked clones and then mask them (method 2):
- Apply masking to a clone, create a masked image from the clone
In this scheme, we create a temporary image (either from the database or a backup), create a clone from this image, apply the masking to the clone, create a new masked image, then drop the temporary image and clone. In other words, we deploy all clones from a masked image. This keeps everything within SQL Clone, and has fewer system dependencies (such as having to rely on a backup/restore process to complete first).- Use the
New-SqlCloneImageandNew-SqlClonecmdlets within SQL Clone to create your temp environment for masking.
- Use the
- Mask each clone individually
Here, we simply apply the masking to each individual clone, by calling Data Masker and passing in the details of the server on which each clone resides (example shown in Listing 3). This approach minimizes the time impact of creating new images but of course also means the image is unmasked. - Create a masked image from a masked database
We can create a PowerShell script that will restore a database backup, and mask the new database. We create a masked image from this database and so, by extension, masked clones, and then drop the temporary database when finished. You might wish to use this approach instead if you have an existing backup and restore process to create (for example) a staging environment.- Use the
Restore-SqlDatabaseand$server.databases["mydb"].Drop()commands to drop the temporary DB when finished.
- Use the
b. Apply the data masking
In this step, we pass the database or clone into Data Masker for SQL Server, to apply our masking scheme. We use the command line functionality within the tool as part of your PowerShell job.
For Data Masker to run via the command line, the user with permissions to do so must be logged in or must schedule via Windows scheduler to run with permissions.
The command in Listing 2 applies the masking set we created previously. The output is written to out-null so that the operation can finish before the script attempts to do anything else.
|
1 2 |
#Mask Temp Clone from Data Masker Command Line & "C:\Program Files\Red Gate\Data Masker for SQL Server\DataMasker.exe" "C:[…]\Documents\Example1.DMSSet" -R -X | out-null |
Listing 2
If you are using either of the approaches that applies the masking to a clone (1 or 2), then you will need to pass the clone name to use into this command also by using the -D argument which will replace the database specified in your existing masking set.
In Listing 3, I specified AdventureWorks_Dev_Chris (a full database backup and restore) in the masking set but want the rules to run against AdventureWorks_Dev_Simon (the clone) instead.
|
1 2 |
# Mask Temp Clone & "C:\Program Files\Red Gate\Data Masker for SQL Server\DataMasker.exe" "C:\[…]\Documents\Example1.DMSSet" -R -D "YOURMACHINE\YOURINSTANCE[AdventureWorks_Dev_Chris] = YOURMACHINE\YOURINSTANCE[AdventureWorks_Temp]" -X | out-null |
Listing 3
If you are using approach 3, you will be able to specify the name of the restored Database in the masking set and call this without the -D argument.
Listing 4 shows a full example of a masking process in PowerShell, with SQL Clone and Data Masker, which applies scheme 1, of masking a temporary clone, creating a new image and then provisioning dedicated clone environments for the development team from the masked image.
|
1 2 3 4 5 6 7 8 9 10 11 12 13 14 15 16 17 18 19 20 21 22 |
# Connect to SQL Clone Server Connect-SqlClone -ServerUrl 'YOUR CLONE SERVER ADDRESS AND PORT HERE' # Set variables for Image and Clone Location $SqlServerInstance = Get-SqlCloneSqlServerInstance -MachineName 'YOURMACHINE' -InstanceName 'YOURINSTANCE' $ImageDestination = Get-SqlCloneImageLocation -Path 'YOUR FILESHARE HERE' # Set names for developers to receive Clones $Devs = @("Chris", "Sam", "Cassi", "Becky", "Matt") # Create New Temp Image and Temp Clone $TempImage = New-SqlCloneImage -Name 'TempImage' -SqlServerInstance $SqlServerInstance -DatabaseName 'AdventureWorks_Production' -Destination $ImageDestination | Wait-SqlCloneOperation $TempClone = New-SqlClone -Name 'AdventureWorks_Temp' -Location $SqlServerInstance -Image $TempImage | Wait-SqlCloneOperation # Mask Temp Clone & "C:\Program Files\Red Gate\Data Masker for SQL Server\DataMasker.exe" "C:\[…]\Documents\Example1.DMSSet" -R -D "YOURMACHINE\YOURINSTANCE[AdventureWorks_Dev_Chris] = YOURMACHINE\YOURINSTANCE[AdventureWorks_Temp]" -X | out-null # Create New Masked Image from Clone New-SqlCloneImage -Name 'AdventureWorksImage' -SqlServerInstance $SqlServerInstance -DatabaseName 'AdventureWorks_Temp' -Destination $ImageDestination | Wait-SqlCloneOperation $DevImage = Get-SqlCloneImage -Name 'AdventureWorksImage' # Remove Temporary Image and Clone Remove-SqlClone -Clone (Get-SqlClone -Name 'AdventureWorks_Temp')| Wait-SqlCloneOperation Remove-SqlCloneImage -Image (Get-SqlCloneImage -Name 'TempImage')| Wait-SqlCloneOperation # Create New Clones for Devs $Devs| ForEach-Object { # note - '{' needs to be on same line as 'foreach' ! $DevImage | New-SqlClone -Name "AdventureWorks_Dev_$_" -Location $SqlServerInstance | Wait-SqlCloneOperation }; |
Listing 4
Figure 3 shows the Person table in the source database (left) alongside the sanitized clone.
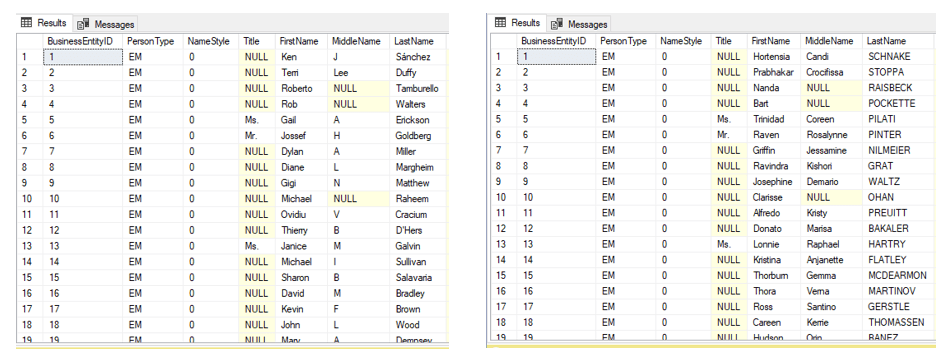
Figure 3
Summary
Any organization that stores and handles personal or sensitive data will need to audit that data, and take steps to ensure that their databases and data processing systems meet the data privacy and protection demands of GDPR, and related legislation.
This article described an approach that will ensure that, when real data is required for development and testing work, or for analytics and reporting, any sensitive and personal data is masked when it leaves the security of the production database environment.
Tools in this post
Data Masker
Shield sensitive information in development and test environments, without compromising data quality
SQL Provision
Provision virtualized clones of databases in seconds, with sensitive data shielded
You may also like
-

Article
SQL Clone Quick Tip: Offloading DBCC checks
If you guard against database corruption by restoring backups to secondary server, licensed as per production, and then running DBCC CHECKDB integrity checks, then you might save a lot of restore time, and disk space, by offloading this task to a clone.
-
Article
Database provisioning from backups using SQL Clone
A step-by-step guide to creating an image from a database full backup, or from a full backup plus differential backup.
-

Webinar
Implementing Data Masking for NIST Compliance
In this webinar, Kendra Little and Chris Unwin will demystify the new requirements for PII in NIST SP 800-53 Revision 5. They will share a plan you can adopt to quickly comply with these standards without stalling the work of developers, testers, or researchers.
-

Webinar
Don’t let POPIA slow down your Database DevOps
Join Redgate and Blue Turtle to learn more about South Africa's POPI act and what it means for teams working with sensitive, PII-filled databases. You'll discover some of the key approaches to pre-Production database provisioning that will allow your teams to move fast and deliver value whilst remaining POPIA compliant.
-
Article
DevOps Self-Service for Databases with SQL Clone
Phil Factor describes the freedom of being able to "self-serve" databases, during testing and development, and explains how it works with SQL Clone.