


How to do Accurate Address Masking using Data Masker
My previous article demonstrated how to mask address information, so that it couldn't accidentally reveal personal or sensitive identifying information. However, we had little regard for the verisimilitude of the data, beyond the fact that the data still looked like address data. In this article, I'm going to outline a set of methods that we can implement using the SQL Data Masker tool, in SQL Provision, to achieve both fake and accurate data, and data distribution.
Before we start, I need to repeat the warning from my previous article: I only describe how to mask address data in the Person.Address table; you'll also need to locate any other data that could be used to identify a real address, such as a phone number, and apply to it similar masking strategies. I also assume that you've masked all the other types of identifying and sensitive data in your database.
Strategies for masking addresses accurately
You might think that, rather than go through the effort of manipulating and masking multiple columns in the Person.Address table, you could just scramble the Person.BusinessEntityAddress table that maps BusinessEntityID to AddressID. However, as discussed at length in the previous article, there are many ways that address data, on its own or used as part of an inference attack, can identify individuals. Either data is masked, or it isn't, and the only way to be sure it is, is to cleanse the data thoroughly. The only thing that is up to you is how much effort you need to expend, on top of that, to make sure the data is masked realistically.
There are various approaches to retaining the data characteristics and distributions of the real data, during masking. Here, I'm going to maintain the production distribution for postal codes, so I'll no longer be substituting postal code values for fake ones. Yet, we still don't want to retain that information on any given person's data, so we need to shuffle the data to ensure that no AddressID value remains associated with a given PostalCode. I'll still be replacing the AddressLine1 and AddressLine2 columns with completely fake data.
Having done this, I'll reestablish an accurate correlation between postal codes, and the States/Provinces and cities, by using staging tables to look up valid StateProvinceID values and City values, for the associated PostalCode. This means that if the town of Grafton appears in our fake city data, it will be correctly located in the state of Massachusetts and have a valid zip code for that municipality.
Implementing accurate address masking in data masker
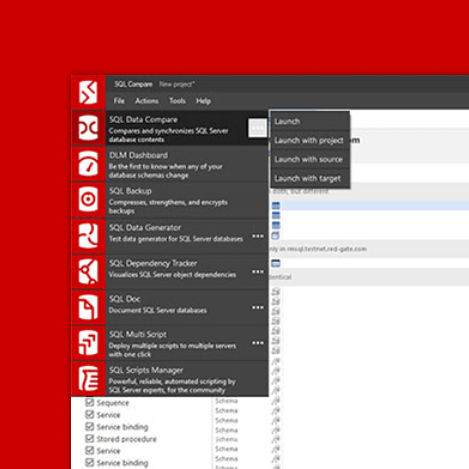
Figure 1 shows a screenshot of the full Masking Set from SQL Data Masker (available to download, FocusedAddress.DMSMaskSet), which I developed for AdventreWorks2017:

Let's walk through each of the steps and outline why I chose to do them, and in the order I chose. It all reflects on our need for realistic data but done within the context of maintaining a distribution and dealing with the structure of our database.
The Command rule: creating the staging tables
Command rules in data masker simply allow us to execute SQL statements in the target schema. We need to use a Command rule to create the staging tables that will allow us to maintain the relationships between PostalCode, and both StateProvince and City in the 'live' data. We'll load these staging tables with the required subset of the original data and then, after we've performed the postal code shuffling and address line substitution steps, use them to lookup the correct city and state values, for each given postal code. Instead of retrieving information from your original database, you could use an external data source for this lookup information, if you have one available.
Listing 1 shows the Command to create the staging tables. You'll note that I also created UNIQUE indexes to help with performance of the data masking process:
|
1
2
3
4
5
6
7
8
9
10
11
12
13
14
|
DROP TABLE IF EXISTS Person.zipstage;
SELECT DISTINCT
a.StateProvinceID,
a.PostalCode
INTO Person.zipstage
FROM Person.Address AS a;
CREATE UNIQUE INDEX ix1 ON Person.zipstage (PostalCode, StateProvinceID);
DROP TABLE IF EXISTS Person.citystage;
SELECT DISTINCT
a.PostalCode,
a.City
INTO Person.citystage
FROM Person.Address AS a;
CREATE UNIQUE INDEX ix2 ON Person.citystage (PostalCode, City);
|
Listing 1
Data Masker is quite particular about the definitions of the tables it's attempting to load. It needs to be sure that these data structures match what it has stored as the data definition, to avoid errors. Data Masker can't reference tables for which it doesn't have a schema.
This requirement for schema definition to be in place ahead of time puts me in a bind. In this case, it means that I need to create the staging tables one time, manually, even if they are empty, with the indexes. I can then get Data Masker to capture them into the schema definition, stored with the data masking set. After that, I can drop the tables, just as we do at the end of the actual data masking process. If you later update the schema, in the masking set, you'll need to recreate the staging tables manually.
Shuffling the Postal Codes
Next, I use a Shuffle command to scramble the existing PostalCode values.
|
1
2
3
4
5
|
SELECT a.PostalCode,
COUNT(*)
FROM Person.Address AS a
GROUP BY a.PostalCode
ORDER BY a.PostalCode DESC;
|
Listing 2
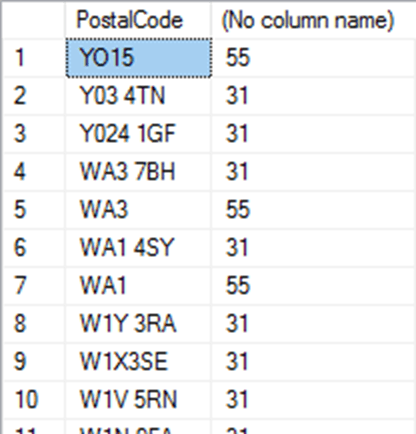
By retaining the distribution based on postal codes, it means that the cardinality of the predicate WHERE PostalCode='Y03 4TN', for example, will be the same in faked data as in the original data, meaning that Listing 2 will return the same number of address values for each postcode, before and after the masking set has been run.
Conversely, Listing 3 will prove that after the shuffle, each AddressID will be associated with a different postal code.
|
1
2
3
4
|
SELECT a.AddressID,
a.PostalCode
FROM Person.Address AS a
ORDER BY a.PostalCode DESC;
|
Listing 3
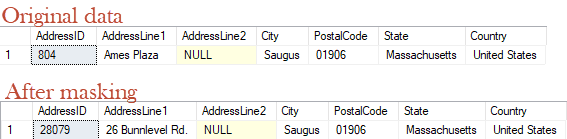
This is the first seven values before running the masking process:
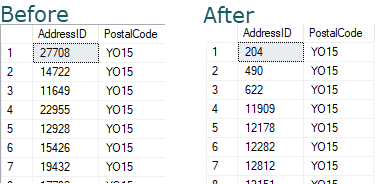
Already, we've masked our data to ensure that no individual will be associated with its original PostalCode. However, all the other address details for each record are, at this stage, identical. The record with AddressID 204, for example, still relates to an address on Kenston Drive in Sammamish, Washington, but will now has a different postal code (Y015, in this case, instead of 98074).
Substituting the address lines
The substitution rule will replace all the existing values in the actual AddressLine1 and AddressLine2 columns. In this instance, I am using purely fake data. It is not accurate address information to any given municipality or postal code:
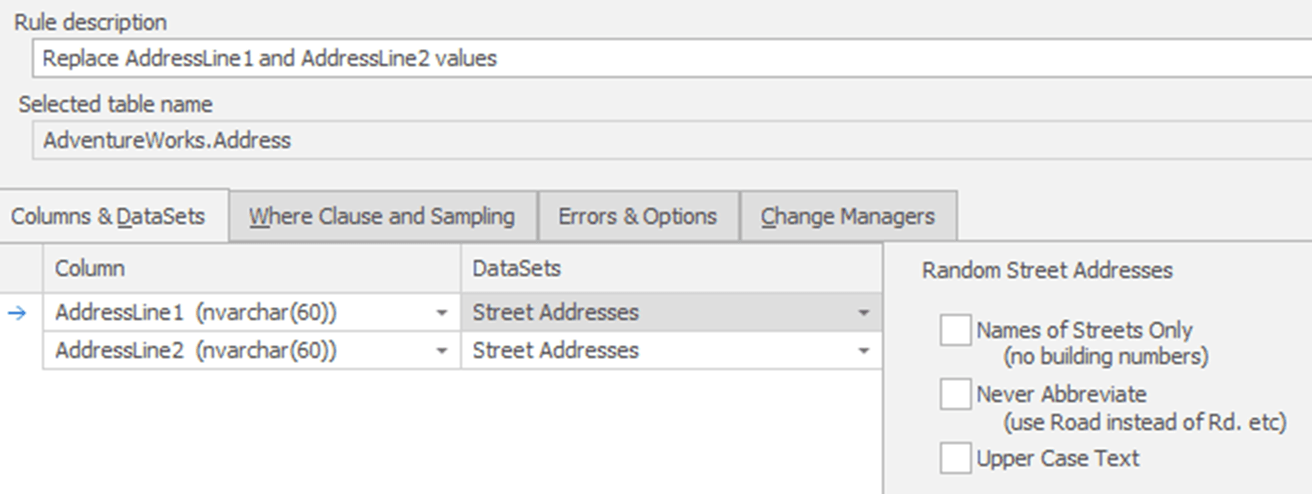
This is where 'fake but accurate' leans more toward fake than accurate. If we needed literal address information from a given municipality, we'd have to go to some external data source to get it. Even if we did that, we'd want to be sure to use that data to mask both the AddressLine1 and AddressLine2 columns. There's just too much likelihood of some PII information leaking in otherwise.
The table-to-table synchronization rules
After scrambling the PostalCode values, they will no longer be associated with valid StateProvinceID or City values. The two Table-To-Table rules use the PostalCode values to look up the correct StateProvinceID and City values for each postcode, from the staging tables, and use them to replace the existing values.
Here's the City column update as an example:
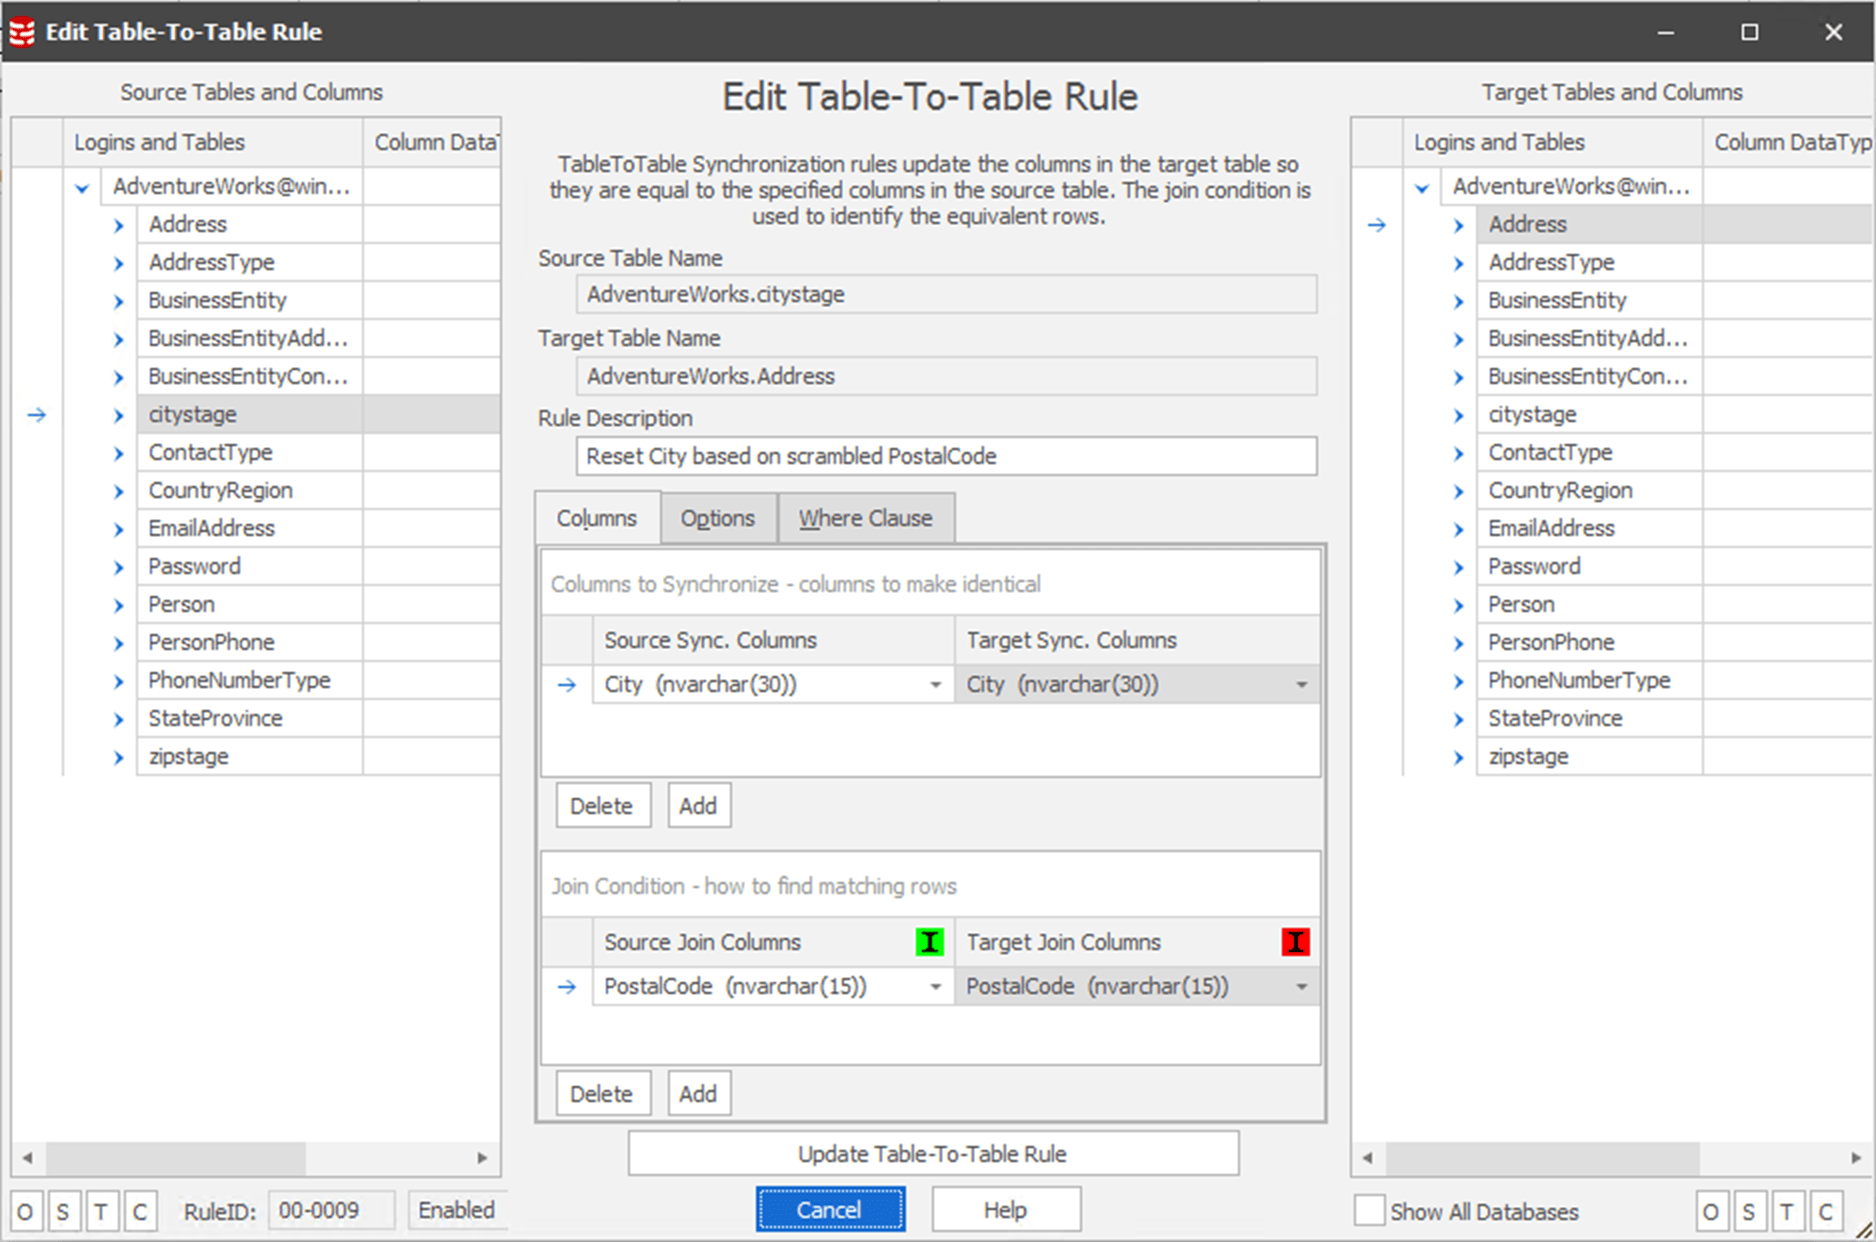
Now, the City and StateProvinceID values are accurate to the PostalCode, but in each case they are associated with new AddressID values.
Finally, I have a step that drops my staging tables.
Testing the masking
The technique I've demonstrated relied on rearranging the PostalCode, substituting the AddressLine1 and AddressLine2 columns, and then synchronizing the shuffled PostalCodes to their correct City and StateProvinceID values. This allowed me to mask the necessary PII information, while retaining the production distribution on my data. A query for AdventureWorks affiliates in a given postal district will have the same cardinality both before and after the masking process.
It's possible that even knowing that only one customer has an address in the postal code of 01906 may make maintaining th correct distribution problematic. In that event, you may have to come up with mechanisms other than the simple scrambling.
Conclusion
You can't simply treat address information just like any other string because there is a high correlation between different parts of the address. As such, simply replacing one or even a couple of the address attributes won't be sufficient, in most cases, to protect the PII data. Instead, all the address information must be redacted in some fashion or another. Then, you can be sure that you've protected the PII in your non-production environments.
Only once you're certain that the data is masked can you move to deciding how to retain this masking, while ensuring that the data behaves sufficiently like the real data to enable meaningful testing. Having large swathes of address columns all with a single value won't allow us to test our indexes. Instead, we strive for a data distribution within our fake, but accurate, data that is itself, fake, but accurate.
This means either creating a method of distributing the data that mirrors our knowledge of our existing data distribution, or, using the existing data distribution to arrive at that fake but accurate distribution. This article took the latter approach, but this could still cause you some issues, which I highlighted along the way.
It's worth some effort though, because the ability both to protect PII, but without sacrificing data functionality or data distribution, will allow organizations to derive maximum benefit from their data in testing and analysis.
Data Masker is part of SQL Provision. Find out more and grab your 14-day fully functional free trial.
This document contains proprietary information and is protected by copyright law.
Copyright © 2026 Red Gate Software Limited. All rights reserved
Downloads
Tools in this post
Data Masker
Shield sensitive information in development and test environments, without compromising data quality
SQL Provision
Provision virtualized clones of databases in seconds, with sensitive data shielded
You may also like

Live training session
Instantly provision and control access to anonymized copies of production data with SQL Clone
SQL Provision combines SQL Clone and Data Masker to enable software teams to deliver database environments at the speed required by modern development practices, while ensuring the security of sensitive data subject to growing global regulations. With the ability to create and centrally manage copies of production databases, protecting any sensitive data through static data masking before copies are made, SQL Provision enables you to scale and maintain data protection across your organization. In this 30-minute training session, Redgate Solution Engineer, Chris Hawkins, will run through the key things to consider when making your copies of production available and how

Live training session
Cataloging and Masking AdventureWorks
AdventureWorks is a database we all know and love so there’s no place better to tackle one of the most challenging aspects of protecting data in non-Production environments. Join Chris Unwin in this session as they walk you step-by-step through getting AdventureWorks classified and masked for non-Production use in just 30 minutes. With the help of SQL Data Catalog and Data Masker for SQL Server, data masking need never be a daunting task again! If you are interested in more sessions on SQL Data Catalog then check out ‘Loading Existing Classifications into SQL Data Catalog’ where Chris will take you through some

Article
New permissions features brings access control to SQL Clone
SQL Clone permissions give you simple control over who can access SQL Clone, and what they can do with it.

Article
Resolving Cross Database Dependencies in SQL Change Automation using Local Databases or Clones
How to avoid database build failures, caused by circular cross-database object references, by restoring or provisioning copies of all required databases to the development, build, or test SQL Server instance.

Article
SQL Provision adds fully integrated data masking
Karis Brummit announces SQL Provision, which combines SQL Clone's fast, lightweight database copying and centralized management of provisioning, with Data Maskers's ability to obfuscate sensitive or personal data, prior to distribution.
Article
Building Better Test Data with SQL Provision
Steve Jones show how a team might use SQL Provision to build consistent, compliant, useful databases, on demand, for development and test environments.
Loading comments...