


SQL Server Database Provisioning: Getting Started with SQL Clone
Updated October 2017
It's a hard and time-consuming task for a DBA to provide developers with development and test copies of a 'production' database. Nevertheless, both the development and operations team have a shared interest in stopping as many data-related 'bugs' as possible from reaching the production system. This requires team to perform integration, performance and acceptance testing, with a database that matches production as closely as possible, from as early as possible in the development cycle.
However, what if the database you need to copy is terabytes in size? Or contains sensitive data that can't be copied outside the production environment? Or you need to deliver and refresh copies of a large database to multiple SQL Server instances, across your development and test environments? Quickly you'll find that the traditional, often manual, database provisioning mechanisms, such as restoring backups, struggle to cope with these demands.
Fortunately, it turns out that we can exploit the technological advances that underlie virtualization to make the database provisioning process a simpler, quicker task. SQL Clone was designed by people who had to rapidly deliver database improvements. It was done to get over the time and network resources needed to do the necessary testing. It was designed for other teams in the same predicament but is more generally useful within development where every developer is working on an isolated instance of the database that must be kept up to date with the version in source control. It does this by exploiting the existing virtualization technology within Windows in a creative way to nail a specific DevOps problem.
This piece is designed to get you started with SQL Clone, and should be read alongside the Getting Started Guide, which provides deeper details on SQL Clone installation and configuration. You'll also find it useful to read Best practices for SQL Provision.
Challenges of provisioning development and test with realistic data
Developers would often like to be able to "spin up" quickly, in their environment, a database that resembles production. For example, let's say customers have reported a flaw with the current application and the business would like the development team to diagnose the problem quickly, and issue a hotfix. Often, such problems only occur in the production data, so before they can even get started they will need to wait for their environment to be "refreshed" with the latest production data, which usually means waiting for the DBA to restore a backup. This can slow down the fix, and cause frustration to the business.
Likewise, one goal of DevOps collaboration is to enable the team to run the necessary database integration, load and performance tests that will ensure that all application processes supported by the database behave correctly, and perform and scale to expectation. With unit tests, where we test isolated units of code, often the database is "mocked", but end-to-end processes will need access to many related tables, and to any objects associated with these tables. We need to test these processes against data that resembles the production data, and against sufficient volumes of data to mimic the production 'payload'.
If each refresh of a test environment requires a manual restore of the latest backup, then provisioning will be a slow process, and will limit what can be achieved within the testing window. In some cases, restoring backups to non-production environments is not permissible from a regulatory standpoint, and then the situation is even more complex. The team need some other way of loading data that is representative of the production data. This could mean cleaning and masking a restored copy of the production data, while retaining a realistic data distribution. Alternatively, it could mean trying to generate sufficiently realistic, standard data sets.
The larger the database, the larger the volume of data we need to create or move, the more complex the requirements, the slower the process of database provisioning. Also, since even an average-size database can reach hundreds of gigabytes in size, provisioning disk space also becomes an issue.
For example, let's say you've developed a thorough suite of tests for each of your application processes (create purchase order, generate invoice, and so on). To test each process, one after the other, against realistic volumes of test data, will take 20 hours. You'd like all tests to complete overnight. The obvious solution to the problem is to parallelize the tests. It's a relatively straightforward task to spin up a number of virtual test environments, with the latest builds of both the application and database installed and configured. The hard part is provisioning the database in each environment with volumes of realistic data.
This is where SQL Clone can help. It uses standard disk virtualization technologies in 64-bit Windows to allows us to create a database 'clone' that behaves just like a normal database, but has a vastly smaller footprint.
How SQL Clone works
From SQL Server's perceptive, a 'clone' is just a normal database and we can work on it just like any other database. Figure 1 shows a copy of the Customers database, on the left, alongside a clone of that database.
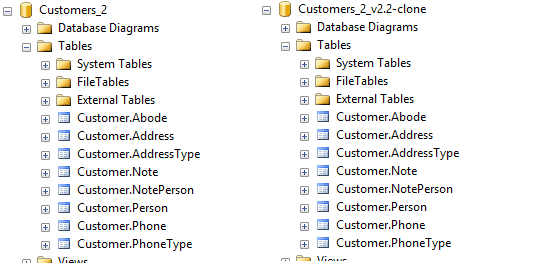
Figure 1
If you were to check the Properties of both the database and its clone, SSMS would report each was the same size (let's say 4 TB). In fact, though, the clone will only be using tens of megabytes of disk space on the local disk, rather than 4 TB.
How does this work? Creating a clone is a simple, 2-step process, each of which relies only on standard virtualization technology. First, we create an image, which is a full byte copy of the database, data and log files, at a given point in time. The image is held only once, in the network, and never updated. We can take the image directly from a SQL Server database (demonstrated later) or from a database backup. In the next step, we can create multiple clones from this image, where each clone is an isolated, copy of the database, megabytes in size.
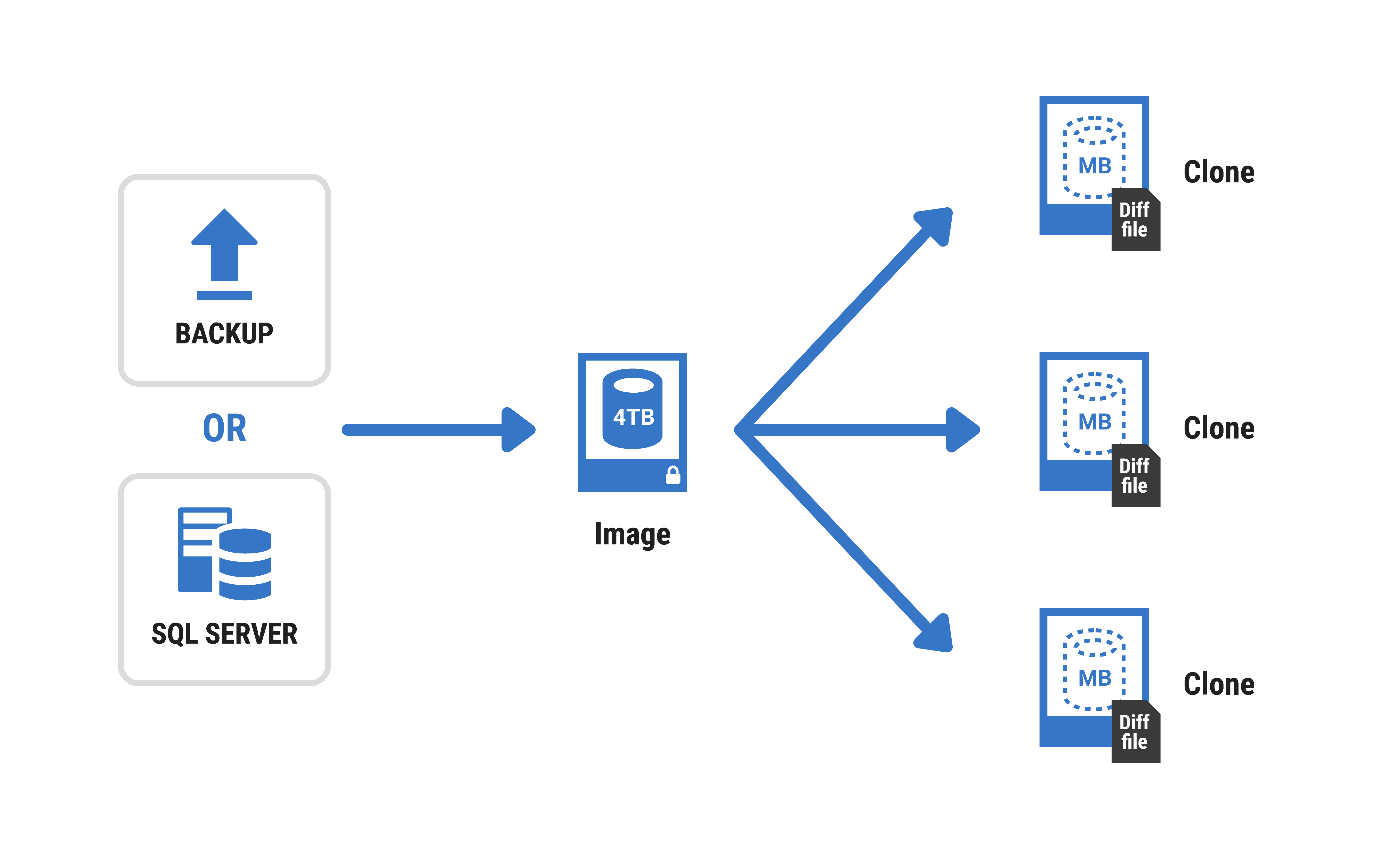
Figure 2
SQL Clone creates the image by first creating a Virtual Hard Disk (VHD), and then copying onto it the database's MDF (schema and data) and LDF (transaction log) files. When creating the image from a live database connection, SQL Clone makes the point-in-time copy of database files using the Windows Volume Shadow Copy Service (VSCS). When creating the image from backup files, the image is simply created by restoring the backup. In either case, creating the image will take about as much time as performing a database restore, and the image will be roughly the same size as the source database.
Now, we can create 'clones' of the source database, from the image. For each clone, SQL Clone creates a VHD, called a differencing disk, on the local instance, with a connection back to the image, so each clone created from an image can access all those same image bytes. These bytes are presented through the VHD in a way that is invisible to SQL Server; virtualization is taking place at windows file system level.
All that's stored locally, in the differencing disk, are data pages containing changes made directly to the local clone. When you modify anything in a clone database, SQL Server writes the change to the local differencing disk. Therefore, any change you make to a cloned database will have an effect only on that clone, and will be isolated from the image. When you query data, the operating system reconstructs the required data pages from the differencing disk plus the database files in the image. Again, all of this is invisible to SQL Server, which works with the clone database just as it would with any other database.
Setting up SQL Clone
I'm not going to walk through the SQL Clone installation and setup process in detail, in this article; please refer to previously-referenced Getting Started guide, as well as to the Installation section of the documentation.
Figure 3 shows the basic components we need to have in place, to create images and clones using SQL Clone.
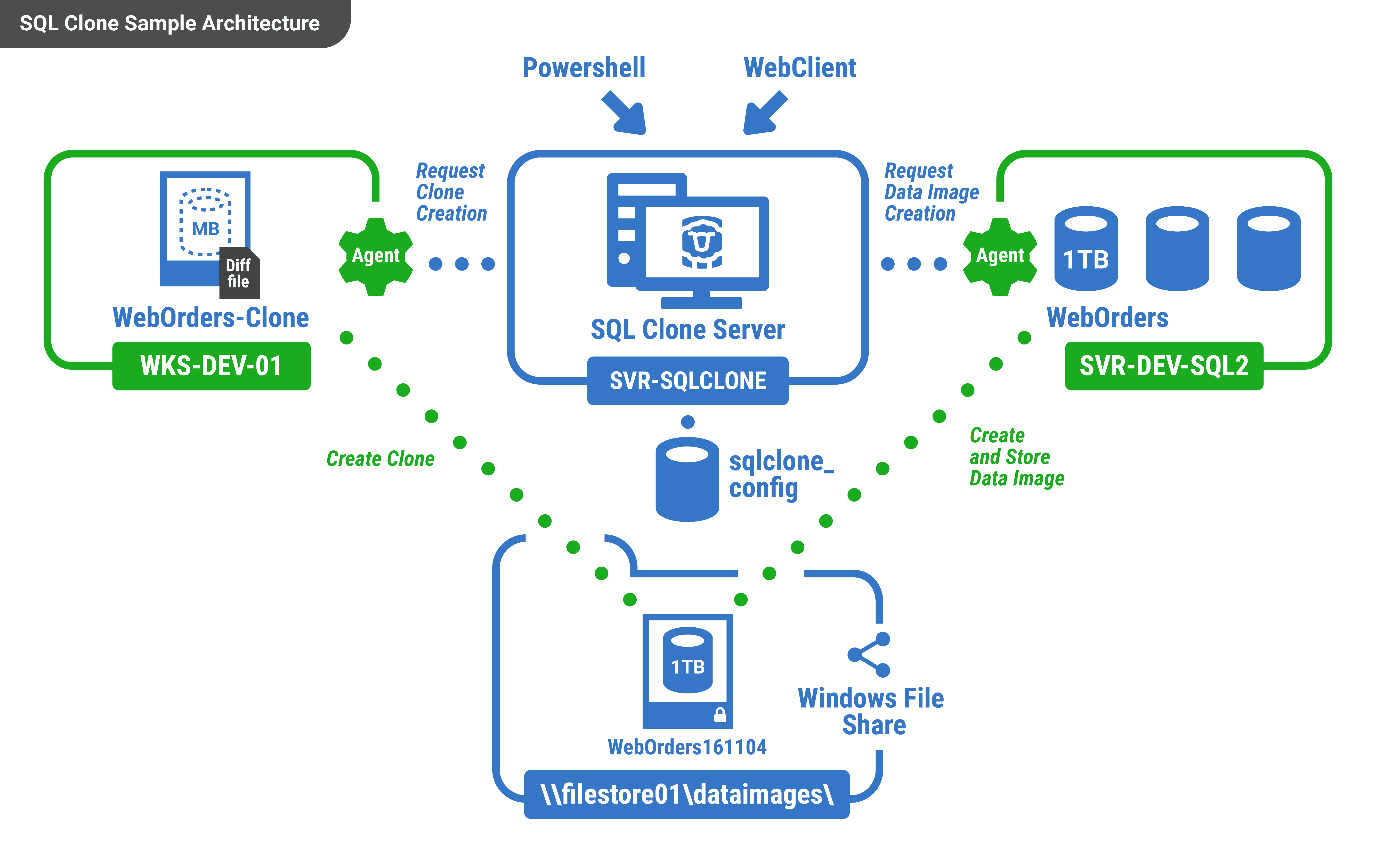
Figure 3
You'll need one central server, on which to install SQL Clone. This central server will host SQL Clone Server, which is a web application so the machine you choose must be visible over the network from everywhere you want to use SQL Clone.
After running the installer on this machine, you'll jump into SQL Clone's setup utility that guides you through the configuration of the SQL Clone Server. You'll need to specify a SQL Server instance on which to install the SQL Clone configuration database (SQLClone_Config), and the credentials for the SQL Clone Server service account. This account will need access to the instance that will contain the configuration database. Please refer to the Requirements section of the SQL Clone documentation for full details.
This done, the SQL Clone Server web client (http://SQLCloneServerName.DomainName:14145/) will open automatically and you'll need to authenticate using your normal Windows credentials.
SQL Clone Server performs all its work through agents and so the next step is to install a SQL Clone Agent on each machine from which you need to create images or to which you wish to deliver clones. For example, to create an image from a database, an agent must be installed on the same machine as the database. However, the resulting image can be created on a machine (e.g. a file share) that doesn't have an agent installed, but an agent must be able to access that machine.
For each machine that needs a SQL Clone Agent, download an agent through the SQL Clone Server web client, and then copy it to the local machine and run it.
Download a separate installer for each machine on which you want to install an agent
Each installer comes packaged with some unique identifying metadata – reusing the same installer will not work.
Subsequently, each time you upgrade SQL Clone to the latest version, the agents should auto-update to the same version. The user account for SQL Clone Agent will need administrative rights on the local machine, and to have read/write access to the file shares used for storing images; see the Requirements for details.
The final piece of the architecture is a Windows network share location, for storing the images. Again, this will need to be accessible to each SQL Server machine from which we need to create images or on which we need to create clones.
The SQL Clone Web Client
In this article, we'll use the web client of the SQL Clone Server to create and manage all images and clones. If you're working on the machine where you installed the SQL Clone Server, then you can start SQL Clone from the Windows Start menu shortcut, or by navigating to the web client URL in a browser.
To allow team members access to SQL Clone from other machines, you'll need to share with them the web client URL. By default, anyone with the URL can use SQL Clone, just by authenticating with their Windows credentials. To control access in a more granular way, go to Settings | Permissions in the web client, where you can set up role-based permissions.
The PowerShell section, within the Settings area, is where you can install the SQL Clone PowerShell cmdlets, to automate image and clone creation and management. The Machines area gives a nice overview of the machines on which agents are installed, and whether the agents are up-to-date.
For the remainder of this article, we'll focus only on SQL Clone Server's Dashboard, as well as Create image and Create clone areas.
Create an image from a SQL Server database
The first job is to create an image of the database we wish to clone. Open the SQL Clone web client and click Create Image. We are presented with the options to create the data image either from an existing database on a SQL Server instance, or from a SQL Server database backup.
In this article, we'll discuss creating an image from a SQL Server database. See my follow-up article for details of cloning from a backup (full and differential).
Following are the four basic actions that SQL Clone performs 'behind the scenes', when we create an image from a SQL Server database.
- Create an initial, small VHD, at the image location
- Create a mount point to this VHD on the local operating system of the machine hosting the source database
- Use the VSCS to "remote copy" the MDF and LDF files to the image location
- Un-mount the VHD
Where is your database?
From the SQL Clone web client, the first step is to select the SQL Server instance hosting the database you wish to clone. I'm using a development copy of the AdventureWorks database, about 9.2 GB in size, on a SQL Server 2014 instance.
SQL Clone populates the SQL Server instance dropdown with all instances visible to a SQL Clone Agent, so just pick one. SQL Clone will attempt to establish a connection to the instance, using the specified SQL Clone Agent's service account. If it succeeds, you'll see a verification message. Then just pick the database you wish to clone from the Database dropdown.
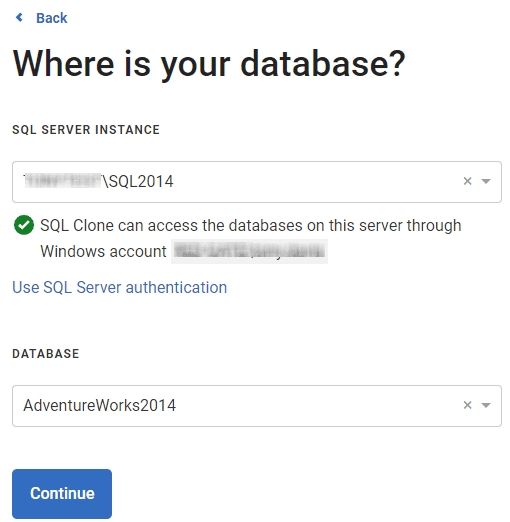
Figure 4
Define the image destination
The next step is to specify where you want to store the image. Depending on how you wish to use the clones, it might be beneficial to choose a high-speed, high-bandwidth network location for the image. Initially, before we make any modifications to the clone database, all the data will be retrieved from the data image, and so its location will affect the query performance of each Clone created from that image. This is a factor to consider if, for example, you are performing load or performance testing using a Clone.
If you've previously established an image location, it will appear in the dropdown, in Figure 5. Otherwise, click Add new image location and enter the path to the network share where you wish to store the image. The Clone Agent will need read and write access to this location.
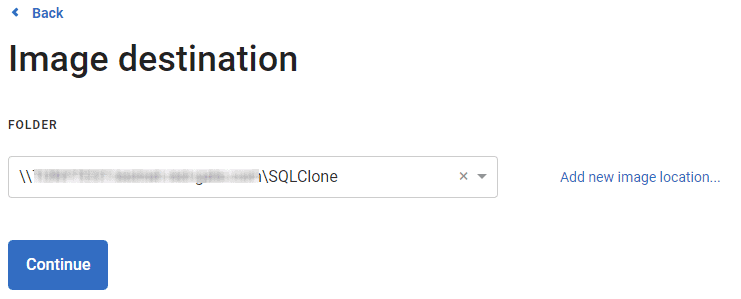
Figure 5
Create the image
The final stage is to review the image details and give the image a meaningful name, possibly including the date the image was taken, as I've done here, or perhaps the current build version of the database.
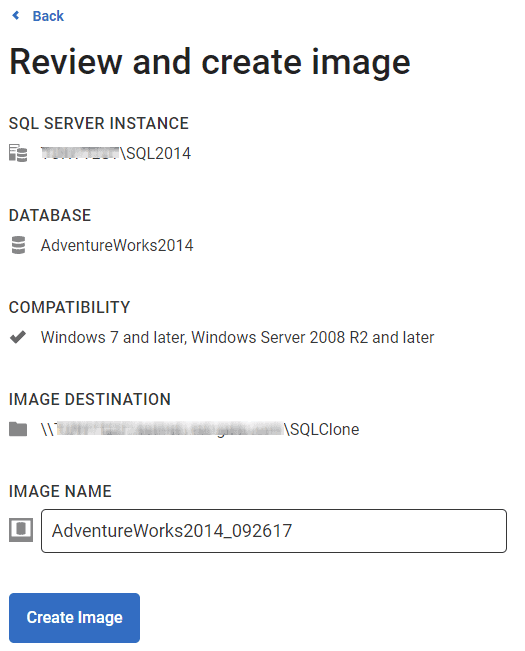
Figure 6
Click Create Image, the image creation process will start, and you'll see a progress screen. Remember that creating an image takes a full byte-by-byte copy of the database. This will take about as long as a database backup or restore operation to the same network location. If it's a big database, it will take a while, but it's a one-time cost. Having created the image, creating clones from this image will take seconds.
When the image creation process completes, you'll see a screen like Figure 7 (I've cropped it for legibility).
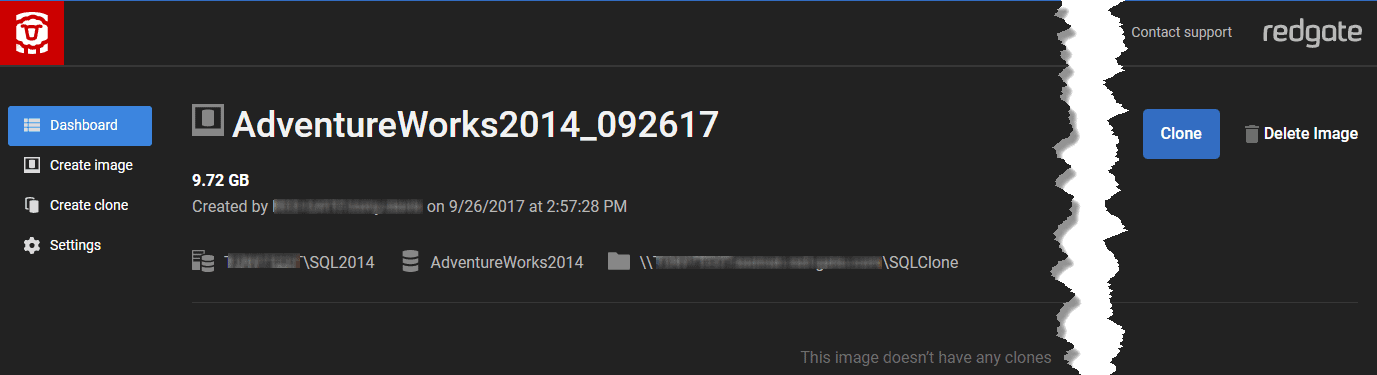
Figure 7
SQL Clone reports the image size as 9.72 GB, which we can verify by inspecting the VHD file itself, at the image location.

Figure 8
SQL Clone appends the image ID (in this case 10011, padded out to 00010011) and some random characters to prevent filename collisions, but its name in the SQL Clone web Server, and in PowerShell scripts, is just AdventureWorks2014_092617.
SQL Clone will sometimes appear to report the size of the image as being substantially larger than the original database, but in fact this is simply due to the dynamic VHD resizing mechanism; the image is always just a straight copy of the data and log files.
Let the Cloning Commence
Having created an image, we're ready to start cloning. Figure 9 shows a simplified depiction of creating a clone
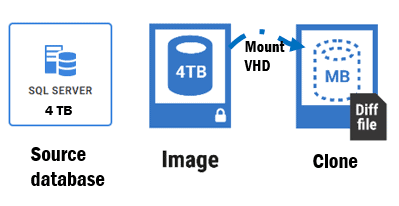
Figure 9
For each clone, SQL Clone creates a VHD, called a differencing disk (or Diff file), on the local instance, with a connection back to the image, accessible to the clone via a mount point. This means that each clone created from an image can access all those same image bytes. All that's stored locally, in the differencing disk, are data pages containing changes made directly to the local clone database.
This means that even for a source database in the terabyte range, each clone will initially be only tens of megabytes in size. When you make data or structural changes to a clone database, SQL Server writes the change to the differencing disk. Any change you make to a clone database will have an effect only on that clone, will be isolated from the image, and will have no impact at all on the integrity or performance of the source database.
When you query data, the operating system reconstructs the required data pages from the differencing disk plus the database files in the original image. All of this is invisible to SQL Server, which works with the clone just as it would with any other database.
Create a clone
To create a clone, go to the Dashboard in the SQL Clone web client. It will display your existing images, and any clones associated with each image. Locate the one you want and click Clone.
We simply need to choose a destination SQL Server instance on which to create the clone, and give it a name. Here, we're going to create the clone on a SQL Server 2016 instance.
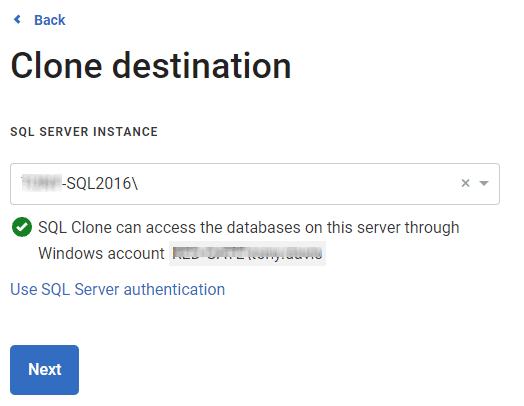
Figure 10
Then we just review the details and give the clone a name.
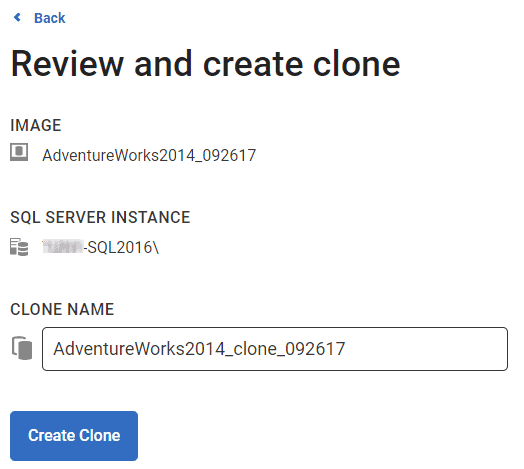
Figure 11
That's it; now we just create the clone! This will take just a few seconds. Once created, we can query and work with it from SSMS, just as any normal database.
|
1
2
3
4
5
6
7
|
USE AdventureWorks2014_clone_092617;
GO
SELECT p.FirstName, p.LastName, e.HireDate
FROM Person.Person p
JOIN HumanResources.Employee e
ON e.BusinessEntityID = p.BusinessEntityID
WHERE e.JobTitle = 'buyer'
|
Create multiple clones for the same image
We can create multiple clones from the same image, for example to perform parallel database testing, or simply so that each developer can work with his or her own local copy of the database, with realistic data.
Back in SQL Clone dashboard, Figure 12 shows two clones; on the right is the one we just created on the SQL Server 2016 instance, and one the left a second clone created on the same SQL Server 2014 instance as the source database.
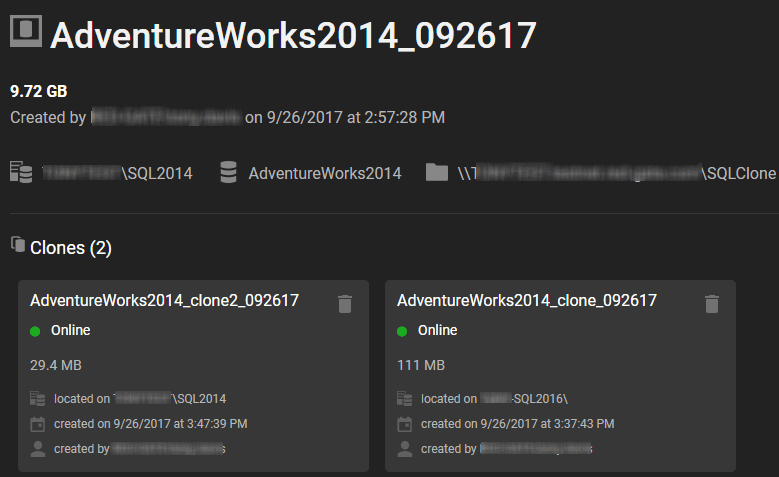
Figure 12
Notice that, compared to a source image size of 9.3 GB, the SQL 2014 clone is only 29 MB, and the SQL 206 clone is 111 MB. In the latter case, SQL Server had to "upgrade" the clone database to run on a SQL 2016 instance, and it writes those changes into the local differencing file. If we'd been cloning in the other direction, trying to create a clone of a SQL 2016 database on a SQL 2014 instance, we'd have seen an error during clone creation.
By default, SQL Clone creates the clones in the SQL Server instance's DATA folder, under a 'clones' subdirectory, although this location may change in future, and it's also possible to use a different location by specifying command-line arguments to the agent installer.
Navigate to this location, and you'll find a folder holding each of the clones created on that machine. Figure 13 shows the VhdMount point and the local differencing disk, disk.vhd, for the SQL 2014 clone.
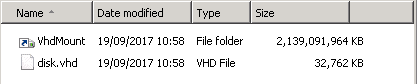
Figure 13
Don't be perturbed by the apparent 2 TB size of the VhdMount folder; this is just a reference to the storage, which is in the data image repository on the file share you're using. This is the 'mounted volume' approach in Windows, which uses 'symbolic linking' (which you may be familiar with from Unix or Linux).
Click into the VhdMount folder, and there is a Data folder containing the data and log files for the database. Remember that these are made accessible to SQL Server via the VHD mount point to the remote data image; this is entirely transparent to SQL Server.
Troubleshooting SQL Clone
If you encounter any errors in installing the Clone agent, or in creating images or clones, please refer to the Troubleshooting section of the documentation. However, here are a few good places to start:
- If SQL Clone web client is unavailable, check that the SQL Clone service is running; try restarting it.
- Open Windows event log viewer on the SQL Clone server (for example, by typing eventvwr.msc from a PowerShell command window) and look at the application errors – this is often the best place to start
- For the SQL Clone agent, check the application event log or install logs
- Query the
sqlclone_configdatabase, which contains anOperationMessagestable that may be helpful.
Administering Clones and Images
Most clones will have a finite lifespan. For example, during testing, we might spin up a clone, run the tests, then immediately dispose of it. We can keep track of what clones exist for what data images via the Dashboard section of the SQL Clone server web app. From here, we can delete clones, and delete images, having first deleted all associated clones.
If you've installed the PowerShell cmdlets, you can run PowerShell scripts to automatically tidy up images and clones after a set period.
Summary
The process of creating images and clones for database provisioning with SQL Clone is straightforward. Image creation will take about as long as restoring a database and storing the image will require about as much space as the original database. However, once we have this image, we can create from it any number of database clones, and each developer and tester can work on their own isolated clone database, without affecting the work of others.
Likewise, the team can achieve much more in the testing window because they have a fast, reliable provisioning process that allow them to spin up multiple copies of a database quickly. Realistic data sets can be incorporated into their testing cycles, making it possible to catch data-related problems much earlier in development.
This document contains proprietary information and is protected by copyright law.
Copyright © 2026 Red Gate Software Limited. All rights reserved
Tools in this post
SQL Provision
Provision virtualized clones of databases in seconds, with sensitive data shielded
You may also like

Article
SQL Clone and backups protected with TDE - part 2
Steve Jones proves that SQL Clone can create a clone from a TDE-protected SQL Server database backup.
Article
Scripting Custom SQL Server Clones for Database Development and Testing
Phil Factor shows how to automatically apply T-SQL modification scripts during image and clone creation. Using this technique you can, for example, apply data masking to all clones, or customize an individual clone to work on a special variant or branch version, or set up instance level objects like Agent jobs or linked servers.

Article
Continuous Data Protection with SQL Data Catalog 2.0 and Data Masking
SQL Data Catalog 2.0 provides a simple, policy-driven approach to data protection, through data masking. It can now automatically generate the static masking sets that Data Masker will use to protect your entire database, directly from the data classification metadata held within the catalog.

Article
Basic data masking for development work using SQL Clone and SQL Data Generator
Richard Macaskill describes a lightweight copy-and-generate approach for making a sanitized database build available to development teams, using SQL Clone, SQL Change Automation and SQL Data Generator.

Article
The Database DevOps Challenges SQL Provision Solves
SQL Provision helps to accelerate the delivery of database changes, by enabling an organization to provide database copies, and the right data, to all parts of the deployment pipeline that need it, with a light footprint, and securely. Tony Davis explains how.
Article
Building Better Test Data with SQL Provision
Steve Jones show how a team might use SQL Provision to build consistent, compliant, useful databases, on demand, for development and test environments.
Loading comments...