Automatically keeping ‘hotfix’ and production database schemas in sync
How to use the SQL Compare Pro command line to automatically compare the schema of two versions of the same database, and then subsequently deploy to the target database any differences detected in the source database.
In this article, I’ll show two ways to automatically compare the schema of two different versions of the same database, each using the SQL Compare command line to generate a deployment script to synchronize them. For any database object that exists in both databases but with differences, the object’s definition in the target will be altered to match its definition in the source. Any objects that exist in source but not in the target will be created, and any that exist in the target but not in the source will be dropped. We can do this even without direct access to the source database. I show how to do it first using an Agent job that runs a batch script, and then using an Agent job that runs a PowerShell script.
Dealing with database drift
Ideally, there should, for any version of a database, be no difference between the source of a database schema in the VCS and any other deployed database at the same version. However, we’ve all come across database systems that stray from this ideal, where, for examples, ‘Wild West’ style hot fixes are applied directly to the production database.
Such ‘drift’ is dangerous and shouldn’t happen, but it does. When a critical bug occurs in a busy OLTP database, many DBAs are often forced to short-circuit the usual dev-test-prod model for deployments. They apply the fix directly to the production database, often then pushing the applied change back down to the test and development environments, in the aftermath.
It’s a dangerous approach, with many unknowns, but organizations often feel that setting up a parallel hotfix-testing environment, which mimics production both in terms of schema and data, would cost too much in resources, time and money, and would slow down urgent fixes.
Sometimes, the wise DBA needs to deal with this messy reality first, in order to move work practices, gradually, towards a more orderly approach
Maintaining a hotfix server
The first step away from this reckless shoot-first approach to maintaining production systems is to ensure that there are adequate facilities for testing changes. In fact, setting up a database for implementing and testing bugs and hotfixes doesn’t necessarily have to involve powerful, high-cost servers and Enterprise Edition SQL Server. In our case, we use SQL Server Express running on a virtual machine. Our process to implement, test and deploy hotfixes is as follows:
- Ensure that a database on the hotfix server is regularly updated with the latest schema changes from production, taken directly, or from the latest full backup.
- When a bug occurs, import the appropriate data set that will allow us to reproduce the bug conditions. We have standard data sets that contain ‘production-like’ data for each of the major areas of functionality supported by the database.
- Implement and test a fix.
- Deploy the fix to VCS and to production.
- Truncate the test data, having completed the fix and root-cause-analysis.
The first task on this list can be achieved by having a scheduled job in SQL Server Agent to regularly run a SQL Compare command line script to update the hotfix environment’s database with any new changes introduced to the production database. Over time, we hope to eradicate all direct changes to production, so changes to any environment will be deployed from source control. However, for now we continue to accept that some small changes. directly to production, are inevitable and that we need to capture them by comparing to the live database or most recent backup.
For step 2, we can import the data set using a tool such as BCP, or by executing a command line script for SQL Data Compare (I won’t show this here but will cover it in a separate article). You might wonder why we don’t just restore the production database into the hotfix environment and use that. If you have a very small database that has no personal or financial data, then that is fine. Otherwise, it is better to maintain the hotfix server with just the data you need, obfuscated where appropriate.
Creating a scheduled batch job for syncing database schemas
Let’s step through how to setup a SQL Server Agent job which keeps two database schemas in sync. I’ll run through the example twice, first creating a job that runs a batch script to deploy the changes, and then creating job that runs a PowerShell script.
The batch script
In this example, we have access to the production database. The Agent job will run on a schedule, comparing the schemas of the AdventureWorks2014 database, on my production instance (.\DW), with the schema of the same database on my hotfix instance (the default instance on my local machine), and deploying any changes from the former to the latter.
In my previous article, How to automate database synchronization using the SQL Compare command line, I described the basic syntax for calling the SQL Compare executable from the command line, to synchronize two databases, as follows:
SQLCompare.exe /s1:SourceServer\SourceInstance

/database1:SourceDatabase /s2:TargetServer\TargetInstance

/database2:TargetDatabase /include:Identical /sync
It compares the source and target databases, and use of the /sync parameter means that SQL Compare will generate a script to apply any schema changes to the target database, necessary to synchronize it with the source. The parameter /include:Identical allows us to avoid raising an error in cases where the source and target databases are identical, which in our example we hope is the case.
Therefore, for my example, the batch script will look as shown in Listing 1:
"C:\Program Files (x86)\Red Gate\SQL Compare 12\SQLCompare.exe" /s1:.\DW

/database1:AdventureWorks2014 /s2:. /database2:AdventureWorks2014 /include:Identical /sync
Listing 1
Create the Agent job
Let’s setup a new SQL Agent job on the hotfix server called SyncHotfixEnvironmentCMD with a job step called RunSQLCompareCMD.
Select an Operating System script and paste the code from Listing 1 into the command text box.
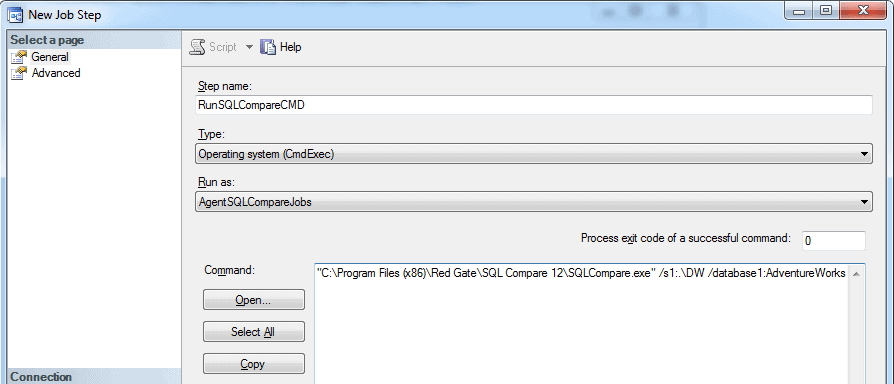
Figure 1
Beyond the raw code for the batch script, there are several other considerations around creating and running Agent jobs, including security, logging and error handling, alerting and more. I won’t delve into any of these in detail, but I’ll offer a few pointers.
Security and the Agent proxy account
The SQL Agent job will need to run using an account that has the appropriate permissions to execute CMD scripts on behalf of the SQL Server Agent, access the required databases, and so on; if not, the job will fail with a permissions error.
You will not want Agent jobs to run under an account with sysadmin privileges. Instead, set up a proxy account that uses a Windows login with only the necessary privileges to perform the task. Following are the basic steps, but for more information, visit the SQL Server documentation on proxies.
- Use an existing AD account (or create one) that has permissions compliant with the security policies of the organization
- Use this AD account to create a Credential in the SQL Server instance
- Use the Credential to create a Proxy under the SQL Agent for the SQL Server instance
- Use the Proxy as a Run As option in the Job step which will be executing the task
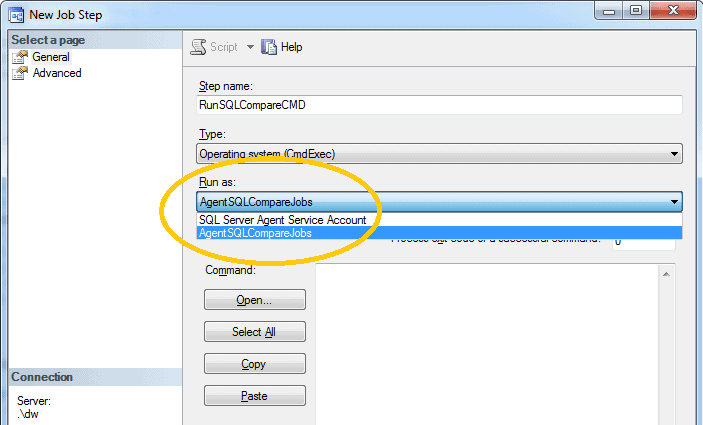
Figure 2
Error handling and logging
If you were running this as a Windows Scheduler batch job, then you’d need a version of the batch script (Listing 1) that had decent error handling and logging (see, for example, Listing 4 in my previous article on deploying schema changes to multiple databases using the SQL Compare command line).
However, with a SQL Server Agent job, if you set it up properly, a lot of logging, error-handling and alerting is done for you. For a starter, it will be retained in the Job History, so that is the first place to look.
The Agent Job History, however, may not provide enough data for debugging. This is why it is better to add the /out parameter to the script, which will write the output to a log file on disk.
For example, for a detailed log file with the results of the compare, the script in Listing 1 can be amended at the end like this:
"C:\Program Files (x86)\Red Gate\SQL Compare 12\SQLCompare.exe" /s1:.\DW

/database1:AdventureWorks2014 /s2:. /database2:AdventureWorks2014 /include:Identical /sync

/out:SQLCompareAgentJobLog.txt
Listing 2
Listing 2 will produce a SQLCompareAgentJobLog.txt file in the SQLCompare.exe directory. To save the log file elsewhere, just add a custom path to the /out parameter setting a the end, as demonstrated in Listing 3:
"C:\Program Files (x86)\Red Gate\SQL Compare 12\SQLCompare.exe" /s1:.\DW

/database1:AdventureWorks2014 /s2:. /database2:AdventureWorks2014 /include:Identical /sync

/out:C:\Temp\SQLCompareAgentJobLog.txt
Listing 3
Alerting
If a job like this fails, the relevant people need to be notified immediately. You’ll set up an email account to be notified of errors in any step.
Test the job
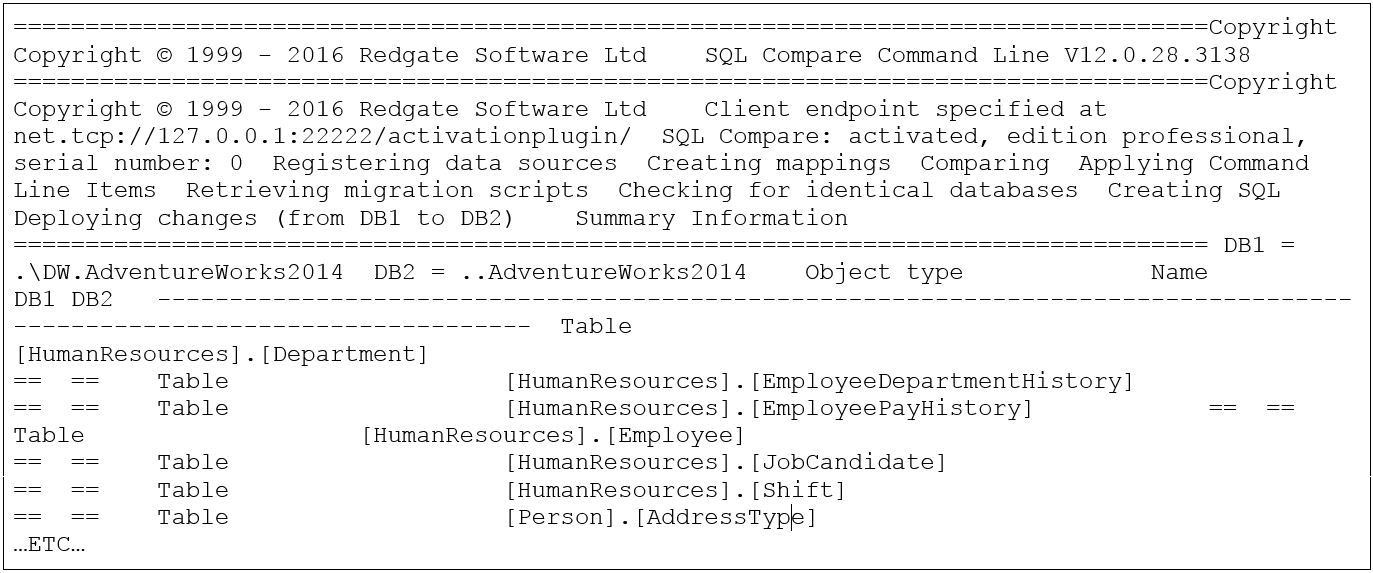
Run the job, and if you receive an error, you’ll need to check the Job History for details or, SQL Compare’s log file if you’ve set up logging as described above.
If the job succeeds, you’ll see a log output like this:
However, in order to really make sure that the job works, simply create a new TestCMD table in the source database:
|
1 2 3 4 5 |
CREATE TABLE [dbo].[TestCMD] ( [ID] [INT] NULL, [TestCMD] [NCHAR](10) NULL ); |
Listing 4
Now, run the SyncHotfixEnvironmentCMD job and check that the table exists in the destination database.
Schedule the job
The job can be scheduled to run on a regular basis, and this is straight-forward using the Schedules tab of the Agent Job setup screen:
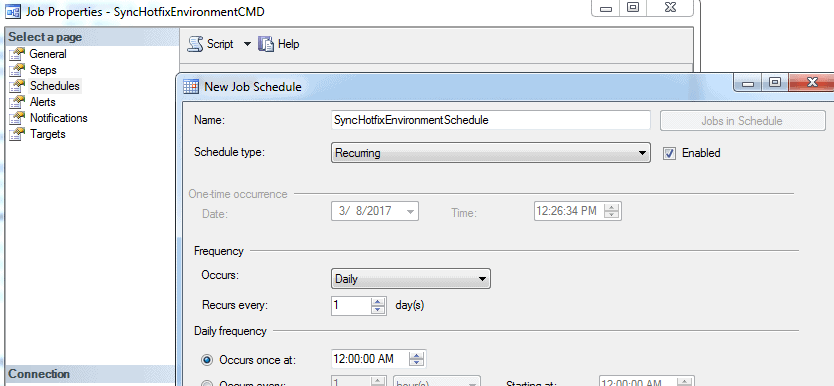
Figure 3
Setting up the agent job with PowerShell
We can perform the same task with PowerShell, using the following general syntax:
Set-Alias SQLCompare 'C:\Program Files (x86)\Red Gate\SQL Compare 12\SQLCompare.exe' -Scope Script

sqlcompare /s1:SourceServer\SourceInstance /database1:SourceDatabase /s2:TargetServer\TargetInstance /database2:TargetDatabase /include:Identical /sync
Therefore, for my example, the PowerShell script will look as shown in Listing 5.
|
1 2 |
Set-Alias SQLCompare 'C:\Program Files (x86)\Red Gate\SQL Compare 12\SQLCompare.exe' -Scope Script sqlcompare /s1:.\DW /database1:AdventureWorks2014 /s2:. /database2:AdventureWorks2014 /include:Identical /sync |
Listing 5
We’ll setup a new SQL Agent job called SyncHotfixEnvironmentPS with a job step called RunSQLComparePS, and then simply paste Listing 5 into the command text box for the job step. All the previous discussion about security, logging, and alerting applies equally here.
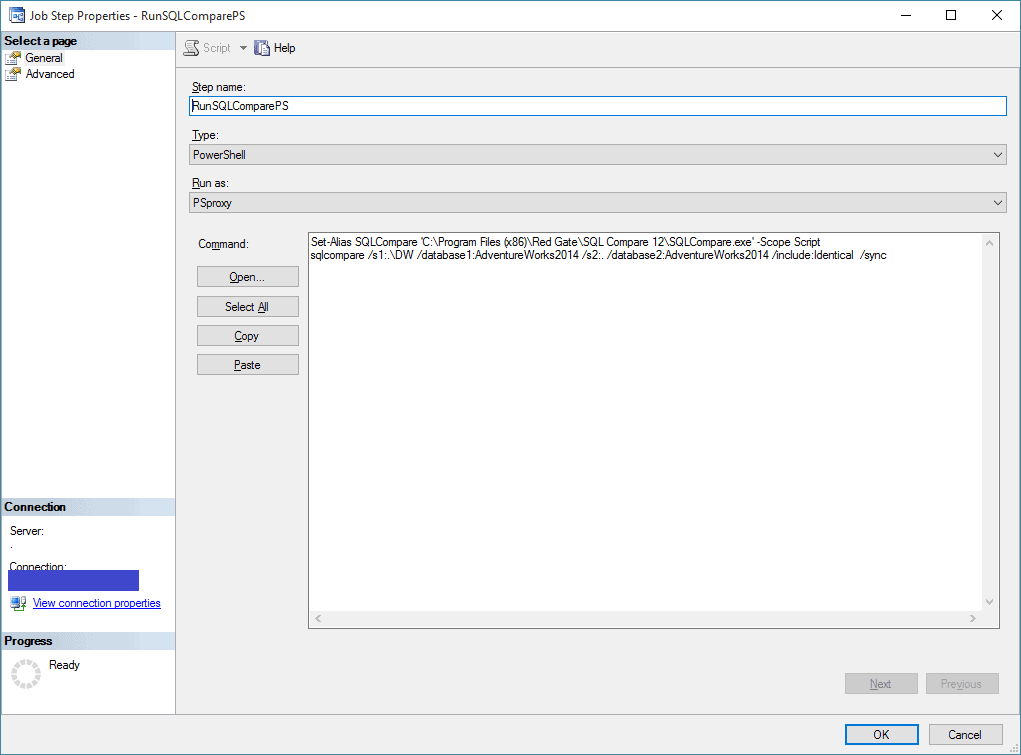
Figure 4
Re-run the job and verify in the job history that the job ran successfully. If desired, you can repeat the test from before, creating a new table, or changing an existing table, on the source database, running the job, and ensuring the changes are deployed to the target.
Syncing schemas when you don’t have direct access to production
Depending on the environment and the industry, access to the production system may be very restricted, and thus SQL Compare may not have access rights to perform direct comparisons between a production database and the hotfix database.
In such cases, SQL Compare can work with a backup the source, or the DDL scripts in the VSC, when we can trust the VCS is always in sync with the prod environment.
The third option is to use a DacPac file as a source for SQL Compare, as described in one of my previous articles.
Conclusion
In this article, we saw how easy it is to setup automated scheduled SQL Server Agent jobs to run schema comparisons between two databases. In this case, we use two different methods – a CMD script and a PowerShell script, to achieve the same result.
Often, there will be good operational reasons to prevent this sort of scheduled task being run on a Production server. In the example in this article, we ran the task on the Hotfix server, from the Hotfix server’s SQL Agent, using a proxy account that had the right of access to the metadata of the production system. Alternatively, it can be run from Windows Scheduler, but you’d lose the SQL Agent’s features of handling errors, logging and alerting.
In cases where direct access to production is prohibited, you’d want to compare from a backup, or a DacPac, rather than from a live server.
If you’re not already using SQL Compare, download a fully-functional 14-day trial and discover how it lets you save time comparing and deploying SQL Server database schemas.
Tools in this post
You may also like
-

Article
Keeping track of history: SQL Compare and Temporal Tables
Asha Patel introduces SQL Compare 13's support for deploying changes to temporal tables,
-

Article
SQL Change Automation Scripting: Getting Data into a Target Database
Your strategy for loading a freshly built database with data will depend on how much you need. If just a few rows, then single-row INSERT statements will be fine, but for more than that you'll need to build insert the rows using native-format BCP. Fortunately, SQL Change Automation (SCA) can be used with either strategy, as Phil Factor demonstrates.
-
Article
SQL Change Automation with PowerShell Scripts: getting up-and-running
Provides a PowerShell automation script that will build a SQL Server database from the scripts in source control, document the database and then deploy it as a NuGet package, using it to update the schema of a live database.
-

Article
How to Generate Fake Test Data for SQL Server
How to use a SQL random data generator to fill SQL Server tables with realistic test data, to shift left database unit testing, integration testing and performance testing so that it is performed during the early stages of database development.
-
Article
Pseudonymizing a Database with Realistic Data for Development Work
How to use SQL Data Generator, and PowerShell to obfuscate personal data (names), while retaining the same distribution of data, so that the test database behaves like the original.


