Getting Started with Flyway and SQL Server
Phil Factor explains how to get started with Flyway, as simply as possible, using PowerShell. This article provides a practice set of database automation scripts that will build a SQL Server database, and then update it, running a series of migrations scripts that make some schema alterations, and load the database with test data.
If you’re unfamiliar with Flyway, it is probably a good idea just to start off simply and get a feel for how it works with your database system, in this case SQL Server. Flyway can be complex but has a comprehensive help system for its various flags, actions and options. It pays to experiment, try things out and to get something up and running quickly.
I find PowerShell the easiest way of automating database migrations, using Flyway, but you can use Flyway within a DOS or Linux batch script too. I’ll provide a practice set of SQL migration files, and PowerShell scripts, that will recreate the old Sybase Pubs database. First, I’ll just run some simple build scripts and then we’ll get to what Flyway best: database migrations. We’ll use PowerShell and Flyway to build the original database and then run a series of migration scripts that make successive modifications, first adding the original pubs data, then making a few schema adjustments to allow for a much larger data set, and finally adding a much larger dataset (generated using SQL Data Generator).
You can find all these scripts in the GitHub project accompanying this article.
Installing Flyway using Chocolatey
If you haven’t installed Flyway, you can get the latest version direct from the Redgate site. However, probably the most efficient way is to install it from Chocolatey, as it is then easier to stay up to date.
|
1 2 3 4 |
<# once Chocolatey has installed Flyway, you can then create an Alias and run it in a similar way to a Cmdlet #> #create an alias for the commandline Flyway, making sure you have the right version, Set-Alias Flyway 'C:\ProgramData\chocolatey\lib\flyway.commandline\tools\flyway-7.3.1\flyway.cmd' -Scope local |
Automating simple database builds using Flyway
Flyway will migrate a database to the version you need. It looks for scripts that must be applied, sorts them, and applies them in order, directly against the database. For further details on how Flyway works, see my previous article, Managing database changes using Flyway: an Overview.
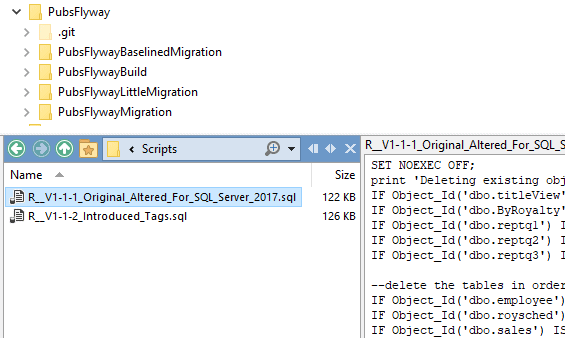
We have a GitHub project directory called PubsFlyway with a series of sub-project directories for each task we’ll tackle, each of which has a subdirectory called ‘Scripts’.
We’ll start off by using Flyway to run a build process, supplying a build script for every version. Therefore, the PubsFlywayBuild directory has in its Scripts directory two build scripts, one that builds a classic version of Pubs, modified slightly so that it will run on SQL Server 2017, and fills it with sample data (v.1.1.1), and one that builds a version of Pubs with support for tags, allowing a book to have multiple topics, and fills it with sample data (v1.1.12).
The capital R, followed by a double underscore, at the beginning of each script tells Flyway that these are ‘repeatable’ files, meaning it will only be executed if it hasn’t been run before on that database, or if it’s been changed, and it exists outside the migrations versioning system. This means that Flyway does not record the version number in the schema_version table along with the result of applying the script.
After that R__, we’ve put in a version number and a comment. Flyway will read all this as a comment that gets displayed in the history. However, it doesn’t read the version in this case because repeatable migration files don’t have a version. As we’re not applying the files in sequence, that’s all that either Flyway or we need to know.
Each new build script will need to do its own housekeeping of tearing down the old version and building the new one. When we execute this Scripts folder for an empty database target, Flyway will create and then drop each database version in turn. To avoid this, you either remove the V1-1-2 script or rename the first character to something else like ‘d‘ (for deleted). By taking the second alternative, Flyway will just ignore it.
We now create an empty Pubs Database. We’ll call it PubsTwo and we’re now ready to test-run Flyway.
Create the config file on the fly
With Flyway, you provide an action (such as “migrate”) via command line parameters. Options are supplied to Flyway either by one or more config files, or as command-line parameters. Toggles such as using verbose mode are also done via command line parameters
We’re going to start off by using a config file for the options so, before running the build, we do a one-off routine that just writes a config file for this project. In this example, the project folder is PubsFlywayBuild. It pays to have all the information that is specific to the project, such as the paths to the script files, and maybe also location and name of the server. We’ll put the credentials in there too, just for the time being.
|
1 2 3 4 5 6 7 8 9 10 11 12 13 14 15 16 17 18 19 20 21 22 23 |
$ProjectFolder = 'MyFullPath' #your project folder $Server = 'NameOfTheServer' #the name or instance of SQL Server $Database = 'PubsTwo'; #The name of the development database that you are using $Password = '' #your password (leave blank if you use windows security) $UserID = '' # your userid (leave blank if you use windows security) $port = '1433' # the port that the service is on cd $ProjectFolder #make this PowerShell's current working directory. # write the config file. This is a once-off if this is based in your user directory. #as credentials will be protected by NTFS security. Later on, we'll have a better way # but then there's more code. $config = "$(if ($UserID -eq '' -or $Password -eq '') { "flyway.url=jdbc:sqlserver://$Server: $port;databaseName=$Database;integratedSecurity=true flyway.locations=filesystem:$ProjectFolder\Scripts" } else { "flyway.url=jdbc:sqlserver://$Server:$port;databaseName=$Database flyway.user=$UserID flyway.password=$Password flyway.locations=filesystem:$ProjectFolder\Scripts" })" <# you can write out the config file at runtime like this, as a UTF8 file #> [IO.File]::WriteAllLines("$ProjectFolder\flyway.conf", $config) |
That’s written all the necessary config information for Flyway, into a file in your project. Now you can do everything with simple flyway commands.
Run the build
We start by building Pubs, in the classic version.
|
1 |
Flyway migrate |
We can now see that Pubs has been built to v1.1.1. It records the fact that it has done the updated build in the flyway_schema_history table. You can see this by running:
|
1 |
Flyway info |
Notice that there is no version entered for repeatable migrations, though we can see it from the Description column.
Right. Now we’ll build the next version, adding support for tags and making a few other refinements. We add the new build script to the directory as ‘R__V1-1-2_Introduced_Tags.sql’ or replace the ‘d’ with the ‘R’ for repeatable. We run Flyway again:
|
1 |
Flyway migrate |
We can now see that Pubs has been built to version 1.1.2. It ignores the original file because we haven’t changed it and again records the fact that it has done the updated build in the history table, which we can check again using flyway info, as before.
If anything goes wrong, such as getting the server name or database wrong, we can put Flyway into ‘verbose’ mode by using:
|
1 |
Flyway -X migrate |
The most likely cause of a problem is that either a config file or a migration file has been encoded wrongly. When you create your own, it’s best to stick to UTF-8 encoding for all text-based files because that’s what Flyway expects, and even Git can’t properly use UTF-16. See the later section Encoding Flyway migration files for more details on avoiding these issues.
We can carry on the process, if we want to, by adding build scripts for each subsequent version and executing flyway migrate when the project directory is PowerShell’s active directory. As discussed earlier, each build script will need to tear down the old version before building the new one. You’ll see how that’s done by examining the scripts.
When you are finished, remember to overwrite any credentials like this:
|
1 2 3 4 5 |
[IO.File]::WriteAllLines("$ProjectFolder\flyway.conf", "flyway.url=jdbc:sqlserver://NameOfMyServer;databaseName=MyDatabase flyway.user=YourGoodSelf flyway.password=inadequateButMemorable flyway.locations=filesystem:MyPath") |
So far, so good. We are getting each of our build scripts being executed within a transaction so that we are not left with the debris of a half-complete build if it fails, and the current version is being recorded in the description column of the flyway_schema_history table.
Migrating databases between versions using Flyway
By using build scripts, as we did in the previous section, we lose Flyway’s great advantage. Although the ‘repeatable’ scripts get only executed once, unless you subsequently alter them, this means that, if you decide to build a different database as a copy of the first, this new copy will, the first time Flyway does a migration, get repeatedly built, once for every script you leave in the directory, and you need to leave repeatable files in the directory once you’ve placed them there as they are recorded in the flyway_schema_history table.
Instead, we’ll use Flyway to build the initial version of the database, and then migrate it.
Doing a simple Flyway migration, using a conf file for settings
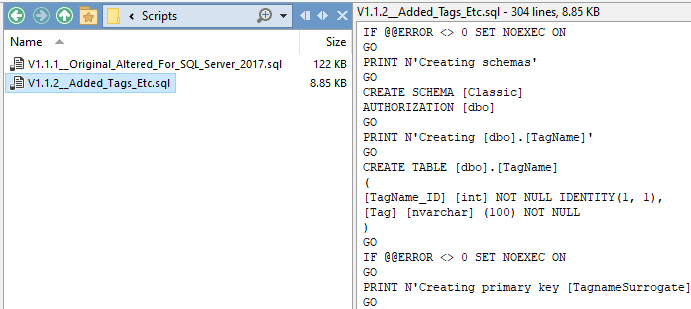
We set up the scripts folder in a new project folder called PubsFlywayLittleMigration, then run the earlier code to set up the conf file with the correct project folder, server, database, credentials and script-folder location.
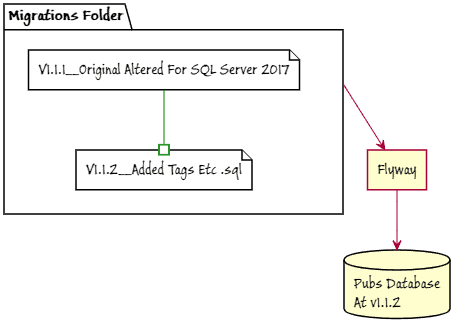
We put the two files in the Scripts folder. The v1.1.1 script s the same build script we used in the previous section but the v1.1.2 script is now simply a migration script for v1.1.1 to v1.1.2.
Now, every time we run Flyway migrate it will execute both the scripts in order, as shown below:
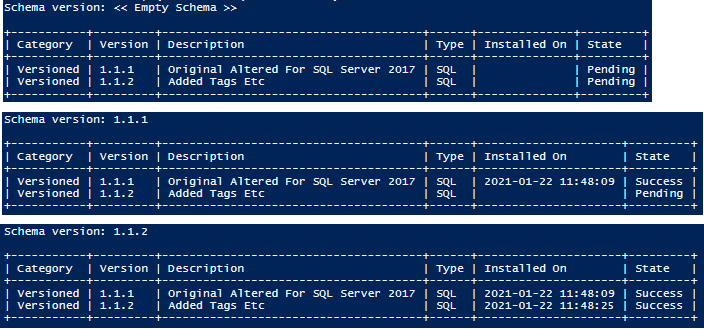
Normally we’d do just that, but to illustrate the process, we’ll execute each file, one after the other. We start with the ‘clean’ action, to remove all existing schema objects.
|
1 2 3 4 5 6 7 |
cd 'MyPath\PubsFlywayLittleMigration' Flyway clean flyway info flyway migrate '-target=1.1.1' flyway info flyway migrate '-target=1.1.2' flyway info |
We get the changes in the flyway_schema_history table revealed each time Flyway presents the info.
We’ve ended up with the correct target version. When you’re finished, remember to overwrite any credentials, as before.
With Flyway, as we’ve seen, you provide an action via parameters. Basically, you must tell Flyway in a parameter the action you want to achieve, such as ‘migrate’, ‘clean’, ‘info’, ‘validate’, ‘baseline’ ‘repair’ or ‘undo’ (the last one is available only in the Flyway Teams edition).
Then you need to specify options, either as parameters or from the configuration file. You can have global configurations stored in either the install directory, current directory or user home directory. Additionally, you can specify a ‘project’ directory either as a parameter or by passing the location through standard input.
Finally, you add whatever flags you need as parameters, the most important one being the -X meaning ‘verbose’ so you can get a running commentary on what Flyway is doing.
The advantage of putting one of your config files in the user home directory, or a subdirectory of it, is that credentials, particularly passwords, are protected there from being seen by other users. Configuration that is relevant to all users can be placed in the installation directory, and all the details for the project can be placed within the project. You can then run the current project by making that the current directory. After looking in the install directory for a flyway.conf configuration file, it then checks the user area, and then finally the current directory. It will find your config file that tells it where to find the database, credentials if necessary, and the script files.
A multi-file migration by ‘splatting’ command line parameters
For this final example, we’ll run a series of migration scripts from the command line. We use the PRINT command in each script so that Flyway gives a running commentary of what we are doing.
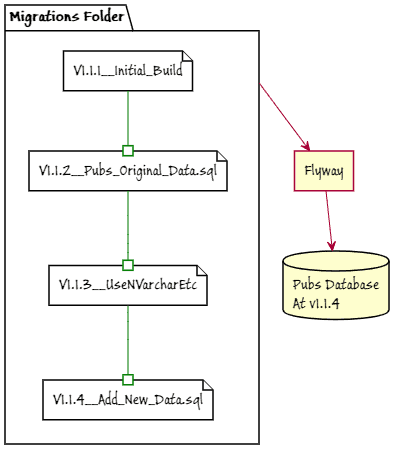
The first script is the same Pubs build script as before (v1.1.1). Next, we import its original data (v1.1.2). We then alter the database, to allow it to use NVARCHARs, for example, so that it can hold a reasonably large quantity of data of up to 5000 rows generated via SQL Data Generator (v1.1.3), and finally add the generated data (v1.1.4). You can find all these scripts in the GitHub project accompanying this article.
Encoding Flyway migration files
I’ve provided the sample files you need to get you airborne, in the GitHub project accompanying this article. However, when you do your own migration files, they are best encoded as UTF-8 because this is what Flyway expects. If you get it wrong, you might see an error mentioning a ‘checksum’.
You can specify the encoding in the config file but you need to be aware that if you change the encoding after migrations have been run, the calculated checksums will be invalidated, and will then require a flyway repair.
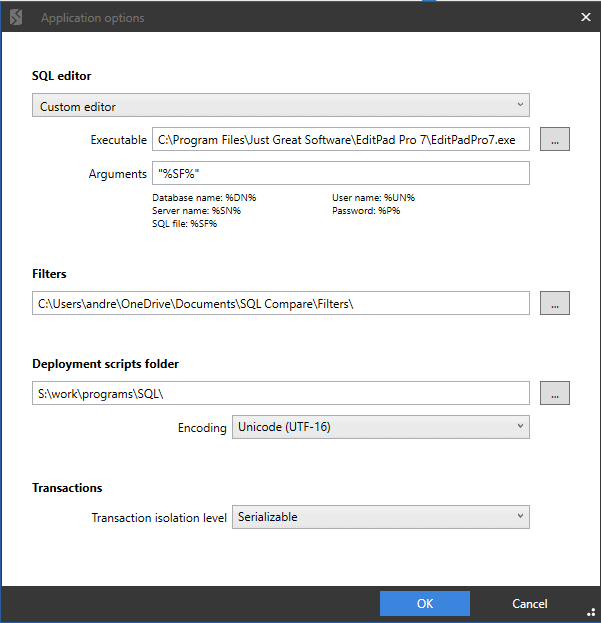
SSMS and some utilities such as SQL Compare and SQL Change Automation save these script files as UTF-16 little-endian. SQL Compare and SQL Data Compare users can specify the output type for scripts in the Tools > Applications-General window:
SQL Server’s SSMS will edit these UTF-8 files but, again, it is tempted to create SQL files as utf16 – little endian. To change its behavior, you need to change the encoding for the sample SQLFile.sql stored in various places according to version. This is where my user and machine defaults are stored. Other than doing this, there seem to be no supported way of changing the default encoding.
|
1 2 |
"$($env:HOMEDRIVE)$($env:HOMEPATH)\AppData\Roaming\Microsoft\SQL Server Management Studio\14.0\Templates\Sql" "${env:ProgramFiles(x86)}\Microsoft SQL Server\140\Tools\Binn\ManagementStudio\SqlWorkbenchProjectltems\Sql" |
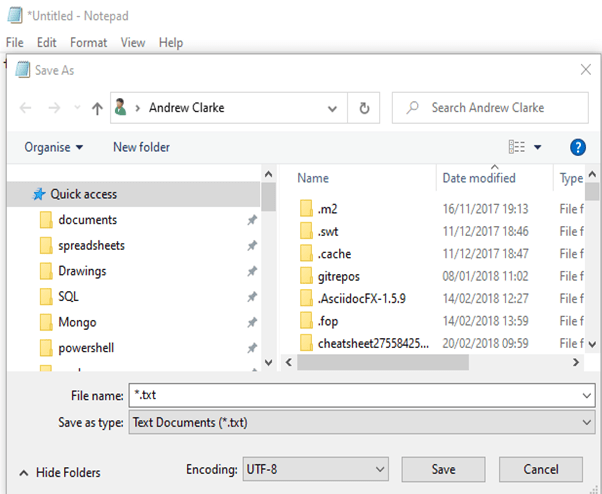
Beyond that, there are plenty of ways to convert a file to UTF-8. Microsoft recommend using Notepad. In the following screen clip, you’ll see that you can specify the encoding.
In PowerShell, you will always get UTF-8 if you use the [IO.File]::WriteAllLines() string method, which is what I use to generate the config files in the examples in this article.
Running the Flyway migration
To kick things off, create an empty database called PubsThree in a handy SQL Server nearby. Then place the files in a scripts folder in your project. I’ve used PubsFlywayMigration.
Again, when we run Flyway migrate it will execute all the scripts in order, as shown below:
Now you can try it out.
|
1 2 3 4 5 6 7 8 |
#create an alias for the commandline Flyway, Set-Alias Flyway 'C:\ProgramData\chocolatey\lib\flyway.commandline\tools\flyway-7.3.1\flyway.cmd' -Scope local $ProjectFolder='MyPathToTheProjectFiles' $Server='MyServer' $Database='PubsThree'; $Password='MyPassword' $UserID='MyUserID' $port = '1433' # the port that the service is on |
This time, instead of using a local config file to provide the details to flyway, we’ll use command line parameters. We can provide these easily in PowerShell by ‘splatting’ them as an array.
The advantage, of course, is that any credentials you must use can be made volatile if we can read them from an encrypted file in the user folder. However, this rather complicates the code, so here we’ll stick with supplying the credentials directly.
|
1 2 3 4 5 6 7 8 9 10 11 12 13 14 15 16 17 18 19 20 |
if ($userID -eq '') { $FlyWayArgs= @("-url=jdbc:sqlserver://$($Server):$port;databaseName=$Database;integratedSecurity=true"; <# provide server and password #> "-locations=filesystem:$ProjectFolder\Scripts")<# the migration folder #> } else {<# just to make things easier to see and document, we'll splat the parameters to FlyWay via a hashtable, but it could just as easily be do as a conventional command line#> $FlyWayArgs= @("-user=$UserID"; <# you only need this and password if there is no domain authentication #> "-password=$Password"; <# Normally, you'd have a routine to provide this dynamically #> "-url=jdbc:sqlserver://$($Server):$port;databaseName=$Database"; <# provide server and password #> "-locations=filesystem:$ProjectFolder\Scripts")<# the migration folder #> } if (-not (Test-Path "$ProjectFolder\Scripts")) { New-Item -ItemType Directory -Path "$ProjectFolder\Scripts" -Force } cls Flyway clean @FlywayArgs # remove all objects from the database, including baselines flyway migrate @FlywayArgs # Do the complete migration flyway info @FlywayArgs # Check that all went well |
You can, of course, run it to whatever version you want. If what you want is the good old ‘golden’ Pubs, you’d run:
|
1 |
Flyway migrate @FlywayArgs '-target=1.1.1' # get to version 1.1.1 |
Remember that the only way of going backwards to a previous version is to do a ‘clean’ first, as above.
Too Many Migrations?
Flyway appeals to the way developers often work, because it provides a ‘canteen’ system of delivering databases at the version that you want. However, at this stage, an experienced developer might feel nervous about the need for so many migrations, providing a long trail of development or changes. There will be puzzlement about the ‘source of truth’ in source control. In fact, there will be a host of questions that will need to be answered. As you might have guessed, there generally are answers, because the system is so flexible. We’ll tackle some of these in later articles.
Flyway encourages interactive use as well as entirely automated use. It is useful to try out experiments, so hopefully these three examples will prove to be useful.
Next articles in the series:
- Flyway Baselines and Consolidations – How to baseline an existing database and also consolidate many migration scripts into a single file
- Customizing Database Deployments using Flyway Callbacks and Placeholders – How to customize a database deployment process, incorporating tasks such stamping a version number into the latest database build, or writing to the SQL Server log.
