


Using the new Flyway Diff commands
Many of my customers are using Flyway Enterprise to create migration scripts that will then be used to deploy database changes. They’ve been using Flyway Desktop, but some of them have expressed interest in using command line instead of the desktop.
NOTE: Migration script creation in Flyway Enterprise is now available for SQL Server, PostgreSQL, Oracle, and MySQL projects.
Redgate recently released a new set of commands that can be used in place of Flyway Desktop. Many customers are interested in this because their developers prefer to work with command line, or they are thinking about automating the entire process. Be sure to upgrade to version 7.6.11 or later of Flyway Desktop to get the new commands. The Flyway CLI version is 10.22.0 or later.
Refresher on Flyway Desktop
The typical workflow when using Flyway Desktop Enterprise in a migrations-based project goes like this:
- A change is made, such as a new table, in a development database.
- Flyway Desktop captures that change and updates the schema-model folder. The schema-model contains one file per object found in the database.
- Flyway Desktop compares the schema-model folder to the migrations folder via the shadow database and reports the differences.
- A new migration script is created based on the differences found in the last step.
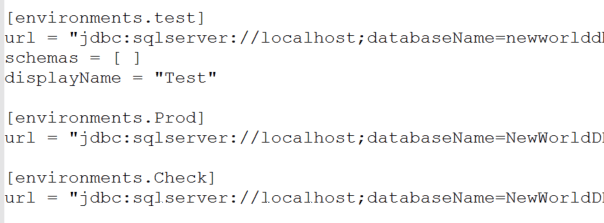
Environments
The new diff verbs take advantage of the environments configuration that Redgate introduced in late 2023. This means that the toml configuration file must have an environment section for each database target. It will look something like this:
After some testing, I found that you can define the environment in the command line. See this article to learn how to define the environment directly in the flyway command, bypassing the need to define the targets in the file.
Even if you don’t plan to use Flyway Desktop to generate migrations, it’s a convenient way to set up your project initially, especially when defining the environments.
You must also be sure to include the schema model location in the file as well:
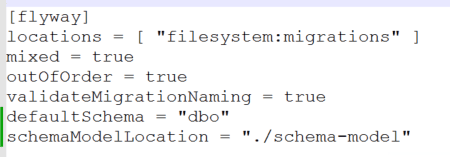
Flyway desktop will automatically add the schemaModelLocation to the toml file at project creation time if you are using compatible Flyway Desktop version.
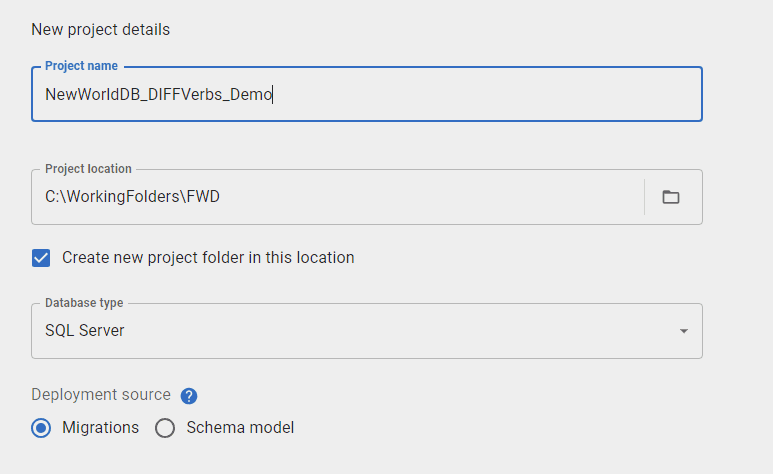
Project setup
To make sure that the project is set up correctly to generate migrations from command line, follow these steps in Flyway Desktop:
- Create the project, either SQL Server, PostgreSQL, Oracle, or MySQL.
- Provide the connection information for the development database. This database should be populated with objects and be up to date with your production database schema. Note that the connection information is saved to user settings. The user settings are not saved to the online repo by default.
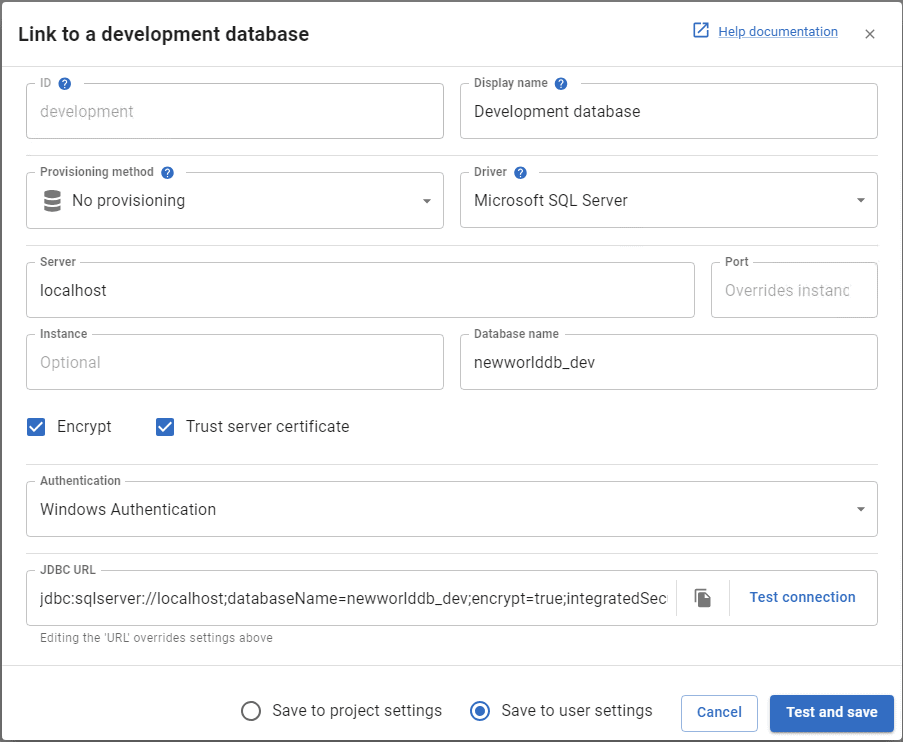
- You’ll be prompted to save the objects into the schema model but ignore this for now. You will use the new commands to save to the schema model later in the article.
- Click the Generate migrations tab and click Set up shadow database.
- Enter the connection information for the shadow database. The shadow database is a workspace for Flyway when generating migrations, and objects may be deleted from this database at any time.
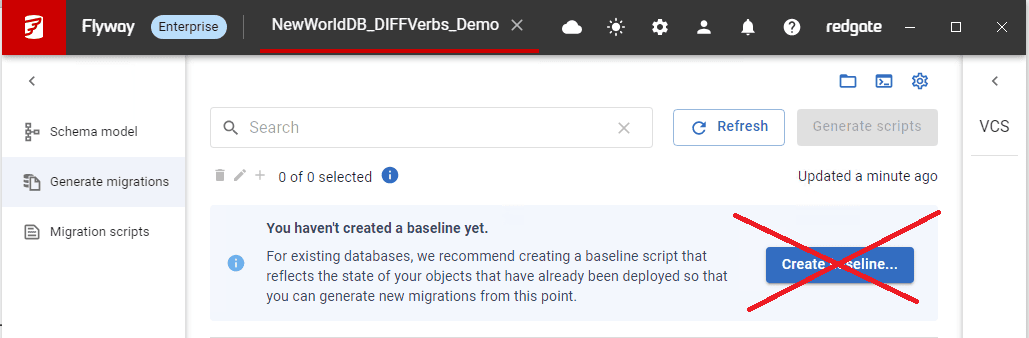
- Since the migration folder is empty, you will be prompted to create a baseline script. Ignore this prompt for now, as you’ll generate the baseline script with the new commands later in the article.
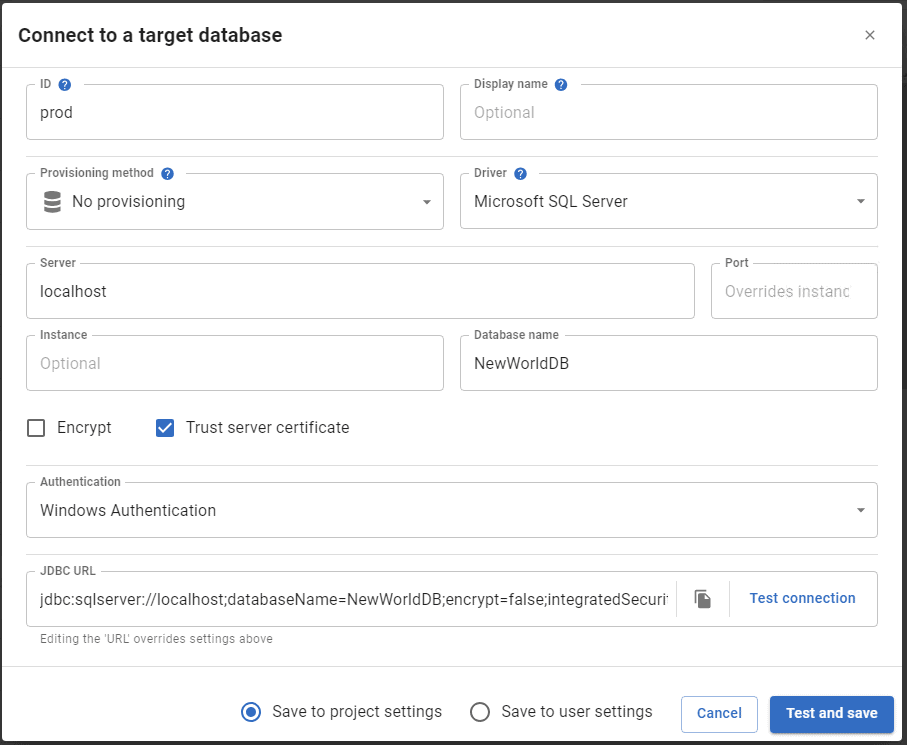
- On the Migrations scripts tab, click Manage target databases.
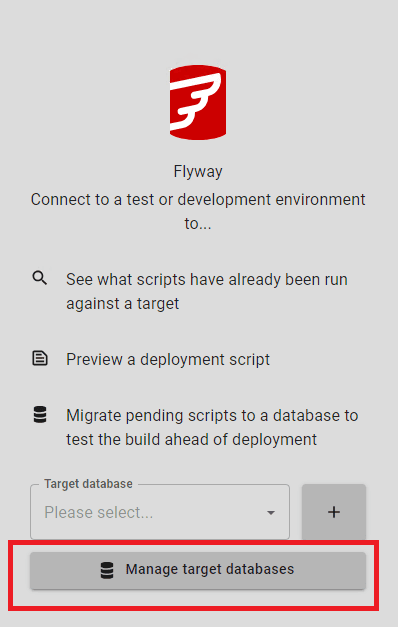
- Fill in the connection information for a target database that will be used for creating the baseline script. By default, the ID will be “target1.” Be sure to change the ID to something more meaningful.
You should now have a Flyway Enterprise project with the correct toml file in place.
NOTE: There is also a new command (init) to create a project for you from command line, however, you would have to manually add the environments sections to the toml files.
Saving the schema model
Now that the project is in place, and you understand environments and the typical workflow, it’s time to see the new commands in action.
Recall that the first thing Flyway Desktop does is compare the development database to the schema-model folder. Since this is at project start up, the schema-model is empty.
NOTE: The examples in this article use PowerShell, but the Flyway CLI is also compatible with bash and Windows command line. Any parameters that have two-part or three-part names must be in quotes when using PowerShell. PowerShell is recommended for this process.
Follow these steps:
- Open a command window at the root of your Flyway project. You can do this by clicking the folder icon in the top right of Flyway Desktop.
- Run this command:
|
1
|
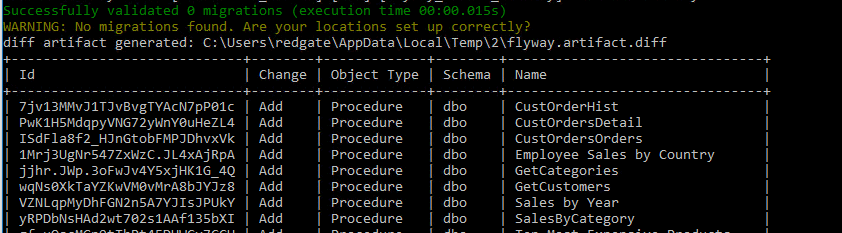
flyway diff "-diff.source=development" "-diff.target=schemaModel"
|
You’ll see a table returned of all the objects in the development database:
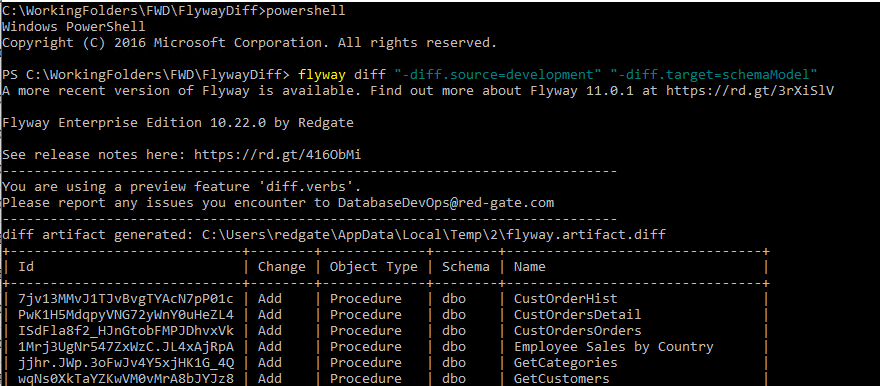
The flyway diff command generates an artifact with information about the changes; in this case it’s all the objects found in the source. The source and target must both be defined in the toml file.
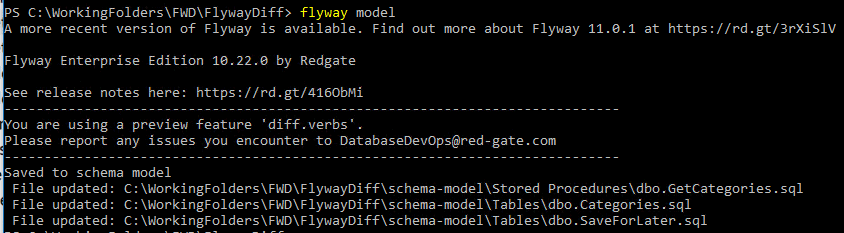
- The next step is saving the objects to the schema-model folder. Run this command:
|
1
|
flyway model
|
NOTE: The Flyway verb diffApply has been replaced with the verb model as of version 10.22.0 (2024-11-20)"
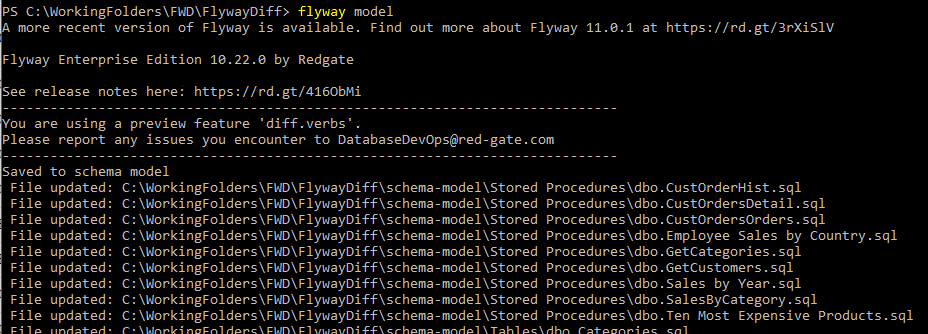
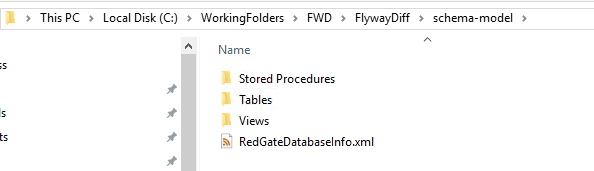
The schema-model folder should now be populated.
Generating a baseline script
The baseline script contains code to populate all the objects in an empty database so that the database schema is in-sync with the beginning of your project. This is used to populate the shadow database and used in the changes and drift report.
When generating a baseline script, you might use production or a copy of production. In this example, my development and production databases are identical, so it doesn’t matter which one is chosen.
- Run this command to generate the diff artifact that will be used for the baseline script:
|
1
|
flyway diff "-diff.source=Prod" "-diff.target=migrations" "-diff.buildEnvironment=shadow"
|
If you scroll down in the results, you’ll see a list of objects in the prod database:
NOTE: you can also specify a file name for the diff artifact and then use that in the command to generate migration scripts.
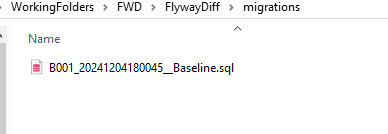
- The next step is to turn the artifact into a baseline script with a date stamp by running these commands in PowerShell:
|
1
2
|
$fileName='B001_' + [DateTime]::Now.ToString("yyyyMMddHHmmss") + '__Baseline.sql'
flyway generate "-generate.types=baseline" "-generate.baselineFilename=$fileName"
|

The new baseline script is in place:
Validating the baseline script
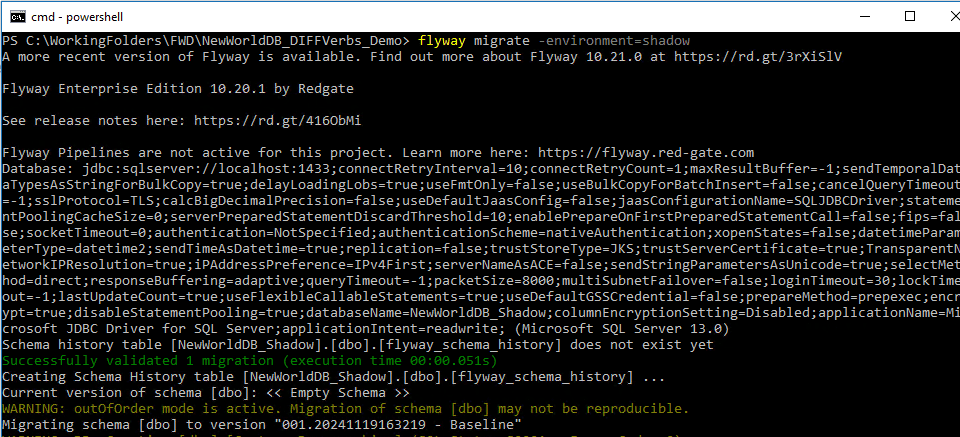
You now have a baseline script to run against an empty database, but will it actually run? There could be problems like invalid objects or missing dependencies. If the script references an object in another database or linked server, those resources must be in place.
You can validate the baseline script by running the flyway migrate command against the shadow database. Don’t panic if there are errors at this point. You’ll have to work through them by filtering invalid objects and adding required dependencies.
|
1
|
flyway migrate -environment=shadow
|
Note: Covering how to resolve baseline script issues is beyond the scope of this article.
Creating versioned migration scripts
Now that your project has the schema-model and baseline script in place, you can begin to make changes that will be deployed to production and other non-production environments.
After making several changes to your development database, follow these steps:
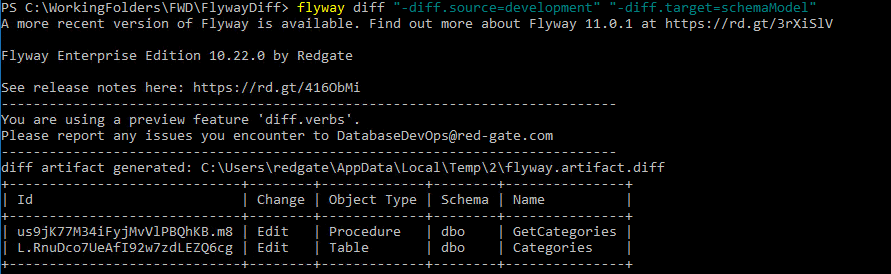
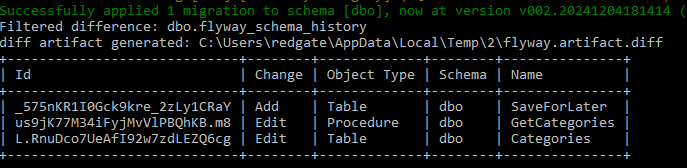
- Run the diff command to find the differences between development and schema-model. This saves an artifact.
|
1
|
flyway diff "-diff.source=development" "-diff.target=schemaModel"
|
You’ll see a list of the changes. In my case, I have a new table and modifications to a stored proc and a table.
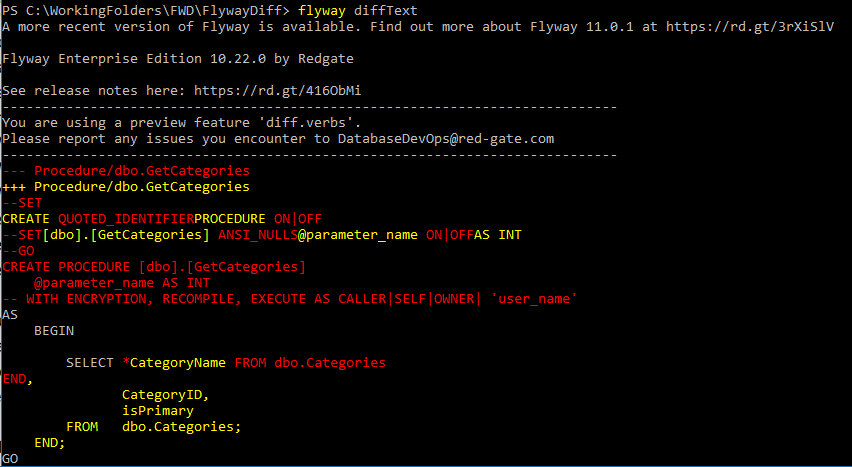
- Run this command to review the changes:
|
1
|
flyway diffText
|
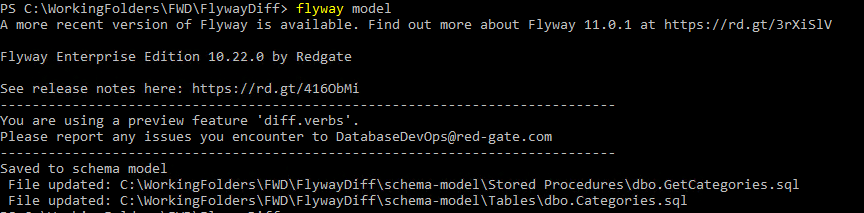
- Now save the changes to the schema-model:
|
1
|
flyway model
|
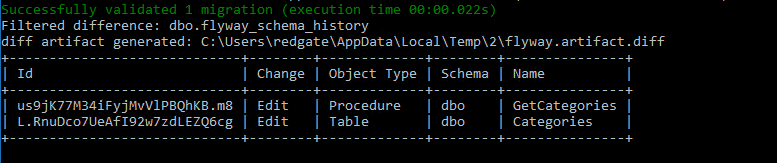
- The next step is to create a migration file and, optionally, an undo file. To do this, compare the schema-model to the migrations folder and then generate the script. Since a migrations folder can’t really be compared to anything, the shadow database will be used.
|
1
|
flyway diff "-diff.source=schemaModel" "-diff.target=migrations" "-diff.buildEnvironment=shadow"
|
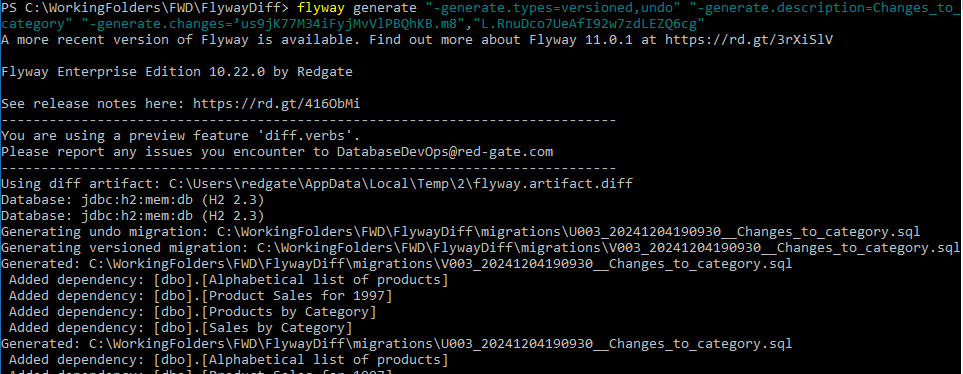
- Then, the flyway generate creates the new versioned and undo files. The command continues the filename pattern set when creating the baseline script.
|
1
|
flyway generate "-generate.types=versioned,undo" "-generate.description=ChangesToCategories"
|
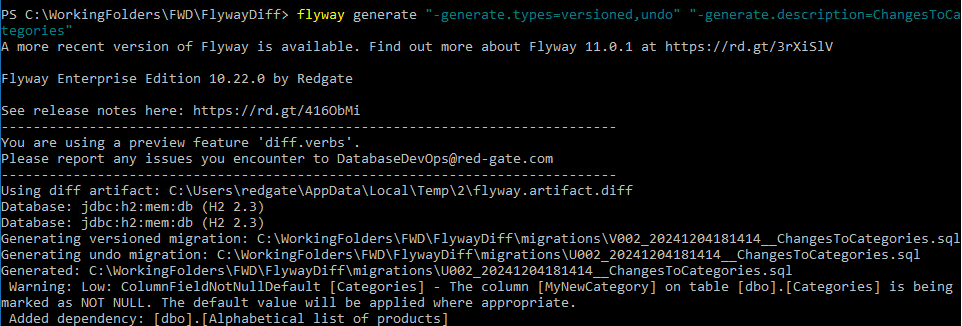
This is the result:
Selecting items
In many cases, you don’t want all the changes to go in the same migration script. This example contains a change to a table and the stored procedure that uses the table. There is also an unrelated change, the new SaveForLater table.
- Run the diff command to find the differences between development and the schema model.
|
1
|
flyway diff "-diff.source=development" "-diff.target=schemaModel"
|
- Run the model command to save the changes to the schema model folder.
|
1
|
flyway model
|
- Run the diff command, comparing the schema model folder to the migrations via the shadow database.
|
1
|
flyway diff "-diff.source=development" "-diff.target=migrations" "-diff.buildEnvironment=shadow"
|
- Run the generate command along with the -generate.changes parameter specifying the two changes that should be included.
|
1
|
flyway generate "-generate.types=versioned,undo" "-generate.description=Changes_to_category" "-generate.changes=’us9jK77M34iFyjMvVlPBQhKB.m8","L.RnuDco7UeAfI92w7zdLEZQ6cg"
|
The new file contains only the changes specified:
At this point, you can either generate a new diff.artifact because it will contain only the remaining change or specify the change. It’s probably a good idea to rerun diff.
What’s next?
The project is ready to be committed and pushed to GitHub. You’ll use the normal git commands to do that. You might want to create a pipeline or workflow in your favorite integration/deployment tools such as GitHub Actions or Octopus Deploy. You can run commands like flyway migrate or undo from command line as well.
When other developers are ready to start working on the project, be sure that they clone the repository down. They will share the project – not create a new one.
This article covered these commands. Take a look at the Flyway docs to learn more.
Conclusion
The new flyway commands to keep a schema model in sync and generate migrations is ready for you to try. It does most of the tasks that Flyway Desktop does, but without the UI. Some teams may prefer to use command line, while others may want to automate the entire process. Flyway has a ton of flexibility. It’s up to you how you use it to meet your goals.
This document contains proprietary information and is protected by copyright law.
Copyright © 2026 Red Gate Software Limited. All rights reserved
Tools in this post
You may also like

Blog
Why Organizations choose Flyway

Blog
Redgate Flyway 2025 year in review

Blog
Loading comments...