Using SQL Data Compare to Sync Reference Data
Let's say your QA team maintain two similar test databases. They run tests to verify that different versions of the same application still produce the same, correct results. Therefore, any differences in the test data, between the two databases, needs to be corrected before the tests start. This is the sort of task for which SQL Data Compare is ideally suited, and Bob Sheldon explains how it all works.
SQL Data Compare greatly simplifies the process of syncing data from a source database to a target. It will compare data between two databases and update the target database so that its data (for example static, reference or test data) matches what’s in the source. If rows exist in the source but not in the target, they’re inserted into the target. If rows exist in the target but not in the source, they’re removed from the target. If rows exist in both but have different values, the target data is updated to match the source.
SQL Data Compare will generate the necessary deployment script to make these changes to the target database and will even create a backup of it before carrying out the update. Best of all, you can perform these tasks with just a few point-and-click operations that you can accomplish in relatively short order.
Let’s see how all this works.
Uses for SQL Data Compare
When working with SQL Server, you’ve no doubt had many reasons to need to sync data from one database to another. The process might have involved two test databases, a development database and staging database, a couple of production databases, or any other combination, with the data itself varying from reference data to something far less static.
With many data syncing operations, you need only ensure that the target database has the same data as the source database. In other cases, however, you might need more granular control, choosing which columns and rows to include when updating the target tables. The databases might even have minor schema variations, such as different column or table names.
In such cases, SQL Data Compare can be the ideal tool. You can easily sync data such as static/reference data, test data sets, or transactional data sets that are either relatively small or that are large but have a relatively small number of different rows. SQL Data Compare will sync data even if the databases have different column or table names, as long as the columns have compatible types.
A common requirement is for a team to run two test databases that are identical in most respects, except that a few column names don’t match, and they contain slightly different data. They might also need to sync a subset of data from a production database to a development or test database. Although this approach is generally not recommended, there can be times when pulling down production data is the most expeditious way to get the sample data you need. If you go this route, however, there will likely be data that should not be included, such as personally identifiable information (PII) or data that’s restricted to a subset of users, such as product wholesale prices or employee job ratings. For other possible SQL Data Compare use cases, check out the articles on Red Gate’s Product Learning site. For example, you’ll find a Phil Factor article about how to use SQL Data Compare to test stored procedures or functions.
Whatever the reason, you need to be able to sync data at a granular enough level that lets you choose exactly what data to sync from one database to the other, but this type of syncing can be a tedious undertaking, often consuming more time and effort than you can afford.
SQL Data Compare in Action
To understand how this works, consider the following scenario. You need to sync reference data from the Widget1 database to the Widget2 database. (You can download the script for creating the databases and adding sample data here.) The schemas in these databases are nearly identical, except for a few unmatched column names. Each database contains the following tables for storing the reference data, which is relatively unchanging information (such as categories, subcategories, and names) about the various widgets:
- WidgetCategories
- WidgetSubcategories
- Widgets
- WidgetReferences (essentially a placeholder that can represent any other type of reference data)
The data in these tables is relatively static, although the Widgets table is more likely to be updated than the others, as we add new types of widgets. For the purposes of this example, however, the table will work fine. All you need to get started is to launch SQL Data Compare.
Setting up your project
The first step in comparing the two databases is to set up a project using the Project Configuration dialog box. To launch the dialog box, click the New project button on the toolbar. On my system, I used a local SQL Server instance for both databases, specifying the Widget1 database as the source and the Widget2 database as the target.
Data Sources
The following figure shows the dialog box’s Data sources tab, with the source and target configured.
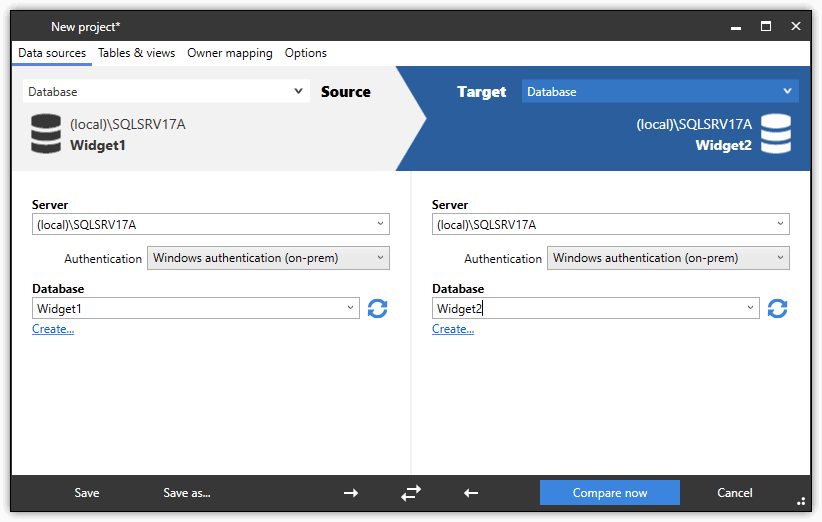
In this case, we’re interested only in comparing databases running on SQL Server instances. Be aware, however that SQL Data Compare also lets you compare SQL Server backup files, script files, and databases linked to SQL Source Control, and you can use any of these options as either your source or target.
Tables & Views
After you configure your data sources, go to the Tables & views tab. Here you’ll see a list of matched tables across the two databases, as shown in the following figure. In this case, SQL Data Compare can match all the tables. If tables cannot be matched, they’re listed in the bottom pane. For example, two tables (one in each database) might have matching columns but the table names themselves are different.
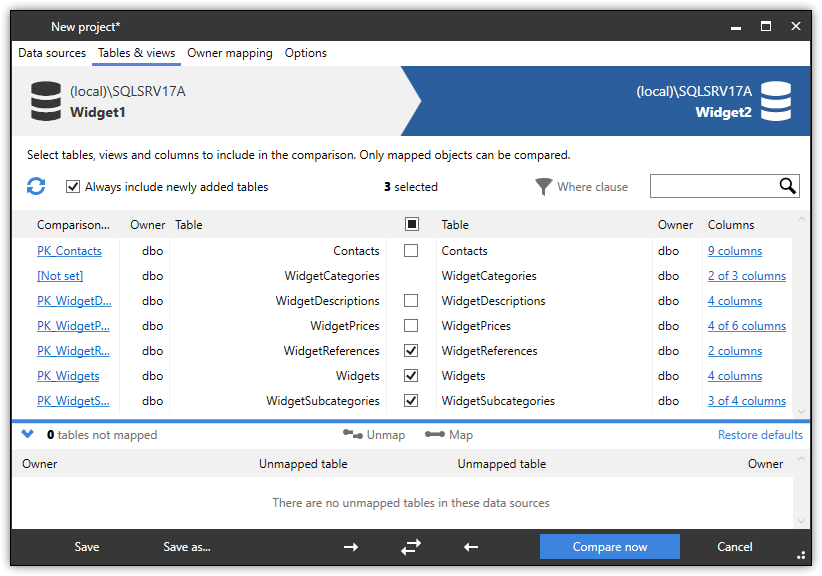
First, notice in the figure that I cleared the check boxes for the tables that I do not want to include in the comparison. This way, the focus remains only on the tables containing static, reference data.
However, the selected column for one of these reference tables, WidgetCategories, has no check box. Although SQL Data Compare can match the two tables, it cannot perform a comparison on them. The dialog box also provides other clues that there’s a problem. The grid’s Comparison key column (first column) shows a value of [Not set] and the Columns column indicates that only two out three columns match. For now, though, leave the WidgetCategories listing as is and just remember that SQL Data Compare can’t compare the two tables in their current state. We’ll return to this issue in a bit. This will allow you to see how the comparison results show tables that cannot be compared.
At the top right of the list, you can also apply WHERE conditions to the identified matches, specifying which rows to include. This can be useful when you want to sync only a subset of data, such as when you’re syncing a test database. For this example, however, you should include all rows.
Now look at the WidgetSubcategories listing. Data Compare was able to compare this table, but again found that one of its four columns in the source does not correspond to a column in the same table in the target, as indicated by the value 3 of 4 columns in the Columns column. To address this issue, click that value to launch the Columns for comparison dialog box, shown in the following figure.
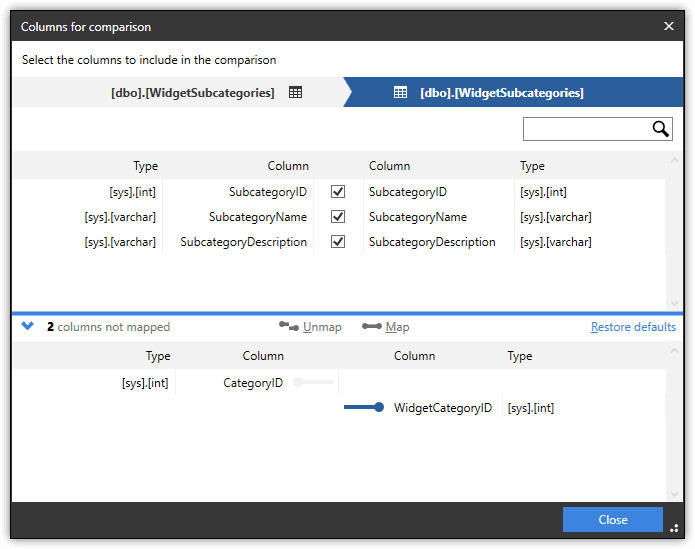
The CategoryID column in the source table is a foreign key and configured with the int data type. The corresponding column in the target table is named WidgetCategoryID, which is configured with the same type. To map the two columns, select each one and click Map. The column pair will be moved to the top pane and selected for inclusion in the comparison.
This brings up another important point. SQL Data Compare lets you choose which columns to include in the comparison. By default, all columns are selected (unless a match can’t be established), but you can specifically exclude a column by clearing its associated check box. In this way, the column will not be included in the comparison or final deployment script. For this exercise, however you should include all columns.
Comparison options
One other setting I configured is on the Options tab. As you can see in the following figure, I selected the Show identical values in results option, which specifies that matching rows should be included in the comparison results. You might choose to omit the rows to simplify the comparison results, although they can be useful in some cases for verification purposes. If you do select this option (now or in the future), be aware that you can’t perform checksum comparisons.
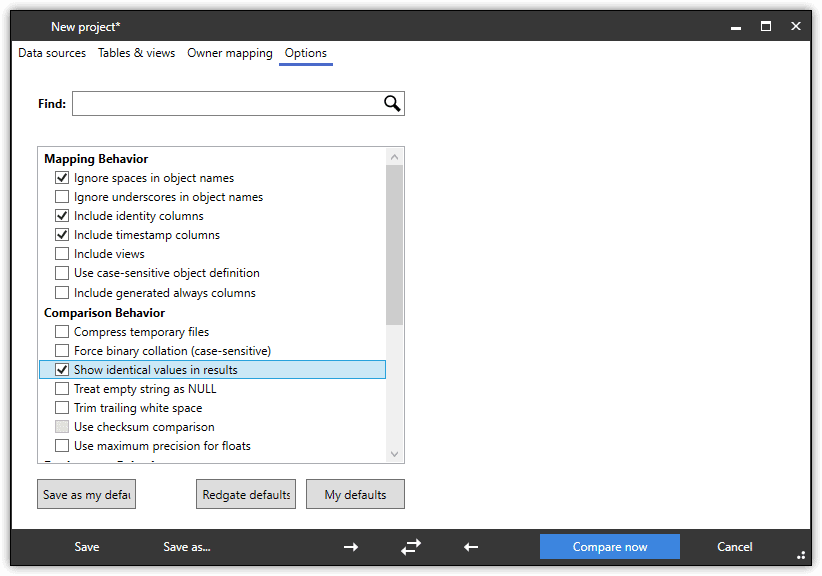
The Options tab provides plenty of other settings as well, such as whether to include views, how to treat NULL values, or what to do with trailing spaces. For this example, you can stick with the default settings, except for Show identical values in results.
Reviewing the table comparisons
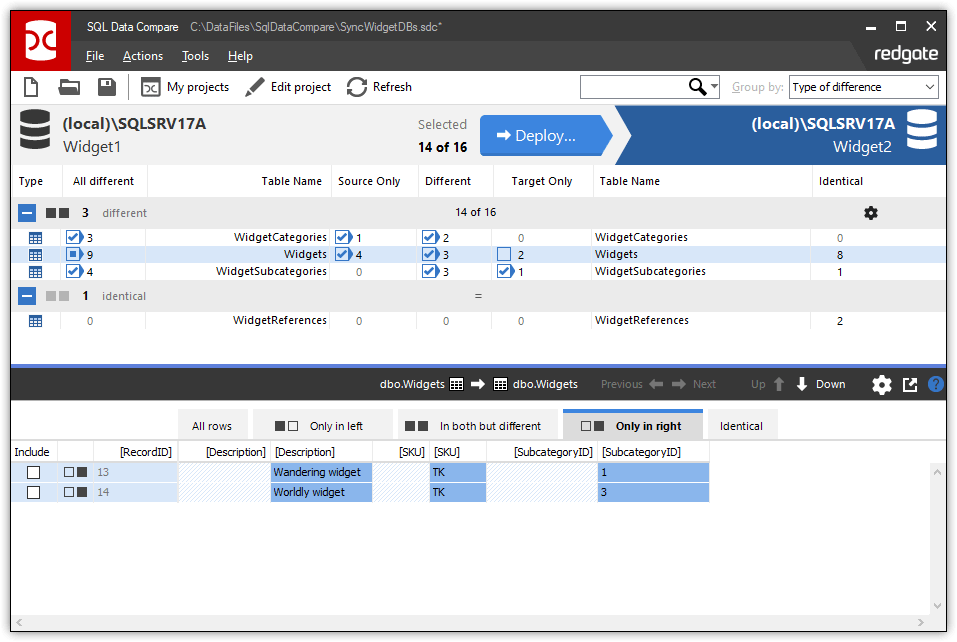
Once you’ve configured the project, be sure to save it, naming it whatever you like. You can then run your comparisons. To do so, simply click the Compare now button and sit back while SQL Data Compare does all the work. When the comparisons are complete, the results are listed in the main interface window, showing which tables include differences, which are identical, and which cannot be compared, as you can see in the following figure.
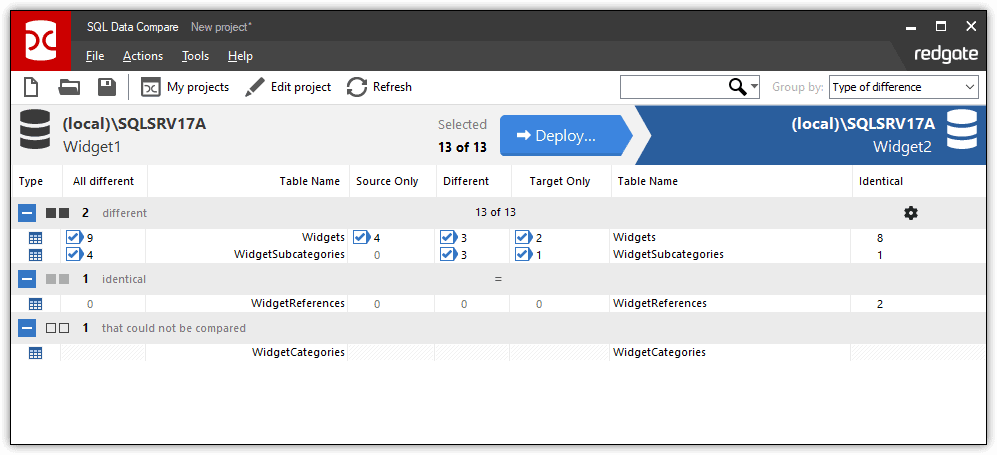
The comparison results show the following information:
- The Widgets tables contain different data.
- The WidgetSubcategories tables contain different data.
- The WidgetReferences tables contain identical data.
- The WidgetCategories tables cannot be compared.
For the tables that include different data, the Source Only column displays the number of rows that exist only in the source table, the Different column displays the number of rows in both tables that match but contain differences, and the Target Only column displays the number of rows that exist only in the target table. The All different column, on the left, provides the number of total differences.
For example, the comparison results for the two Widgets tables, in the Widget1 and Widget2 databases, show the following:
- There are a total of nine differences between the two tables
- The source table contains four rows not included in the target table.
- Both tables contain the same three rows, but with different data.
- The target table contains two rows not included in the source table.
In addition, the Identical column for the Widgets listing indicates that the two tables contain eight identical rows.
You can dig into more details about each table, but before you do that, we should address the issue with the WidgetCategories tables, which currently cannot be compared. To fix this problem, reopen the Project Configuration dialog box, go to the Tables & views tab, and click the [Not set] link associated with the WidgetCategories listing. This launches the Comparison key dialog box, shown in the following figure.
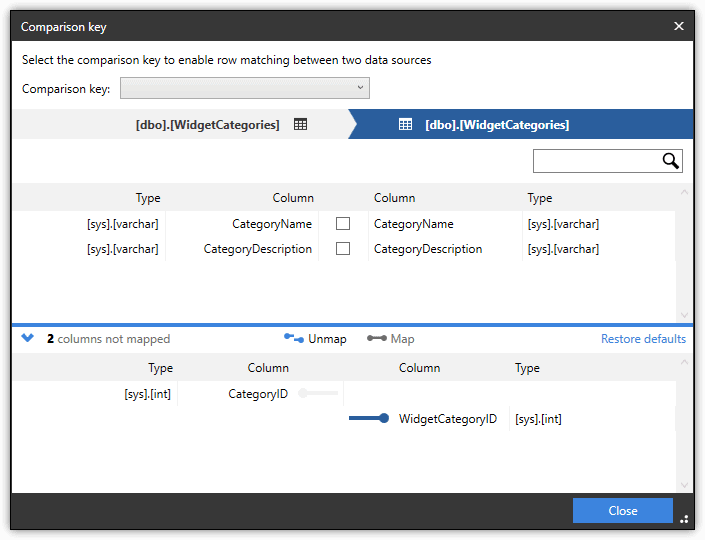
The reason that SQL Data Compare cannot compare the two tables is because the key column in the source table is named CategoryID and the key column in the target table is named WidgetCategoryID. You can manually map the columns by selecting each one and clicking the Map button. This moves the column pair to the top section.
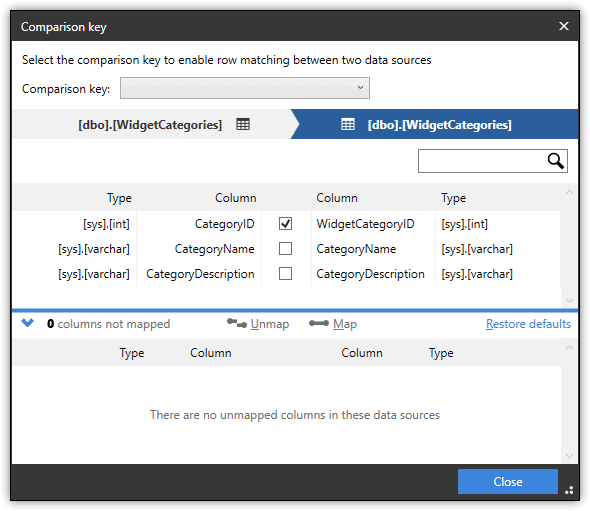
You must also select the check box associated with the column pair to set it as the comparison key. You might have to do this as a separate step by closing and reopening the Comparison key dialog box. When you’re finished, the dialog box should look as follows:
After you fix the issue with the WidgetCategories tables, rerun the comparison to incorporate your changes. The updated report should now indicate that the WidgetCategories tables can be compared and that it contains differences.
Reviewing the row comparisons
After you run a comparison, you can deploy the changes to the target database or generate a script for later deployment. By default, all differences revealed by the comparison are applied to the target table to bring it into sync with the source table. In many cases, however, you might want to choose which modifications to deploy, as is the case with our Widget1 and Widget2 databases.
SQL Data Compare makes it easy to review and accept changes at a granular level. For each compared table, you can view the specific differences between the source and target data in the lower pane. For example, the following figure shows the comparison details for the Widgets tables.
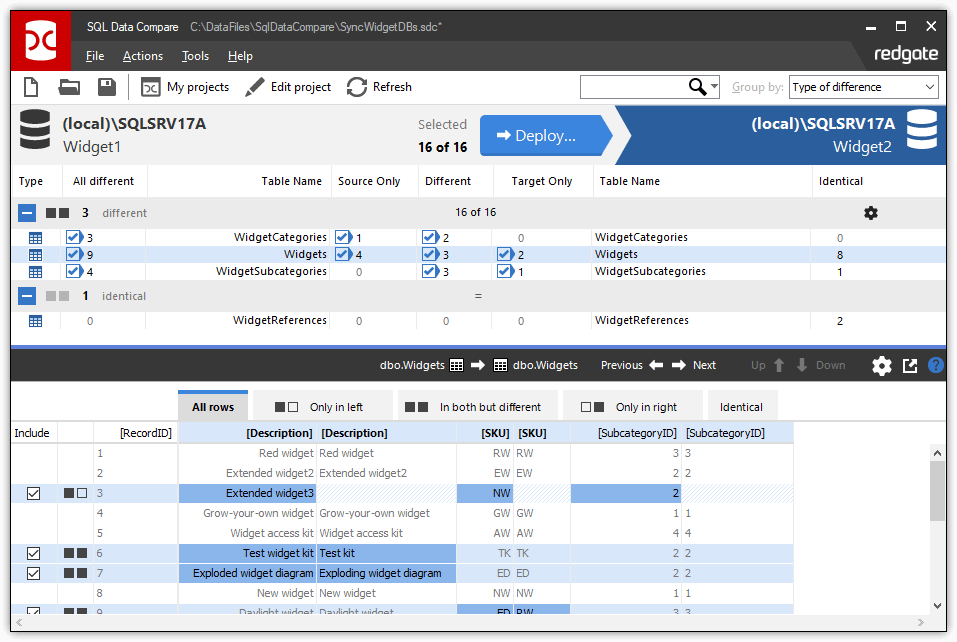
If you’re not familiar with SQL Data Compare, these details can seem overwhelming at first, especially when identical data is included (which is why many users often exclude it). Fortunately, SQL Data Compare provides several methods for more easily approaching all this information.
To begin with, you can view the table details in a separate window, which can be especially useful when you have a lot of data. To open this window, click the button in the upper right corner of the lower pane (the one with the tooltip that reads View differences in a separate window). The next figure shows the detail window for the Widgets table.
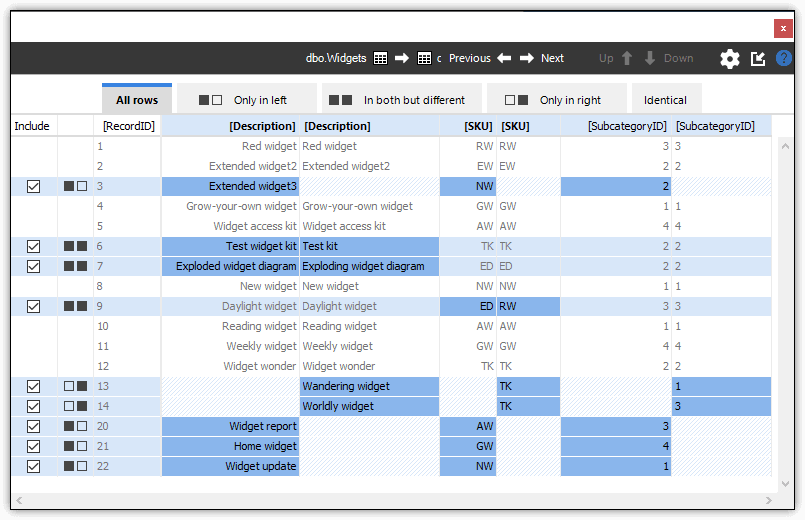
SQL Data Compare displays the data by column pairs. The light blue highlight indicates that the row contains differences, and the dark blue highlight shows the specific differences. SQL Data Compare uses blue crosshatching when a table doesn’t include a corresponding value and gray text on white when rows are identical.
Although the separate detail window helps make it easier to see what’s going on, you can simplify the view even more by selecting one of the other tabs. The window includes the following five tabs, which are the same as those used for the table detail pane in the main window:
- All rows (shown above) displays all rows in the two tables, combining rows when there’s a match.
- Only in left displays rows that appear only in the source table.
- In both but different displays matching rows with different values.
- Only in right displays rows that appear only in the target table.
- Identical displays rows that are an exact match.
SQL Data Compare also adds a double-box icon near the beginning of each row to indicate the type of differences:
- If the left box is black but not the right, the row appears only on the source table.
- If the right box is black but not the left, the row appears only on the target table.
- If both boxes are black, the rows match but contain different data.
For example, the following figure shows the Only in left tab for the Widgets table. The tab displays the four rows included in the source table but not the target table. The data in each row is preceded by an icon in which the left box is black.
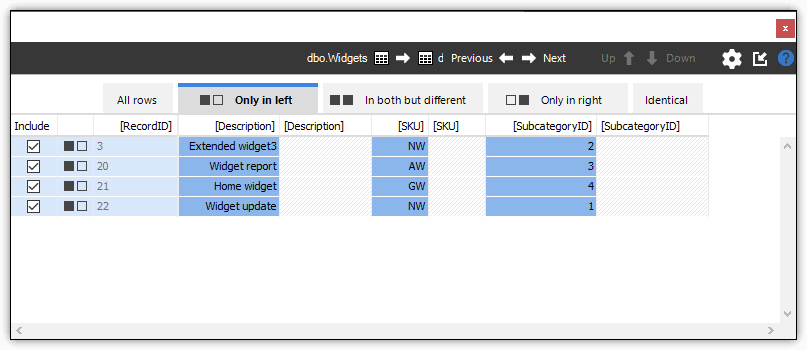
Notice that each row also starts with a check box in the grid’s Include column. The check box is selected by default, which means that the update script generated from this comparison will add the row to the corresponding target table. If you clear a check box associated with a row, the row will not be added. For this example, you should include all rows.
The next figure shows the In both but different tab for the Widgets table. In this case, three rows match but contain different data (highlighted in dark blue). Notice that the two boxes are now black.
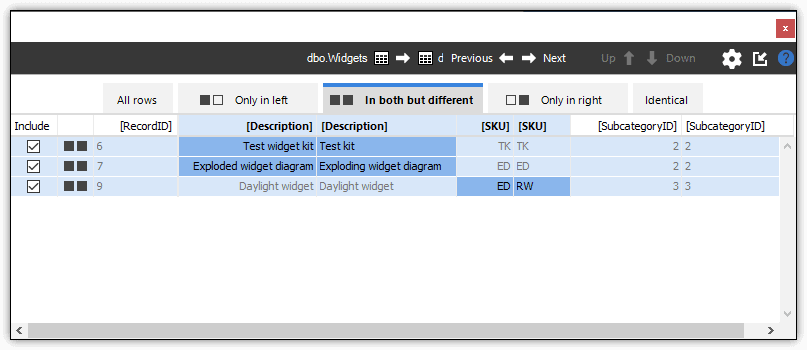
As with the Only in left tab, each row is preceded by a check box that’s selected by default. As a result, the deployment script will update all these rows in the target table, so they match the source. If you don’t want a row to be updated, you should clear the check box. For this exercise, however, leave all rows selected.
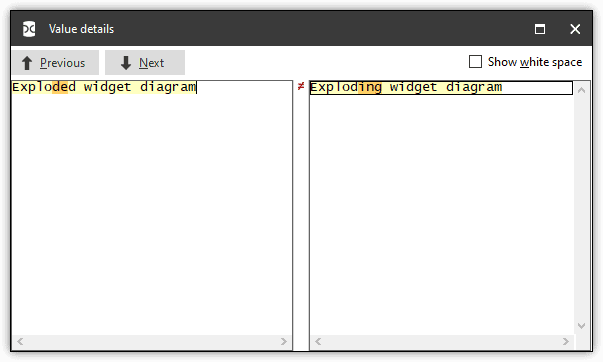
In some cases, the values in a compared column might be quite long, making it difficult to see where the differences lie. If you double-click the value pair, SQL Data Compare launches the Value details dialog box, which makes it easier to view the data and what has changed, as shown in the following figure.
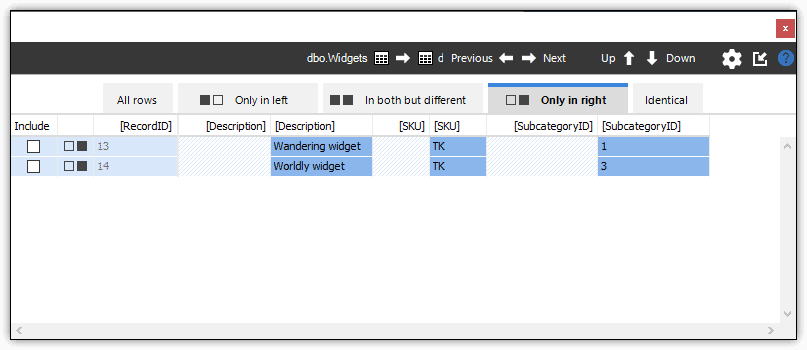
The Only in right tab works just like the Only in left tab, with one important difference. When a row’s check box is selected, the update script will delete that row from the target table, which can be confusing because the check box is in the Include column. The term “Include”, in this sense, means that the update script will remove the row from the target table.
In the case of the Widgets tables, the target table contains two rows that are not in the source table, as shown in the following figure. This time around, you should clear the check boxes so the rows are persevered when you update the target database.
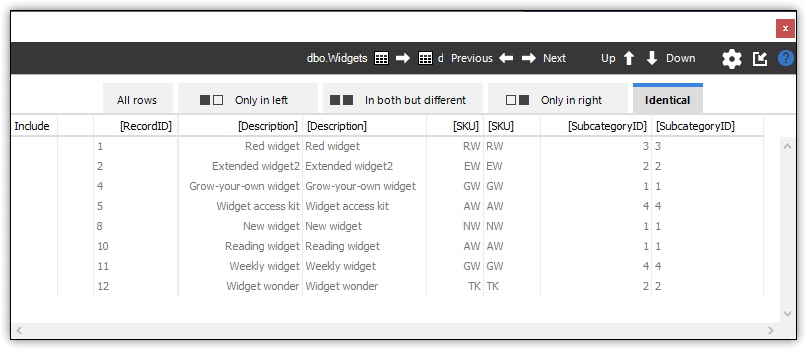
The final tab in the table detail window is Identical, shown in the following figure. The tab displays the rows that are an exact match. Notice that there is no Include check box associated with each row. The update script does not touch rows that are an exact match.
When you clear or select a check box in the detail window or in the lower detail pane of the main window, the change is reflected in the upper pane, as shown in the following figure. As you can see, the Target Only check box in the Widgets row is no longer selected, and the All different check box shows a mixed selection.
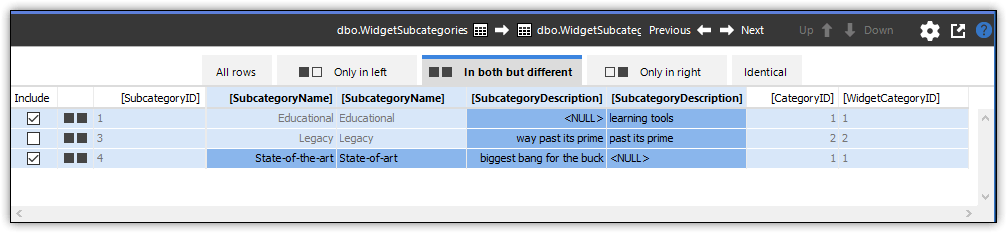
After you review the details for the Widgets tables, you can review the WidgetCategories tables. For these tables, all changes should be applied to the target database, so do not need clear any checkboxes. When reviewing the WidgetSubcategories tables, however, you will make a change. Go to the In both but different tab and clear the check box associated with the row that has a SubcategoryID value of 3, as shown in the following figure. In this way, the update script won’t change the value past its prime to way past its prime.
Deploying your changes to the target database
After you’ve reviewed the comparisons for each table and made the appropriate changes, you’re ready to update the target database. To start this process, launch the Deployment Wizard, which provides an easy-to-use tool for applying your changes to the target or generating a script for later deployment. The following figure shows the wizard’s opening screen, which is where you specify most of the details about the deployment operation.
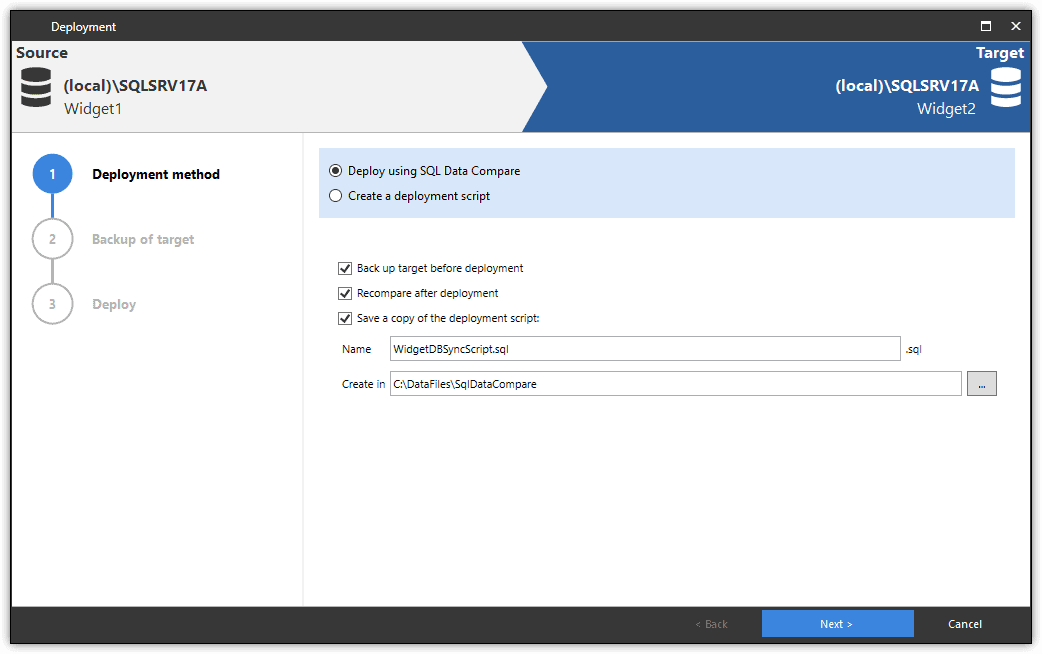
For this example, use SQL Data Compare to deploy the changes right away. As part of this process, you should also create a backup of the target database and save the script used for making the changes. It’s also a good idea to run a comparison after you’ve deployed your changes to verify that you’ve gotten the correct results.
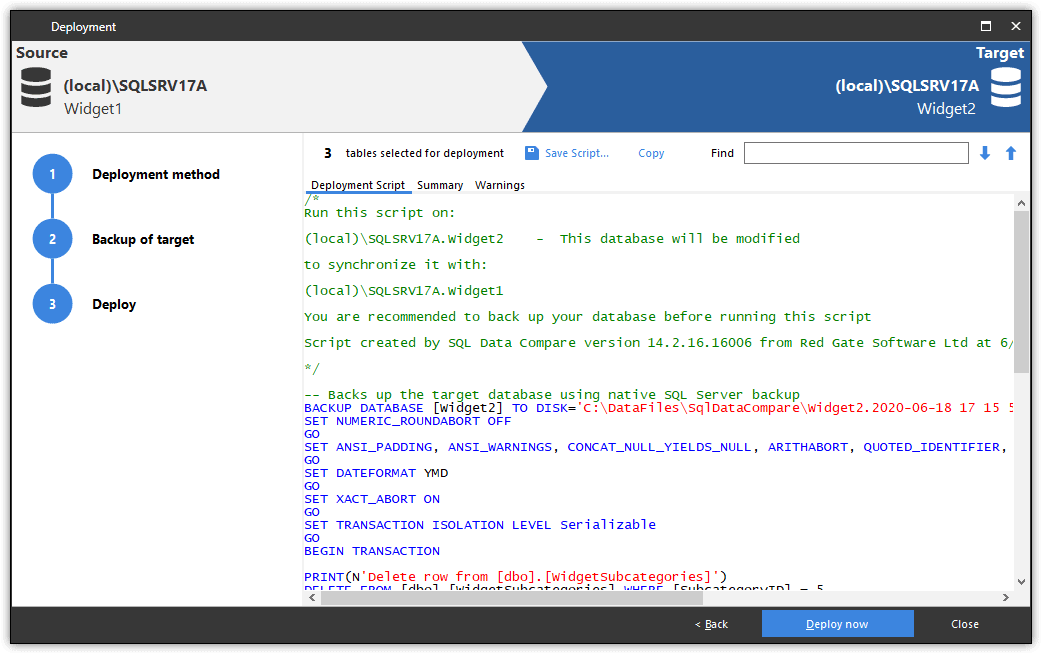
If you choose to back up the database, you’ll need to provide details about where to save the file, which you do on the next wizard screen. After that, on the wizard’s final screen, you can review the update script, save the script to a file, or copy it to the clipboard. The following figure shows the Deployment Script tab on the last screen, along with the other options.
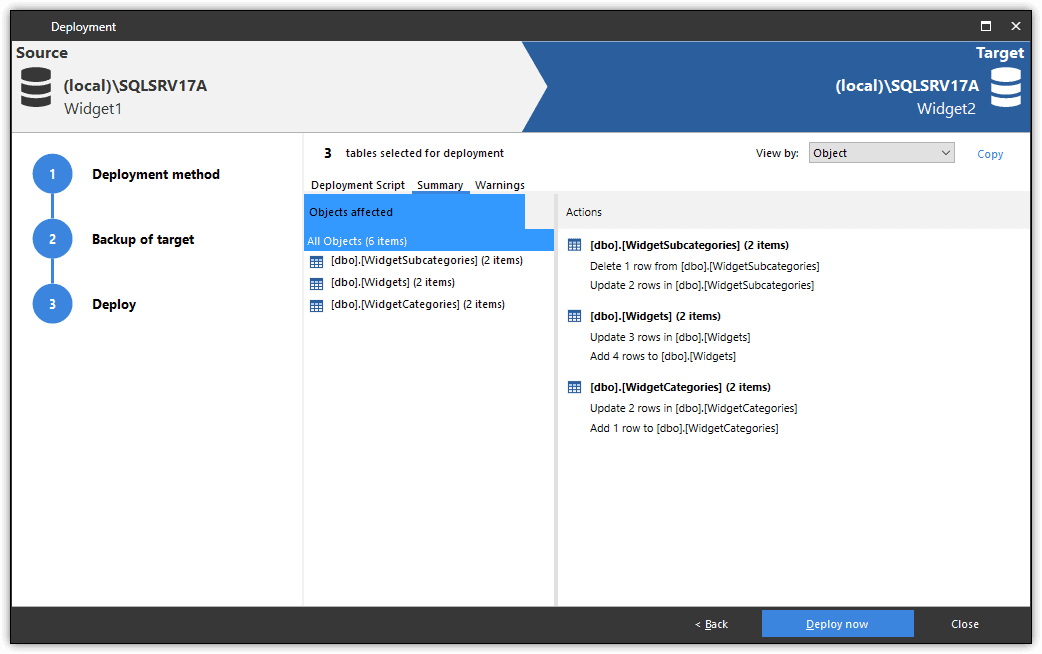
The final screen also includes the Summary tab, which provides an overview of modifications that will be applied to target database, as shown in the following figure. The tab offers a great way to do a final check before deploying your updates.
When you launch the deployment, SQL Data Compare applies your changes to the target database, runs another comparison against the two databases, and displays the results in the main interface, as shown in the following figure.
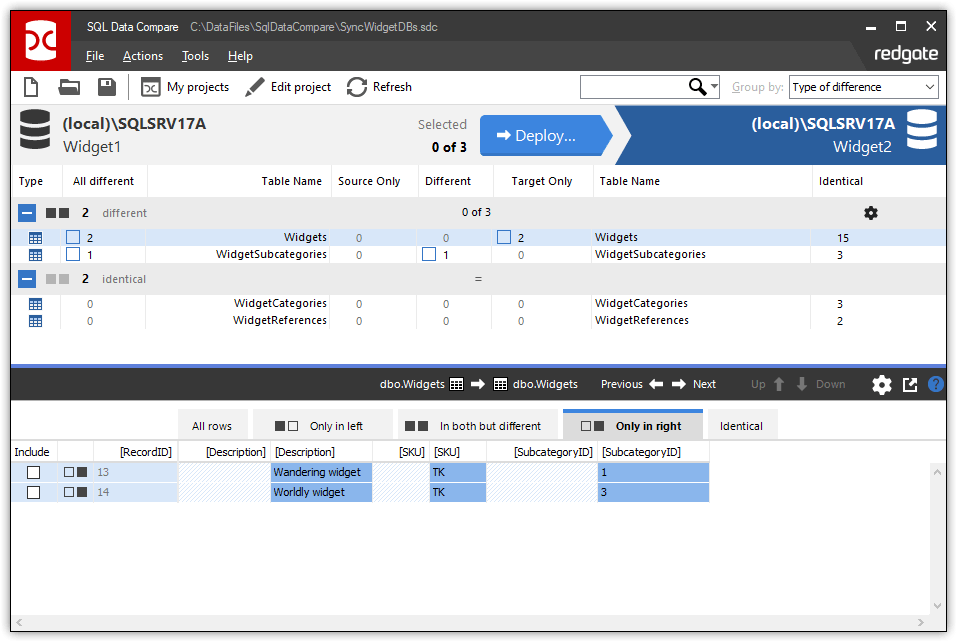
As expected, the Widgets target table still includes two rows that are not in the source table, and the WidgetSubcategories tables include a matched row with different values. However, the WidgetCategories tables now match exactly, as do the WidgetReferences tables.
Working with SQL Data Compare
SQL Data Compare makes it easy to sync data from one database to another, while letting you control data modifications at the column and row levels. In this way, you can easily support different application versions, multiple test configurations, or other scenarios that require granular control over the data syncing process. You need only to set up a project, run your comparisons, determine which updates to include, and deploy your changes to the target database. SQL Data Compare takes care of the rest, freeing you up for other essential tasks.
In future articles, we’ll explore other topics about SQL Data Compare, such as using the command-line utility, filtering out rows or columns, comparing sources such as backup files, or taking advantage of other advanced features.
Tools in this post
You may also like
-

Article
SQL Compare 14.0: A Command Line Interface on Linux and support for SQL Server 2019
SQL Compare is the industry standard tool for comparing and deploying database schema changes, and version 14.0 now provides a Command Line Interface (CLI) on Linux (available as a beta, at time of writing). Teams working with SQL Server on Linux, or across multiple platforms, benefit from seamless development processes, driven by SQL Compare, without
-
Article
Overcoming Database DevOps Challenges: Part 1
As part of our research for the 2021 State of Database DevOps report, we asked 3,000+ recipients what they consider to be the greatest challenge when integrating database changes into a DevOps process. According to the respondents, these are the most important challenges facing database professionals when introducing DevOps practices to database development. Three of
-

Article
Getting In A State Using Flyway Baseline Migrations
Flyway Teams baseline migration scripts are a simple and fast way to deploy new copies of a database, at a specific version, for testing work, or to create a new branch during development.
-
Article
SQL Server deployments: Which Redgate tools should you use?
Since 1999, we’ve been developing tools at Redgate to support database deployments for SQL Server. In the past couple of years, we’ve increased our effort in this space by further developing our proprietary technologies based on SQL Compare, and acquiring others like Flyway, the most popular database migration engine. As a result, we now offer
-

Webinar
Eliminate the Database Bottleneck and Speed up Software Delivery with Redgate Deploy
Software is at the heart of how business responds to customer needs. The database shouldn’t stand in the way. Too often, database changes slow things down. They add risk and uncertainty or make it hard for teams to work together and deliver value. Automating DB deployments eliminates that risk. From version control to continuous delivery,


