


Using Filters to Fine-tune Redgate Database Deployments
Filters are used by Redgate's SQL Compare, SQL Source Control, DLM Dashboard, and SQL Change Automation. A typical use for a filter is to work on just one schema within a database or just a limited set of tables and routines. You would also want to use a filter to exclude certain object, such as database users, from comparisons. Phil Factor explains how they work, and how to create, edit and then use them within the various Redgate tools.
Why Filters?
You generally use them when SQL Compare is giving you too much, or too little, information and you wish to be more precise about what the tool that you’re using should be comparing. Filters tell the SQL Compare Engine to ignore or include specific objects, by name or by type. You can set up a filter so that only the objects matching the conditions you specify are included in the comparison operation being done, in order to see the differences between databases, check for drift, synchronize databases, create or update script folders, and so on. The same filter files can be used in any of these tools.
Filters can define the parts of a database that should or shouldn’t be in the development version of a database and what should only be in the production version. You might want to exclude such objects as synonyms, partition schemes and partition functions from a deployment, for example.
Filters can also allow you to work on databases in a more surgical way. This isn’t always risky; DLM Dashboard, for example, is only used for recording changes to a database, without being able to make changes, so using filters in creative ways is safer. With the other tools, it is something that, as with a surgeon, requires special expertise.
Excluding classes of database objects
You can decide to exclude certain classes, or types, of object. The most common example is users, because it is usually considered the responsibility of the ops DBA to add these, in Staging. There will probably be other objects too that aren’t part of the development database but may be used in operations. Often you find out about these things when they appear as seemingly irrelevant differences. They’re not, in fact, irrelevant because if you leave them in a comparison, they could easily be deleted on the target, which would have bad consequences.
Excluding specific database objects or groups of objects
You can prevent part of a database from being released by excluding the components from the comparison. You may want to exclude entire schemas from comparison or deployment, such as those that contain objects that are controlled by a third-party. It could also open the possibility of doing releases in bite-sized chunks, but this requires some discipline, in terms of object dependencies.
Including only named objects
Let’s suppose that you want to work on an alteration to just one part of a database. The most obvious example of this is to concentrate on just one schema for development work, but it might also be to work on a part consisting of certain named objects, or on tables or views with a specific function.
You need, if possible, to work on just this part of the database without making any other changes to the rest of system. To select a schema and every object belonging to the schema, you must select the option ‘all object types in all schemas’ and then include only the schemas that you want.
Once you’ve made changes to a collection of objects, or just the objects in a schema, then you’d want to update a test server to do an integration test. When you do this, SQL Compare will assume that any dependent objects excluded by your filter already exists in the target, at the correct version. This may be necessary for the objects to work properly or even to compile without errors.
It is quite easy to check that all is well by doing an initial comparison that specifies the option in SQL Compare that dependencies should be included. This will tell you of any potential clashes where another member of the team has altered a dependency. If all is well, you can allow specific groups of objects such as a set of tables to be deployed to the target database separately. If there are altered or missing dependencies, these are best resolved before the next build.
Filters in the GUI
The most convenient way to define a filter is to use SQL Compare, the SCA add-ins, or SQL Source Control. You can save filters for use in other Redgate tools or other SQL Compare projects. The filter will be saved as an XML filter file, with the .scpf extension (covered a little later).
SQL Compare
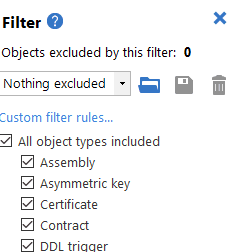
In the SQL Compare GUI, you can set up and edit filter rules to restrict which specific objects are included in or excluded in a comparison. You can also read-in an existing file of rules. When you create a new project, you’ll be using the ‘Nothing excluded’ filter.
You can also choose an existing filter from the same drop-down list, the Filter box. If your filter isn’t listed, it could be that it isn’t in the default folder for filters, but you can click on the ‘Open filter from file’ icon and browse to the filter.
If you edit the “Nothing excluded” filter, then ‘Custom*’ is shown in the Filter box. The asterisk is displayed next to the name of any filter you edit, to show that there are unsaved changes.
For example, if you want to see only the differences between tables, you can set up a filter for object types that will include only the table objects in the comparison. You simply click on the ‘filter’ icon in the top menu bar, and then you can exclude or include objects, and set up or edit quite complicated filter expressions. You can define which object types the filter includes in the comparison results using the object type check boxes in the Filter pane.
You can also create rules to control the specific objects that a filter includes or excludes. To edit the filter rules first click Edit filter rules on the Filter pane. This will cause the Edit filter rules dialog box to be displayed. You can then select individual object types or All object types in all schemas, from the dropdown, and edit the rules applying to those objects.
In the following example, I’m setting up a filter that includes all objects types, but only if they belong to the Person schema:
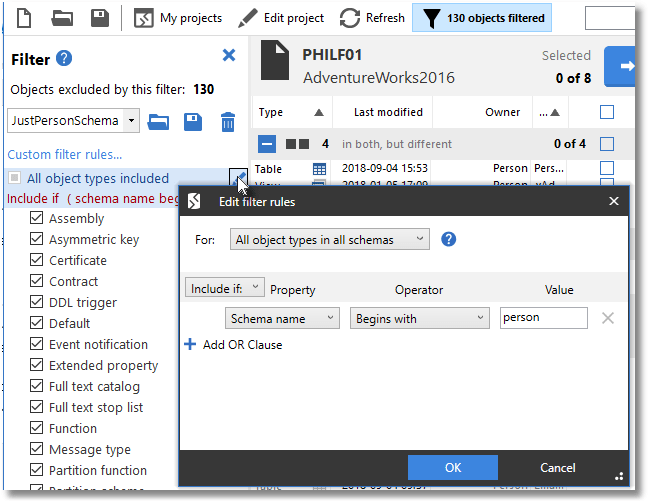
Whenever you create a filter rule for a filter, the filter displays its filter conditions. If you wish to edit any of these, you need to give it focus by hovering the mouse over it, and clicking on “edit” (the pencil, or crayon icon). If you wish to remove a condition, you click instead on the “trash can” icon that also appears.
To save the current filter, click “save” on the Filter pane. In the ‘Save Filter’ dialog box, you must type the name for the filter, which should be descriptive because it will appear in the dropdown list. In the above example, I saved the filter conditions under a filename called JustPersonSchema.scpf. When you save an edited filter, you can either save it with the same name to overwrite it or change the name to create a new filter.
If you want to delete the current filter, “trash can” item on the Filter pane. You will then be prompted to confirm. After you delete the current filter, Custom* is still shown in the Filter box, and the conditions for the filter that you just deleted will remain set until you select another filter or make any changes.
SQL Source Control
In SQL Source Control, filter rules are edited in the ‘Edit Filter Rules’ tab of the source control window. To edit the filter rules for a database, either use Setup tab, or right-click the database in the object explorer and then select ‘Other SQL Source Control tasks‘, and choose ‘Edit Filter Rules’. To edit the filter rules for an object type, such as a table, that is currently included in a the comparison, you can right-click the an object of that type in the list of changes within the ‘Commit changes’ tab or the ‘Get latest’ tabs.
The ‘Edit filter rules’ tab lets you specify whether you want to exclude or include individual objects or all object types, and under what conditions:

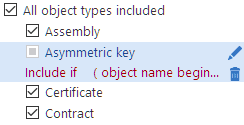
You can use the left-hand pane to exclude object types using the check boxes or build more complex conditions by specifying AND clauses and OR conditions in the right-hand pane. When you create a filter rule, its conditions are displayed in the left-hand pane under the name of the object type to which it applies:

To clear the filter rule for an object type, click ![]() next to its name.
next to its name.
Filters and Options
As well as filters, SQL Compare and SQL Change Automation have ‘options’. These are of obvious use with the generation of deployment scripts, because you can, for example, specify that the script should include a line to switch to the named database to start the deployment (AddDatabaseUseStatement) or add object-existence checks (ObjectExistenceChecks).
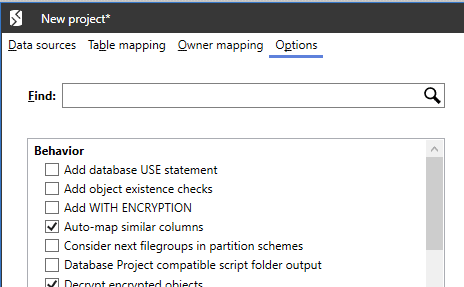
There is, however, an overlap in functionality that allows you to use an ‘option’ to ignore classes of object in comparisons and deployments. Some options are excluded in comparisons but not deployments. The use of filters is more consistent: if you exclude an object, a subsequent deployment will not concern itself with the objects or object types that you’ve excluded so nothing will get deleted..
If, for example, you use a filter to exclude an object from a comparison, the resulting script does not remove it from the target. Some options, by contrast, will actively delete these objects in the target. This can come as a surprise unless you read the fine print. There is a subtle difference between ignoring certain objects when doing a comparison and ignoring certain objects in a deployment.
The deployment script will only make any necessary changes to the objects you specify. When you exclude an object with a filter, it isn’t shown on the Commit changes tab, the Get latest tab, or the Undo changes dialog box. You can never commit, get, or undo an excluded object. They therefore represent a safer approach unless you are sure what the option you want to use does.
Editing filter files
Redgate tools specify filters within a XML file called a filter file with a .scpf extension. The easiest way of generating or editing a filter file is to use the user interface provided by SQL Compare or SQL Source Control, as described above. If you specify objects by type, filters are generic and so can be set up as a library and used as needed.
It is much more convenient to use SQL Compare, the SCA add-ins, or SQL Source Control to produce filter files but if you only have DLM Dashboard on the server, which doesn’t allow you to edit filters, it isn’t that hard to view or change a raw XML filter file.
Filter files are not a lot more than a list of each class of SQL Server object, with an indication of whether they should be included or excluded, and the expression that should be tested for the action. A class of object is included (or excluded) when the filter expression evaluates to true, so in the following example, extended properties are always included the comparison:
|
1 2 3 4 |
<ExtendedProperty version="1"> <Include>True</Include> <Expression>TRUE</Expression> </ExtendedProperty> |
In the following example, stored procedures are included, but the expression doesn’t ever return true, so no stored procedures are included in comparisons: This is what the filter looks like if you uncheck a box for a type of object (exclude it from a comparison) in the filter pane.
|
1 2 3 4 |
<StoredProcedure version="1"> <Include>True</Include> <Expression /> <!-- Excludes changes to stored procedures --> </StoredProcedure> |
There is a special filter that means ‘all object types in all schemas’. You’d generally use this together with an expression. So, in this example, all objects are included if “name of schema = HumanResources” evaluates to true.
|
1 2 3 4 |
<None version="1"> <Include>True</Include> <Expression>(@SCHEMA = 'HumanResources')</Expression> </None> |
And this means that we want to include the schemas ‘person and ‘sales’
|
1 2 3 4 |
<None version="1"> <Include>True</Include> <Expression>(@SCHEMA = 'person') OR ((@SCHEMA = 'sales'))</Expression> </None> |
You can have rules that test object names or schema names. The following filter includes all objects but then uses in “exclude if” condition to exclude any with names that start with ‘temp’ or ‘IgnoreMe’ or if they are owned by a schema called ‘utils%’.
|
1 2 3 4 |
<None version="1"> <Include>False</Include> <Expression>(@NAME LIKE 'temp%') OR ((@NAME LIKE 'IgnoreMe%')) OR ((@SCHEMA LIKE 'Utils%'))</Expression> </None> |
Managing your Filter Files
Filters are saved in the %USERPROFILE%\Documents\SQL Compare\Filters folder on the workstation. In SQL Compare, all files in this folder with the .scpf extension will be displayed in the Filter drop-down list. They will need to be copied to a shared folder to be usable by other Redgate tools. To migrate filters to another computer so that the tool’s user interface shows the available filters, copy them from the source %USERPROFILE%\Documents\SQL Compare\Filters folder to the corresponding folder on that other computer, perhaps via a shared library. In the SCA ‘Migrations’ add-in for SSMS, you need to copy the filter file to the root of the SQL Change Automation project folder (i.e. alongside the .sqlproj file). When this tool is used to import new changes as migrations, the rules defined within the filter file will be applied: any objects that do not satisfy the rules will be excluded from the generated migrations, programmable objects and/or offline schema model. If you need to exclude a set of objects across an entire development project It is best to commit the filter files to source control and get the latest version when they are updated. SQL Source Control will alert you of changes.
Command-line and scripted access
You can use filters from the SQL Compare command line, or when writing scripts that use the SQL Change Automation PowerShell cmdlets.
SQL Compare
In SQL Compare you can specify a filter by its absolute or, if it is placed in the %USERPROFILE%\Documents\SQL Compare\Filters folder, by its relative path. For example, using the working directory C:\SQLCompare, you can call the filter myfilter.scpf from C:\SQLCompare\filters\myfilter.scpf with a relative path:
C:\SQLCompare>SQLCompare.exe /s1:SourceServer /db1:SourceDatabase/s2:DestinationServer /db2:DestinationDatabase /filter:filters\myfilter.scpf
If you need to specify an ‘absolute path’, such as when you are using a shared filter directory on the network, you can do this:
C:\SQLCompare>SQLCompare.exe /s1:SourceServer /db1:SourceDatabase/s2:DestinationServer /db2:DestinationDatabase /filter:\\SharedResources\SQLCompare\filters\myfilter.scpf
SQL Change Automation
SCA can use filters in three different circumstances.
New-DatabaseReleaseArtifactcan create a release artifact using use whatever Filter.scpf file that you specify, and will use it to create a released object that contains only what you specify in the filter file.Sync-DatabaseSchemacan likewise use it to update in a target schema only what you specify in the filter fileInvoke-DatabaseBuildwill use a filter to validate that the database, as described by the scripts in the script folder, will build, and will use it to build just what you specify in the filter file.
If you are using a database as the source, you will need to specify the path to the filter file in the -FilterPath parameter of the SCA cmdlet you are using. If you are using a scripts folder as the source, you can alternatively include a Filter.scpf file in the scripts folder, but the filter, if passed as a parameter, will always take precedence over the one in the source directory or NuGet database package.
DLM Dashboard
You can upload a filter to DLM Dashboard and apply it to the databases in a pipeline. When you add a filter, DLM Dashboard will adjust the comparisons to the new filter, excluding or including the objects that you specify. Once you apply the filter, the change in the objects that are checked may show as database drift.
When you move a database from a filtered pipeline to a newly created pipeline without a filter, the existing filter file is applied to the new pipeline. However, if you move a database to an existing pipeline with existing filters, the database will use this filter on the pipeline to which it has been moved.
Summary
It is possible to participate successfully in a deployment using SCA or SQL Compare while remaining oblivious of filters and options, but in order to set up the more complex deployment processes successfully with Redgate tools, it is important to get familiar with filters and options. Filters are probably the most important of the two, but it is wise to have team standards for both set up and shareable. I prefer to set them up in source control, along with all development configuration settings. Filters provide a very effective way of partitioning up the deployment of a database application and ensuring that there is no confusion between the parts of a database that are the responsibility of development, and those parts, such as, for example, the configuration of users in the production system that shouldn’t be a development activity.
Tools in this post
You may also like
-

Article
Easing the transition from shared to dedicated database development
Working in dedicated development environments for the database is the ideal for many. This is the message we frequently hear throughout the industry from thought leaders, at conferences, and in many written pieces about implementing best practices. Yet 70% of developers still work in shared environments, as highlighted in the 2020 State of Database DevOps
-

Article
Database Updates: Roll Back or Fix Forward?
Phil Factor's take on the best ways to reverse or accelerate your way out of the problems caused by a failed database update.
-
Article
Using SQL Compare with In-Memory OLTP tables
SQL Compare can help you compare two databases that have In-Memory objects, the tables, their indexes and any natively-compiled procedures, and generate the appropriate scripts.
-
Article
A strategy for implementing database source control
Much has been written on the strategic benefits of having a database under source control though many articles are clear on “why” but conspicuously vague on “how”. Dave Poole tries to fill in some of the gaps.
-

Article
Database Build Blockers: Cross-Server Database Dependencies
Phil Factor demonstrates how to tackle builds when databases make cross-server references. The technique uses synonyms to represent the remote objects, and local 'stub' objects to overcome the problems caused by 'missing references' when building the individual objects.


