Eliminating ‘noise’ from database deployment scripts
How to eliminate false positives, and avoid making unintended changes to a database, when comparing the schema of two SQL Server databases.
You want to compare the schema of two databases for differences, and then generate a migration script that, when run on the target database, will makes its schema identical to that of the source database. A database schema comparison tool like SQL Compare will take a lot of the time, pain, and tedium out of this task, and make it much less error prone.
However, depending on how you have configured SQL Compare, there may still be some manual work to be done to make sure that running the auto-generated migration script doesn’t cause unintentional or breaking changes in the target database, which could be a production system. For example, if the collation settings on the source and target databases are different, the schema comparison, showing side-by-side differences in respective objects in the two databases, will detect that each text column in the source is different from its counterpart in the target. System-named constraints can also cause a lot of ‘false differences’.
If you simply autogenerate the migration script and send it to a DBA for sign off to deploy, that you or the DBA will have to spend a lot of time amending it by hand, so that it includes only the required changes, which risks introducing errors. Instead, it pays to take a bit of time to familiarize yourself with SQL Compare options. By setting these correctly, for each database comparison project, you can remove a lot of ‘noise’ from the schema comparison and generate a migration script that includes only meaningful and intended changes to the objects in the target database.
Exploring the SQL Compare Project Options
When comparing databases, SQL Compare offers many configurable options, designed to allow you to ignore certain objects or certain differences between objects as well as deal quickly with more complicated object differences, such as differences between tables where the column order is different in source and target databases.
You can find the project options in the startup New Project dialog, under the Options menu (or you can get to these options from the comparison results by clicking Edit project).
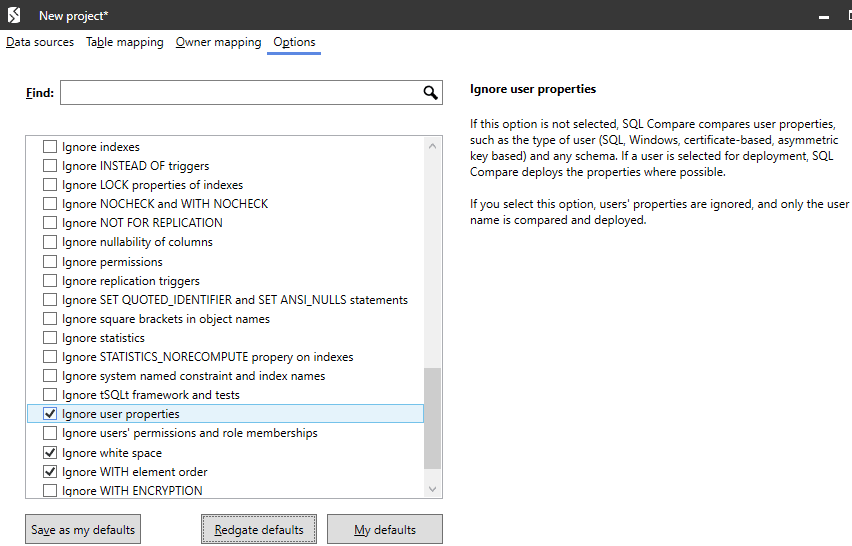
Figure 1
Hover over any of the options and SQL Compare will give you more detail on exactly how it’ll behave if you select that option.
A number of these options are enabled by default. For example, by default SQL Compare will ignore whitespace, database user properties, database and server names in synonyms, and so on. Beyond the defaults, there are many other project options for you to pick and choose. In this article, I’m just going to focus on some of the most commonly-used options that will help reduce noise in your synchronization scripts.
Ignoring objects in schema comparisons
Sometimes, you simply don’t want to ignore certain types of object altogether, when performing the schema comparison.
Ignore Indexes and constraints
SQL Compare offers several options for ignoring objects such as indexes and constraints. For example, a common requirement is to load transactional OLTP data from a Customer table (say) to the Staging environment, transform it, then merge that data into the table in a data mart.
In such cases, it might not be appropriate to deploy indexes to the Staging environment, and so we can use SQL Compare’s Ignore Indexes option.
Ignore collation setting
Sometimes the target database will have a different collation setting than the source. Collation is the process of sorting character strings according to some order and so different collations can result in different collation ordering for text columns. If you do overwrite the collation setting on the target database, with th setting for the source database, it may affect how data is ordered in the results returned on the target.
Also, attempting to change the collation may result in deployment errors because you cannot change the collation of a column that is currently referenced by, for example, an index, a FOREIGN KEY or CHECK constraint, among other things.
In the following example, I’ve created ‘identical’ Customers databases on two SQL Server instances, and then compared them. Figure 1 shows the side-by-side comparison of the definitions of the Persons table on the source and target databases. As you can see in Figure 2, for each of the text columns, SQL Compare has detected differences in the collation setting.

Figure 2
To ignore these collation differences in the comparison, click Edit Project, click on the Options menu, and check the Ignore Collations checkbox, then hit Compare now.

Figure 3
Now SQL Compare detects no differences in the collations, but we are still seeing a difference in naming of one of the constraints. Let’s deal with that next.
Ignore system named constraints and index names
Our database designer, in this case, has chosen to allow auto-naming of constraints, so they get a system-generated name. Again, we can choose to ignore the names of system names indexes, statistics, foreign keys, primary keys, and default, unique, and check constraints when comparing and deploying databases, simply by checking the Ignore system named constraints and index names box.
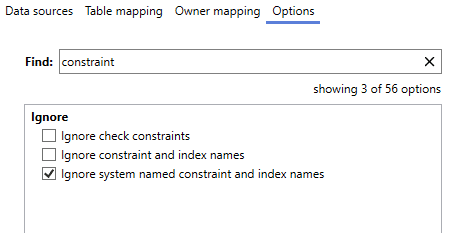
Figure 4
Notice, in Figure 4, how use of the search box allows us to narrow in on the option we need, very quickly.
Ignore Permissions
Handling security issues during database deployments can be a painful. Some teams choose to handle all security objects (logins, users, roles, permissions) entirely separately from the code objects and tables, for example defining configuration files that define the correct security configuration for each environment.
Some teams allow SQL Compare in include database users and roles in the comparisons, but prefer to set up all permissions as a separate manual step, on the target server, ensuring for example the use of entirely role-based security.
There are a couple of project options to help deal with differences in permissions between databases, as shown in Figure 5.
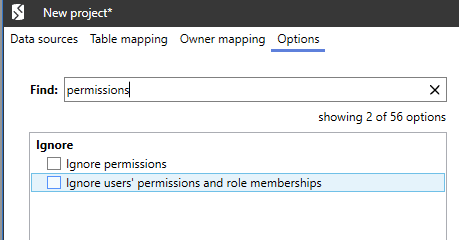
Figure 5
To demonstrate how each of these option work, I created on the source Customers database only, the following security scheme:
- Create 3 database roles (
Sensitive_low,Sensitive_medium,Sensitive_high) - Create a SQL login and associated database user (
TonyTest) TonyTestis a member ofSensitive_lowSensitive_mediumrole is a member ofSensitive_low- Assign
SELECTpermissions onCustomerschema toSensitive_lowrole - Assign
SELECT,INSERTandUPDATEpermissions directly toTonyTest
Figure 6 shows the results of the database comparison (with neither option in Figure 4 enabled), with the differences for the Customer schema highlighted.
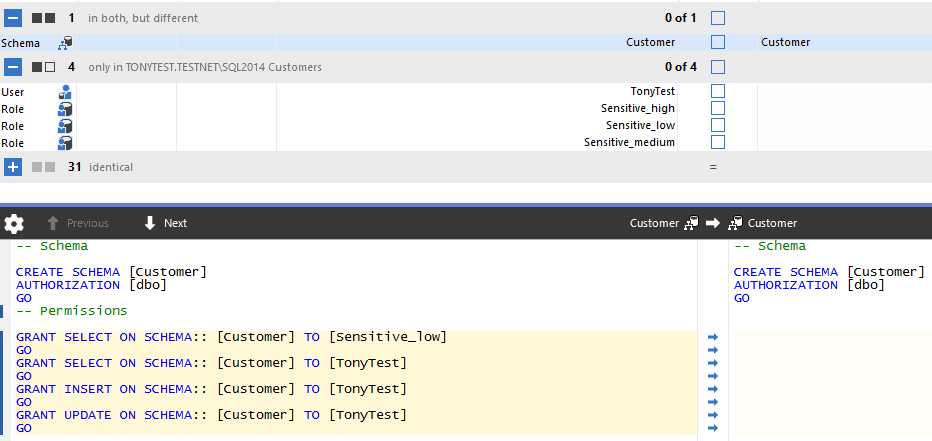
Figure 6
Figure 7 shows the comparison for the Sensitive_low database role.

Figure 7
The ‘Ignore permissions‘ option will simply ignore permissions on all objects when comparing and deploying databases. If we enable it them re-compare databases, SQL Compare will detect not differences in the Customer schema, so we won’t be deploying any of our permissions to the target database.
The subtler option is Ignore users’ permissions and role memberships. If you’re using role-based security, you’ll only want to accept object permissions assigned to roles, not specific users. With this option checked, SQL Compare will compare and deploy object permissions only for roles, and members of roles that are roles. Users’ permissions and role memberships are ignored. In our example, with this option enabled, the database user TonyTest will be deployed to the target, but without any direct permissions or role membership, as shown in Figure 8.
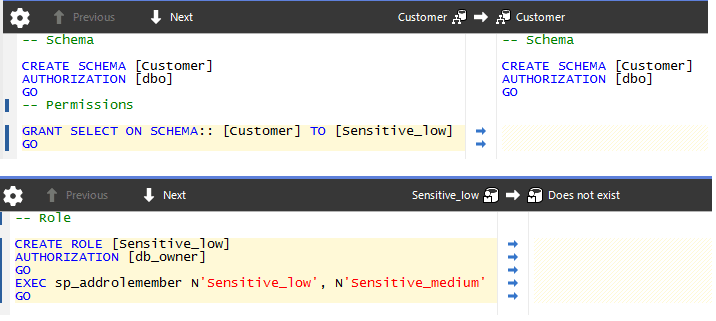
Figure 8
Ignore comments
We can reduce ‘noise’ in our comparison results by ignoring comments when comparing views, stored procedures, and so on. Be aware though that comments will not be ignored when the objects are deployed.
Ignore tsqlt tests
Say you’re comparing source control to a target database and have tSQLt frameworks and tests in the source environment but not the target. You don’t want to deploy these, so quickly jump back into the options and simply check the appropriate box.

Figure 9
Controlling other behaviors during schema comparisons
Finally, let’s briefly review how to avoid a few behaviors that could cause deployment, or post-deployment problems.
Mapping similar tables and columns
When you have selected your data sources to compare, SQL Compare automatically maps tables and columns with the same name in the source and target data sources. Not only that, SQL Compare also allows you to map together tables and columns with different names. This can be useful to prevent data loss when deploying tables or columns that have simply been renamed.
One step beyond that, SQL Compare can sometimes auto-map columns with compatible data types and similar names. Of course, you’ll see a warning to make you aware that automatic mapping has taken place, so you know exactly what is being compared.
To demonstrate this, I simply renamed the Note column in the Customer.Note table, in the source database, to Note2.
|
1 2 3 4 |
USE Customers; GO EXEC sp_rename 'Customer.Note.Note', 'Note2', 'COLUMN'; GO |
Listing 1
In this particular example, the collation settings on the target and source columns don’t match, as discussed previously, and this is a case where SQL Compare will not attempt to do auto-mapping. The deployment script it generates would simply drop the existing Note column on the target database, and create a new one called Note2, with a warning that a migration script will be required to avoid possible data loss.
However, if we alter the collation of the Note2 column in the source database to match the collation in the target, then SQL Compare will auto-map the renamed Note2 column in the source database to the original Note column in the target database, and the resulting deployment script will rename the Note column in the target database to Note2, rather than drop and recreate it.

Figure 10
Note that SQL Compare warns us that auto map has been used, and this new option, Auto-map similar columns, can be turned off if you’d rather SQL Compare didn’t make these assumptions for you.
Force column order
If additional columns are inserted into the middle of a table, this option forces a rebuild of the table so the column order is correct following deployment. Data will be preserved.
For example, I used SSMS to add a new column (ShortNote) into the middle of the Customer.Note table, on the source database.
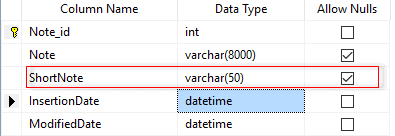
Figure 11
If you save such a change (you may need to navigate Tools | Options | Designers and temporarily disable the Prevent saving changes that require table recreation option), and then re-run the schema comparison you’ll see that SQL Compare will detect the new column and in the deployment script, simply add it to the end of the table.
![]()
Figure 12
However, if you have code objects that rely on the exact order of the columns (a bad idea), then you can enable the Force Column Order option. Having done so, SQL Compare will generate a deployment script that will rebuild the table while preserving data. It will recommend you re-deploy all dependent objects, in this case the Customer.NotePerson table

Figure 13
Then, it will present a warning that the Customer.Note table will be rebuilt.

Figure 14
Save your own default settings
SQL Compare also allows you to create your own default options. I’d recommend you run the comparison with the default options first, review your comparison results, and then consider changing some of the options to remove ‘noise’ from the results and help you identify meaningful differences more quickly.
For example, perhaps you want to ignore a variety of different objects when you’re running a quick comparison to check on the state of differences between dev and production. Simply make your selections and select ‘Save as my defaults’.
It’s likely you’ll want to change your options for different circumstances, say if you’re doing a quick comparison between environments, as I described, or if you want to generate a deployment or run a deployment with SQL Compare. You can always reset the default by selecting ‘Redgate defaults’. Be aware that some of the options apply only to the comparison, and don’t affect the deployment. Similarly, some options apply only to the deployment.
Identify what works for you, then save your own default settings to save you some time and effort next time round.
Make sure you’re on the latest version of SQL Compare by running ‘check for updates’ from the Help menu. If you’re new to SQL Compare, get your free 14-day trial today and give it a go for yourself.


