


Automating Flyway Desktop Development using the Flyway CLI
Redgate's schema comparison capabilities are now fully integrated into the Flyway CLI. This introduces a host of new commands to the CLI for comparing databases, saving schema models, and generating scripts. Previously, this functionality was available only via the Flyway Desktop GUI, or by using the separate Flyway Desktop CLI (flyway-dev), which is now deprecated. This automation capability means that developers can skip the Flyway Desktop UI entirely and take full control of the migration process through command-line instructions.
Let's see how this might work in practice! The demo assumes the use of Flyway Enterprise edition, which supports the full range of schema comparison functionality. However, the step of saving changes to the schema model is also supported in Flyway Teams.
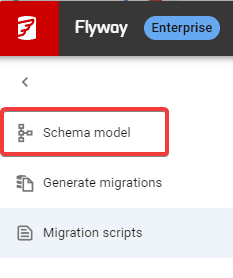
A typical database development workflow with Flyway Desktop
A typical Flyway Desktop (FWD) development workflow will include the following tasks:
- Make changes to a local development database, connected to our Flyway Desktop project,
- Save those changes to the project's schema model,
- Generate and save migration scripts to capture those changes,
- Use those migration scripts to update other database environments,
- Commit all the changes to the version control system.
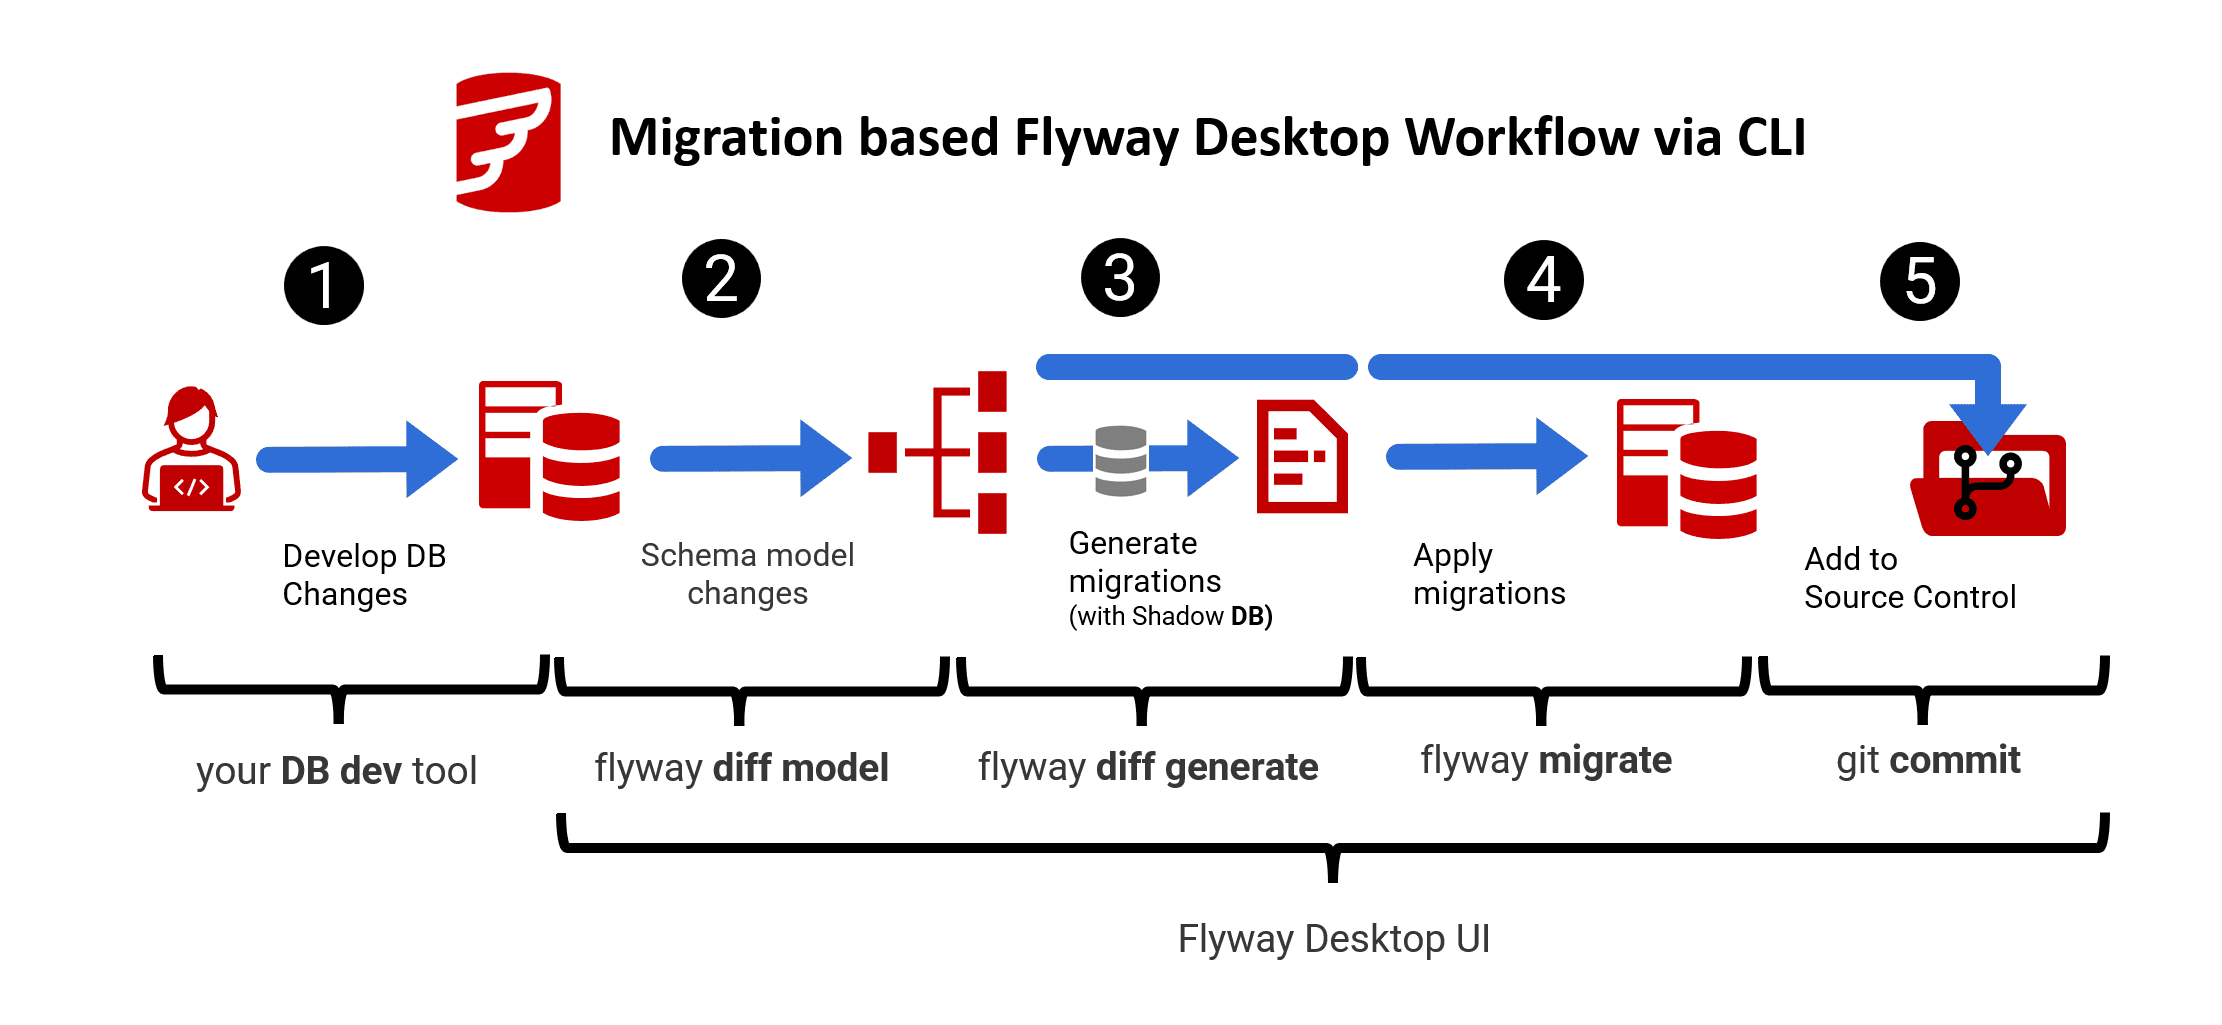
Under the hood, Flyway Desktop uses schema comparison commands in the Flyway CLI to compare databases, detect differences, and then capture those differences in scripts or a schema model. You can verify this by opening the log files for one of your Flyway Desktop sessions!
In step 2, to save development changes to the schema model, Flyway runs a 'diff' with the latest development database as the source, and the schema model folder as the target. In step 3, when generating migration scripts, it runs a diff with the schema model as the source, and the migrations folder (materialized in the shadow database) as the target. It validates the generated script by running it on the shadow and then saves it. This part of the workflow is illustrated in more detail below:
Automating a typical, migration based, Flyway Desktop workflow
To illustrate the automation capabilities of the Flyway CLI, we'll walk through a script that demonstrates how to run steps 2-4 of this workflow using various Flyway commands.
I'll assume you're familiar with Flyway Desktop. Other articles on this website have described how it works. See, for example, Flyway Desktop in Database Development Work: An Overview. The demo currently only works with versions of Flyway Desktop v7.7.0 and up, which ships with the new flyway CLI. You could also do the demos without Flyway Desktop, by just getting Flyway v11 and up.
Create the Flyway project
Setting up a project for Flyway CLI automation is a one-time task and is not covered here because the documentation explains how to do it. Alternatively, you can create the project using Flyway Desktop, as usual.
Create the database environments
To run the demo, you'll need to set up the connection details for a source database (e.g. dev), a target database (e.g. prod) and a build, or shadow, database. If you do all this in Flyway Desktop, it automatically saves the connection details for each of these databases to disk, as Flyway Environments. If you opened the flyway.user.toml configuration file for this demo, you would see the saved configuration details for the dev, prod, and build (or shadow) environments.
If you're working directly with the Flyway CLI, then you'll need to add these details manually.
Save dev database changes to the schema model
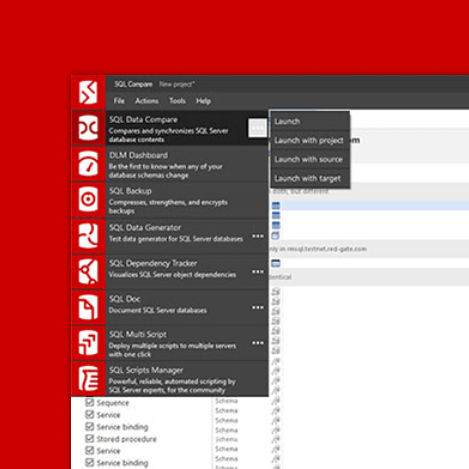
Once we've made and tested changes to our development database, we would, in the Flyway Desktop UI, switch to the schema model tab.
On doing so, the Flyway will automatically detect these changes. It does this by comparing two database environments: the development database (source) and the schema model folder (target). It displays exactly which objects have been altered and how, with a side-by-side comparison of the 'before' and 'after' state of each changed object.
When you hit the Save to project button, Flyway Desktop updates the schema model folder, on disk, so that every CREATE script reflects the current state of its associated database object.
We can perform the same task in the flyway CLI by initiating a comparison, or diff, between the development database and schema model folder to identify differences in their structures.
flyway diff "-diff.source=development" "-diff.target=schemaModel"
The CLI captures these differences in a temporary "diff artifact", which contains a list of differences, each identified by an ID. If working interactively, we could use these IDs as an input parameter to pick and choose our changes, but in an automated pipeline, we're just going to accept all of them.

With the diff artifact saved, themodel command is used to select the differences detected in the previous comparison and saves the differences to the schema model.
flyway model

We can also chain the diff and model command, so no user interaction is needed after viewing the difference output, like this:
flyway diff model "-diff.source=development" "-diff.target=schemaModel"
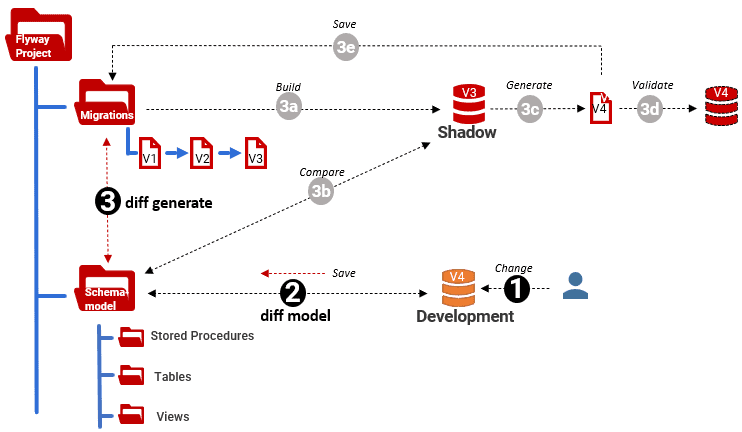
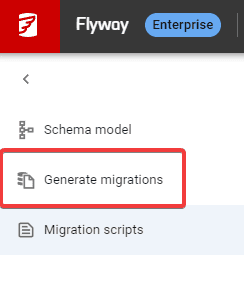
Generating the migration script
Having saved our latest development changes to the schema model we would, in the Flyway Desktop UI, then switch to the Generate migrations tab. The tool will automatically generate and validate a script that includes all of those changes and invite us to give it a name and save it to the Migrations folder. This step is Enterprise edition only.
Let's see how we can automate this part of workflow with the flyway CLI.
The diff this time is between the schema model and the Migrations folder, with the intention of detecting any changes that have been saved to the schema model but are not yet captured in a migration script. However, Flyway cannot directly compare to a folder of migration scripts, so it builds the current version of the database, as represented by the migrations folder, in the Shadow database. The flyway.user.toml configuration file, the 'shadow' database is the one referenced in the build environment.
The diff is then, in effect, between the schema model folder (source) and the build, or shadow, database (target). This produces a diff artifact, as described previously, and we can then use the generate command to capture these differences in a versioned migration script. We can also choose to generate the undo script at the same time. Beside the types of scripts that are generated, we can specify a description, which will appear in the migration filename, using generate.description.
flyway diff generate "-diff.source=schemaModel" "-diff.target=migrations" "-diff.buildEnvironment=shadow" "-generate.types=versioned,undo" "-generate.description=NewTableAdded"
Flyway will automatically validate the new script by running it on the shadow database, and then save it to the Migrations folder
Apply migrations
In the final steps of the workflow, we apply the new migration script to a target database and then commit all the changes to version control. In the Flyway Desktop UI, we would run migration scripts from the Migrations tab. As you can see in the View command window, the migrate command we need is generated for us.
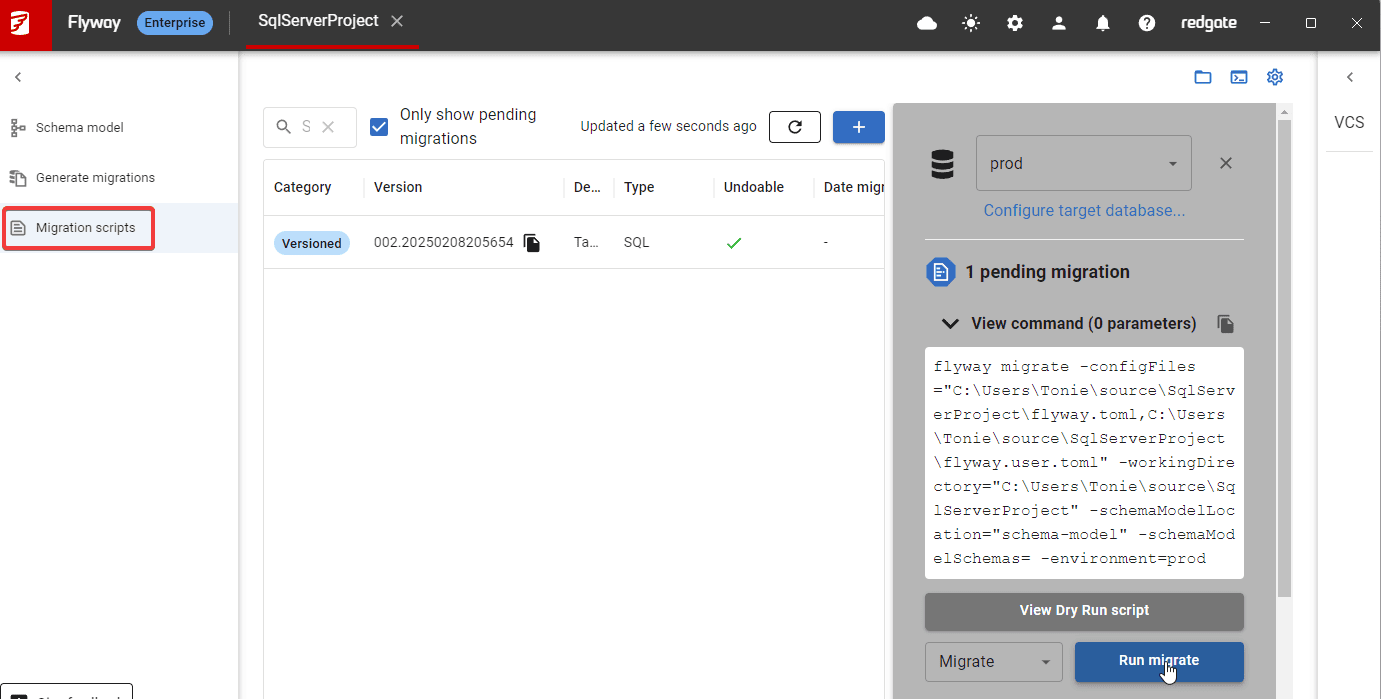
With the environments set correctly and by executing the Flyway CLI from the root directory of the Flyway project, the migrate command is very simple:
flyway migrate -environment=prod
The environment could of course be anything like QA, Test, Preprod, or whatever we have configured in the environments of the project.
Commit your work
Finally, we’d switch to the Version control tab in Flyway Desktop to commit all the changes to our repository.
This last step can be scripted and automated but since it’s not involving any flyway CLI logic, we won’t go into the details here. However, as mentioned previously, you can see exactly what commands get executed 'behind the scenes' by, first, turning on verbose logging:
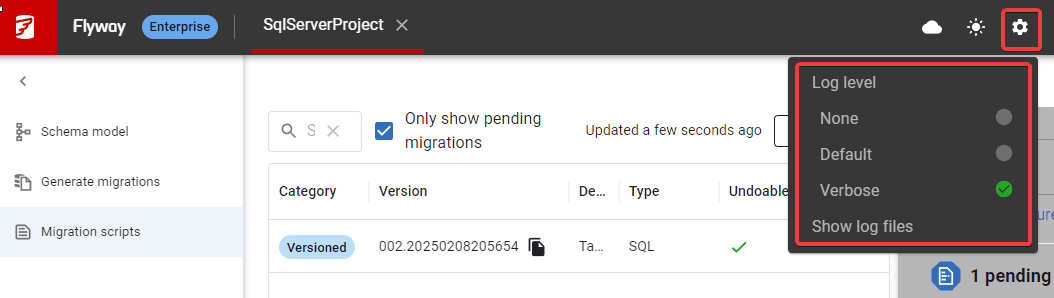
Then you just run through the tasks in the UI and examine the log files. You'll find:
- The Flyway command for the Migration tab, as:
"[App] Calling "C:\Program Files\Red Gate\Flyway Desktop\flyway\flyway.cmd" - The git actions as:
"[App] git".
Summary
With the Flyway Desktop CLI (flyway-dev) deprecated, the standard Flyway CLI now provides all migration and schema management capabilities. This simplifies database automation and improves integration with DevOps pipelines. We can use it to achieve more efficient database schema management and streamline the creation of migration scripts.
If we can automate each step in this process, building in tests and checks each time to ensure that both the generated migration script and the resulting new database version work exactly as intended, then we significantly enhance the development workflow, ensuring consistency and reducing the chances of errors during the migration process.
Personally, I'm a strong advocate of the migration-based approach, as discussed in this article. However, keep an eye for an article on the state-based approach, which is now also supported in the Flyway CLI.
This document contains proprietary information and is protected by copyright law.
Copyright © 2026 Red Gate Software Limited. All rights reserved
Tools in this post
You may also like

Article
Learn how to use Flyway for Automated Database Migrations
A learning path for managing and automating database deployments, from version control, using Flyway.
Article
Automated State-based Deployments in Flyway
Learn how Flyway's state-based deployments help teams coordinate database changes and automate deployments, reducing risk, without disrupting existing development workflows. This article explains how they work, where they fit best, and when it makes sense to move to a migration-based approach.
Article
Simplifying Data Import and Export for Database Development
Extracting and importing data for development and testing is made trickier due to issues such as constraints, dependencies, and special data types. This article introduces a cross-RDBMS solution with JSON for data storage and PowerShell cmdlets that use ODBC to help automate extraction and import, and JSON Schema for validation. Just provide a DSN, and you’re good to go!
Article
JVM Properties
At its core, Flyway is a Java library, though it hooks into many clients which are frequently used in non-Java contexts. For non-Java contexts we’d like Flyway to be as platform-agnostic as possible. Nonetheless, some Java-specific concepts have to be exposed, like our use of Java Database Connectivity (JDBC) drivers. The Flyway Command Line client in particular is designed to be generic, and behave like a native application. Nonetheless, sometimes it’s necessary to deal with the underlying Java platform for advanced configuration, and to enable certain features. In this blog post we’re going to talk about one such case –
Article
Using Git Hooks with Flyway
When you’re on your own developing a simple application, managing your migration scripts is not a demanding task; each time you add a script, it gets the next version number in whatever sequence you’ve decided on using. When your application takes off and you find you have a team working on migrations simultaneously, sharing code via a distributed source control system such as git, then there is an increased risk of running into problems as the developers work on the same database migration code at the same time. Problem one: Numbering conflicts Let’s say you’ve been asked to add a new
Article
Announcing Flyway/CockroachDB Support
Earlier versions of Flyway supported simpler schema migrations within a single CockroachDB node. Both Flyway and CockroachDB aim to be simple to use, and we’re delighted that the Cockroach Labs team have worked closely with us to enable Flyway to be just as robust and reliable in scenarios involving many distributed nodes where migrations need to propagate from any node safely without downtime – scenarios that are increasingly common in cloud applications – without imposing that underlying complexity on Flyway users. Indeed, you shouldn’t notice any difference at all. Flyway is now fully compatible with CockroachDB. CockroachDB is a distributed
Loading comments...