Using Redgate Monitor with SCOM
This walkthrough shows how to configure SCOM so that it can consume alerts from Redgate Monitor.
In my last blog post, I talked about how to get Redgate Monitor to send alerts to Slack and how to send SNMP Traps. It’s easy to make Redgate Monitor send SNMP traps, but SCOM is more challenging than most management tools to configure to receive these traps.
Discover Redgate Monitor
To receive SNMP traps, SCOM first needs to discover the machine Redgate Monitor is running on as an SNMP device.
Make the Redgate Monitor machine discoverable
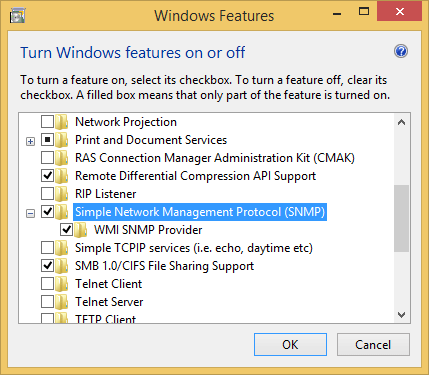
You’ll need to be running the SNMP Service on the Redgate Monitor machine. This can be installed from Programs and Features -> Turn Windows features on or off -> SNMP Service.
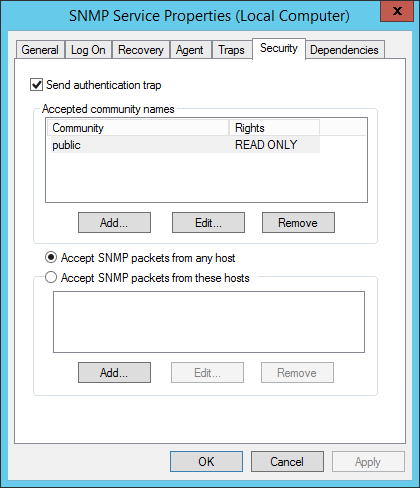
Once this is installed, navigate to the service’s properties dialog box in the computer management console. In the Security tab, add an accepted community name. We’ll use the word public throughout this walkthrough. Either add your SCOM server to the allowed hosts section, or permit packets from any host.
Also ensure that incoming traffic on port 161 is allowed to the Redgate Monitor machine.
Allow SCOM to discover SNMP on Windows machines
By default, SCOM can’t discover Windows machines as SNMP devices, so it’s necessary to make a modification to its network discovery rules. On the SCOM machine, open C:\Program Files\Microsoft System Center 2012 R2\Operations Manager\Server\NetworkMonitoring\rules\discovery\ic-post-processor.asl, navigate to following section, and change all of the return TRUE statements to return FALSE:
ISWINDOWSHOST(systemObj) do {

if (systemObj->Type == "HOST" && systemObj->Vendor == "MICROSOFT") {

return TRUE ;

}

if (SEARCHSTRING(systemObj->Description, "Windows")) {

return TRUE ;

}

systemOIDCheck = ".1.3.6.1.4.1.311.1.1.3.1" ;

if (substring(systemObj->SystemObjectID, 0, sizeof(systemOIDCheck)) == systemOIDCheck)

{

return TRUE ;

}

systemOIDCheck = ".1.3.6.1.4.1.99.1.1.3.11" ;

if (substring(systemObj->SystemObjectID, 0, sizeof(systemOIDCheck)) == systemOIDCheck) {

return TRUE ;

}

return FALSE ;

}
Perform the discovery
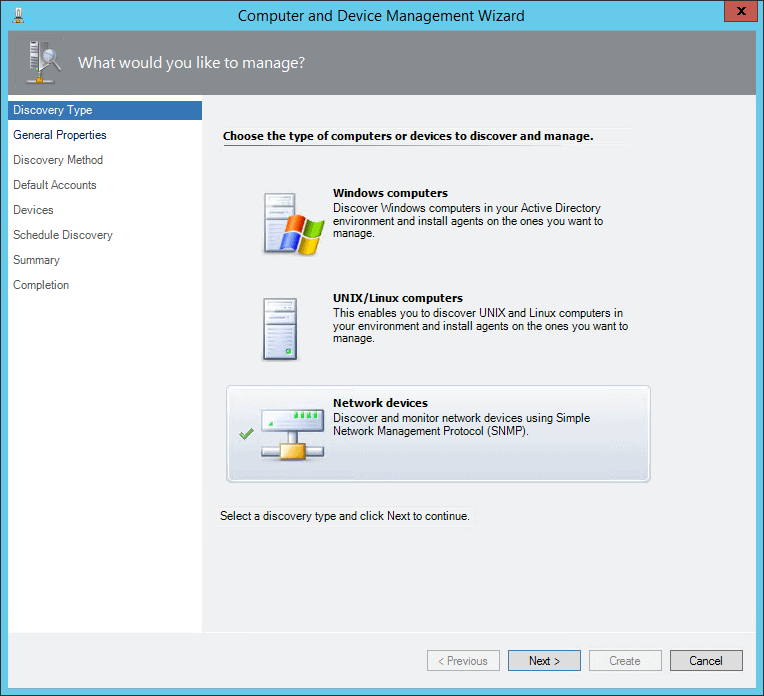
In SCOM, select the administration tab, and run the Discovery Wizard.
Choose Network devices (not Windows, as would be intuitive).
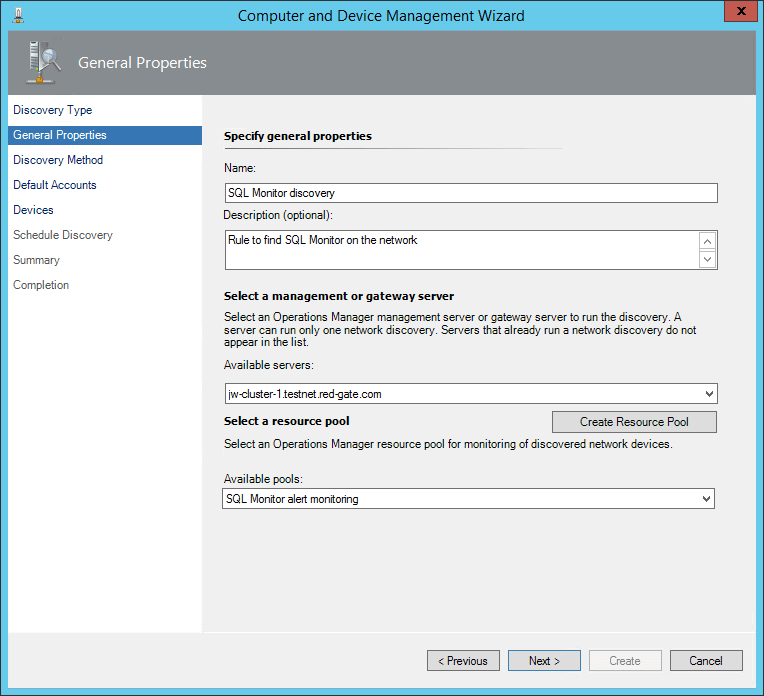
Give the discovery rule a name and choose a management server. Either create a new Resource Pool for the Redgate Monitor server to live in, or assign it to an existing one.
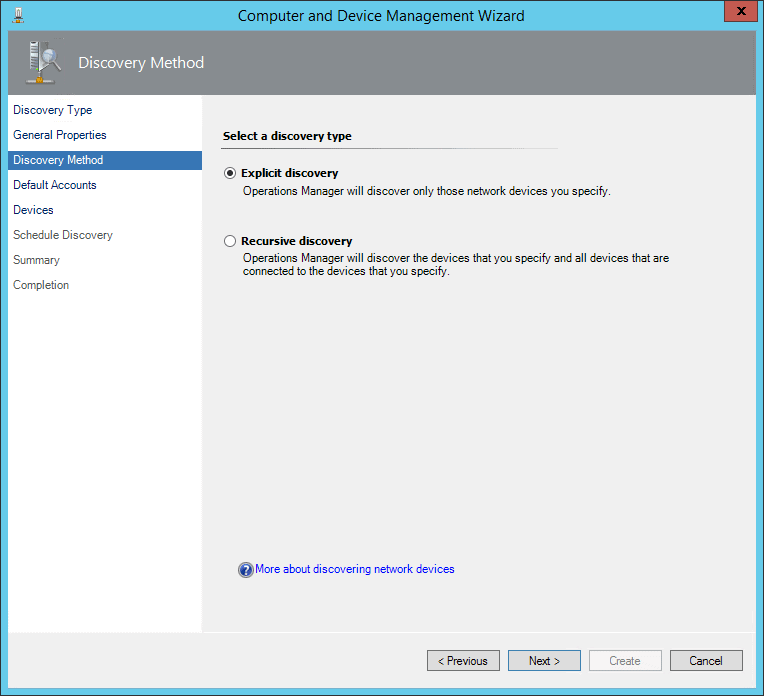
Choose Explicit discovery.
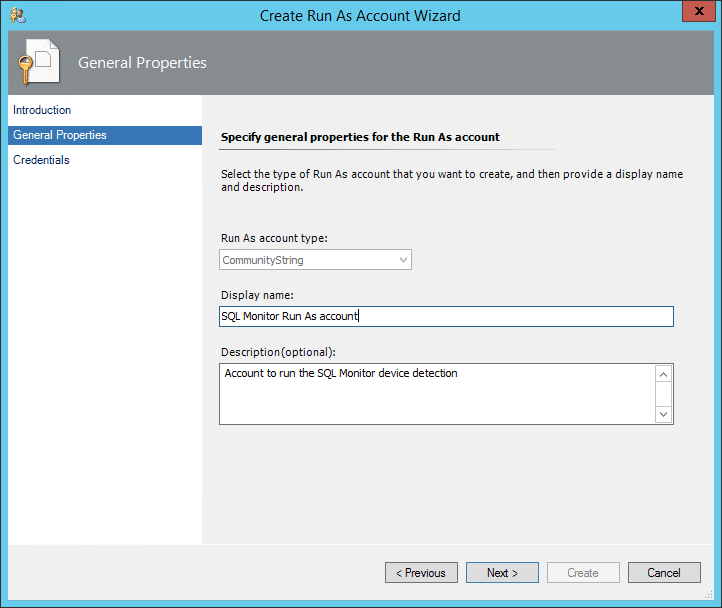
On the next screen, choose Create Account. Create a new Run As account, and on the Credentials screen enter the word public (or whatever other key you chose to use earlier).
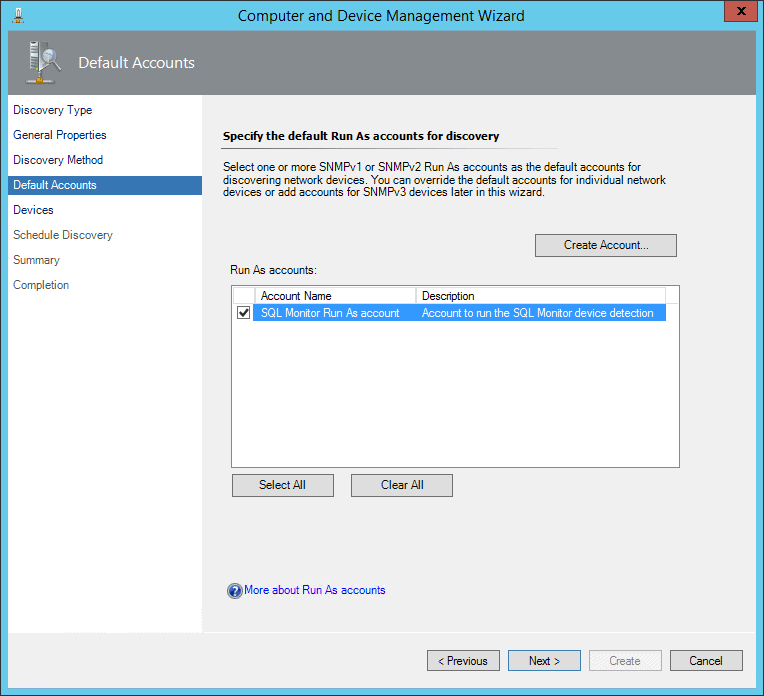
Select the newly created account.
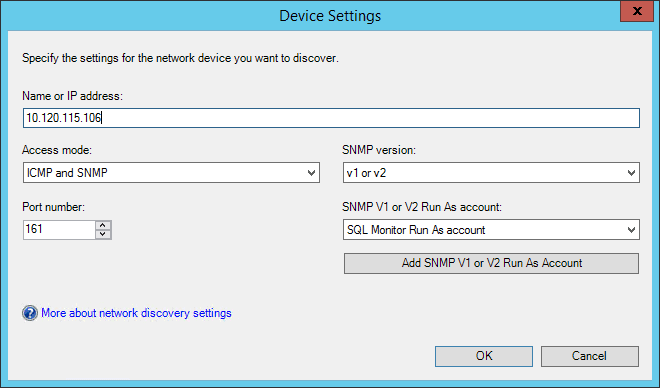
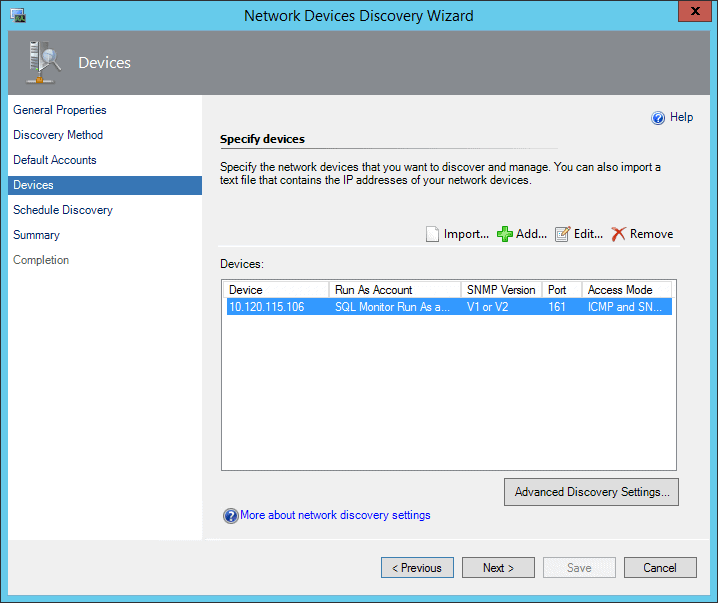
On the Devices page, add a new device. Choose the previously created Run As account, and put in the IP address of the Redgate Monitor server.
Select Next on the Devices page.
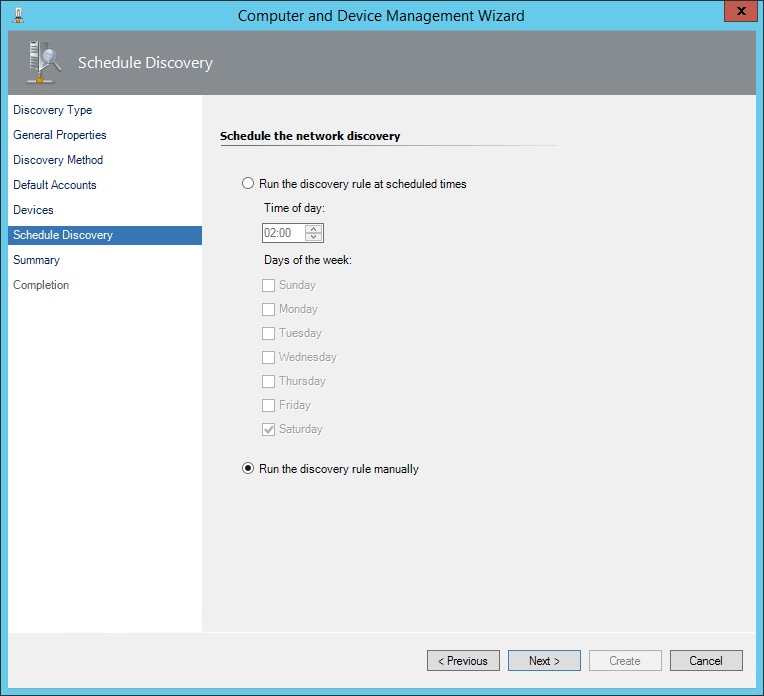
Choose to run the discovery manually.
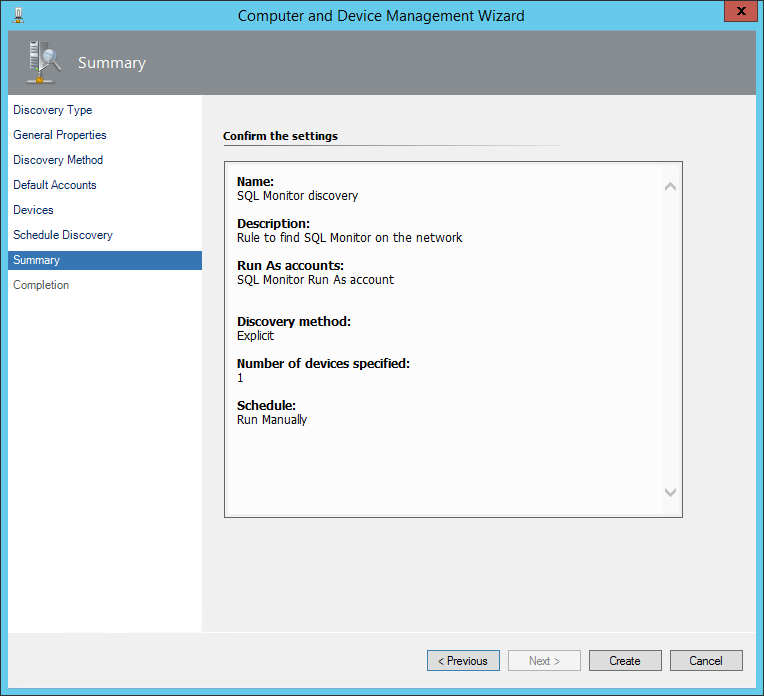
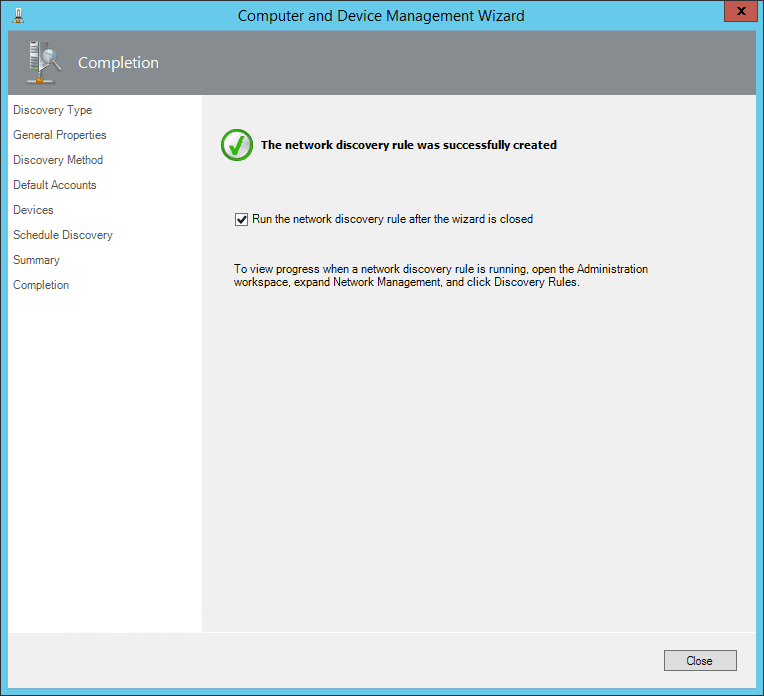
Review the settings.
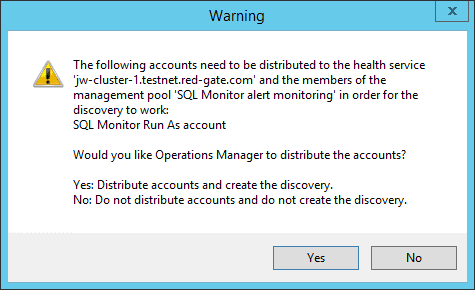
After clicking Create, if prompted choose Yes to allow SCOM to distribute the Run As account to your management servers.
 c
c
Once the rule has been created, select to run it.
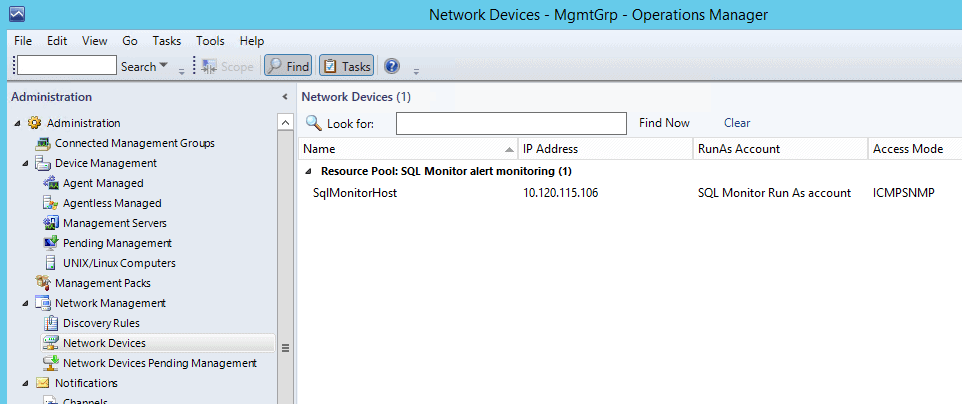
After a minute or two, you should be able to browse to the Network Devices tab, and see the machine listed (SqlMonitorHost is the name of the Windows machine running Redgate Monitor).
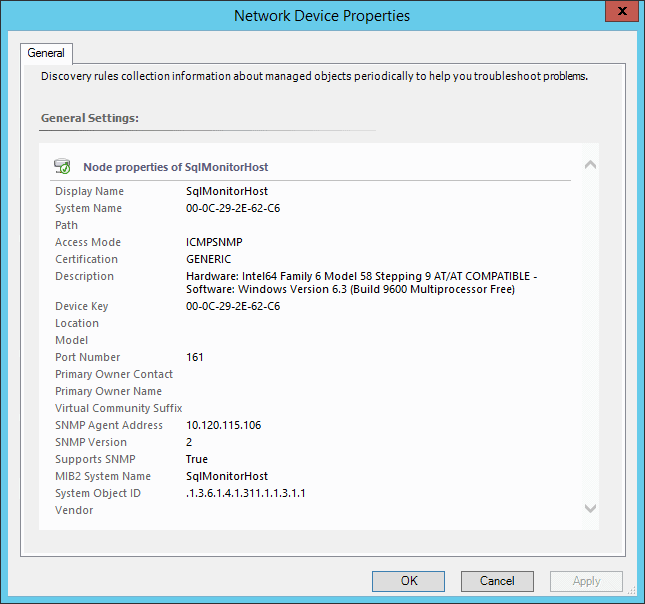
If you right click and select the properties for this device, you can confirm it looks like this, and specifically that the access mode is recorded as ICMPSNMP.
Receive SNMP Traps in SCOM
Having discovered the Redgate Monitor machine, we now need to configure SCOM to receive SNMP traps from it.
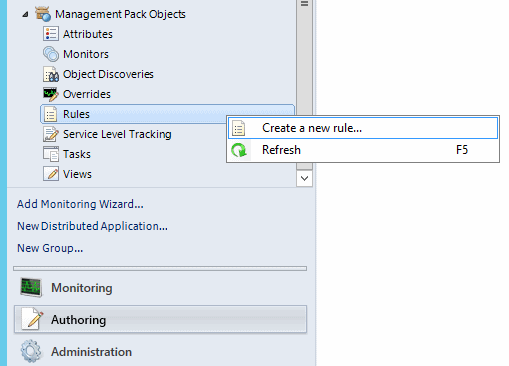
Under Management Pack Objects in the Administration tab, Create a new rule.
Use the SNMP Trap (Event) type.
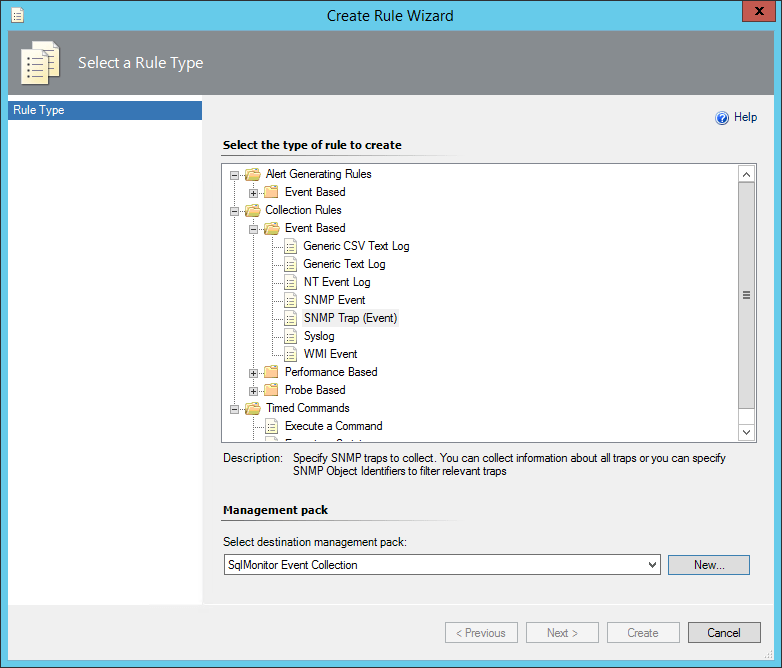
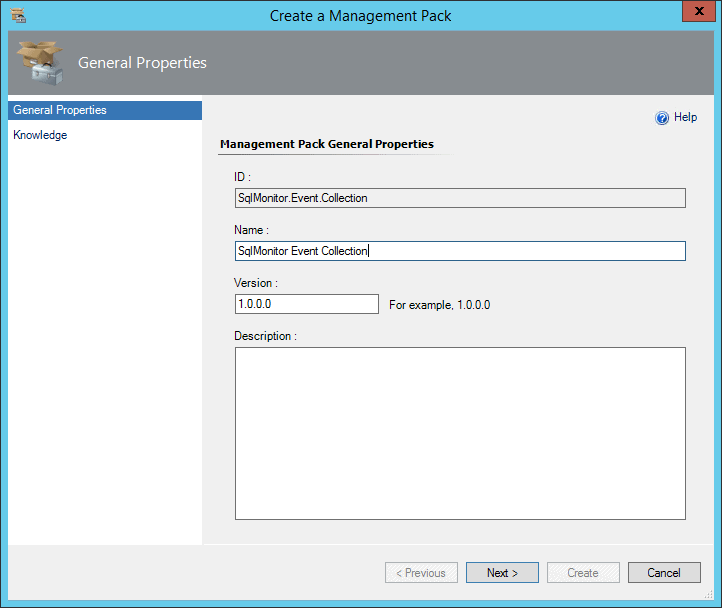
Either choose an existing Management Pack, or create a new one:
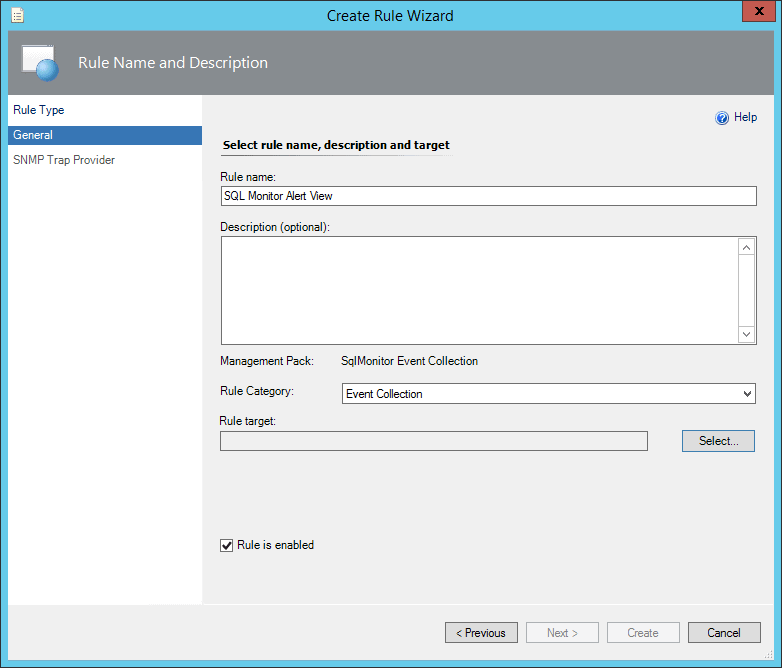
Give the rule a name like Redgate Monitor Alert View, and choose Event Collection as the category. Under Rule target, click Select.
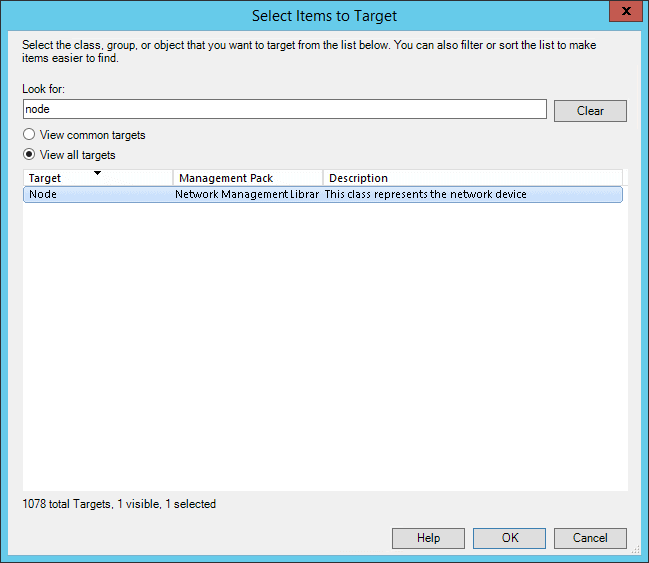
Search for and select the Node target (after selecting View all targets).
On the next screen, you can leave the object identifier blank to receive from any OID (or optionally filter to Redgate Monitor’s id of 1.3.6.1.4.1.48099.1.1). Then click Create.

To view these alerts, you need to create an event view. Go to the monitoring tab, and create a new folder with the destination management pack set to the same one you created previously.
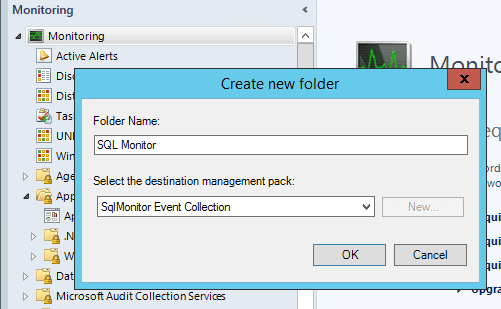
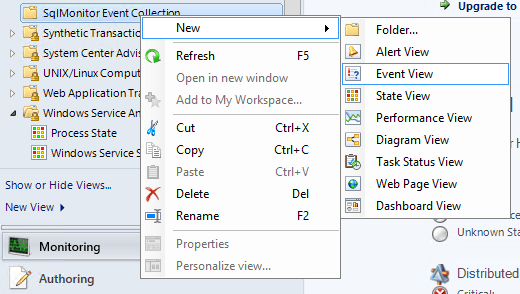
Right click on the created folder, and create a new Event View.
Select again to show data related to Node, and click OK to save the view.
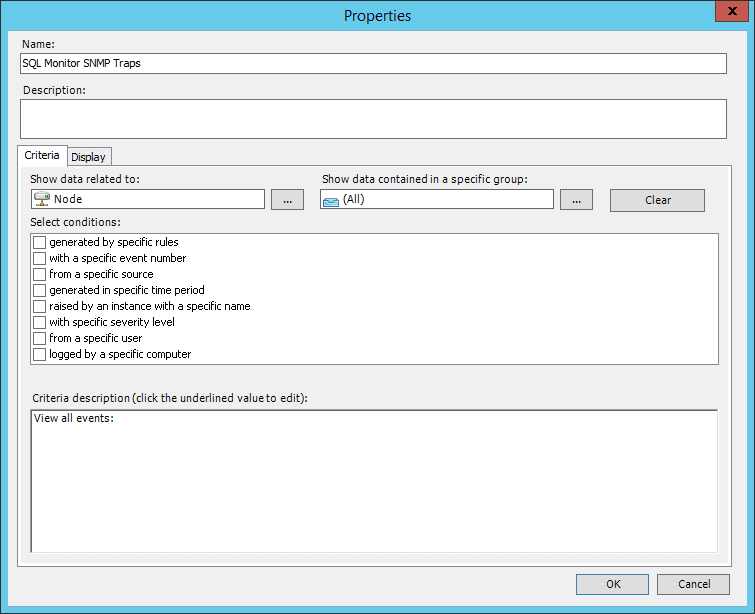
Expand the folder and open the newly created view.
SCOM should now be ready to receive SNMP traps from the Redgate Monitor machine.
Configure Redgate Monitor
You need to configure Redgate Monitor to send SNMP traps when alerts are raised. In Redgate Monitor, browse to the Configuration tab, then select Notification settings.
Select to send an SNMP trap when alerts are raised. Fill in the ip address of your SCOM server, and set the community string to whichever value you used previously (public in this case).
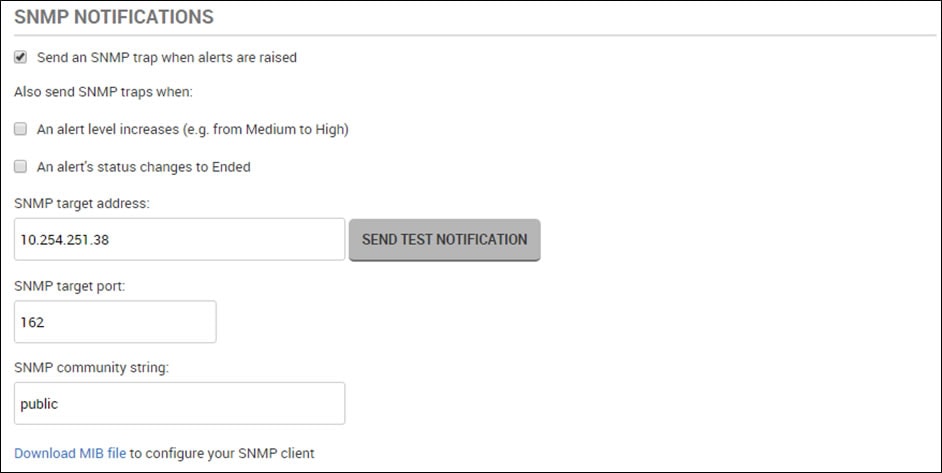
Click SEND TEST NOTIFICATION to make sure messages are being sent successfully.

Checking it all works
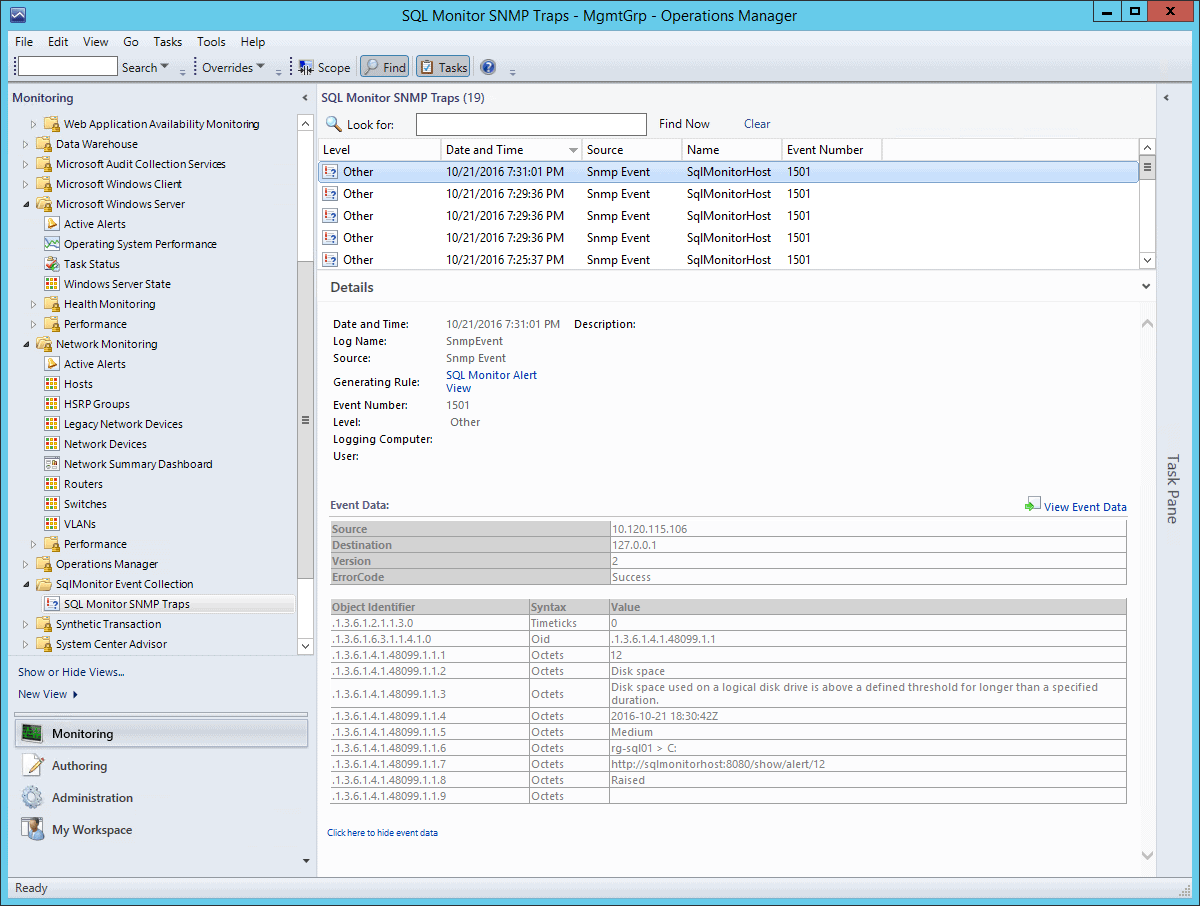
Now in SCOM, you should see this test message from Redgate Monitor appear:

You’re now receiving alerts like the following, and can consume them however you wish inside SCOM.
Troubleshooting
If you run into any difficulties, you might find the following detailed articles useful (in particular, note that Redgate Monitor sends SNMP v2 packets – if your Windows machine is discovered as either a v1 or a v3 device, SCOM will fail to receive the SNMP traps. The first article describes how to work around this filtering by editing some management pack xml.
SNMP Trap monitoring with SCOM 2012 R2
How to discover a Windows Computer as a Network Device in SCOM 2012
SCOM needs to be able to receive UDP traffic on port 162, and Redgate Monitor needs to be able to send traffic on that port. During setup, the Redgate Monitor Server must be able to receive UDP traffic on port 161, and SCOM needs to be able to send traffic on that port.
Summary
Setting up SCOM to receive SNMP traps can be a little tricky, but getting it working with Redgate Monitor can be really valuable, allowing you to take advantage of Redgate Monitor’s richer SQL Server alerting capabilities inside SCOM.
If you’ve yet to get started with Redgate Monitor, you can download a free 14-day evaluation. As usual, we’d love to hear any feedback – just drop an email to SQLMonitorFeedback@red-gate.com.
Tools in this post
Redgate Monitor
Real-time multi-platform performance monitoring, with alerts and diagnostics
You may also like
-
Webinar
Maximize Your SQL Server Efficiency with Redgate Monitor
Managing your SQL Server estate has never been more critical. Join our webinar to explore how Redgate Monitor offers a holistic solution for monitoring your database performance, availability, and security from a single pane of glass. Key features include: Global Overview: Monitor all your servers at a glance. Diagnosis: Quickly identify root causes of issues.
-
Live training session
What's new in SQL Monitor 11
In this session hear about the improvements we have made in the latest release of SQL Monitor, and a demonstration to show how to fully optimize the tool. Our experts cover monitoring instances hosted on Amazon RDS, monitoring tempdb, performance improvements, and an introduction to the new documentation site for SQL Monitor.
-

Article
Migrating Between Monitoring Systems
This question comes up all the time: How do you migrate between monitoring systems? The answer is both simple and complicated. In order to understand this better, rather than just rely on my own knowledge, I reached out to a number of people to see how they accomplished this. I’m going to summarize their process
-

Article
Set up Redgate pgNow Activity Monitoring on Azure Database for PostgreSQL Flexible Server
This article is a QuickStart setup guide for Redgate pgNow activity monitoring on Azure Database for PostgreSQL Flexible Server. Once you’ve completed the setup, you can start using live query activity, health, and performance data to troubleshoot current issues on your PostgreSQL instances, all without writing any SQL scripts.
-
Ask Me Anything
Straight from the Source: A DBA’s Experience with Redgate Monitor
Join a Live Peer-to-Peer Conversation on Redgate Monitor’s Real-World Impact Date: Thursday, July 31, 2025 Time: 8 am Pacific / 10 am Central / 11 am Eastern Location: Virtual (Zoom) Recording: This session will not be recorded — join live to get the full experience. Why Attend? Evaluating Redgate Monitor? This is your chance to hear directly