Getting Started with SQL Data Masker: I Need to Mask some Columns
Grant Fritchey explains the core rules and features of Data Masker, and how you go about using them to mask columns, so that when the data is used outside the production system it could not identify an individual or reveal sensitive information.
Redgate’s Data Masker for SQL Server is a tool for protecting private or sensitive production data, so that it is safe for it to be used for other business purposes, such as for development and testing work. It supports a wide range of masking rules, from simple data substitution and data shuffling rules to synchronization rules that will help you mask your data fully and consistently, even if it is stored in denormalized form, and even in less well-designed databases that lack the proper keys and constraints.
However, this versatility means that it can, at first, seem daunting. It’s hard to know which rules you need when. To mask hiredate and birthdate columns, for example, you might quickly decide you need a substitution rule, to substitute the real dates with fake ones. However, of course, you want to do it sensibly, and in a way that complies with your business rules, so that a person isn’t hired before they were born, or before they are 18, or before the company was founded. Which combination of masking rules, run in which order, will do the job? In fact, Data Masker can achieve this sort of task quite easily, and I’ll show you how.
In this article, I’ll just be masking a few columns in the AdventureWorks database with random values selected from built-in datasets. In later articles, we’ll build on this, moving on to mask whole databases, and doing so in a way to ensure that not only is all the data protected, but the masked data still accurately represents the characteristics and distribution of the real data.
Creating a Masking Set
I’m going to assume that you know next to nothing about SQL Data Masker and that you’ve just finished the successful install and registration. If you have questions about the basic setup or licensing, please follow the documentation here.
Masking, like many terms, is more than a little overloaded. If we use a technique such as Dynamic Data Masking in SQL Server, then the database engine masks sensitive data values as they are retrieved from the database, to prevent unauthorized users from viewing them. However, on development and testing instances, the users might have direct, administrative access to the database, and will quite easily be able to “look behind the mask”. When we refer to masking a column using Data Masker, we mean replacing the real values in that column with different values, picked from a list or randomly generated. It is a permanent, physical change to the data and so cannot be accidentally exposed or reverse engineered.
When you launch the tool, you’re asked to either create a new masking set or open an existing one. We’ll be creating a new one. At the next screen, you’re invited to connect to a database.
Connect to the database
SQL Masker works by inspecting your data structures, so that it understands what schemas, tables, columns and datatypes are present and how tables are related. Therefore, it must be connected to a database. Data Masker imports the connection and schema information into a masking set, to which you then add the required masking rules.
I strongly recommend that you do not connect directly to a production instance to set up your masking sets. Instead, I’d recommend practicing on a non-production instance of SQL Server. The next question is harder to answer: do you work initially with a set of production data or do you work with a database already filled with test data or do you even choose an empty database?
The safest choice is probably to work with a test database, filled with test data. This way, you’re not putting your production data at risk in your initial work. Ultimately, of course, you will need to test your masking set against a copy of production (again, run the tests on a non-production instance).
Here is the Data Masker database connection window configured for running against my local instance of SQL Server (a Linux instance running within a Docker Container):
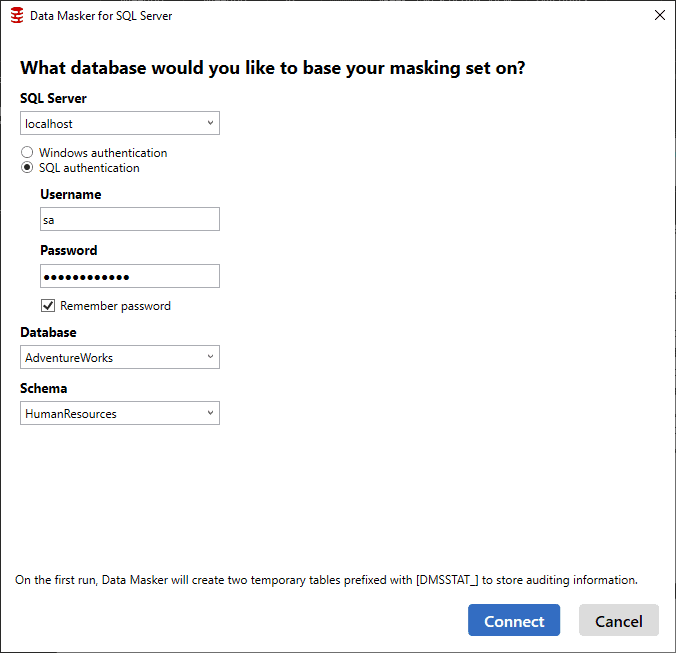
There are only two points of special interest. Firstly, when you start creating a masking set, you must specify not only the database but also an initial schema. In this example, I’ve started with the HumanResources schema of the AdventureWorks database. Of course, you can work with more than one schema within the tool, but for reasons that will become clear as we progress, we start with a single schema. Secondly, the tool will create two temporary ‘masking statistics’ tables, with the prefix DMSSTAT_,in order to store auditing information about which rules have been applied to which tables.
Clicking the Connect button will connect you to the database and open the Data Masker application, which will look something like this:
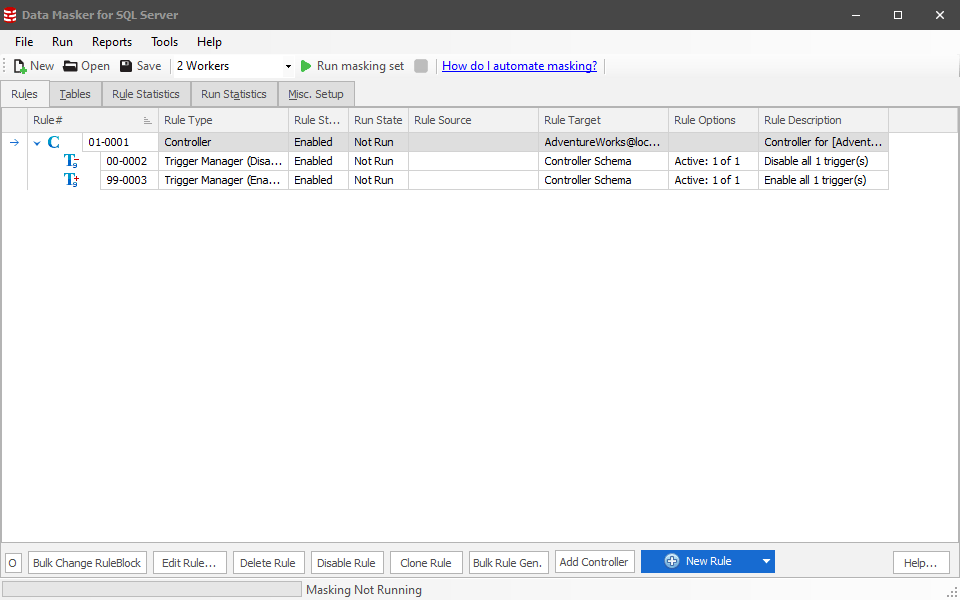
The masking set is fully configured and ready to run; just click the green arrowhead. Of course, it won’t mask any data at this point, since we’ve not selected any columns to mask nor added any rules with which to mask them. The user interface is even prompting us towards this next step, with the New Rule button highlighted in blue.
However, first, let’s take a moment to review some the elements of this screen. I’ll skip the top menu items for now as we won’t use them in his article. In the toolbar below, we have the standard buttons to create, open or save a masking set. You can also define the number of workers, think of them like threads, used to run your masking set. We’ll discuss that some more later in the article.
Below that is the main window, with a series of five tabs. The first two (Rules and Tables), and the last (Misc. Setup) control different aspects of the masking operation. We’ll only need the Rules tab in this article, but the Tables tab is worth a brief mention, as it provides useful details about each of the tables in our schema, and allows us to establish which columns are sensitive, so we know what we must mask. However, I’ll explore this more in a subsequent article.
The other two tabs, Rule Statistics and Run Statistics, show information about how your masking set behaves when you run the masking operation on your data. We’ll look at these tabs a little later in this article.
The Rules tab: adding rules and defining their order
The Rules tab is where we define our masking rules; the steps that will be undertaken in order to mask our data. We can see that Data Masker has automatically added 3 rules to our masking set, a Controller, which is really a container for other rules, and two Trigger Manager rules.

Each rule has a rule ID, a rule type, and various other properties, such as a status, state and so on. The Rule ID has two digits specifying the rule block to which the rule belongs and then, after the en-dash, the rule ID number.
Any time you create a masking set, you’ll get one Rule Controller, at the top, marked with a “C”, and all other rules in the set will be nested (indented) below this parent Controller, meaning they are dependent on it. Once the Controller runs, and loads up all the schema information, other rules can run. In this case, the first rule to run will disable any triggers, and the last will enable them again. In between, will come any other rules that we subsequently add to the masking set.
We won’t go into the details of rule blocks and dependencies in the article but suffice to say it’s how we control the order in which rules run:
- If a rule is dependent on (nested beneath) another rule, it cannot run till the parent rule completes.
- Rule blocks run in ascending order; all rules in rule block 03, say, must run before any rules in rule block 04.
- Rules within a block run in ascending order of ID number, but if more than one thread is being used, then rules within a block that are at the same nesting level might be run in parallel.
Rule Controllers: connection and schema information
Each schema in your database will get its own Rule Controller, which stores the schema information for that database connection. This means that once you’ve created the Controller and saved your Data Masker set, you won’t need to connect to the database again in order to create, edit, and maintain rules.
Since each schema has a parent controller, which we can enable or disable individually, it means we can pick which masking sets to run for which schemas. The Controller is a big part of the level of control you get over SQL Data Masker.
If you double click on a controller, or, select the controller and click the Edit Rule button at the bottom, or, select a Controller and right click on it, you can get to the Edit Rule Controller window:
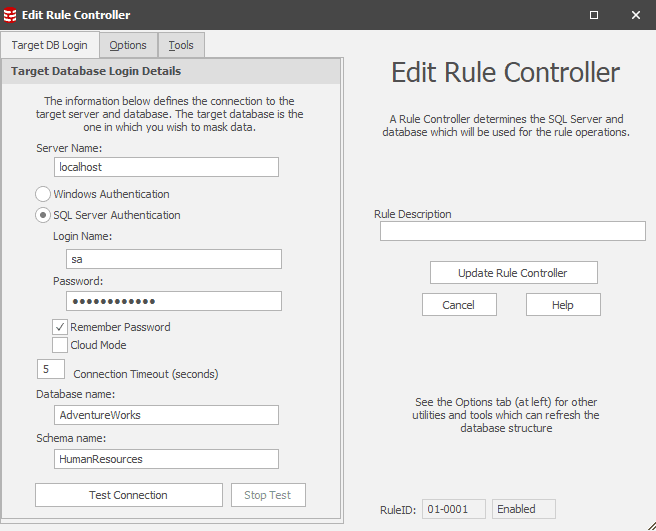
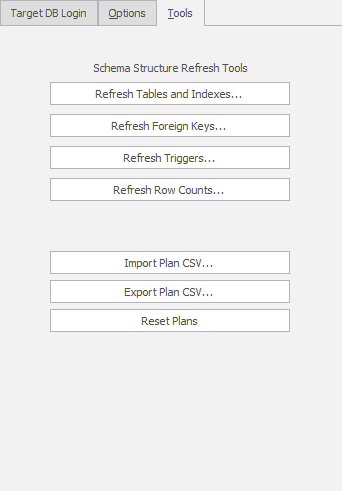
The Target DB Login tab shows the database connection details, which we can edit directly if required. We’ll skip the Options tab for this introductory article, but the Tools tab is important to us during database development, because this is where we can refresh the schema information in the masking set with any changes made to underlying database.
Enabling and disabling Triggers and other objects
As we discussed earlier, the Controller reads the schema supplied when creating the masking set. In this example, we chose the HumanResources schema, and one of the tables in the schema, Employee, which has a trigger (which would stop us trying to delete an employee):
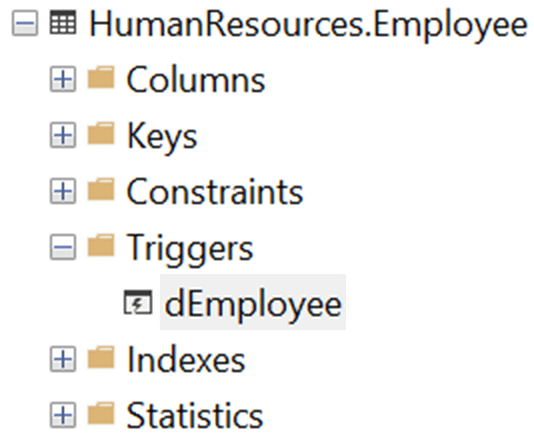
So, in order to be sure that the data can be appropriately masked, through data modification, SQL Data Masker has added a special Trigger Manager rule that will disable the trigger, before any other rules run, and then re-enable it at the end. On the other hand, if you have a trigger that updates other data, on changes in a given column, you may need to either leave that trigger enabled, or deal with its effects as a part of your masking set definition.
There are also rules to disable/enable foreign key constraints and indexes, as well as triggers. In most cases, SQL Data Masker will make the right choices regarding which of these objects should be disabled. However, you may have unique circumstances that will require you to take control of individual database objects.
Creating Masking Rules
We now get to our core task, which is to add a series of masking rules to our masking set to protect any columns that contain personal or sensitive data. In some cases, deciding exactly which data requires masking within a database can seem like a pretty easy proposition. For example, email addresses: it we allow use of real email addresses on development and test servers, it can easily cause an organization all sorts of headaches. However, in other cases it’s not so clear cut. Take, for example, job titles. In some organizations, this may be an entirely benign set of data. For others, letting unauthorized people know the various job titles that exist would be considered a serious security breach.
Over the coming sections, I’ll demonstrate how to mask columns that contain various types of sensitive data by applying masking rules to a few of those columns, namely the JobTitle, BirthDate and HireDate columns in the Employee table, and the Resume column (an XML column) of the JobCandidate table (to mask any names that appear within the XML).
Of course, this does not represent every piece of data in the HumanResources schema that might need masking, or even close. I don’t, for example, mask the NationalIDNumber column, which you would certainly need to do, and once you’ve followed along, you should feel confident that you’d know how to it.
Substitution rule: replace real values with those from a selected dataset
The core rule that we use in Data Masker, to protect sensitive data, is the Substitution rule, which replaces the sensitive data in a column with the values from a configured dataset.
The HumanResources.Employee table has a JobTitle column. In order to keep that information out of our non-production systems, we’re going to introduce a simple Substitution Rule that will replace the real job titles with fake ones, from a built-in dataset.
To do this, we can click on the New Rule button, or right-click the rule controller and select New Rule in Block…. Alternatively, you can use the dropdown immediately to the right of the New Rule button, although this is only useful if you know you want one of the three most used rules, Substitution, Shuffle, or Table to Table.
For my purposes, I want to show the full rules window:
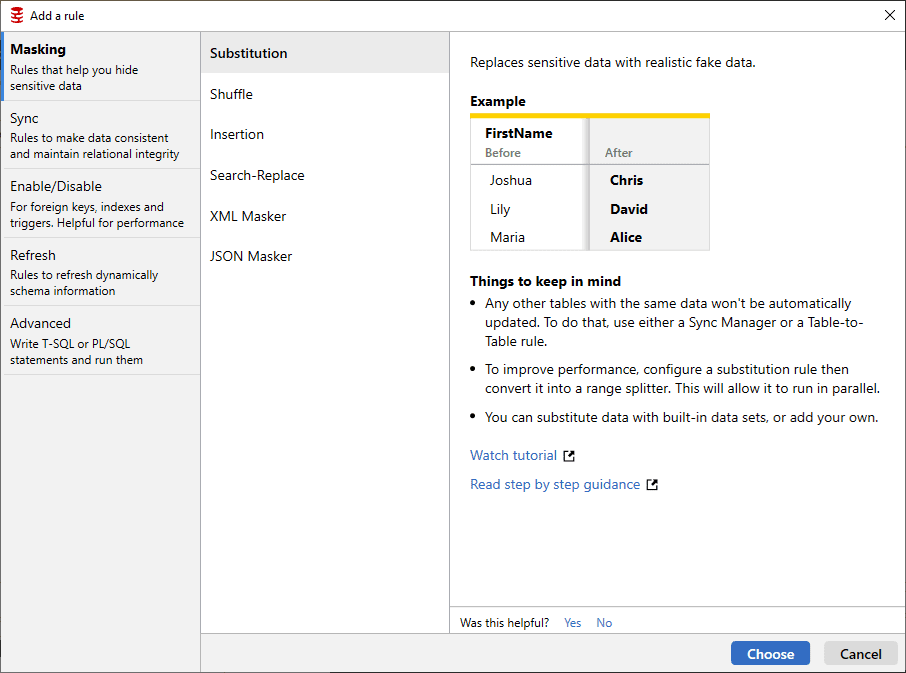
On the left you can see various categories of rules with a general description for what each one does. Selecting any category will show the rules within that category. We’re looking at the six types of rules currently available in the Masking category, and a detailed description of what the Substitution rule does and how it does it. Further, you get guidance on how best to use the rule in question along with links to videos and lesson plans on using the rule. Clicking on the Choose button opens the New Substitution Rule window:
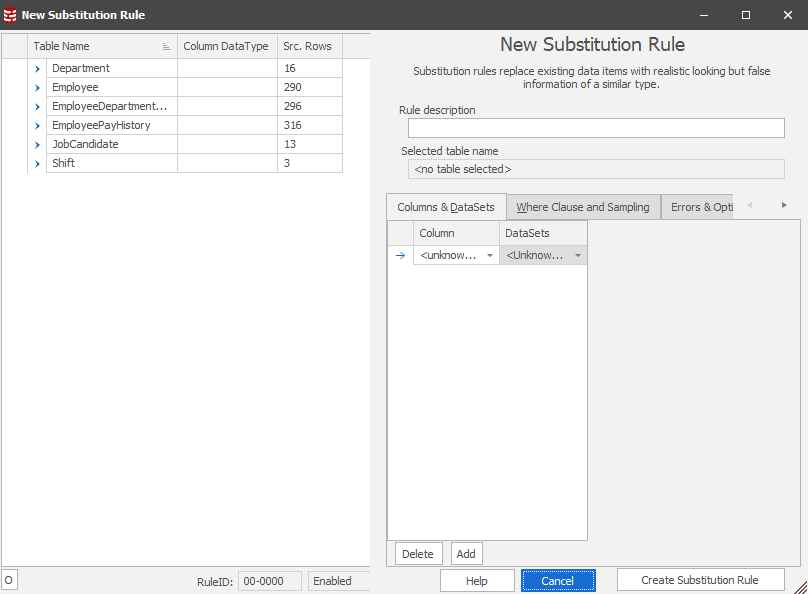
To the left are all the tables within this controller’s schema, each of which you can expand to see the columns and select the ones you want to mask. You also get some statistics about the data, showing the number of rows that were in each source table the last time the controller was refreshed.
On the right is where we’ll define our rule. At the top of the pane you can document the purpose of this rule, which I strongly recommend you do, for clarity and communication. Below that, you get to pick your columns, and the datasets you’ll use to replace the data in those columns.
Start by selecting a table, in this case the Employee table, and a column from that table, in this JobTitle. Fill in the Rule description then, in the Columns&DataSets tab, we need to select our substitution dataset.
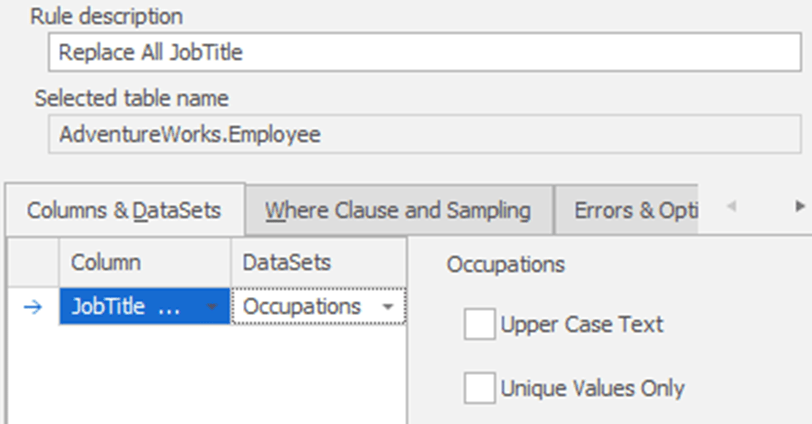
From the DataSets dropdown, we need to pick one that, ideally, contains fake but realistic job titles. There are many specialized datasets built into the tool, although not one called “Job Titles“. However, there is one called “Occupations” which is close enough for our needs.
Unless there is a defined business need, which requires us to substitute in specific values, then a “close enough” approach takes care of most masking needs. After all, the goal is not always to have 100% perfect data but rather to have human readable information that closely matches the ‘look and feel’ of your production data. We can specify certain options, or characteristics, of the Occupations dataset, such as ensuring all job title are in upper case, or that each job title is unique. This latter option can be a little problematic, depending on the dataset and the number of rows in your data. In any case, we won’t use either option here (after all, there can be many employees with the same job title).
There are three other tabs here that we could explore, but for a simple case like this, we don’t need them, and could now simply add the substitution rule to the masking set. However, worth briefly mentioning is Where Clause and Sampling, which several types of rules support, including substitution, to control more precisely which rows get masked and how.
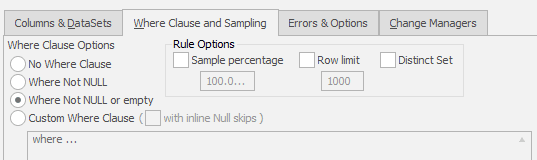
By default, Data Masker will use a WHERE clause that means it won’t substitute values into NULL or empty rows. If you need to change that behavior, so that it masks every row regardless, or any row that isn’t NULL, you can do it here. You can also substitute values based on a custom WHERE clause filter, such as to substitute values in one table, using values selected based on a grouping from another table. The Sampling (Rule Options) part of the tab is where we can specify a proportion or limit for the number or rows masked, such as to match the distribution of the masked values roughly to that found in the real data (currently the distribution is random).
For this example, we can just click on the Create Substitution Rule button. We’ll get a prompt telling us that the rule was saved and asking if we want to create another. In a normal workday, it’s likely we’d move on to the next table or the next rule. For our purposes though, we’ll click on “No” to go and see the results of our work:

Highlighted right there in the middle you can see the new rule that we created. Data Masker has nestled it neatly between our trigger rules.
Depending on what kind of work you’re doing, the size of your system and more, I would frequently at this point, run the masking set as a test, to confirm that what I expected to happen has in fact happened. We’ll save that for later. Now, let’s work our way through another business requirement and select the right rule to satisfy it.
XML Masker rule: substitute data found in XML elements and attributes
A common challenge when trying to ensure that all information from a production system is protected, before a copy of the data is distributed for use elsewhere, is that sometimes this data is “hidden”, in denormalized form, within your database, such as in JSON or XML. In this example, we have a Resume column containing XML, in the JobCandidate table.
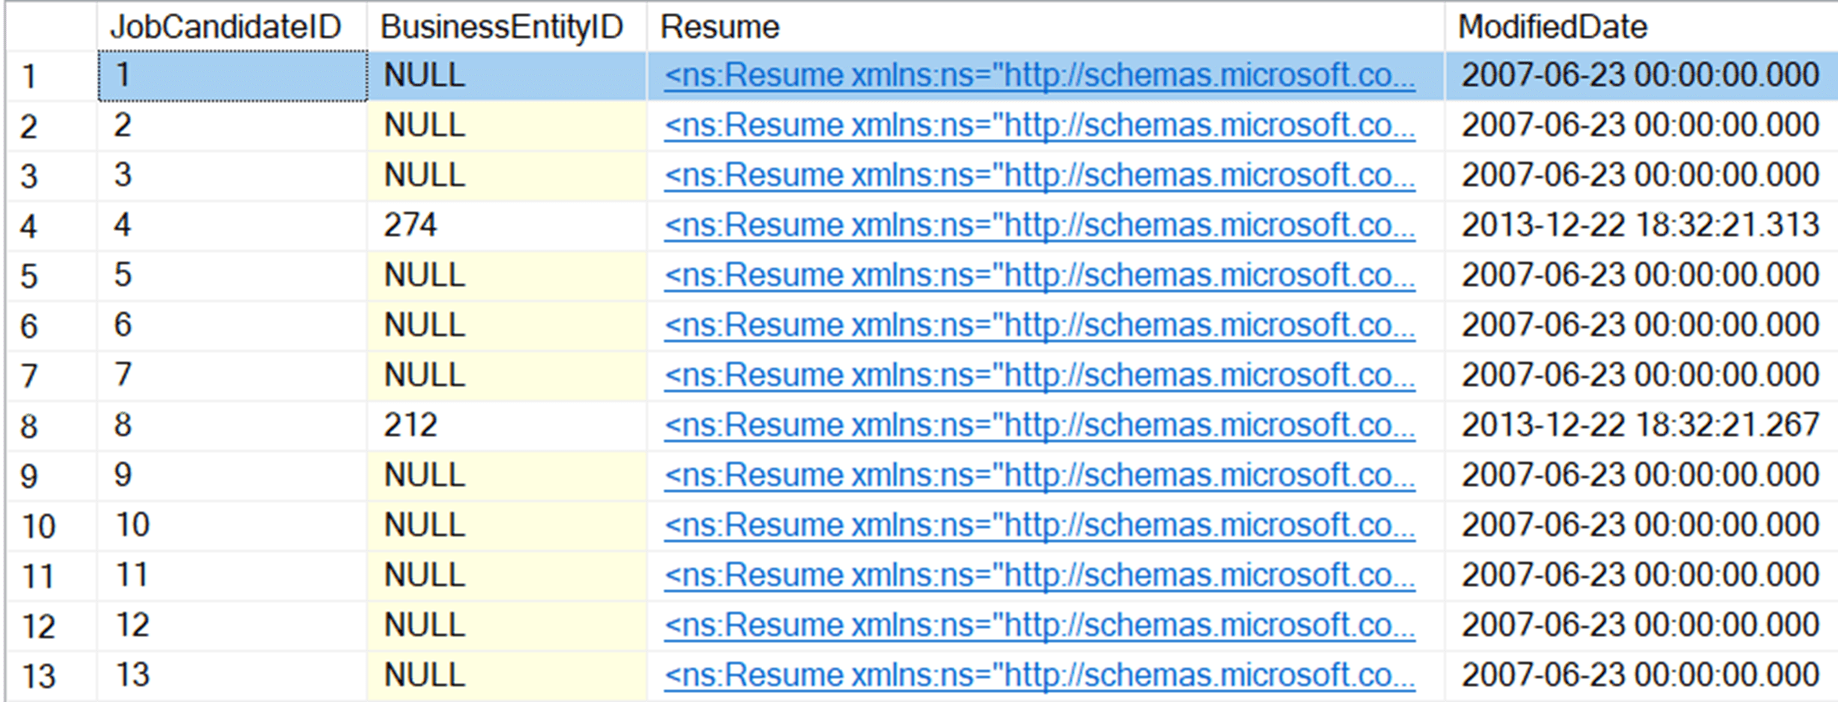
You can’t tell what kind of data is within that XML without drilling into it. In fact, resumes, as you might expect, contain a lot of personally identifying information:
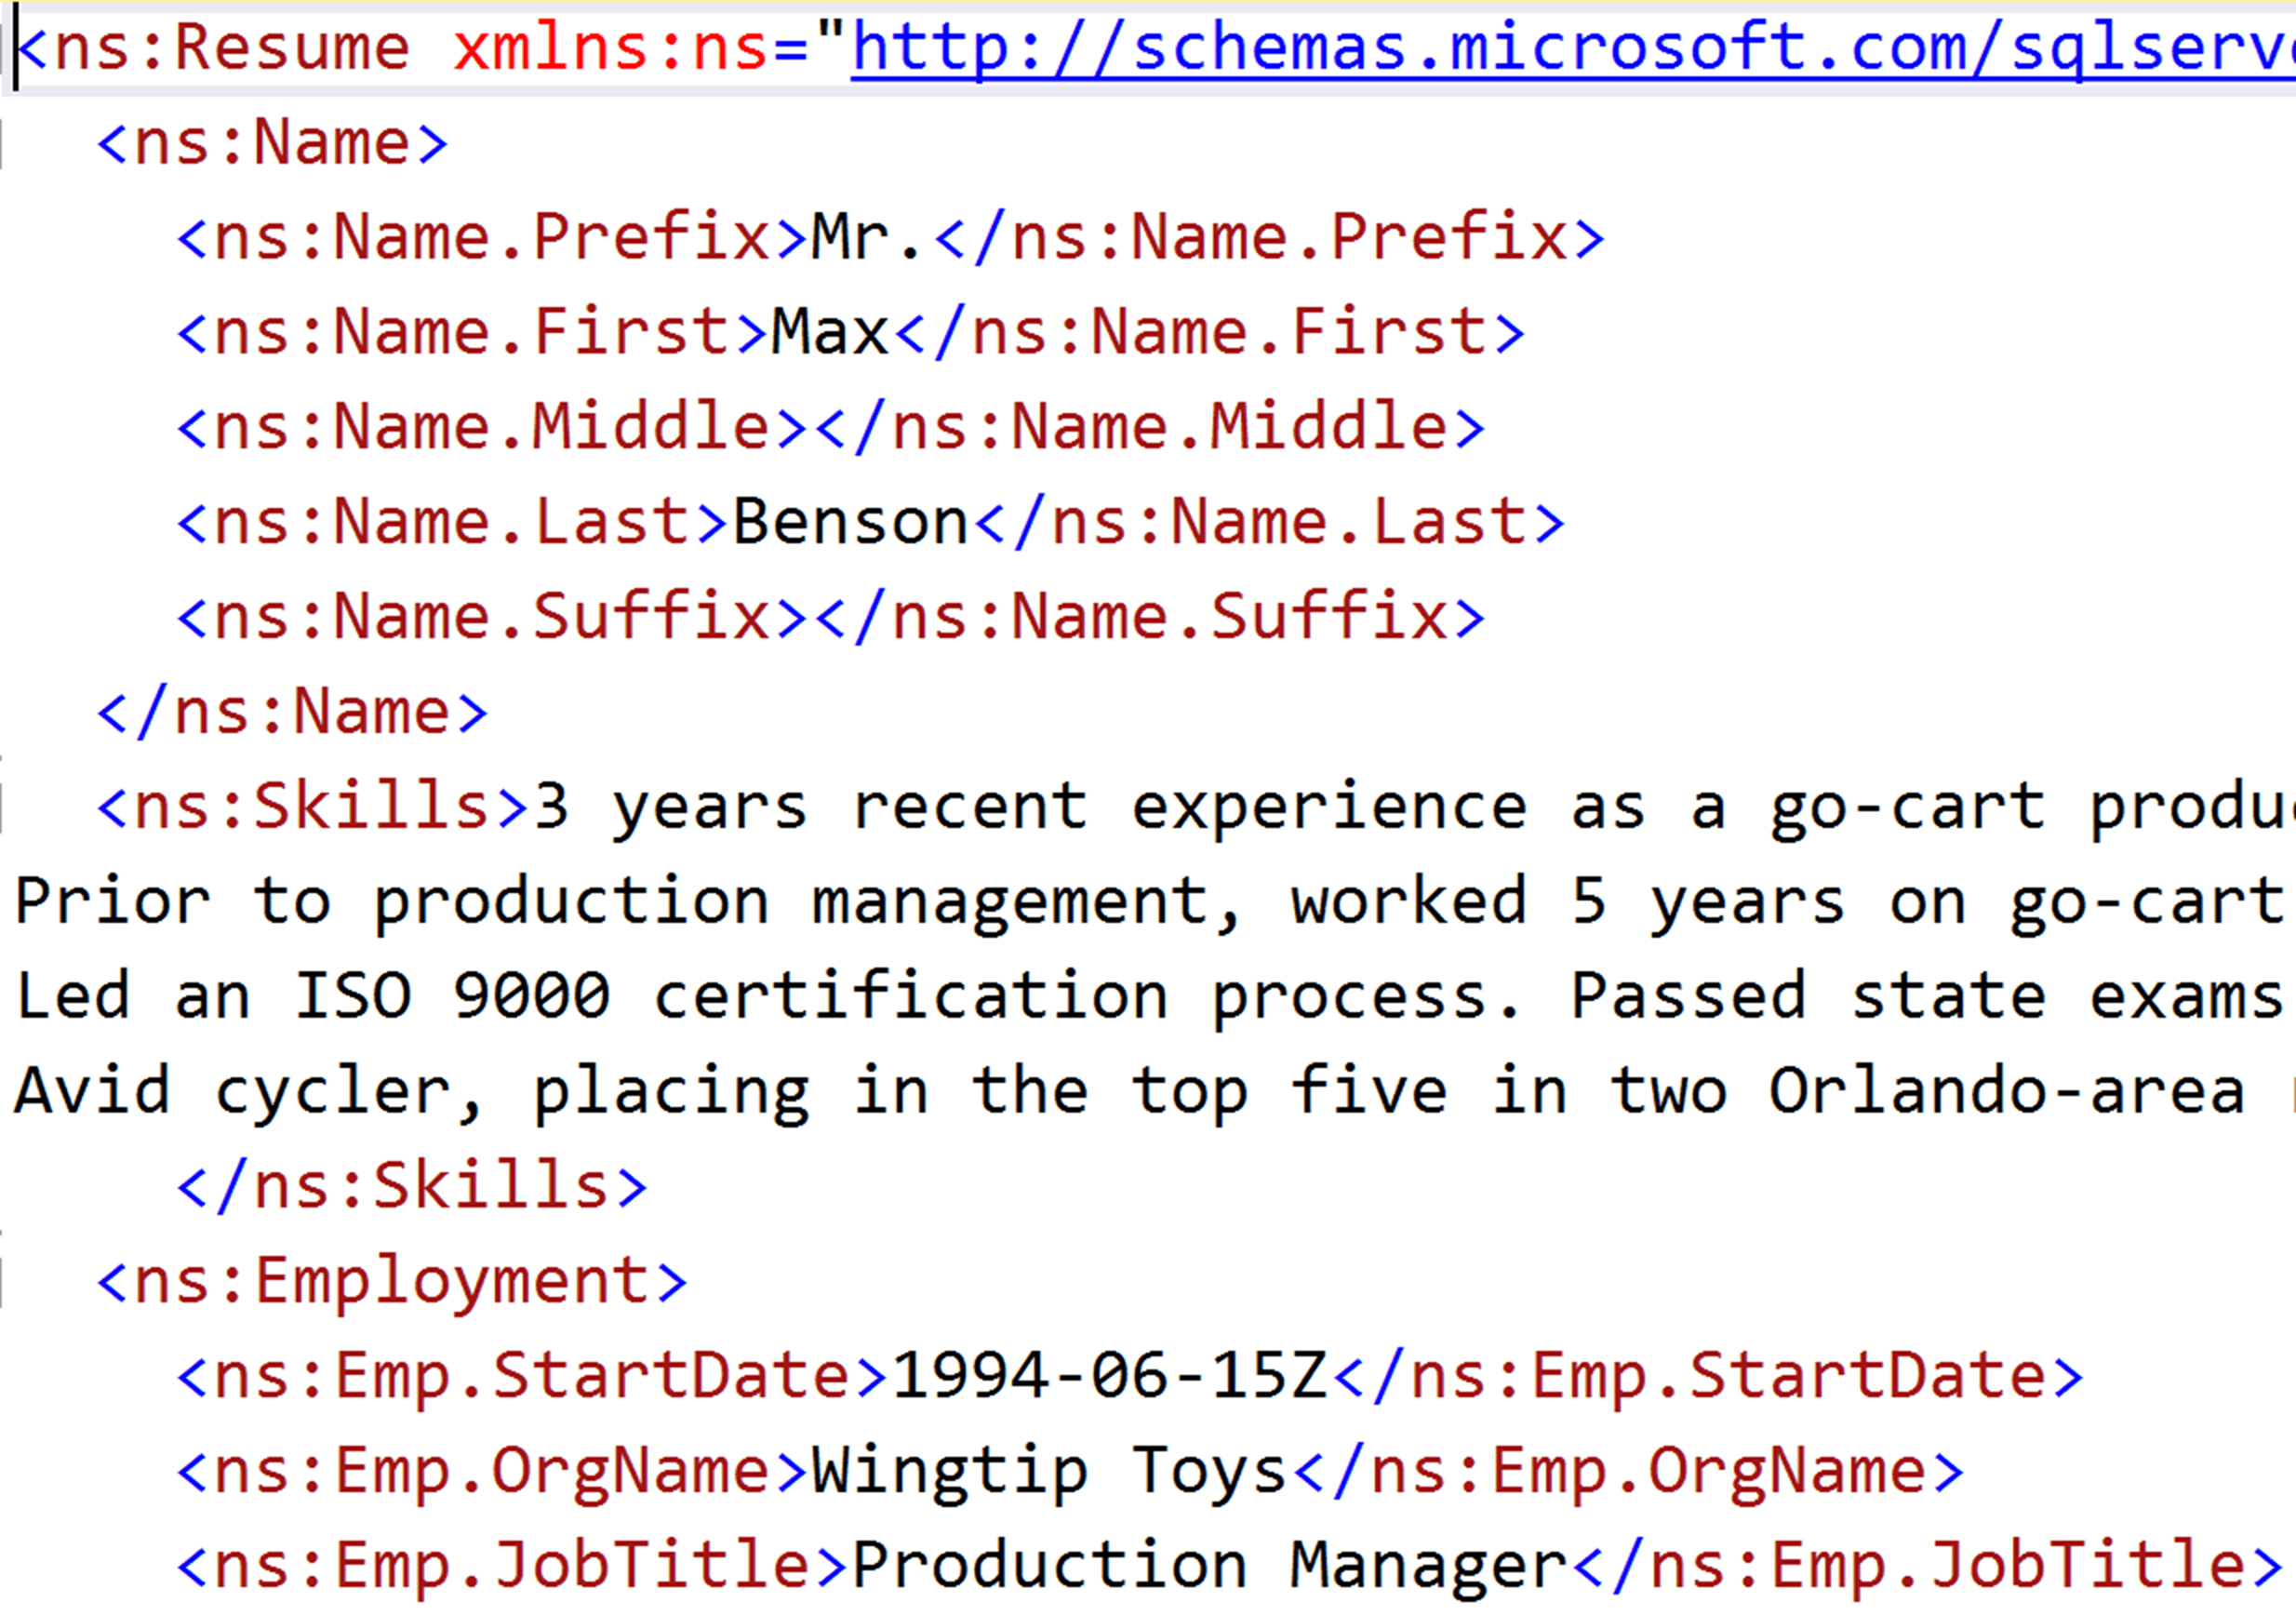
Here we see several elements containing data that will need masking, such as the candidates’ names and skills, and details of previous employments (dates, organizations, and job titles – again!), and more. Our business wants to maintain the resume information in non-production data, but we absolutely must remove some of the personally identifying information.
Luckily, Data Masker’s XML Masker rule offer an immediate and simple solution. Let’s see how we can use to mask the candidates’ real names. This is another substitution-style of rule, so we follow the same steps to get started with it as we did before. Choose an XML Masker rule type, select the JobCandidate table, expand it and select the Resume column:
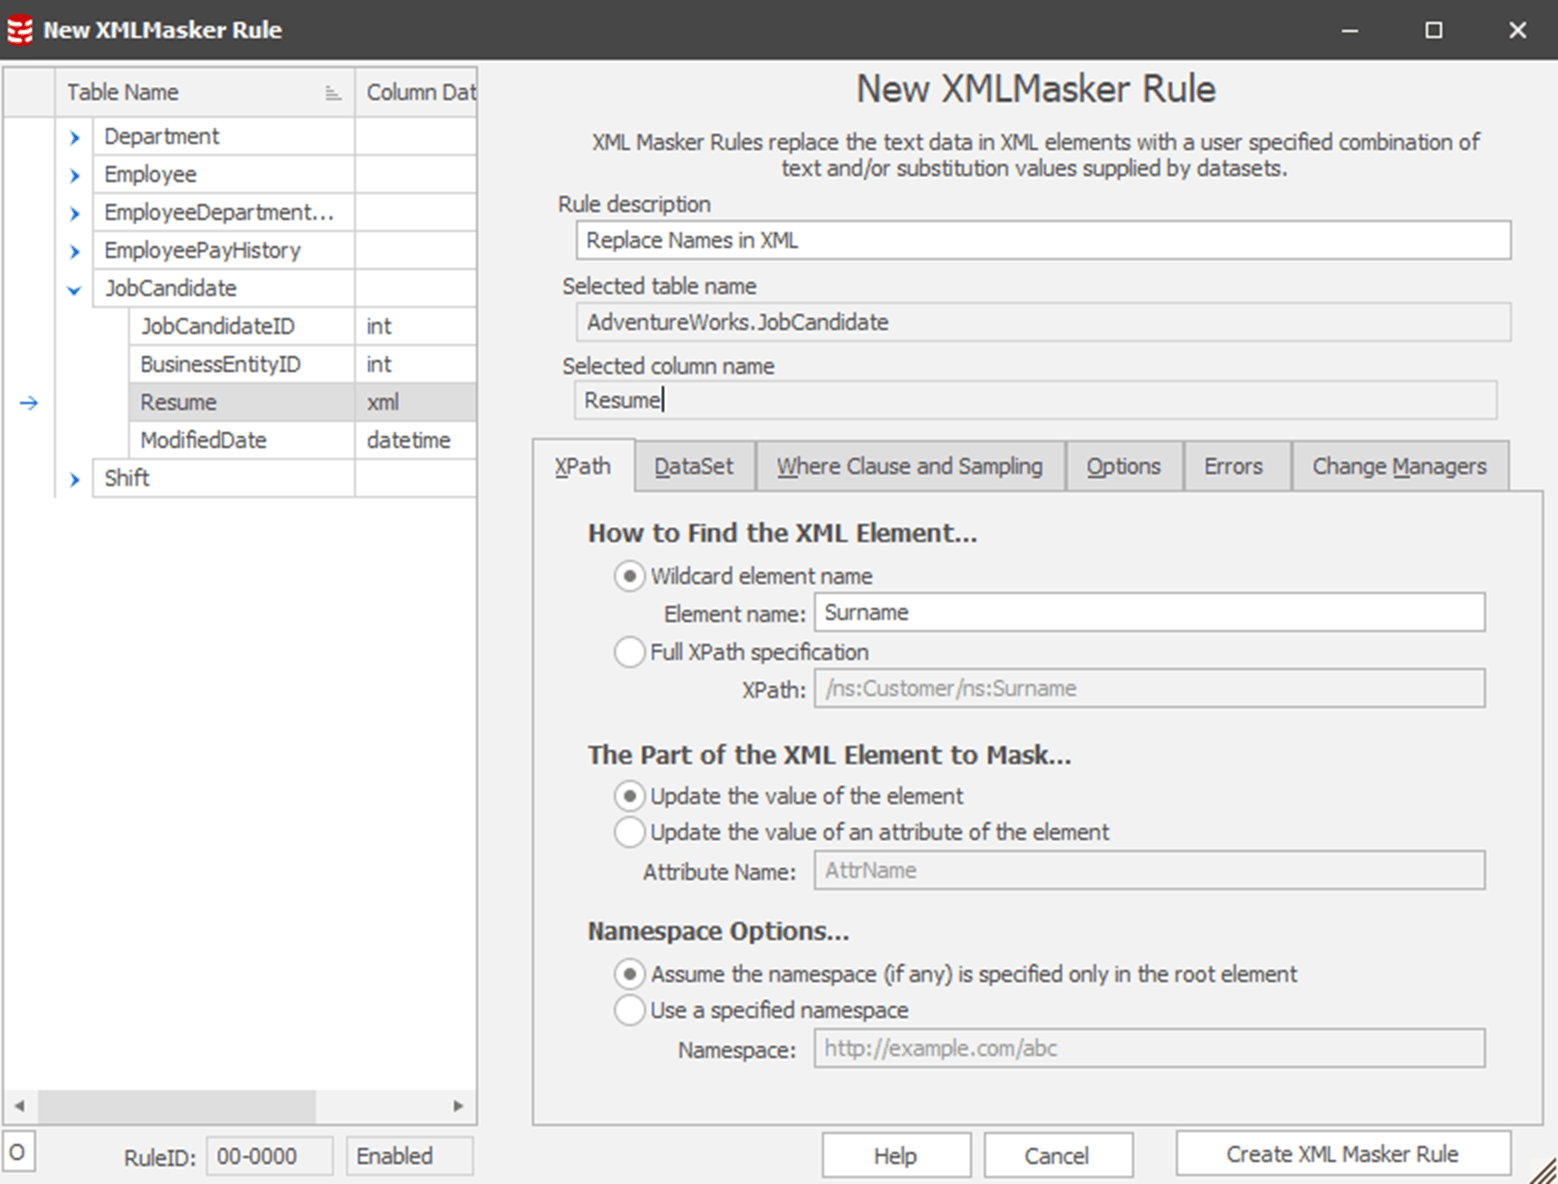
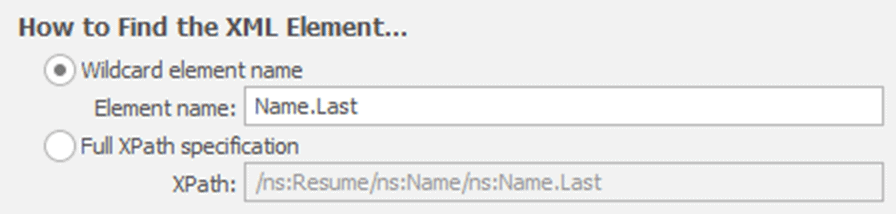
In the XPath tab, we locate the XML element containing data we need to replace. In this example, I want to mask the candidates’ names, starting with the last names. Having already seen the XML, we know that the element is labeled Name.Last. Therefore, one way to do this would be to use the element name in a wildcard search of the XML. If you have badly formed XML, this might be your only option, but otherwise a much more efficient and faster way is to provide the Full XPath specification for the element, which in this case is /ns:Resume/ns:Name/ns:Name.Last.
In the other sections of this screen, we can accept the default choices, since we’re updating the element itself, rather than an attribute of it, and our namespace is defined in the root element.
Next, switch to the DataSet tab. You’ll recognize the list of datasets from the previous section. I’ve picked the Names, Surnames, Random (Large List) dataset, to ensure that I’m picking from a big list of possible names and that they are in a random distribution. The rest of the options are largely the same as before. There will be some differences just based on the type of data we’re working with now. For example, because this is XML, there’s no way to ensure a distinct data set, so those options have been removed.
By the same process, I’ll add another XML Masker rule for the Name.First element, and my masking set now looks like this:

Of course, there are still the name prefixes and suffixes to worry about, as well as many other elements, but I leave those as an exercise for the reader!
Row Internal rule: synchronize masked data with values in other columns of the row
Sometimes data masking can be as straightforward as we’ve defined it so far. Here’s the column that contains the data we want to change. Here’s how we want to change it. Done. However, the world isn’t always that simple. Let’s assume in our imaginary use case, that we also need to mask the birth dates and hire dates of the people in the Employee table. Easy enough, right? Simply substitute fake dates into these two columns.
However, databases often have few rules that restrict what data values are allowed in these columns. In this case, there’s a CHECK constraint on both columns, to ensure that the BirthDate column will not allow any dates before 1930 or less than 18 years in the past (to comply with employment laws) and that the hiredate is between 1996, when the company was founded, and the current year.
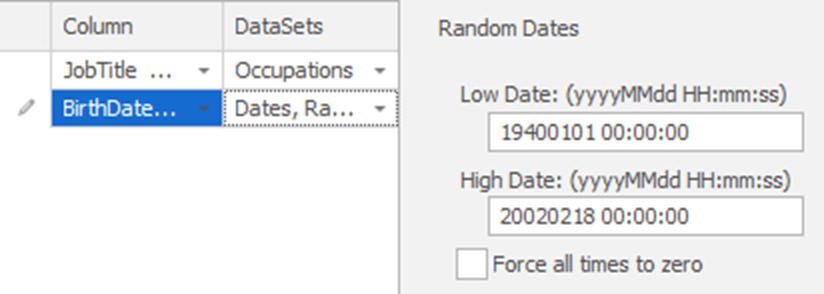
For BirthDate, it’s easy enough to substitute the dates while complying with the constraints. We’ll add this column to our current substitution rule for JobTitle (double click it and use the “Add” button at the bottom of the screen), and specify random dates, but only those less than 80 years ago, but more than 18 years ago, like this:
We could now simply add the HireDate column too and, similarly, specify the required restriction on the random dates (between 1996 and now). However, that means that in the masked data, we could end up with an employee born in 2000 but hired in 1998 or born in 1990 and hired in 2000. Now we’re in a pickle. We need the fake hire date to be between 1996 and now, and we’d like the fake hire date to be at least 18 years after their fake birth date. In other words, the hire date is dependent on what’s in the birth date; we need to mask the birth dates first then synchronize that with the masked hire dates.
Luckily, Data Masker has a series of Synchronization rules that allow us to “make data consistent and maintain relational integrity“. The one we need here is called Row Internal, which replaces data based on values from other columns in the row (I’ll demo more of these Sync rules in later articles).
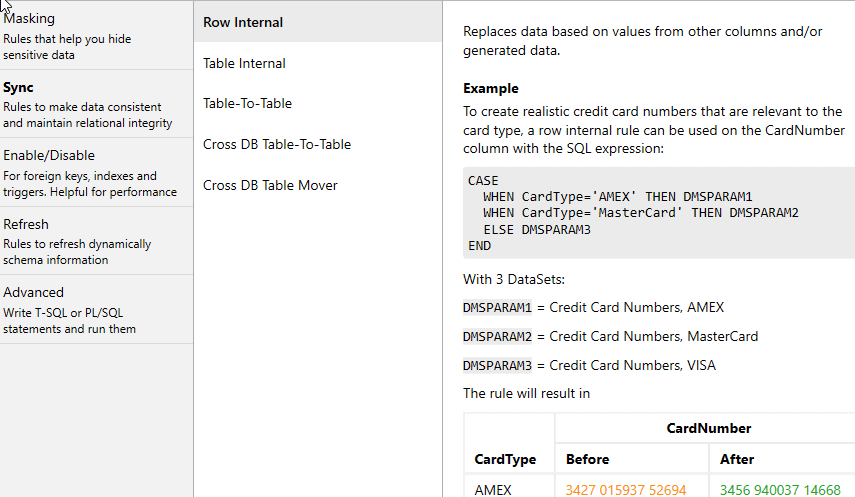
The example given in the tool is synchronizing the masked values for the credit card number column with those in the card type column. Similarly, we gong to set up the Row Internal to mask the HireDate column in a way that’s consistent with the masked values in the BirthDate column:
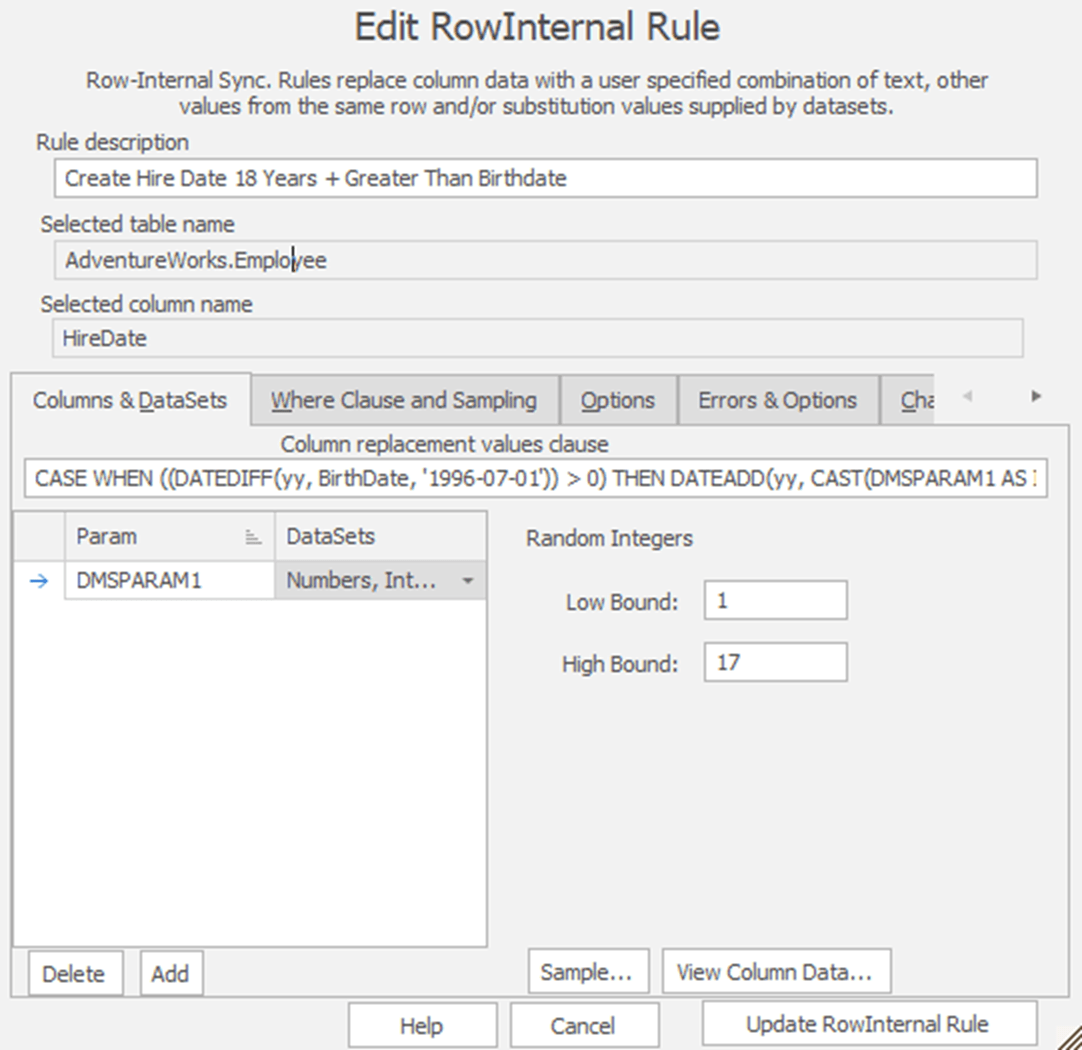
Now, this one gets a little complex, so let’s break it down. I’m doing two things here. First, I’m using a masking set that generates random numbers. I’ve limited it to between 1 and 17 years. Then, I’m using that value, expressed as DMSPARAM1 (you could edit its name if you wanted to make it clearer), in some T-SQL code as follows (formatted for clarity):
|
1 2 3 4 5 6 |
CASE WHEN ((DATEDIFF(yy, BirthDate, '1996-07-01')) > 0) THEN DATEADD(yy, CAST(DMSPARAM1 AS INT), '1996-07-01') ELSE DATEADD(YEAR, CAST(DMSPARAM1 AS INT), BirthDate) END |
I’m performing a CASE statement against the BirthDate column. If the Birthdate is prior to 1996, the founding of the company, I’m generating a hire date between 1 and 17 years after 1996. If, on the other hand, the employee is born after 1996, I’m adding somewhere from 1 to 17 years to their birth date as the HireDate.
Of course, while I’ve ensured that the fake data complies with the database constraints, and that no one is hired before they were born, I’ve not yet solved the issue that there could be employees with a start date less than 18 years after their birth date. Solving this could be as simple as adding one more masking set to update any data that falls into that gap. I’ll leave that as an exercise.
The final set of rules including the Row Internal rule looks like this:

Running the Masking Set
When working on simple replacement masking sets, you’ll seldom need to run that masking set multiple times during development. However, when working with a more complicated masking set, such as the last one above, you may find it helpful to run your masking set as you edit to ensure you’re getting good data. When you’re ready to run the masking set, simply click on the button on the tool bar.
Rule ordering, dependencies and worker threads
The Row Internal rule relies on the values in our masked Birthdate column, so it’s obviously a requirement that it runs only after the Substitution rule completes. Here, I’ve relied on the rule number ordering and the fact I’ve only used 2 workers. If I chose 4 or more workers, it’s possible all the masking rules ion the 01 block would be run in parallel. In that case, I’d have to take extra steps to ensure that the Row Internal rule only ran after the substitution rule completes, either by nesting it, or placing it in a higher block number. We’ll revisit the topic of running masking rules in parallel in the next article.
Assuming you don’t see any errors, the interface doesn’t really change much. The Run State column will switch from “Not Run” to “Running” to “Complete” as it walks through your masking set. That’s the only immediately apparent thing that anything was done. However, there is another tab that we have yet to discuss, the Rule Statistics. After running a masking set, this tab has changed values, from all zeros to actual row counts, as shown here:

For larger data sets, you can switch to this tab and watch it in real time. For a short run like this, there’s no real opportunity. What it shows prior to a run is what the Controller knows about your schema based on the last time you updated it. My Employee table had 290 rows at the time I generated the initial Controller and started working with it. If I add rows to any of the table is in the HumanResources schema, then refresh the controller, I’d now see a difference in the Rows To Process column and the Row Operations columns. However, the rest of the data lays out about the way you would expect. It shows how many operations it did as defined by each of the rules and the number of rows involved. For example, there were only 13 row operations for the XML Masker rule, even though there are more rows than that in the table. It reflects the number of rows that were affected by the rule. One point to note is how the number of Col Operations, or column operations, doubled for the Substitution rule. This makes sense when you consider that we’re updating two columns, so there were two operations for each row in the table.
We can also watch the Run Statistics tab while the processing is occurring:
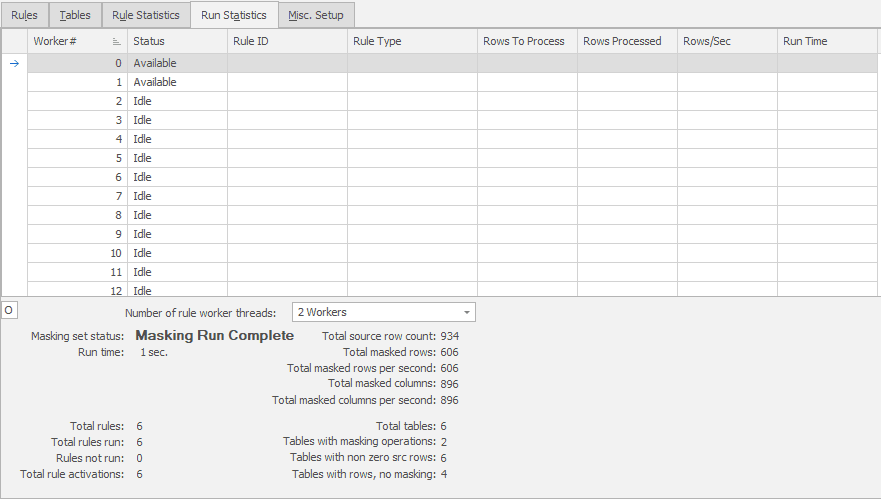
Like the Rule Statistics tab, this tab will be updated in real time as you process your masking set. This is where you can see the results having multiple workers, because you can see each of the workers working on a given rule and how many rows they have processed as well as the rows/sec and run time. Finally, at the end of it all, there’s a summary showing the aggregation of all the work done through this masking set.
Conclusion
The purpose of this article was to walk you through the basics of how to translate a business need of “I have some columns I need to mask” into a masking set containing the best masking rules for the job. We only explored a few of the possible rules, but we looked at several different data types in order to give you a broad understanding of how you can combine the masking rules to mask the data thoroughly, while ensuring the fake data still adheres to real business rules.
Tools in this post
Data Masker
Shield sensitive information in development and test environments, without compromising data quality
You may also like
-

Article
A quick guide to the New Zealand Privacy Act 2020 for DBAs
December 1 saw the introduction in New Zealand of the Privacy Act 2020 which not only brings increased protection for individuals but also has some new implications for businesses, including increased fines for non-compliance and the reporting of serious privacy breaches. However, the changes and impact may be less than organizations fear because the act
-

Article
Create, protect and manage non-production databases with SQL Provision
SQL Provision allows users to create copies of SQL Server databases in seconds, using a fraction of disk space, and mask any sensitive data to help address data privacy and protection concerns. It serves as a gateway between production and non-production environments, to ensure the safe distribution of database copies from one central location, without blocking the team's development and release processes.
-

Article
Getting Started with Data Masker for SQL Server: I Want to Mask A Database
Grant Fritchey explains what's involved in masking a SQL Server database. It can seem a daunting task, but it all becomes a lot more logical if you start from a plan, based on agreed data classifications, and then use a tool like Data Masker to implement the masking, and track progress.
-

Article
Quickly Find and Mask all Sensitive Data with Data Masker for SQL Server
Khie Biggs, a software developer on the Data Masker team at Redgate explains how a recent set of Data Masker improvements should make it significantly easier and faster to determine what data needs to be masked, implement a masking plan, and then to apply the masking operation, to protect sensitive and personal data in all the tables and columns of your SQL Server databases.
-
Article
SQL Provision adds fully integrated data masking
Karis Brummit announces SQL Provision, which combines SQL Clone's fast, lightweight database copying and centralized management of provisioning, with Data Maskers's ability to obfuscate sensitive or personal data, prior to distribution.
-
Webinar
POPIA - What we learnt from GDPR


