How to version control a database using GitHub and SQL Source Control
This article explains some simple steps to create a GitHub database repository and then version control your SQL Server database, for team development work, using SQL Source Control.
Are you interested in version controlling your SQL Server database in GitHub? This article explains some simple steps to create a GitHub database repository and get your database code in there, using SQL Source Control.
I assume you’re a SQL Server professional and don’t need a deep dive into how source control systems work, nor an in-depth look at version control commands, but you do have a database that is not yet in version control, and you’d like to get started quickly.
Is a database repository different than other repositories?
No. A database repository is just like any other repository; it’s a folder in which to organize all the files and assets required to build a working project, in this case a database. At a minimum, this will include the CREATE scripts that define each table in the database, as well as any schema-scoped objects such as views and stored procedures, and so on, plus scripts to insert any necessary static data.
Step 1: Create a GitHub account
If you don’t already have a GitHub account, simply visit the GitHub website and sign up. GiHub supports 2-factor authentication, so to take advantage of that you’ll need to provide both the usual sign-in details plus a mobile device to receive authentication codes.
You’ll be given the option to read the Hello World guide to GitHub. It explains the basic purpose of GitHub, how to create a repository, how to create a new branch, make and commit changes, create a pull request, and then merge changes made on the new branch back to the master branch. It’s well worth ten minutes of your time, though we won’t progress to branching and merging in this article; we use only the master branch.
Step 2: Create a database repository in GitHub
The first step is to create the database repository in GitHub, as described in the Hello World guide. We’re going to put into source control a Customers database, so we’ll call the repo Customers. It will be a public repo, unless you have a paid subscription, in which case you can opt to make it private. Choose the Initialize this repository with a README option, and optionally a .gitignore file and a license, and hit Create Repository.
What we’ve done here is create a ‘remote’ database repository on the GitHub server. We can manage and administer this repository using the GitHub browser, but in the basic mode of working for team-based development, each developer will clone the repo locally, commit changes to the working repo, traditionally from a local working folder, then push changes to the repo on GitHub so that the rest of the team can access them, as well as pull down the changes of others.
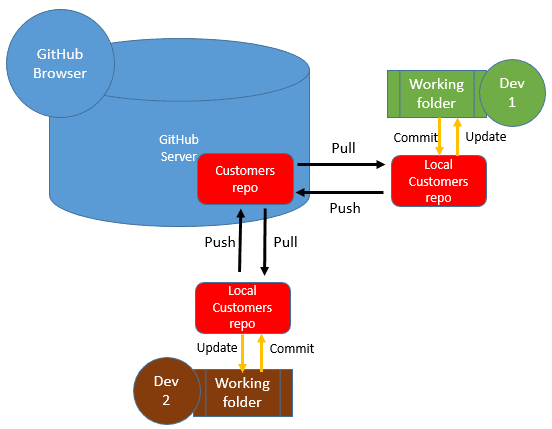
Figure 1
Step 3: Clone your database repository to your local machine
The next step is to clone the ‘remote’ database repository that we just created to your local machine. For this task, we’re going to use GitHub Desktop, so you’ll need to download it and install it on your machine. There are other tools that can perform this task, such as SourceTree, so feel free to use an alternative tool, but I’m not going to discuss them here.
Open GitHub Desktop. Clone your Customers repository by clicking on the + sign in the upper left corner and then selecting the clone tab. Select the Customers repository and click Clone Customers. Alternatively, if you’re in the GitHub browser, you can click into the Customers database repository, and then select Clone.
Choose the directory to which you wish to clone Customers and you’re done. You now have your database repository cloned locally.
Version controlling a new database using SQL Source Control
In the traditional model of working with a version control system, we might place an existing database into version control by scripting out all the tables and other objects to a local ‘working folder’ for the project (such as by using the Tasks | Generate Scripts wizard in SSMS), commit all the object scripts to the local repository, and then from there push them to the remote repository, or create a pull request.
Instead, I’m going to show how to perform this task using SQL Source Control. In this model, each developer can work on their own local copy of the live database, creating new objects and modifying existing objects, and then using SQL Source Control to commit changes to their local repo, before pushing those tested changes to the remote repo where other developers can access them.
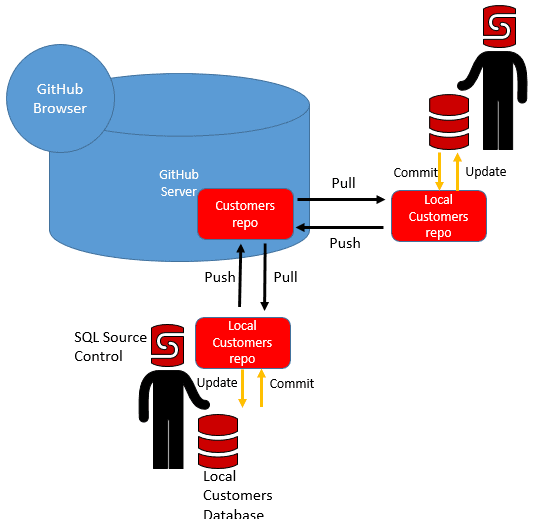
Figure 2
Step 4: Install SQL Source Control
Go to the Redgate website and download the trial version of the SQL Toolbelt. There are more tools in the toolbelt, but for this tutorial you only need SQL Source Control. It’s simply a plug-in for SSMS that allows the developer to commit changes made to a local database directly to a version control repository (in this case, GitHub), as well as update the database with the committed changes of others.
Step 5: Create a database and link it to Github
Open SSMS, and on your local SQL Server instance, create a new database named Customers.
Select the database in the Object Explorer and open the SQL Source Control tab (or right-click the database and select Link database to source control). If the SQL Source Control tab isn’t open in SSMS yet, you can open it via Tools | SQL Source Control.
Select Link to my source control system, Select Git, and then enter or navigate to the folder location for the local Customers repository. Click Link, and your database is linked to your database repository!
The database is empty, currently, but nevertheless if you go to the Commit tab, you will see a message that there is a commit in your local repository that can be pushed to the remote repository. That’s because you just linked your database to the repository and SQL Source Control placed a file there (RedGate.ssc).
Enter a meaningful commit message, like ‘Init‘ and click Push. You’ll be asked to enter your GitHub credentials and after filling those in, SQL Source Control will push the RedGate.ssc file from your local repository to your GitHub repository.
Note that if you enabled 2-stage authentication, you’ll need instead to set up a personal access token in order to authorize communication between SQL Source Control and GitHub. Go to the GitHub browser and in Settings (under your user profile), find Developer Settings and choose Personal access tokens.
Step 6: Create database object scripts in the GitHub repository
We’ll create a number of tables in the Customer database. The script to do this is available to download here.
Having created the tables, we want to commit the CREATE scripts for each table to the local Customers database repository. Go to the SQL Source Control tab again and on the Commit page click on refresh. You now see that SQL Source Control detected the changes you just made.
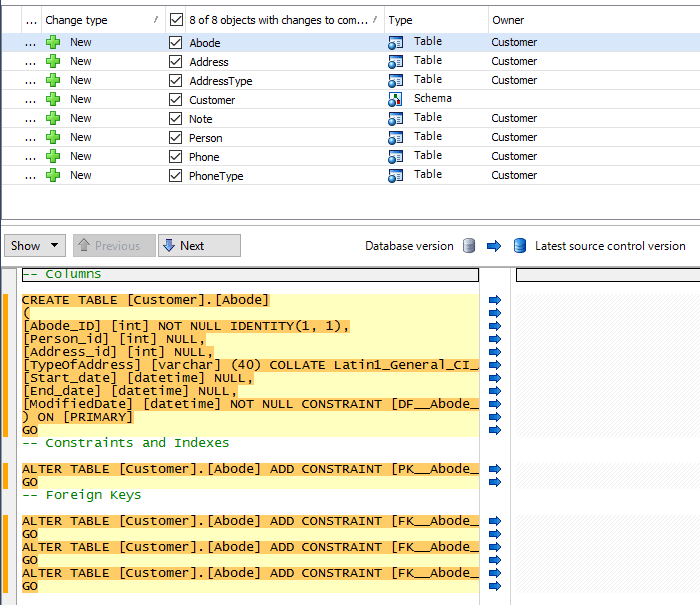
Figure 3
Enter a meaningful commit message again (for example Create Initial Customers tables) and hit Commit. Your changes are now committed to your local repository.
In your local GitHub folder, you’ll now find sub-folders named Tables and Security containing a file with the CREATE scripts for each of the new tables, and the Customer schema, respectively.
Just as before, we can push this change to the GitHub repository again by entering a commit message (you can reuse a previous message using the little clock symbol) and clicking Push.
As an alternative, you can also push your changes from your local repository to your central repository with your GitHub Desktop client, or whatever other native client you use. I encourage you to try this.
Next steps
Now you know the basics of GitHub and SQL Source Control, and how to get a new database under version control. However, at some point you’ll receive a ‘pull request’, indicating database changes made by another developer, which you will want to pull down to your local repository, and then apply them to your development copy of the database. I’ll describe a couple of ways to do that in my next article.
