The refresh schedule on the Power BI portal is made at the Dataset level. This means all the tables refresh on the same schedule. Some models may not have a problem with this, but many models will. This article explains how to automate table level refresh in Power BI.
This refresh schedule means you will be creating a bigger workload than you really need compared to a refresh at the table level if it were possible.
There are some options to ignore and work-around this, and there is one option which will require more effort but can solve the problem. This article will analyse these options and go deeper into how to build custom refresh automation solutions.
In this article, I will also refer to many solutions previously published in other blog posts and explain where they fit when trying to solve big problems. Some you may already know; others will be completely new for you. Be prepared for a long journey of new knowledge which may change your point of view about managing Power BI refreshes.
Why customize Power BI refresh
Here are some reasons to customize the refresh in Power BI:
- Schedule the refresh on table level according to the frequency each table needs
- Go beyond the refresh schedule limit in Power BI
- Create refreshes by partitions. This is especially important when using incremental refresh. (This will be a subject for a different article.)
Ignore the refresh frequency problem
In many scenarios, scheduling all refreshes at once will not be a big deal. The tables which could live with a less frequent refresh schedule are probably small dimension tables, and the workload created by their refresh is not that big.
That’s why in many scenarios it’s safe to ignore this problem; it’s not a completely wrong option.
Use dataflows to break down the ETL process
One solution is to use dataflows to break down the tables according to their refresh needs. Each dataflow can have its own refresh schedule, solving the workload problem at the data source.
One single dataset can load the data from multiple dataflows. However, each table in the dataset will need to have its own storage mode. The solution is to use import storage mode on all the tables coming from the dataflow.
The bad side: This means the data will be duplicated, on the dataflows and on the datasets. You will also have many refresh schedules to deal with, one for each dataflow, what was expected, and one for the dataset.
The good side: On the other hand, the workload to the data source will be very precisely configured according to the needs. There will be a second workload, but it will be inside Power BI, between the dataset and dataflows, so it will be less critical.
You may be wondering why not to use Direct Query. It’s simple: Performance. The relationships between tables using import mode will result in better performance for the queries than using direct query mode.
The solution
There is no way to refresh one single table from the UI, but you can refresh a single table or even a single partition using the XMLA (XML for Analysis) connection to Power BI. The XMLA connection is a Power BI connection endpoint, open to any developer who would like to build a tool and connect to it. Microsoft allow connecting to the XMLA endpoint using SQL Server Management Studio (SSMS) You can also connect to the XMLA endpoint using the Tabular Editor.
Both tools can refresh individual objects interactively. They can also generate scripts for the refresh. However, they can’t schedule the refresh, it’s always an interactive task.
You can schedule a recurring execution of the generated script. In order to do so, use an Azure Automation Account. Using the Automation Account allows scheduling a PowerShell script to connect to Power BI and refresh the table.
The Power BI connection is made by using an identity from the same tenant. You will need to register an application to provide us with this identity.
Generating the refresh script
The first step is to generate the refresh script, or just copy it from below. Here are the steps to generate the refresh script.
- On the Power BI Portal, navigate to a workspace and open Workspace Settings.
- Select Premium
The XMLA endpoint is only available on PPU or Premium subscriptions
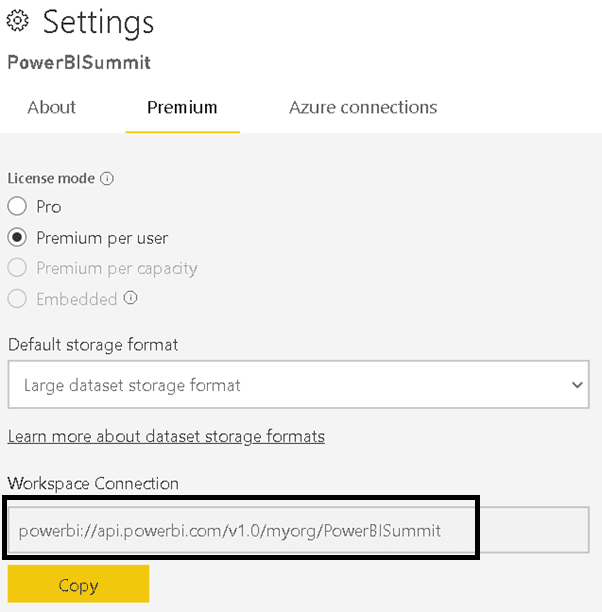
- Copy the XMLA endpoint address (Workspace Connection in the dialog)
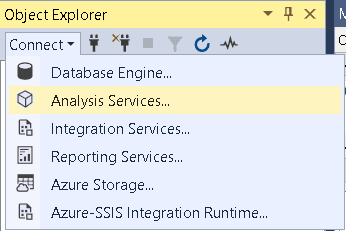
- Open SSMS
- In Object Explorer window, select Connect-> Analysis services
It’s possible you don’t need to do that, if the Connect to Server window is already open. Only change the Server type to Analysis Services
- Paste the XMLA endpoint as the server’s name
- Choose Azure Active Directory – Universal with MFA authentication
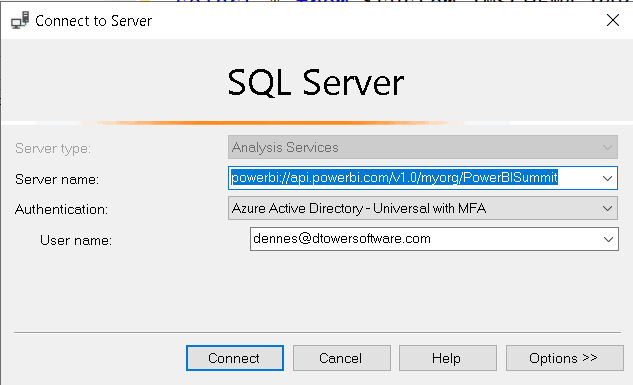
- Type the e-mail of your Power BI login
- Click the Connect button. You will be requested to authenticate
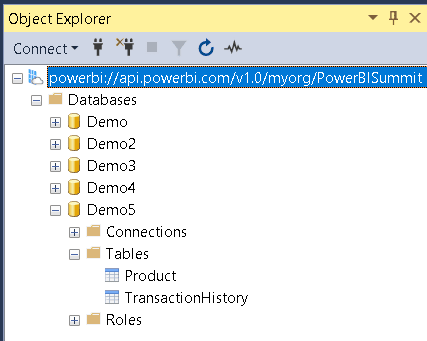
- On object explorer window, open the database. Each dataset on the workspace will appear as a different database.
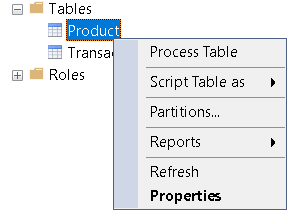
- Right click the table you would like to refresh
- Select the Process Table menu option
- On the Mode drop down, select the Process Full mode
There are many different modes you can use for different scenarios. You can check additional details here.
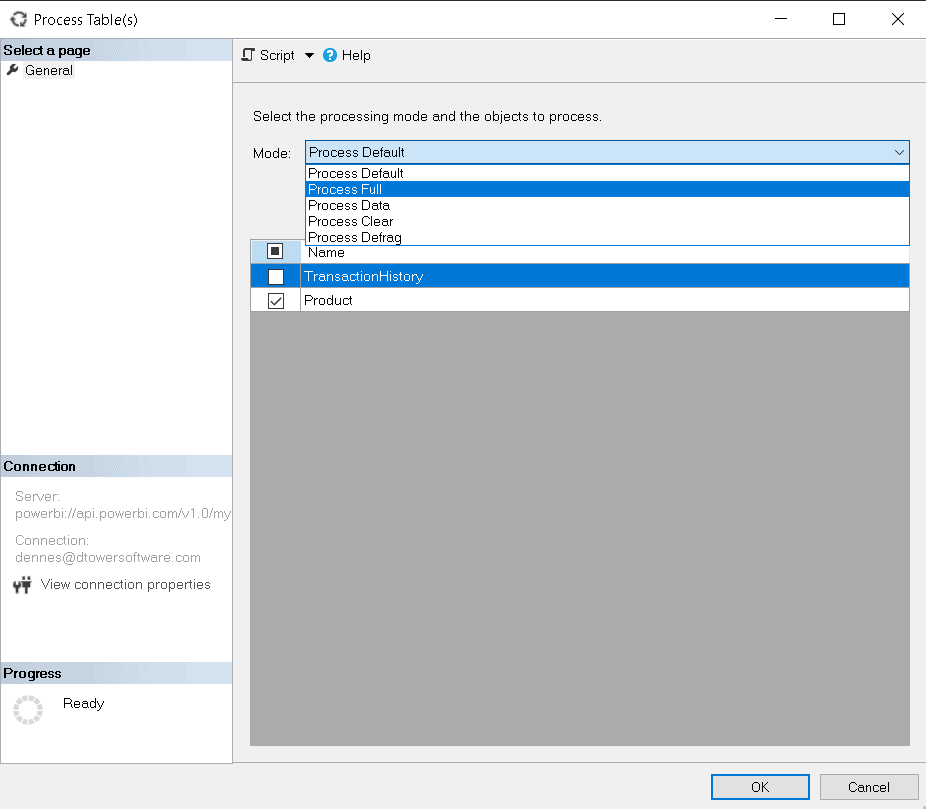
- Select the table you would like to process. It’s interesting to notice you can choose multiple tables and create one single script to process multiple tables together, if they need the same refresh frequency.
- Using the Script button, select Script Action to a New Query Window
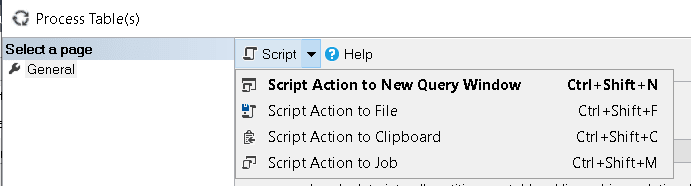
- Click the Cancel button. You don’t need to process it interactively.
A script like the one below will be generated:
|
1 2 3 4 5 6 7 8 9 10 11 |
{ "refresh": { "type": "full", "objects": [ { "database": "Demo5", "table": "Product" } ] } } |
You may notice it’s not XML, it’s JSON. XMLA processing can accept JSON format as well.
Side Option: Interactive refresh using the Tabular Model
An alternate option for this situation, although it doesn’t meet the goal for in this article, is to use the Tabular Editor to generate and execute scripts.
Tabular Editor can generate XMLA scripts but can’t execute them. On the other hand, it can generate C# scripts using TOM (Tabular Object Model) and execute the script.
There are three interesting references about this:
- This article explains how to generate scripts to make multiple updates in batch using the Tabular Editor.
- This article explains an application created to be executed inside the Tabular Editor which helps to easily generate the refresh scripts.
- This video summarizes many options about interactively refreshing tables using Tabular Editor.
These are interesting options, but in this article, I will proceed with the automation of a PowerShell script.
Generating an identity for authentication
The PowerShell script will need an identity to authenticate to Power BI. You create this identity using Azure AD, and you will need to register an application in Azure AD.
There is another blog post explaining how to do it in detail for Power BI, so I will leave you with this link.
Installing the ADOMD library
PowerShell is the script language I will use for this example. However, this is not enough. You need to use a client library to connect to the XMLA endpoint. Some examples are ADOMD, AMO or TOM.
I will illustrate the example with ADOMD. It’s enough to execute a XMLA script and I believe it will be more familiar to most developers, since it uses the ADO model (Connection/Command).
You can learn more about these client libraries on the following links:
- https://docs.microsoft.com/en-us/analysis-services/client-libraries?view=asallproducts-allversions
- https://docs.microsoft.com/en-us/analysis-services/tom/introduction-to-the-tabular-object-model-tom-in-analysis-services-amo?view=asallproducts-allversions
This script used in this example requires the ADOMD Library, and the library must be installed from the machine where it will run. In this case, you will test it locally before scheduling it with the Automation Account.
You can access the link and use the installer for the library; it will be enough for a local execution.
The configuration for the ADOMD library to be used in an Automation Account will require some additional steps. I will talk about this further in this article.
Creating the PowerShell script for the refresh
Below you can find the complete PowerShell script you can execute using the PowerShell ISE. Here are some details of this script:
- The connection string contains the XMLA endpoint for the workspace, but it also contains an initial catalog. The Initial Catalog contains the name of a dataset. Each dataset on the workspace behaves as a database and you will be connecting to one specific dataset.
- The service principal (using its format:
AppId@TenantId) is included in the connection string as the username, and the password is the secret value. - ADOMD contains the traditional ADO objects:
Connection/Command/Adapter/DataReader. For this example,ConnectionandCommandare enough. - The script uses Command’s
ExecuteNonQuerymethod. This method is used when you want to execute something, but you don’t want to bring any information back. - The script opens the connection at the last possible moment and closes it as soon as possible. This is old school good practice.
- The script calls the Connection’s
Disposemethod, a good practice used with .NET objects.
This is the PowerShell script. You can copy/paste it in PowerShell ISE and execute, and it should work after you modify it for your environment.
|
1 2 3 4 5 6 7 8 9 10 11 12 13 14 15 16 17 18 19 20 21 22 23 24 25 |
<strong>[System.Reflection.Assembly]</strong>::LoadWithPartialName("Microsoft.AnalysisServices.AdomdClient") $PowerBIEndpoint = "powerbi://api.powerbi.com/v1.0/myorg/PowerBISummit;initial catalog=Demo5" $ServicePrincipal = "app:f10213a0-a879-4a76-8bc1-2570edc4c8a8@47a64ce3-3ebb-4b1a-920c-575f9b892069" $ServicePrincipalSecret = "<<your app service secret>>" $Query = "{ ""refresh"": { ""type"": ""automatic"", ""objects"": [ { ""database"": ""Demo5"", ""table"": ""Product"" } ] } }" $Connection = New-Object Microsoft.AnalysisServices.AdomdClient.AdomdConnection $Connection.ConnectionString = "Datasource="+ $PowerBIEndpoint +";User ID="+ $ServicePrincipal +";Password="+ $ServicePrincipalSecret $Command = $Connection.CreateCommand(); $Command.CommandTimeout = 20000; $Command.CommandType = <strong>[System.Data.CommandType]</strong>::Text; $Command.CommandText = $Query; $Connection.Open() $Command.ExecuteNonQuery() $Connection.Close() $Connection.Dispose() |
Checking the results
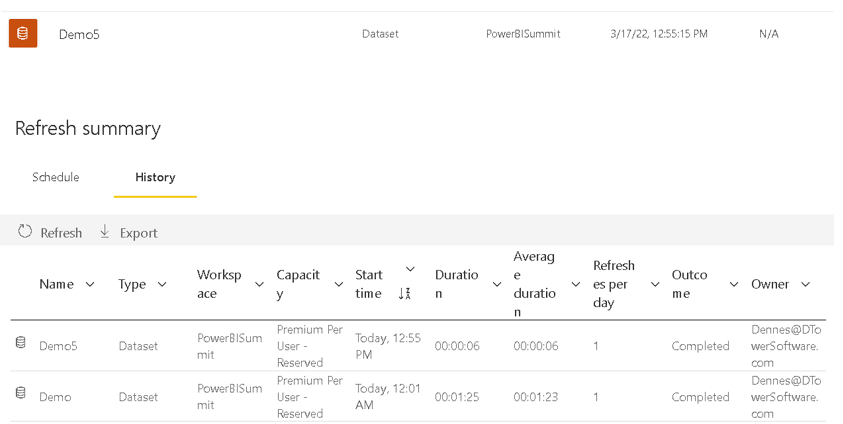
In the Power BI portal, the refresh will appear as if it was a dataset refresh. It will appear as the last refresh date of the dataset. This happens even if you open the Refresh Summary on the Admin Portal page. The view is always by dataset.
Power BI has the information about the last refresh date, but you need to extract the information through the XMLA endpoint. You can do that using SSMS.
There are two ways to get this information:
- Checking the table properties in SSMS. SSMS brings the last refresh date. You can check this on both tables, and you will see the date will be different, because the refresh was done only in a single table
- Querying the system tables. Power BI behaves as an SSAS server, and it also has system tables. There are limitations about what data can be retrieved, but they are very useful.
Querying Power BI System Tables
The queries to system tables can be built in the MDX window, but they are neither MDX nor SQL. They are in fact another syntax called DMX. You can think about it as a simplified SQL which doesn’t support JOIN, GROUP BY and more.
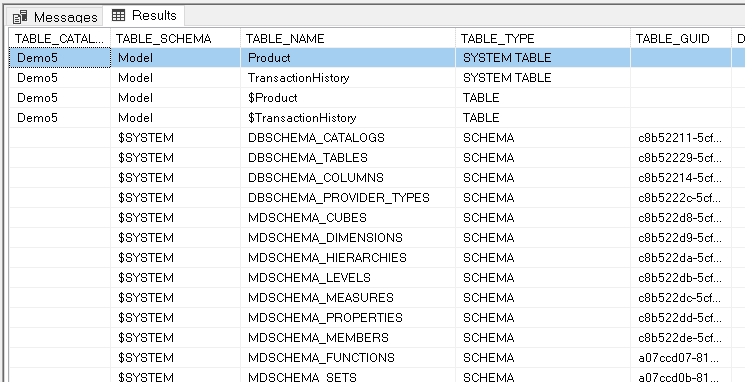
You can start with a simple select to show all the tables, including system tables:
|
1 |
SELECT * FROM $System.DBSchema_Tables |
The secret to finding the information is how the refresh happens. The refresh is always executed by partition. Power BI doesn’t care if you request by dataset or table, the execution will always be on the partition level.
You can query the table $system.TMSCHEMA_TABLES to get the Id of the table, but the last refresh date is only located in the table $system.TMSCHEMA_PARTITIONS . You can retrieve this information with the following query:
|
1 2 3 |
select TableID,[Name],RefreshedTime from $system.TMSCHEMA_PARTITIONS where TableID=921 |

The older folks may still remember what DMX means: Data Mining Extensions. It’s an old language created to be used with the data mining feature in SSAS. I confess I thought this feature was long gone, but it was only deprecated in SQL Server 2017. It’s very curious that the language originally built to query data mining models is now used to query Power BI System tables.
One more way to capture the refresh activity
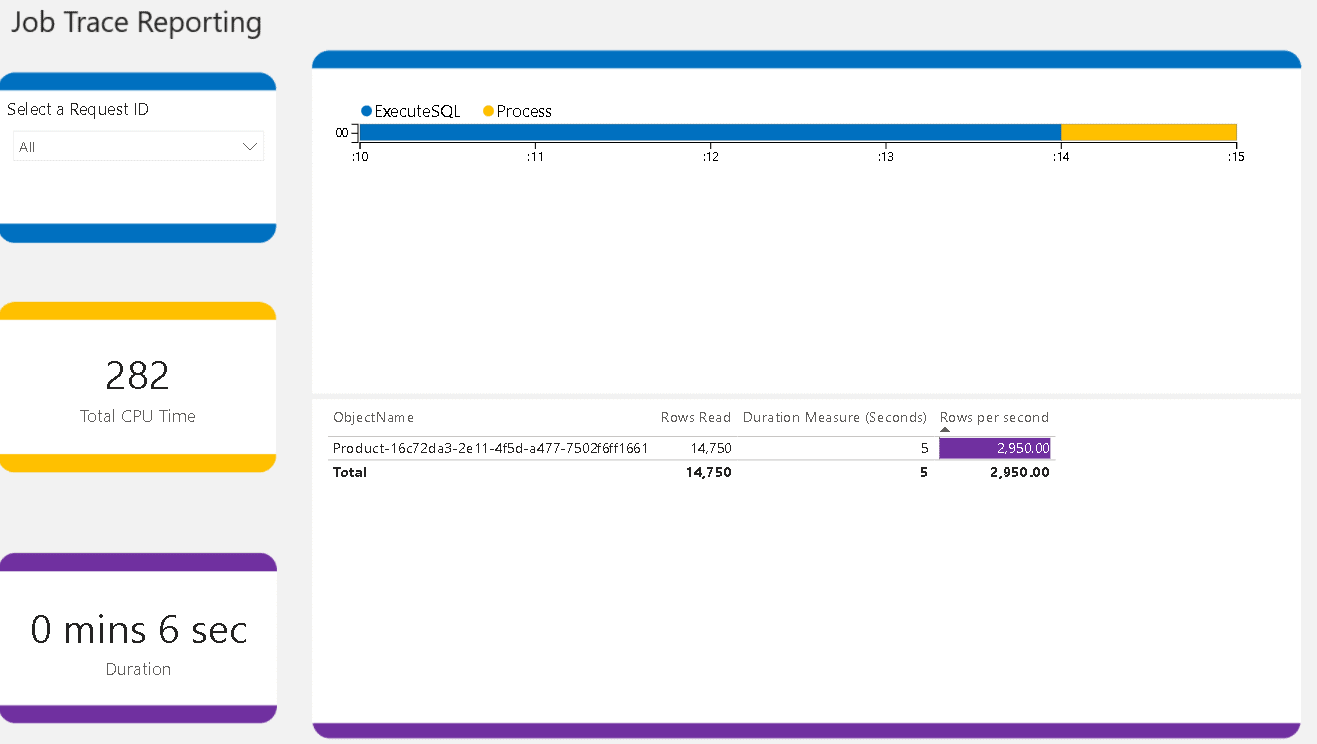
Another interesting way to view the refreshes is by capturing the refresh activity using SQL Server Profiler and checking the details of the activity using a Power BI Dashboard.
A dashboard for this purpose already exists and it’s very interesting. It depends on the captured data from SQL Profiler. Because of that, it’s a tool to be used for short tests, not to analyse production activity.
You can check the details about this dashboard and step by step about how to capture the information and use the dashboard.
I executed this test as well. The image below is the dashboard generated from the captured trace after the execution of the script. As you may notice, it shows only the product table, the only one included in the refresh.
Automating the refresh
After building and testing the script for the refresh, it’s time to automate the execution of the script. The first step is creating an automation account in Azure.
Create an automation account
If you already have an automation account or have already worked with one before, you can skip this part of the article.
Here’s how to make a small step-by-step to provision the automation account that will be used to schedule the refresh of the tables:
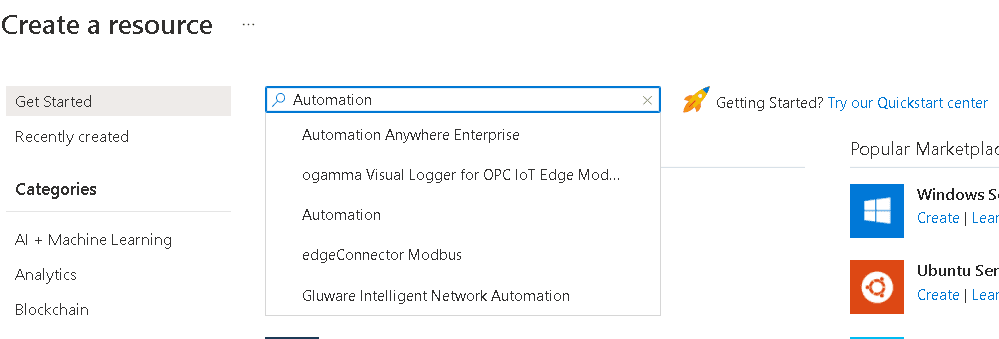
- In the Azure Portal, click Create a Resource icon
![]()
- In the search text box, type Automation to find the automation account
- On the Automation provisioning page, click the button Create
- On the Create an Automation Account page, click the Create New button below the Resource Group text box.
Create a new resource group called PBIAutomationRG for the new Automation account.

- Select the region closer to you
- Click Review + Create button. For this example, you don’t need to customize the additional configurations in Advance or Networking.
- In the review window, click the Create button
That’s it, the Automation Account is created.
Configuring the Automation Account to use ADOMD
After provisioning the Automation Account, it’s time to configure it to support the ADOMD library. This is done by managing the modules imported on the Automation Account.
There is another blog post explaining how to use AMO and ADOMD in an Automation Runbook. The post has all the details you will need. It’s interesting that AMO already has a PowerShell module for it, but ADOMD doesn’t, so this post shows both scenarios, using an existing module from the gallery or including a new module uploading a zip file containing the DLL. https://sqlitybi.com/how-to-use-amo-and-adomd-in-azure-powershell-runbooks/
Creating an Automation Runbook
Here are the steps to create and test the automation runbook. –
- Open your automation account.
- In the runbooks blade, click the button Create Runbook

- Fill the runbook information. You will use a PowerShell 5.1 runbook.
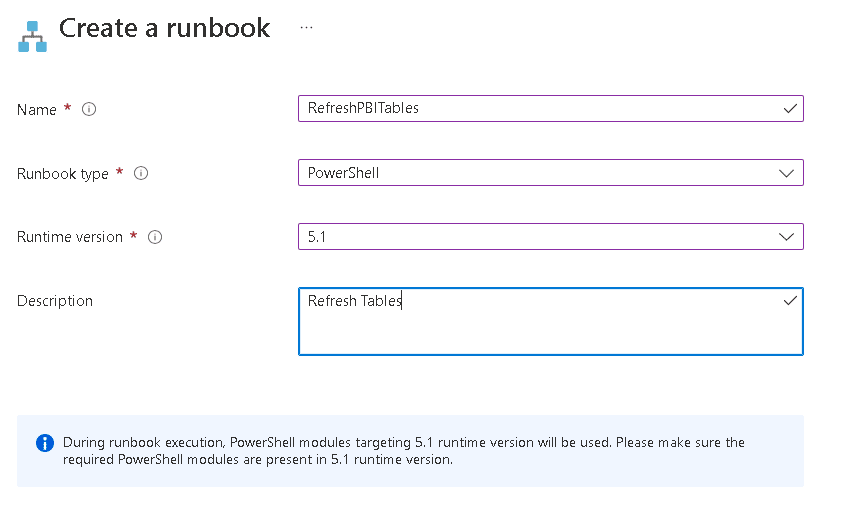
- Click Create
- In the Edit PowerShell Runbook window, paste the code you built before and executed in the PowerShell ISE
- Replace the first line, which is loading the ADOMD module, by the following lines:
|
1 2 3 |
$assemblyPath = "C:\Modules\User\Microsoft.AnalysisServices.AdomdClient\Microsoft.AnalysisServices.AdomdClient.dll" <strong>try</strong> {Add-Type -Path $assemblyPath} <strong>catch</strong> { $_.Exception.LoaderExceptions } |

- Click the Save button
- Click the Publish button
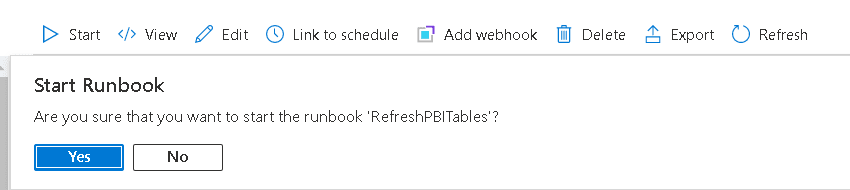
- On the Runbook page, click Start button and confirm, clicking Yes on the question
Every time you execute a Runbook, a job is created. You will be automatically taken to the job window.
- On the Job window, wait until the job is completed
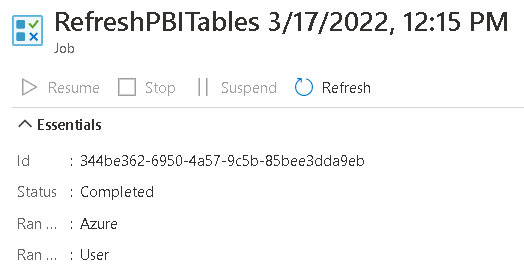
- Check if the refresh was successful. You can use SSMS for a precise information and look in the portal to confirm the information in the portal as well.
Scheduling the runbook execution
The runbook is created. Now it’s time to schedule it for an automatic execution
- On the Jobs window, on the breadcrumbs, click the name of the Runbook, returning to the Runbook window.
- On the schedule blade, click the Add a schedule button
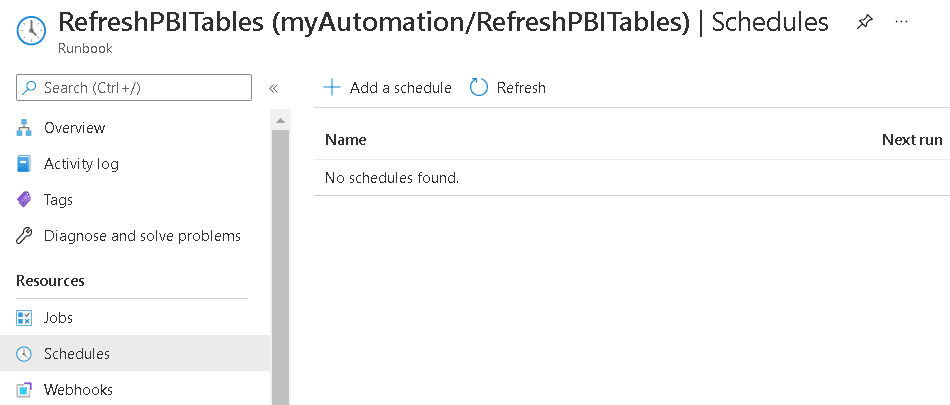
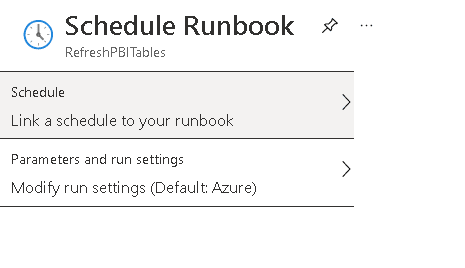
- On the Schedule Runbook window, click the option Link a schedule to your runbook
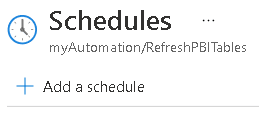
- On the Schedules window, click the Add a Schedule button
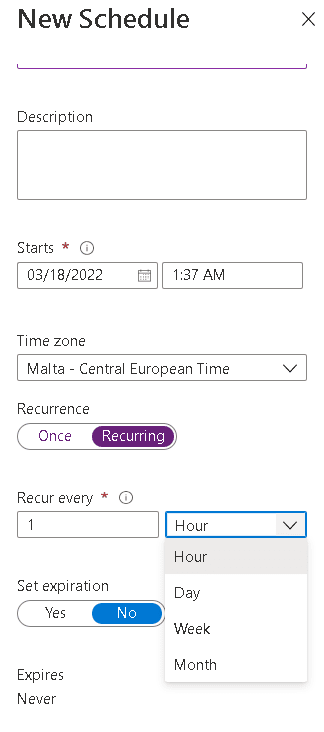
- Define the schedule as you wish and click the Create button
- Click the Ok button on the Schedule Runbook window
The schedule object is linked with the Runbook, but it’s stored in the automation account. This makes the same schedule available for many different runbooks, another advantage of the automation account.
Automate Power BI table refresh
You may just have discovered an entire new point of view about how to manage a Power BI data refresh. This is just the beginning. The possibilities in relation to automation only increase from this point forward.
If you liked this article, you might also like Power BI: ETL or not ETL, that’s the question

Load comments