The series so far:
- Azure and Windows PowerShell: The Basics
- Azure and Windows PowerShell: Getting Information
- Azure and Windows PowerShell: Using VM Extensions
PowerShell provides a great way of automating many things thus saving the time and effort of an Azure administrator. In the case of Automating Azure tasks, Microsoft has provided the Microsoft Azure PowerShell Module, which can be used to write scripts. As described in the first part of this series, this module is great and provides functionalities that will be described all along this series. But one of the main things to do when you will write your Azure scripts is that you must sign onto your Azure subscription first. You need to install the AzureAD PowerShell module and then use the Login-AzureRMAccount cmdlet. This cmdlet can be used to perform the login process, but the login needs to be done manually by entering the login and password of the Azure account in the popup window. As obvious it is, there can be no manual intervention during this process! Therefore, before going deeper in this article, I will explain how to get around this problem using Azure Service Principal to automate this login process.
What is a Service Principal?
A service principal is an identity your application can use to log in and access Azure resources. Azure Administrators need to perform a one-time activity to set up a Service Principal, which is similar to a service account. Following are the steps that need to be done so that they can automate the process:
-
Create an AD Application: This application will be used to log on to Azure.
-
Create a Service Principal: This account will be mapped to the application created above.
-
Assign a role to the Application: Configure the access level for the user account which can be Reader, Contributor, …
PowerShell
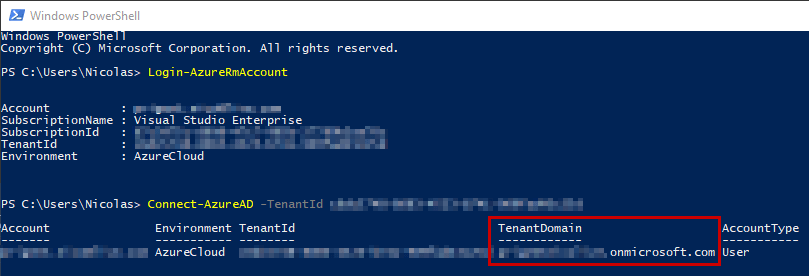
Service Principal requires you configure your Azure Active Directory domain. Navigate to Azure Active Directory, click Custom Domain Names and you will see your Azure Tenant Domain:

You will get the TenantID from the results of the Login-AzureRMAccount command. Use the Connect-AzureAD cmdlet to connect to your Azure AD tenant, which also asks you for your credentials:
|
1 2 |
PS > Login-AzureRmAccount PS > Connect-AzureAD -TenantId <Tenant_ID> |
The output is below:
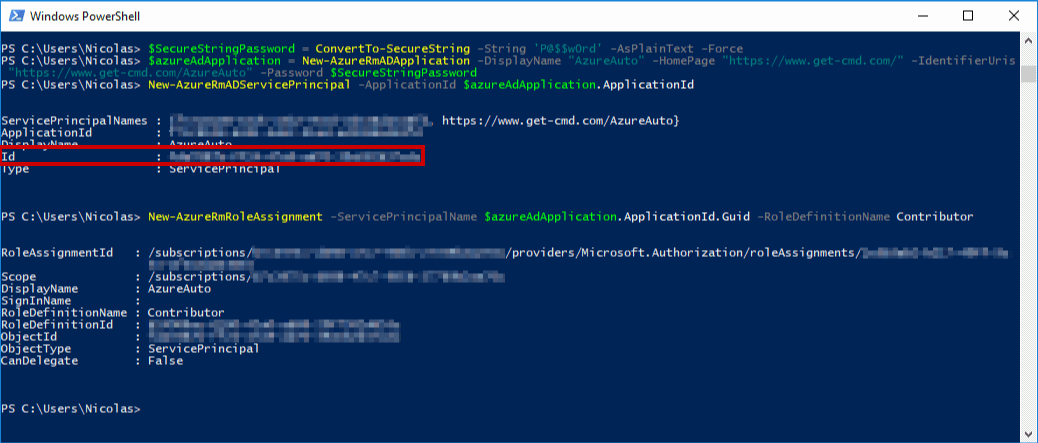
Copy the tenant domain and paste it in the following commands. First, create the Azure AD Application with the New-AzureRmAdApplication cmdlet, then use the New-AzureRmAdServicePrincipal cmdlet to create the application and, finally, to access resources in your subscription, you must assign the application to a role. In this example, assign the contributor role with the New-AzureRmRoleAssignment cmdlet. To learn more about the available roles, read this guide.
|
1 2 3 4 5 |
PS > $SecureStringPassword = ConvertTo-SecureString -String 'P@$$w0rd' -AsPlainText -Force PS > $azureAdApplication = New-AzureRmADApplication -DisplayName "AzureAuto" -HomePage "https://<tenant domain>/" -IdentifierUris "<tenant domain>/AzureAuto" -Password $SecureStringPassword PS > New-AzureRmADServicePrincipal -ApplicationId $azureAdApplication.ApplicationId PS > sleep 20 PS > New-AzureRmRoleAssignment -ServicePrincipalName $azureAdApplication.ApplicationId.Guid -RoleDefinitionName Contributor |
The output is below:
If you run all these commands at one time without the sleep command, you will get the following error:
New-AzureRmRoleAssignment : Principal xxxxxxxxxxxxxxxxxxxxxxxx does not exist in the directory.
After creating the Azure Service Principal, you must wait around 10 or 15 seconds before running the New-AzureRMRoleAssignment cmdlet to replicate the content in your Azure Subscription.
Confirm the login process by running the following commands in a new PowerShell console. Copy in the ID and tenant ID from the previous results.
|
1 2 3 4 |
PS > $SecureStringPassword = ConvertTo-SecureString -String '<Password>' -AsPlainText -Force PS > $azureAccountName = "<AppID>" PS > $psCred = New-Object System.Management.Automation.PSCredential($azureAccountName, $SecureStringPassword) PS > Login-AzureRmAccount -Credential $psCred -ServicePrincipal -tenant <TENANT_ID> |
Azure CLI
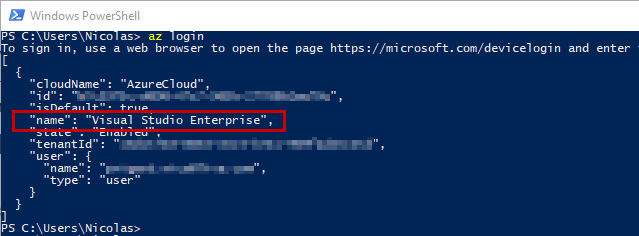
For those of you who want to use Azure CLI, it is possible to automate the same process using an Azure Service Principal. Run the az login command to log in to your Azure account. You will be prompted to authenticate with a code. This command is similar to the Login-AzureRmAccount cmdlet:
|
1 |
az login |
Then use the az account set command to select the desired subscription using the name parameter:
|
1 |
az account set -s <Azure_Subscription_Name> |
Finally, run the az ad sp command to create the service principal. Be sure to replace the service principal name and strong password.
|
1 |
az ad sp create-for-rbac --name <Service_Principal_Name> --password <StrongPassword> |
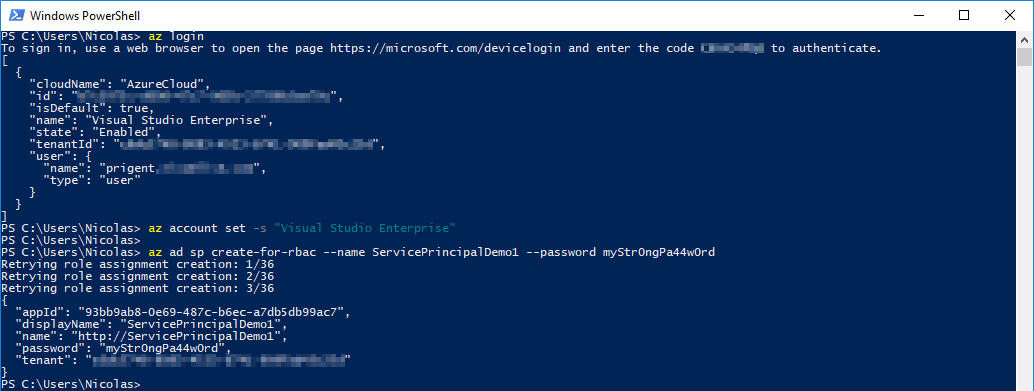
After running the az login command, copy the tenant ID and app ID for the next command.
Now it’s time to test the new service principal. Run the az login command in a new window and provide the following parameters to log in with a service principal:
-
–username: the service principal name using the AppID or the name but don’t forget to include ‘http://’
-
–password: the service principal password
-
–tenant: the tenant associated with the service principal
|
1 |
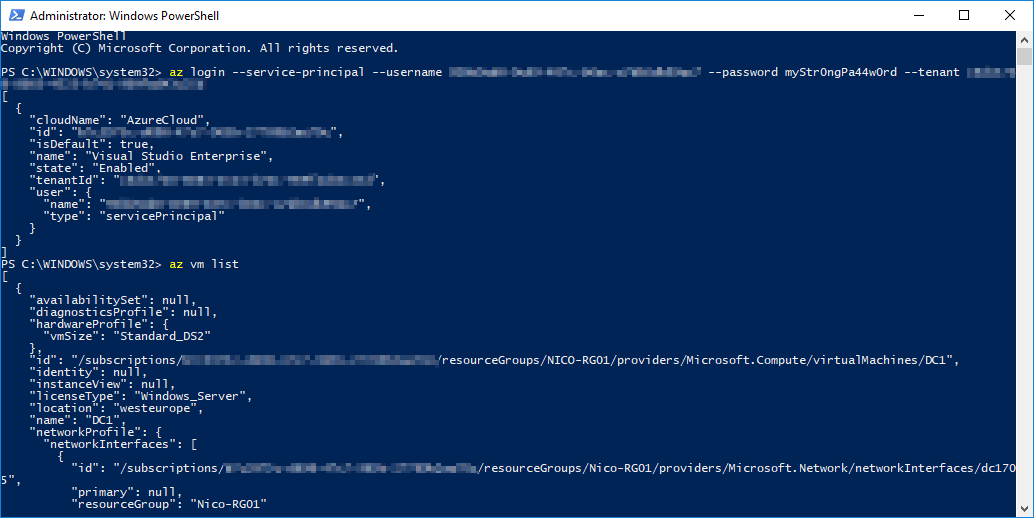
az login --service-principal --username <AppID> --password <Password> --tenant <TenantID> |
The output is shown below:
Azure Portal
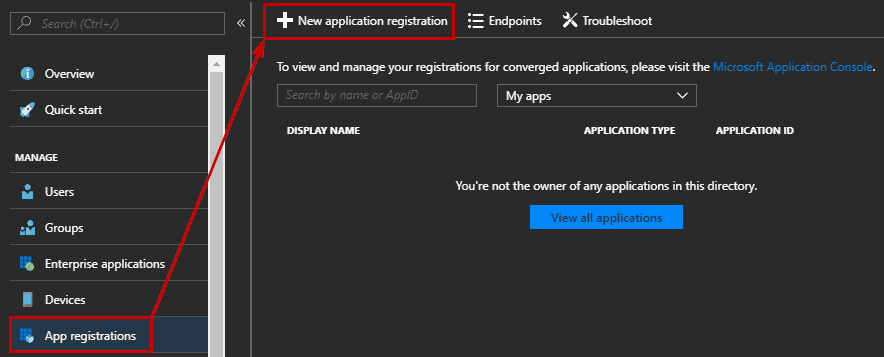
As you may imagine, creating a service principal can also be done with the Azure Portal. Log in to your Azure Account through the Azure portal. Then, select Azure Active Directory, App registrations and New application registration.
Provide a name and URL for the application. Select Web app / API for the type of application you want to create. Replace the URL with your tenant domain.
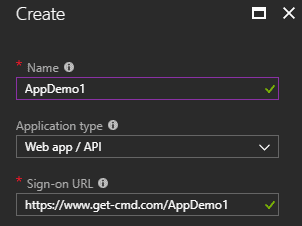
Note: you cannot create credentials for a Native application; therefore, that type does not work for an automated application.
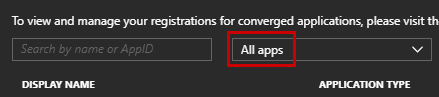
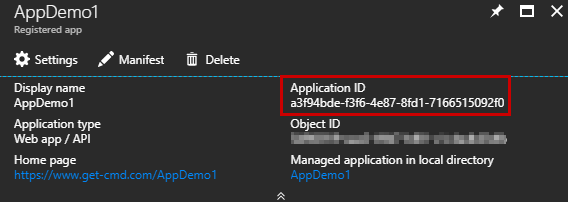
To retrieve the App ID, go to the App registrations tab and select the newly created application. Do not forget to switch from My Apps to All Apps to list all the Applications:
Copy the Application ID and save it on your machine because you will need to use it when connecting in your scripts.
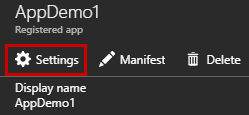
The App ID equals to the login, so now, create a key for this application that will be used as a password. Click Settings Keys to create the key:
Add a description, and a duration. This duration is used to limit access. Click Save to generate the key and then copy the key value because you won’t be able to retrieve it after you leave this blade.

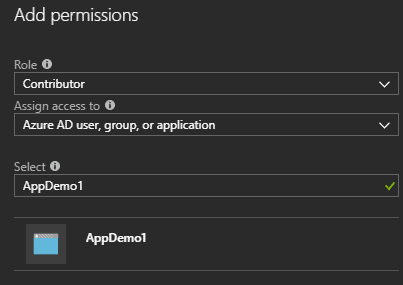
At this step, the Application is created, and the ID and the key are generated. The last step will add a role to the application. Go to the Subscriptions blade and select your subscription, navigate to Access control and click Add:
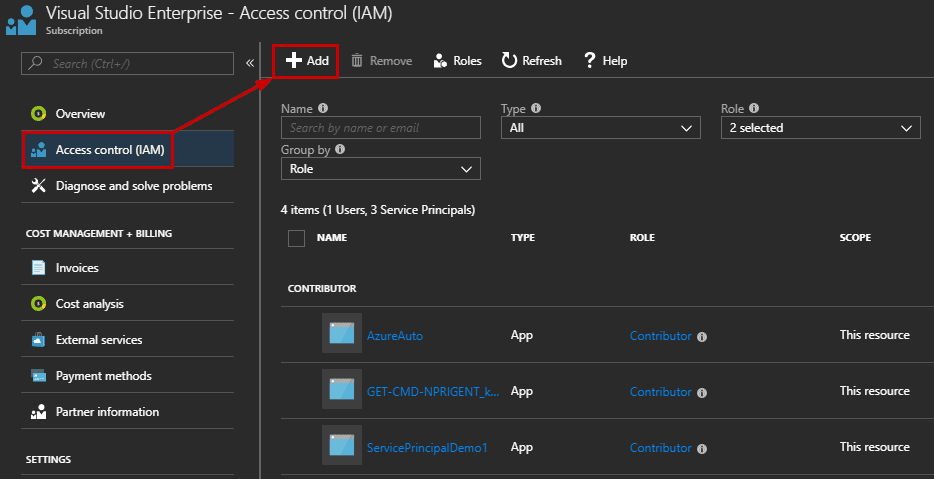
Here is a very nice bug! By default, Azure Active Directory applications are not displayed. It means that you must manually provide the name to find the application and click Save:
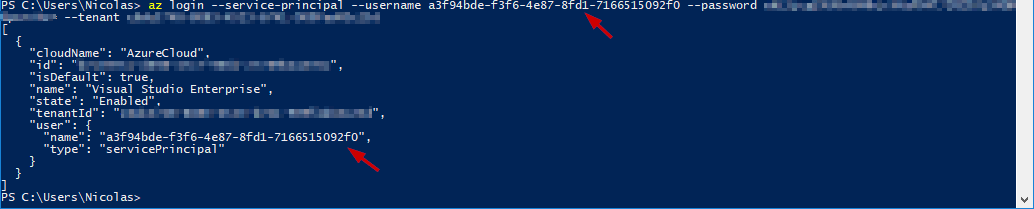
Validate and test your service principal using Azure CLI or PowerShell. In this example, run the az login followed by the username which is the AppID, the password which is the generated key and your Tenant ID. Now confirm you are authenticated:
Retrieving information
Before going deeper in this series, I will discuss in this part of all the necessary commands to retrieve information about your Azure account including:
-
Subscription
-
Resources
-
Cost
-
And logs
Azure Subscription
After logging in to your Azure subscription, the login-AzureRmAccount cmdlet returns the same output as the Get-AzureRmContext cmdlet. Run this cmdlet to display information about the subscription. This cmdlet is helpful when you need to retrieve the tenant ID:
|
1 |
PS > Get-AzureRmContext |
The same information can be retrieved using Azure CLI but in JSON. Run the following command:
|
1 |
az account list |
Depending your needs, you may work with multiple Azure subscriptions. When you login, you get a default subscription set, so running some commands may fail if you don’t set the correct subscription. To switch between them, use the following PowerShell commands:
|
1 |
PS > Set-AzureRmContext -SubscriptionId <Subscription_ID> |
Retrieve the Azure subscriptions with Azure CLI:
|
1 |
az account list --output table |
And switch to a new subscription:
|
1 |
az account set --subscription <Azure Subscription Name> |
Note: You can use either the subscription ID or the subscription name to select the subscription.
Azure Resources
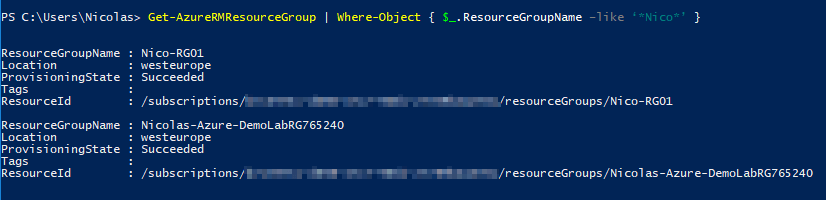
Getting all Azure Resource Manager resource groups with PowerShell is very simple. Just use the Get-AzureRMResourceGroup cmdlet:
|
1 |
PS > Get-AzureRMResourceGroup |
Depending the number of Resource Groups your Azure subscription contains, you can filter the output:
|
1 |
PS > Get-AzureRMResourceGroup | Where-Object { $_.ResourceGroupName –like ‘*Nico*’ } |
Note: depending which service principal you use to connect to your Azure subscription, some results could be incomplete due to the assigned role (e.g. Contributor, Reader).
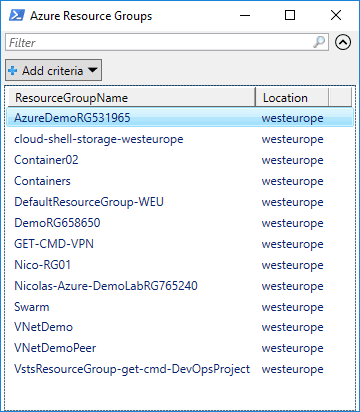
For better visibility, I recommend the Out-GridView cmdlet:
|
1 |
PS > Get-AzureRMResourceGroup | Select-Object ResourceGroupName, location | Out-GridView -Title 'Azure Resource Groups' |
The output is below:
Working with Tags in Azure is helpful when you need to manage a large number of items. To list all the resource groups with their tags, run the Get-AzureRmResourceGroup cmdlet.
|
1 |
PS > Get-AzureRmResourceGroup | Select-Object ResourceGroupName, tags |
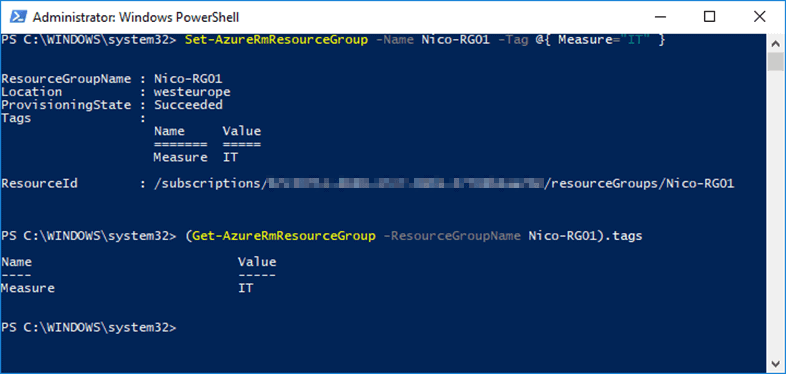
You can easily get the pair ‘key=value’ for a specific resource group by using the following command:
|
1 |
PS > (Get-AzureRmResourceGroup -ResourceGroupName <RG_Name>).tags |

You can add tags on a Virtual Machine, a Resource Group, a Virtual Network, etc., using PowerShell and the Azure Portal:
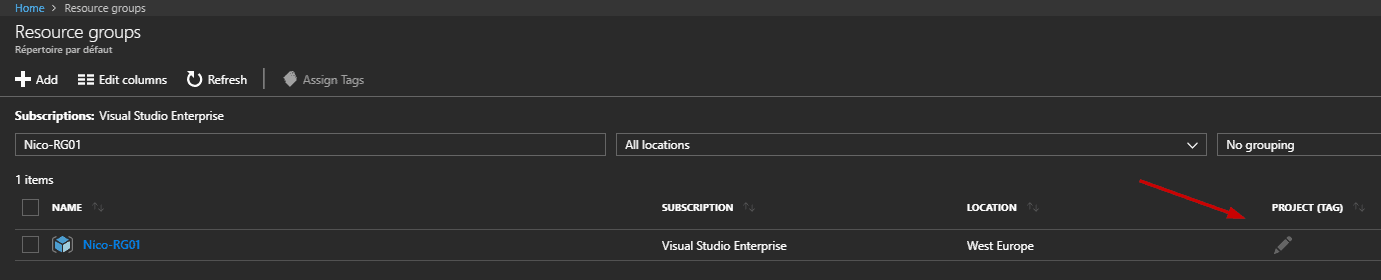
To add tags to a resource group without existing tags, use the Set-AzureRMResourceGroup command with the tag parameter:
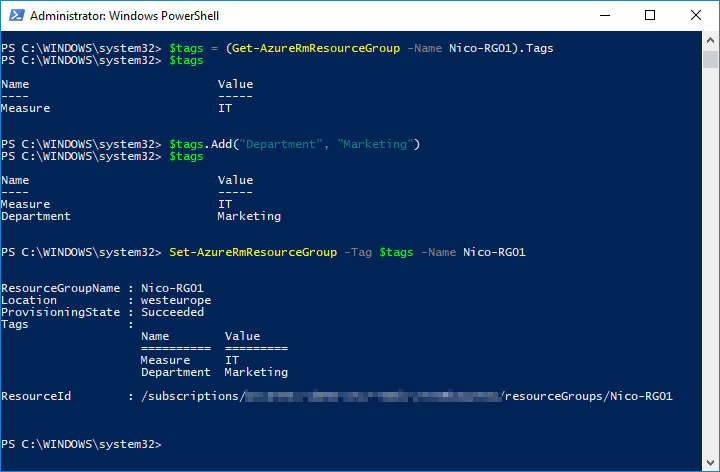
To add tags to a resource group that has existing tags, retrieve the existing tags, add the new tag, and reapply the tags:
To finish with the Resource Groups, of course you can list Resource Groups using Azure CLI:
|
1 |
az group list |
Filtering by tag is very simple as well:
|
1 |
az group list --tag Measure=Test |
The output is below:

Azure Costs
Monitoring and visualizing cloud usage and costs can be done using PowerShell. In my opinion, the Azure Portal is a nice way to get the information about Azure costs, but sometimes, you may need to retrieve this information by command line to generate some reports, for instance. You can use the Get-UsageAggregates cmdlet to get billing information. Several parameters can be used to filter the results:
-
ReportedStartTime
-
ReportedEndTime
-
AggregationGranularity
-
ShowDetails
Below is the syntax:
|
1 |
PS > Get-UsageAggregates -ReportedStartTime "2018-01-01" -ReportedEndTime "2018-01-07" -AggregationGranularity "Daily" -ShowDetails $true |
In this example, I can get usage details of the current subscription between 2018-01-17 to 2018-01-19:

Listing the details of Azure resource consumption can be performed with the following Azure CLI command:
|
1 |
az consumption usage list |
This command can be filtered because, depending your subscription, it can take a long time to run. You can add the –top parameter to limit the number of items to return:
|
1 |
az consumption usage list –top 100 |
Listing the resource consumption by date can be performed by using the start-date and end-date parameters:
|
1 |
az consumption usage list --start-date "2017-06-01" --end-date "2018-01-01" |
Azure Logs
The command line is interesting to automate some tasks, but Azure logs is very well implemented in the Azure Portal. So of course, PowerShell and Azure CLI can be used to get the log activities, but the Azure Portal allows creating great dashboards, and performing rich data exploration with interactive queries. Using the Azure Logs, you can determine the “what, who, and when” for any operations taken on the resources in your subscription. Azure logs are different from Windows logs or Linux logs. It means that if you deploy a Virtual Machine in your subscription, Azure logs contains information regarding the deployment of this VM. Information about the operating system itself will not be displayed.
Nevertheless, PowerShell provides the Get-AzureRmLog cmdlet to show logs. By default, this cmdlet will query all the resource groups:
|
1 |
PS > Get-AzureRmLog |
Filtering certain resource group, for certain actions and from a given time is possible. Depending on the start time you specify, the previous commands can return a long list of operations for the resource group. For instance, to find all logs in the last day and for a specific Resource Group, the following command retrieve this information:
|
1 |
PS > Get-AzureRmLog -ResourceGroup <RG_Name> -StartTime (Get-Date).AddDays(-1) |
Note: If you do not specify a start and end time, entries for the last hour are returned.
You can also look up the actions taken by a particular user using the –Caller parameter:
|
1 |
PS > Get-AzureRmLog -ResourceGroup <RG_Name> -StartTime (Get-Date).AddDays(-14) -Caller someone@domain.com |
You can filter for failed operations using the –Status parameter:
|
1 |
PS > Get-AzureRmLog -ResourceGroup <RG_Name> -Status Failed |
Now, if you need more information about Azure deployments, in order to get the status of a Virtual Machine deployment, for example, use the Get-AzureRmResourceGroupDeployment cmdlet:
|
1 |
PS > Get-AzureRmResourceGroupDeployment -ResourceGroupName <RG_Name> |
This cmdlet is very helpful for Azure administrators, because troubleshooting can be done very quickly by filtering the output. For instance, filtering by failed deployment status can be perform using the following command:
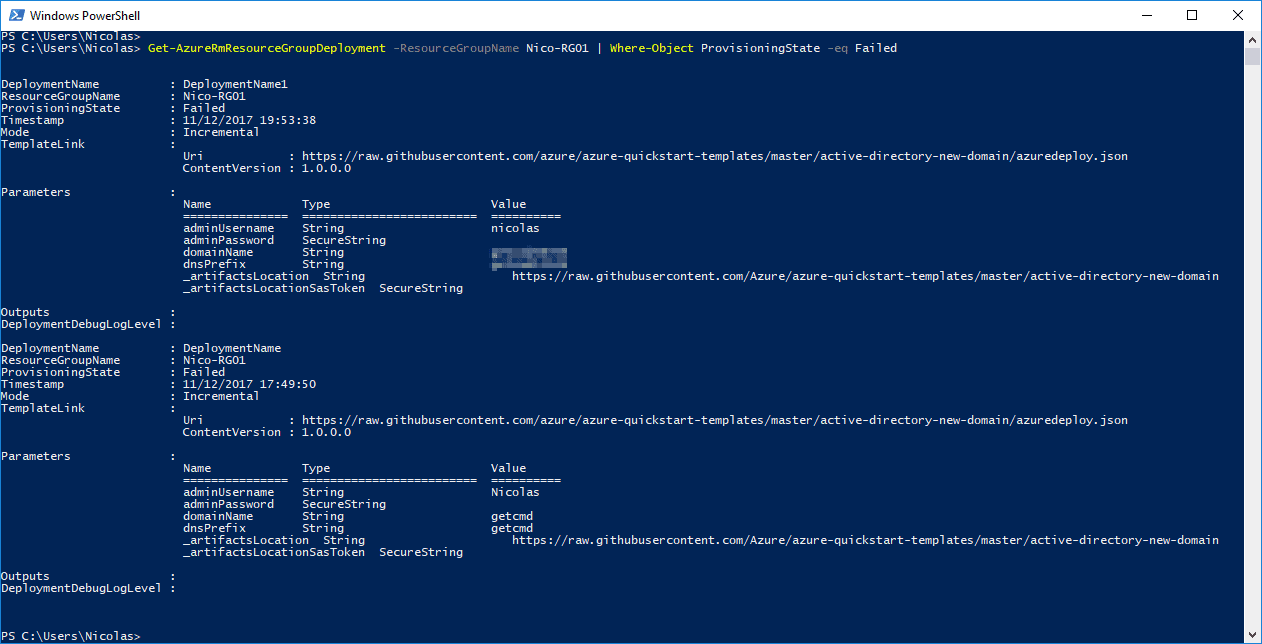
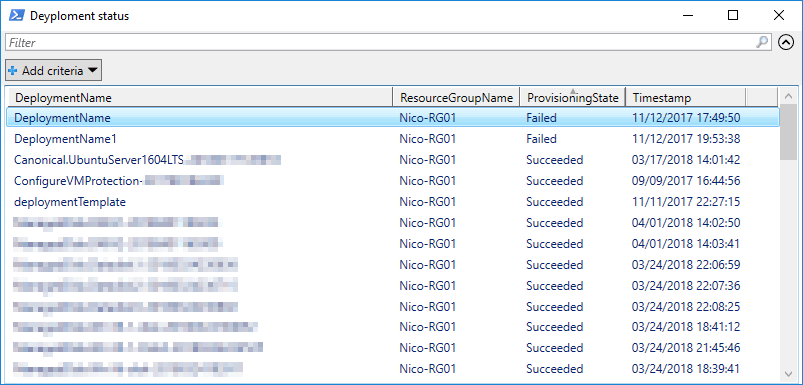
Here is one of my favorite command to quickly and easily check deployment status in the current Azure subscription:
|
1 |
PS > Get-AzureRmResourceGroupDeployment -ResourceGroupName <RG_Name> | Select-Object DeploymentName, ResourceGroupName, ProvisioningState, Timestamp | Out-GridView -Title 'Deyploment status' |
The az monitor activity-log list command return Azure logs with Azure CLI:
|
1 |
az monitor activity-log list --resource-group <RG_Name> |
Conclusion
This second article in this series described important steps to automate Azure tasks and retrieve the required information from your Azure account:
-
Creating a service principal
-
Automating the login process using PowerShell, Azure CLI and Azure Portal
-
Retrieving Azure Resources information
-
Viewing Azure costs
-
and getting the Azure logs
At this step, you know how to automate the login process using PowerShell and Azure CLI. It means that you can create your own scripts in order to interact with your Azure resources. In the next articles, I will describe how to create and manage your Azure Resources in practice, such as:
-
Creating Virtual Network
-
Creating and attaching Disk to a VM
-
Backing up Virtual Machines
-
Deploying Network devices (Load Balancer, …)
-
…
I will not explain how to create Virtual Machines in detail, because Robert Cain published a great series about Azure VMs: Create Azure VMs

Load comments