
I was talking with a good friend that has an environment with terabytes of information and to create a homolog or dev environment to him is a pain. He comes to me with a solution : A PowerShell script that gets only the first 1000 lines of each table, creates the inserts and schema files and runs in another server. I said to him. It´s crazy. We already have a solution that does that, BCP. So why not automate BCP? He agreed with me and then this article is how we did that . When you finished to read the article you will be able to understand how apply this solution if its is your case or even for not too large databases it´s a very delightful way to perform this operation.
The Problem
We have tons of data that needs to be exported only the first 1000 lines in a text file. This process needs to be automated and with less human intervention. Doing all repetitive tasks by writing code is what separates programmers from the non-programmers.
The Solution
As mentioned, the solution is to automate BCP as much as possible, and as the title belies, I am using my automation tool of choice: PowerShell. Like a lot of tasks you want to automate, this solution is not 100% automated.
Often you reach a point where the cost of writing the code is greater than some of the manual work. It is something you need to consider when automating processes. How many times you do a task * number of times the task is done needs to be compared to the costs to automate. In this case I did the same, so you will see some manual parts of the process, but I guarantee that if you need to do something similar, it will save a lot your time. Certainly, enough to take the time to do a little automation.
It´s simple and consist of 3 PowerShell scripts :
ExportTablessmo.ps1– It´s the script that will export all the tables (and only the tables) from the source database to the target database. You may also need to disable foreign key constraints in the target database before the load because BCP is not smart enough to deal with that.If you have schemas and user defined types (or any other objects that make dependencies) I suggest you use SSMS to script out these objects before apply the script tables (of course). The code I am using does not create these parts of the target database for you.
Bcpoutsmo.ps1– This script is responsible to export out the data from the tables in the specified database inside the script (source database)Bcpinsmo.ps1–Finally this one imports the exported tables into the target database
We need to create on SQL Server a login to do the BCP work. I will use a SQL Standard login named BCPExportLogin with a password of ExPoRtPassword! in both servers (source and target). For some reason I could not make BCP works with windows authentication. For your production work you should use a user with a much better password and the least rights needed, then drop the login as soon as you have completed the task.
The scripts
First let´s create the sysadmin login. Open the SQL Server Management Studio and execute the following (note the code for this and all of the files is available here in a file named CreateLogin.sql, and there is a DropLogin.sql as well):
|
1 2 3 4 5 6 7 |
USE [master] GO CREATE LOGIN [BCPExportLogin] WITH PASSWORD=N'ExPoRtPassword', DEFAULT_DATABASE=[master], CHECK_EXPIRATION=OFF, CHECK_POLICY=OFF GO ALTER SERVER ROLE [sysadmin] ADD MEMBER [BCPExportLogin] GO |
Both machines will need to have SMO installed. Fortunately, it comes as part of the SSMS installation, so you typically won’t need to add anything else. There are other methods, which you can find in this page on the Microsoft Learn site.
ExportTablesSMO.ps1 – Used to export the table structures.
Note that the comments for the code follow the actual code and correspond to the #<Letter> tags.
|
1 2 3 4 5 6 7 8 9 10 11 12 |
[System.Reflection.Assembly]::LoadWithPartialName('Microsoft.SqlServer.SMO') | out-null #A $sourcedatabaseName="adventureworks2016" #B $sourceserverName="DESKTOP-SQEVVO1\SQL2017" #C $baseExportPath="c:\Export" #D New-Item -Force $baseExportPath -type directory #E $Server = new-object ('Microsoft.SqlServer.Management.Smo.Server') $Sourceservername #F ($server.databases[$ourcedatabaseName] | select -ExpandProperty tables).script() | out-file "$baseExportPath\scripttables.sql" #G |
The letter comments are explained in the following:
- #A – loads the SMO assembly
- #B – creates the source database name variable
- #C – creates the source server name variable
- #D – creates the variable to the folder to export the tables. The file created will be scripttables.sql
- #E – creates the folder based on #D
- #F – connects to the source SQL Server
- #G – connects to the source database, get the tables and then script it and save into a file
BCPOutSMO.PS1 – Exports the data from the database into files
|
1 2 3 4 5 6 7 8 9 10 11 12 13 14 15 16 |
[System.Reflection.Assembly]::LoadWithPartialName('Microsoft.SqlServer.SMO') | out-null #A $SourcedatabaseName="adventureworks2016" #B $SourceserverName='DESKTOP-SQEVVO1\SQL2017'#C $baseExportPath="c:\Export\tables" #D New-Item -Force $baseExportPath -type directory #E $Server = new-object ('Microsoft.SqlServer.Management.Smo.Server') $SourceserverName #F $server.databases[$SourcedatabaseName] | #G select -ExpandProperty tables | #H ForEach-Object { #I $expression = "bcp ""select top (1000) * from $_"" queryout $baseExportPath\$_.txt ` -c -U BCPExportLogin -P ExPoRtPassword -S $SourceserverName -d $SourcedatabaseName" #J invoke-expression $expression #L } |
- #A- loads the SMO assembly
- #B – creates the source database name variable
- #C – creates the source server name variable
- #D – creates the variable to the folder to export the content of the tables. Each file created will be the name of the table
- #E – creates the folder based on #D
- #F – connects to the source server
- #G – selects the source database
- #H – Select the tables from this database
- #I – creates a foreach to the tables
- #J – Build the BCP string
- #L –Invoke the BCP string
BCPInSMO.PS1 – Imports data into the database
|
1 2 3 4 5 6 7 8 9 10 11 12 13 14 15 |
[System.Reflection.Assembly]::LoadWithPartialName('Microsoft.SqlServer.SMO') | out-null #A $newdatabaseName="newdatabase" #B $newserverName='DESKTOP-SQEVVO1\SQL2017' #C $baseExportPath="c:\Export\tables" #D $Server = new-object ('Microsoft.SqlServer.Management.Smo.Server') $newserverName #E $server.databases[$newdatabaseName] |#F select -ExpandProperty tables | #G ForEach-Object { #H $expression = "bcp $_ in $baseExportPath\$_.txt -c -U BCPExportLogin -P ExPoRtPassword ` -S $newServerName -d $newdatabaseName" #I invoke-expression $expression #J } |
- #A- loads the SMO assembly
- #B – creates the target database name variable
- #C – creates the target server name variable
- #D – creates the variable pointing to the folder will load the files
- #E – connects to the source server
- #F – selects the source database
- #G – Select the tables from this database
- #H – creates a foreach to the tables
- #I – Build the BCP string loading the tables in the foreach
- #J –Invoke the BCP string to load the data
Putting it to work
In this section I will demonstrate the process of using these scripts.
Step 1 – Export the schema
To export the schema table of the source database use the script ExportTableSMO.ps1. The variables to change to your environment are $sourcedatabasename, $sourcesevername,$basexport.
The output will be a file called scripttables.sql in the $baseexport path ?

If you open the scripttables.sql script that was generated, you will see something like the following, based on the database you have chosen:
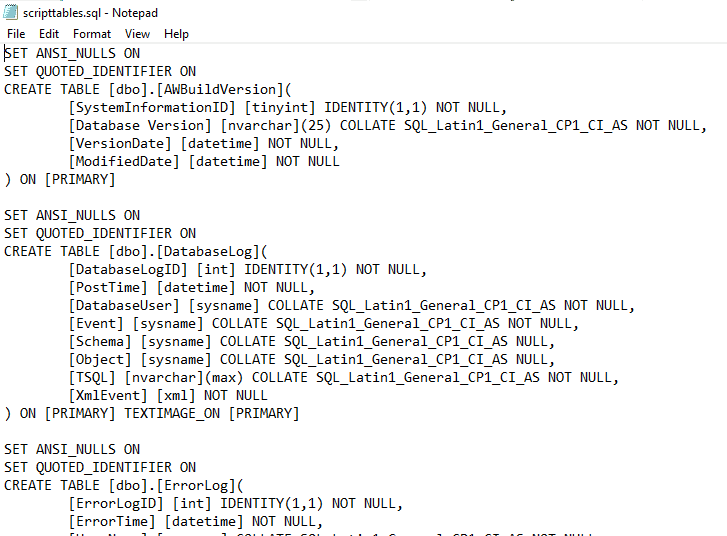
Use this file to create the objects in your target database, typically using SSMS.
As mentioned, you may need to manually create schemas, user defined types, and perhaps any scalar functions used in constraints.
Step 2 – Export the Data From Tables.
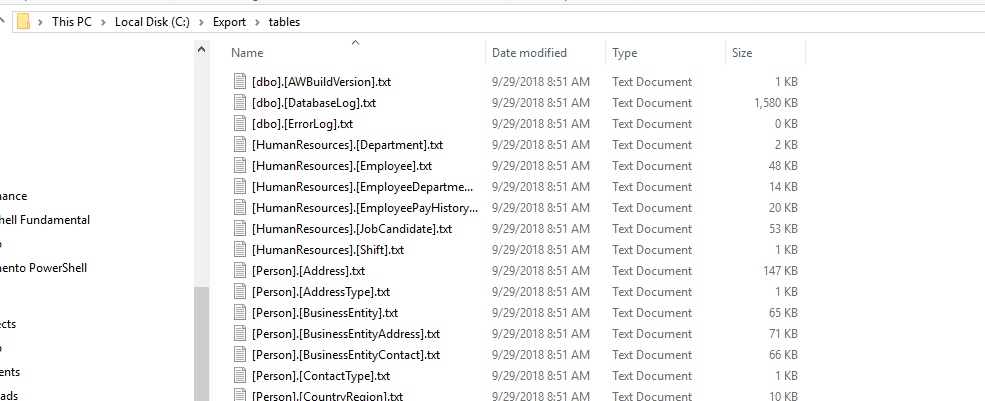
Open the BCPOutSMO.ps1 script. Change the $sourcedatabasename, $sourcesevername,$basexport. To match your environment. Execute the script and you should see a set of .txt files created in the $baseexport folder. One for each table to be exported:
Step 3 – Load the data into the new database
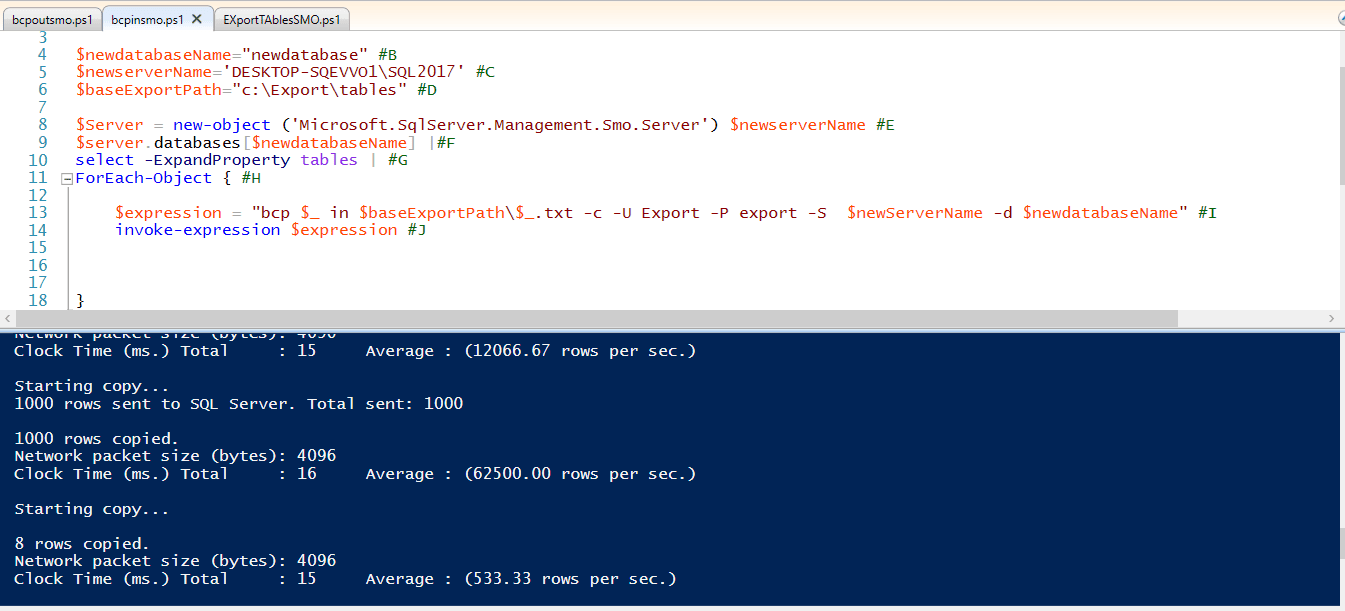
Open the BCPinSMO.ps1 script and change the header variables to meet your environment. The variables to change to your environment are $newdatabasename,$newservername,$baseexportpath.
Set the newservername and newdatabasename to the target of your data. Point the $baseexporpath to the folder where the .txt files are from step 2. Then just run the script and the tables will be filled.
Conclusion
As we can see, it is fairly simple to set up this set of code that will save a huge amount of time if you have to do this process more than a few times. If this is done frequently, with a bit more work the entire process could be built into a solution that calls the code in each file with just a little bit of work.
Any time you find yourself doing repetitive management tasks, consider if PowerShell can help you achieve what you need, if only the parts are especially cumbersome like importing and exporting data from a database.
This document contains proprietary information and is protected by copyright law.
Copyright © 2026 Red Gate Software Limited. All rights reserved


Load comments