
This article is part of Robert Sheldon's continuing series on Learning MySQL. To see all of the items in the series, click here.
In the previous article in this series, I introduced you to the SELECT statement, one of several SQL statements that fall into the category of data manipulation language (DML), a subset of statements used to query and modify data. Another DML statement is the INSERT statement, which lets you add data to MySQL tables, both permanent and temporary. This article covers the INSERT statement and the different ways you can use it to add data.
Earlier in this series, I introduced you to the INSERT statement, but most mentions were fairly brief because the statement was included only to support other concepts. This article focuses exclusively on the INSERT statement and the primary components that you should understand when getting started with this statement.
Preparing your MySQL environment
For the examples in this article, I used the same database, tables, and data that I used in the previous article. If you have not set up that database and want to try out the examples in this article, you can download the MySQL_06_setup.sql file and run the script against your MySQL instance. For your convenience, I’ve included the SQL for the manufacturers and airplanes tables here so you can reference their definitions when trying out the INSERT statements in the examples throughout this article:
|
1 2 3 4 5 6 7 8 9 10 11 12 13 14 15 16 17 18 19 20 21 22 23 24 25 26 27 |
CREATE TABLE manufacturers ( manufacturer_id INT UNSIGNED NOT NULL AUTO_INCREMENT, manufacturer VARCHAR(50) NOT NULL, create_date TIMESTAMP NOT NULL DEFAULT CURRENT_TIMESTAMP, last_update TIMESTAMP NOT NULL DEFAULT CURRENT_TIMESTAMP ON UPDATE CURRENT_TIMESTAMP, PRIMARY KEY (manufacturer_id) ) ENGINE=InnoDB AUTO_INCREMENT=1001; CREATE TABLE airplanes ( plane_id INT UNSIGNED NOT NULL AUTO_INCREMENT, plane VARCHAR(50) NOT NULL, manufacturer_id INT UNSIGNED NOT NULL, engine_type VARCHAR(50) NOT NULL, engine_count TINYINT NOT NULL, max_weight MEDIUMINT UNSIGNED NOT NULL, wingspan DECIMAL(5,2) NOT NULL, plane_length DECIMAL(5,2) NOT NULL, parking_area INT GENERATED ALWAYS AS ((wingspan * plane_length)) STORED, icao_code CHAR(4) NOT NULL, create_date TIMESTAMP NOT NULL DEFAULT CURRENT_TIMESTAMP, last_update TIMESTAMP NOT NULL DEFAULT CURRENT_TIMESTAMP ON UPDATE CURRENT_TIMESTAMP, PRIMARY KEY (plane_id), CONSTRAINT fk_manufacturer_id FOREIGN KEY (manufacturer_id) REFERENCES manufacturers (manufacturer_id) ) ENGINE=InnoDB AUTO_INCREMENT=101; |
If you don’t want to mess with downloading and running the script, you can simply create these two tables without populating them. They include everything you need to test out the INSERT statements in the following examples.
The INSERT statement syntax
A MySQL INSERT statement is one of the fundamental DML statements in MySQL. You can use it to add one or more rows of data to a table. The following syntax shows that basic elements that go into an INSERT statement:
|
1 2 3 |
INSERT [IGNORE] [INTO] table_name [(column_list)] VALUES (value_list) [, (value_list)]... |
The syntax does not include all the elements in an INSERT statement, but it does provide the ones that will be most useful to you when first learning how to use the statement:
- The
INSERTclause specifies the table in which the data will be inserted. TheINTOkeyword is optional, but it is used quite commonly withINSERT. Its use does not impact the statement one way or the other. TheIGNOREkeyword determines how certain exceptions are handled when running theINSERTstatement, which will be covered later in the article. - The second line in the syntax specifies the columns into which the data will be inserted. The column list must be enclosed in parentheses, and if there is more than one column, they must be separated by commas. The column list is optional, but it is generally a good idea to include it in case there are underlying schema changes. If the column list is not included, a value must be provided for every column in the table, in the order the columns are listed in the table definition.
- The
VALUESclause specifies the values to be inserted into the target table. The values themselves must be enclosed in parentheses and, if there is more than one, separated with commas. The values must correspond to the columns in the column list, if one is present. If not, you must include a value for every column. You can specify multiple rows of data (value lists) in theVALUESclause. If you do, each value list must be enclosed in its own set of parentheses, and the value lists must be separated by commas.
The INSERT statement also supports the INSERT…SELECT format, which enables you to add data to a table using the results returned by SELECT statement, rather than including a VALUES clause. Although there’s more to the INSERT statement than the basic elements I’ve described here, this should be enough to get you started and, in fact, enable you to add a wide range of data to your MySQL tables. This will also provide you with a good foundation for when you’re ready to learn more advanced statement features.
Inserting a single row into a table
In most cases, adding a single row of data to table is a reasonably straightforward process. You define the INSERT clause and VALUES clause and usually specify the column list in between. The column list should include only those columns for which you provide values. The list can include the primary key column, generated columns, or columns defined with default constraints, but you must be careful how you handle them, as you’ll see later in the article.
When specifying the column values, be sure that they conform to the data types defined on the target column. To demonstrate what I mean, take a look at the following example:
|
1 2 |
INSERT INTO manufacturers (manufacturer) VALUES ('Bombardier'); |
The INSERT statement adds a row to the manufactures table. In this case, the column list includes only the manufacturer column, which is defined with the VARCHAR(50) data type. Because only one column is specified, the VALUES clause contains only one value, Bombardier, which is passed into the clause as a string (as indicated by the single quotations). The string is treated as character data, which can be inserted into the VARCHAR column, as long as the string is within the 50-character limit.
You don’t need to pass values into the other columns in the table because MySQL assigns their values by default. The manufacturer_id column is automatically assigned a value through the AUTO_INCREMENT operator, and the create_date and last_update columns each include a DEFAULT constraint that uses the CURRENT_TIMESTAMP operator to automatically assign the current timestamp to the column.
After you run the INSERT statement, you can verify that the row has been added by running the following SELECT statement.
|
1 |
SELECT * FROM manufacturers WHERE manufacturer = 'Bombardier'; |
Figure 1 shows the statement’s results, which includes only one row because the SELECT statement includes a WHERE clause that specifies Bombardier as the manufacturer.

Figure 1. Adding a row to the manufacturers table
Notice that the manufacturer_id value is 1007. You will need to know this value when you add data to the airplanes table, if the data is related to the Bombardier manufacturer. This is because the airplanes table includes a foreign key that references the manufacturer_id column in the manufacturers table. For example, the following INSERT statement adds a row of data to the airplanes table, specifying 1007 as the value for the manufacturer_id column (note that if you are following along, your value may not be 1007 in the statements, depending on what you have done with the table, so you may need to alter the value as you work with the code):
|
1 2 3 4 |
INSERT INTO airplanes (plane, manufacturer_id, engine_type, engine_count, wingspan, plane_length, max_weight, icao_code) VALUES ('Learjet 24',1007,'Jet',2,35.58,43.25,13000,'LJ24'); |
As you can see, the column list includes many more columns than the previous example. In fact, it includes all the table’s columns except the primary key column (plane_id), the generated column (parking_area), and the two columns defined with default constraints (create_date and last_update).
The VALUES clause contains a value for each specified column. The value list includes 1007 for the manufacturer_id value because the row data describes one of Bombardier’s planes. If you try to insert a row that includes a nonexistent manufacturer_id value, MySQL will throw an error.
After you run the INSERT statement, you can verify that the row has been added by running the following SELECT statement:
|
1 |
SELECT * FROM airplanes WHERE manufacturer_id = 1007; |
Figure 2 shows the results returned by the SELECT statement. Because only one plane has so far been added for Bombardier, the results include only that row.
 Figure 2. Adding a row to the
 airplanes table
The two examples in this section demonstrated the basic elements that go into an INSERT statement. The biggest issue to watch for is to ensure that you correctly match your column list and value list. If you don’t, your statement is likely to generate an error or, worse still, add incorrect data to your database.
Working with primary keys
Even if you define your primary key column with the AUTO_INCREMENT operator, you can still insert a specific value into that column, as long as the value doesn’t already exist and it conforms to the column’s data type. For example, the following INSERT statement adds another row to the airplanes table, only this time it specifies a plane_id value, rather than letting the operator automatically generate the value:
|
1 2 3 4 |
INSERT INTO airplanes (plane_id, plane, manufacturer_id, engine_type, engine_count, wingspan, plane_length, max_weight, icao_code) VALUES (401,'Learjet 24A',1007,'Jet',2,35.58,43.25,12499,'LJ24'); |
In this case, the plane_id value is 401, but you could have specified any unsigned integer, as long as it’s not already being used. If you now run the preceding SELECT statement, you should get the results shown in Figure 3 .
 Figure 3. Specifying the primary key value (outlined in red) when inserting data
If you just created the table, the plane_id value for the first row should be 101, but if you had created (and populated) the table in the previous article, the value should be 342.
When adding a value manually to an AUTO_INCREMENT column, be aware this will set a new starting point for the operator. You can see this in action in the following example, which adds another row to the table, but without specifying the plane_id value:
|
1 2 3 4 |
INSERT INTO airplanes (plane, manufacturer_id, engine_type, engine_count, wingspan, plane_length, max_weight, icao_code) VALUES (‘Learjet 24E’,1007,’Jet’,2,35.58,43.25,12900,'LJ24'); |
If you were to query the airplanes table after running the INSERT statement, you would see that the plane_id value for the new row is 402, not 343, which would have been the old starting point for the AUTO_INCREMENT operator.
 Figure 4. Viewing the primary key values (outlined in red) on the inserted data
In most cases, a new starting point will probably not be a big deal, but it could cause a bit of confusion for someone reviewing the data because it might appear as though rows are missing. You can’t go back, either. For instance, you can add a row that manually specifies 343 as the plane_id value, but the next auto-incremented value will still be 403, not 344.
Whatever value you add to a primary key column, you must ensure that you don’t specify a value that’s currently being used, as in the following example:
|
1 2 3 4 |
INSERT INTO airplanes (plane_id, plane, manufacturer_id, engine_type, engine_count, wingspan, plane_length, max_weight, icao_code) VALUES (401,'Learjet 25',1007,’Jet’,2,35.58,47.58,15000,'LJ25'); |
Because the plane_id value 401 already exists, MySQL will stop execution and return the following error:
|
1 |
Error Code: 1062. Duplicate entry ‘401’ for key ‘airplanes.PRIMARY’ |
That said, if a primary key value has been deleted from the table or changed to another value, the original value can be reused.
At times, you might want to prevent a statement from generating an error even if there is a problem with a value. In these situations, you can add the IGNORE modifier to the INSERT statement to instruct MySQL to return a warning rather than generate an error and stop execution. To use the modifier, add the IGNORE keyword directly after INSERT, as in the following example:
|
1 2 3 4 |
INSERT IGNORE INTO airplanes (plane_id, plane, manufacturer_id, engine_type, engine_count, wingspan, plane_length, max_weight, icao_code) VALUES (401,'Learjet 25',1007,’Jet’,2,35.58,47.58,15000,'LJ25'); |
The IGNORE modifier applies only to certain types of errors. Fortunately, a duplicate primary key is one of those. Now the INSERT statement will return the following warning, rather than stopping execution:
|
1 |
0 row(s) affected, 1 warning(s): 1062 Duplicate entry ‘401’ for key ‘airplanes.PRIMARY’ |
The data is still not inserted into the table, but statement execution can continue if necessary. This probably won’t have much of an impact when adding only one row to a table. However, if you were running an INSERT statement that adds multiple rows, the modifier makes it possible for the statement to still add the other rows even if one of them fails.
Overriding default values
There will likely be times when you’ll want to override a column’s default value with your own, in which case, you simply specify the value as you would any other column. For example, the following INSERT statement overrides the default value assigned to the create_date column:
|
1 2 3 4 5 |
INSERT INTO airplanes (plane, manufacturer_id, engine_type, engine_count, wingspan, plane_length, max_weight, icao_code, create_date) VALUES ('Learjet 25',1007,'Jet',2,35.58,47.58,15000, 'LJ25','2022-06-12 08:30:00'); |
As you can see, I’ve included create_date in the column list and the new value in the value list. If you query the airplanes table after running the INSERT statement, you’ll see that the specified value has been inserted into the create_date column, as shown in Figure 5.
 Figure 5. Overriding a column’s default value (outlined in red)
The INSERT statement also supports the use of the DEFAULT keyword. This can be handy when including a column that automatically generates a value. For example, you can use the keyword in your value list for primary key columns, generated columns or columns defined with default constraints.
The main advantage of this approach is that you don’t have to specify the table’s columns after the INSERT clause. For example, the following INSERT statement achieves the same results as the preceding example, but without the column list:
|
1 2 3 |
INSERT INTO airplanes VALUES (DEFAULT,'Learjet 25',1007,'Jet',2,15000,35.58,47.58, DEFAULT,'LJ25','2022-06-12 08:30:00',DEFAULT); |
That statement uses the DEFAULT keyword for the primary key column (plane_id), the generated column (parking_area), and the last_update column, which is defined with default constraint. However, the statement still specifies a value for the create_date column.
Although this approach might make it easier to write certain types of INSERT statements, you must ensure that you specify values for all columns and that you list them in the correct order (as they appear in the table definition), otherwise, your statement might generate an error or insert incorrect data. Be aware this approach does not protect against underlying schema changes. For example, if a column is added to the table, the INSERT statement would break. That’s why it’s usually better to specify the column list.
Getting the values right
An INSERT statement will fail if the number of specified values in the VALUES clause does not match the number of specified columns in the column list. For example, the following INSERT statement includes a value list that contains one more value than the column list:
|
1 2 3 4 |
INSERT INTO airplanes (plane, manufacturer_id, engine_type, engine_count, wingspan, plane_length, max_weight) VALUES ('Learjet 25A',1007,'Jet',2,35.58,47.58,12499,'LJ25'); |
In this case, the missing column is icao_code, but it could have been any column. The statement will still return the following error:
|
1 |
Error Code: 1136. Column count doesn’t match value count at row 1 |
The reference to row 1 in the error message means that the first error to be encountered was the first row of values that you tried to add to the table. If you were trying to add five rows and the error occurred at the third row, the error message would reference row 3. However, if you try to insert multiple rows and more than one row contains incorrect values, the error message will reference only the first row that caused MySQL to stop execution and generate the error.
You’ll also receive this error if you specify more columns than values, as in the following INSERT statement:
|
1 2 3 4 |
INSERT INTO airplanes (plane, manufacturer_id, engine_type, engine_count, wingspan, plane_length, max_weight, icao_code, create_date) VALUES ('Learjet 25A',1007,'Jet',2,35.58,47.58,12499,'LJ25'); |
This time, the column list includes the create_date column, but the value list does not include a value for the column. The number of columns must match the number of values. If they don’t, MySQL generates an error and stops statement execution. Unfortunately, the IGNORE keyword does not prevent this type of error from being generated.
In addition to getting the number of columns and values right, you must also ensure that your values are the correct data types. For example, the following INSERT statement attempts to insert the value multiple tons in the max_weight column:
|
1 2 3 4 |
INSERT INTO airplanes (plane, manufacturer_id, engine_type, engine_count, wingspan, plane_length, max_weight, icao_code) VALUES ('Learjet 25A',1007,'Jet',2,35.58,47.58,'multiple tons','LJ25'); |
The statement generates the following error because it’s trying to insert a character string into a column configured with the MEDIUMINT data type:
|
1 2 |
Error Code: 1366. Incorrect integer value: 'multiple tons' for column 'max_weight' at row 1 |
Unlike the first two examples in this section, the IGNORE keyword will work in this situation, changing the error into a warning. However, rather than inserting multiple tons into the max_weight column, MySQL will insert 0.
Another issue to be aware of is the column order. You must ensure that your column list and value list are in the same order to avoid inserting the wrong data into the wrong column. For example, the airplanes table includes the wingspan and plane_length columns, both of which are defined with the DECIMAL(5,2) data type. In a situation such as this, it would be easy to invert the values when inserting them into the columns, without generating an error, resulting in the database storing the wrong wingspan and length.
Because the columns are configured with the same data type, this type of error can be difficult to catch. This is similar to what you might see when first names and last names get reversed in a database. You might be able to define check constraints on the table to help eliminate some risks (depending on the nature of the data), but it basically comes down to taking extra care to ensure that the values correctly match their respective columns.
Inserting multiple rows in a table
The INSERT statement lets you add multiple rows of data to a table, without having to define multiple statements. You need to include only one VALUES clause, but you must include a value list for each row, enclose each value list in parentheses, and separate those value lists with commas. For example, the following INSERT statement adds four rows to the airplanes table:
|
1 2 3 4 5 6 7 8 |
INSERT INTO airplanes (plane, manufacturer_id, engine_type, engine_count, wingspan, plane_length, max_weight, icao_code) VALUES ('Challenger (BD-100-1A10) 300',1007,'Jet',2,63.83,68.75,38850,'CL30'), ('Challenger (BD-100-1A10) 350',1007,'Jet',2,69,68.75,40600,'CL30'), ('Challenger (CL-600-1A11) 600',1007,'Jet',2,64.33,68.42,36000,'CL60'), ('Challenger (CL-600-2A12) 601',1007,'Jet',2,64.33,68.42,42100,'CL60'); |
As you can see, each row is enclosed in parentheses, and commas separate the rows. If you query the table after running the INSERT statement, you should see the newly added rows, as shown in Figure 6.
 Figure 6. Adding multiple rows to a table
Adding multiple rows is a straightforward process, but you must ensure you take the same precautions as when adding a single row. Each value list must include the same number of values as the number of specified columns. The values must also be in the correct order and conform to the data types defined on the target columns. However, you can use the IGNORE keyword if you want the INSERT statement to continue to execute even if one row fails, although this depends on the nature of the error.
Inserting data into a temporary table
MySQL also lets you use the INSERT statement to add data to a temporary table. It works the same as adding data to a regular, permanent table, except that a temporary table exists only during the current session and is dropped as soon as the session ends. To create a temporary table, you can use the CREATE TABLE statement, but you must include the TEMPORARY keyword after CREATE, as shown in the following example:
|
1 2 3 4 5 6 7 8 9 |
CREATE TEMPORARY TABLE airplanes_temp ( plane VARCHAR(50) NOT NULL, manufacturer_id INT UNSIGNED NOT NULL, engine_type VARCHAR(50) NOT NULL, engine_count TINYINT NOT NULL, wingspan DECIMAL(5,2) NOT NULL, plane_length DECIMAL(5,2) NOT NULL, max_weight MEDIUMINT UNSIGNED NOT NULL, icao_code CHAR(4) NOT NULL); |
The statement creates the airplanes_temp table, which includes many of the same columns as the airplanes table. After you create the airplanes_temp table, you can use an INSERT statement to add data to that table, following the same format as you saw in earlier examples:
|
1 2 3 4 5 6 7 8 |
INSERT INTO airplanes_temp (plane, manufacturer_id, engine_type, engine_count, wingspan, plane_length, max_weight, icao_code) VALUES ('Challenger (CL-600-2B16) 601-3A and -3R',1007,'Jet',2,64.33,68.42,43100,'CL60'), ('Challenger (CL-600-2B16) 604',1007,'Jet',2,64.33,68.42,47600,'CL60'), ('Challenger 604-605',1007,'Jet',2,64.33,68.42,48200,'CL60'), ('Challenger 650',1007,'Jet',2,64.33,68.42,48200,'CL60'); |
The INSERT statement adds four rows, as indicated by the value lists in the VALUES clause. After running the statement, you can query the table to verify that the rows have been properly inserted:
|
1 |
SELECT * FROM airplanes_temp; |
The SELECT statement should return the results shown in Figure 7.
 Figure 7. Adding data to a temporary table
You can access the temporary table just like a regular table, as long as you’re still in the same session in which the table was created. The temporary table retains the data until you explicitly drop the table or end the session.
Inserting data from a SELECT statement
Another handy feature of the INSERT statement is its ability to use the results of a SELECT statement to add data to a table. For this, the INSERT statement takes a slightly different syntax:
|
1 2 3 |
INSERT [IGNORE] [INTO] table_name [(column_list)] select_statement |
Many of the statement’s base elements are the same. The main difference is that you substitute the VALUES clause with a SELECT statement. For example, the following INSERT statement replaces the VALUES clause with a SELECT statement that retrieves data from the airplanes_temp temporary table:
|
1 2 3 4 5 6 7 |
INSERT INTO airplanes (plane, manufacturer_id, engine_type, engine_count, wingspan, plane_length, max_weight, icao_code) SELECT plane, manufacturer_id, engine_type, engine_count, wingspan, plane_length, max_weight, icao_code FROM airplanes_temp WHERE manufacturer_id = 1007; |
The SELECT statement itself is just a standard query. The main thing to be aware of in this case is that it’s retrieving data from a temporary table, so you must run the INSERT statement in the same session that the temporary table was created. After you run the INSERT statement, you can then run the following SELECT statement (which is the same one we’ve been using) to verify that the data has been added:
|
1 |
SELECT * FROM airplanes WHERE manufacturer_id = 1007; |
The SELECT statement returns the results shown in Figure 8. Notice that the four rows that were in the temporary table are now in the airplanes table.
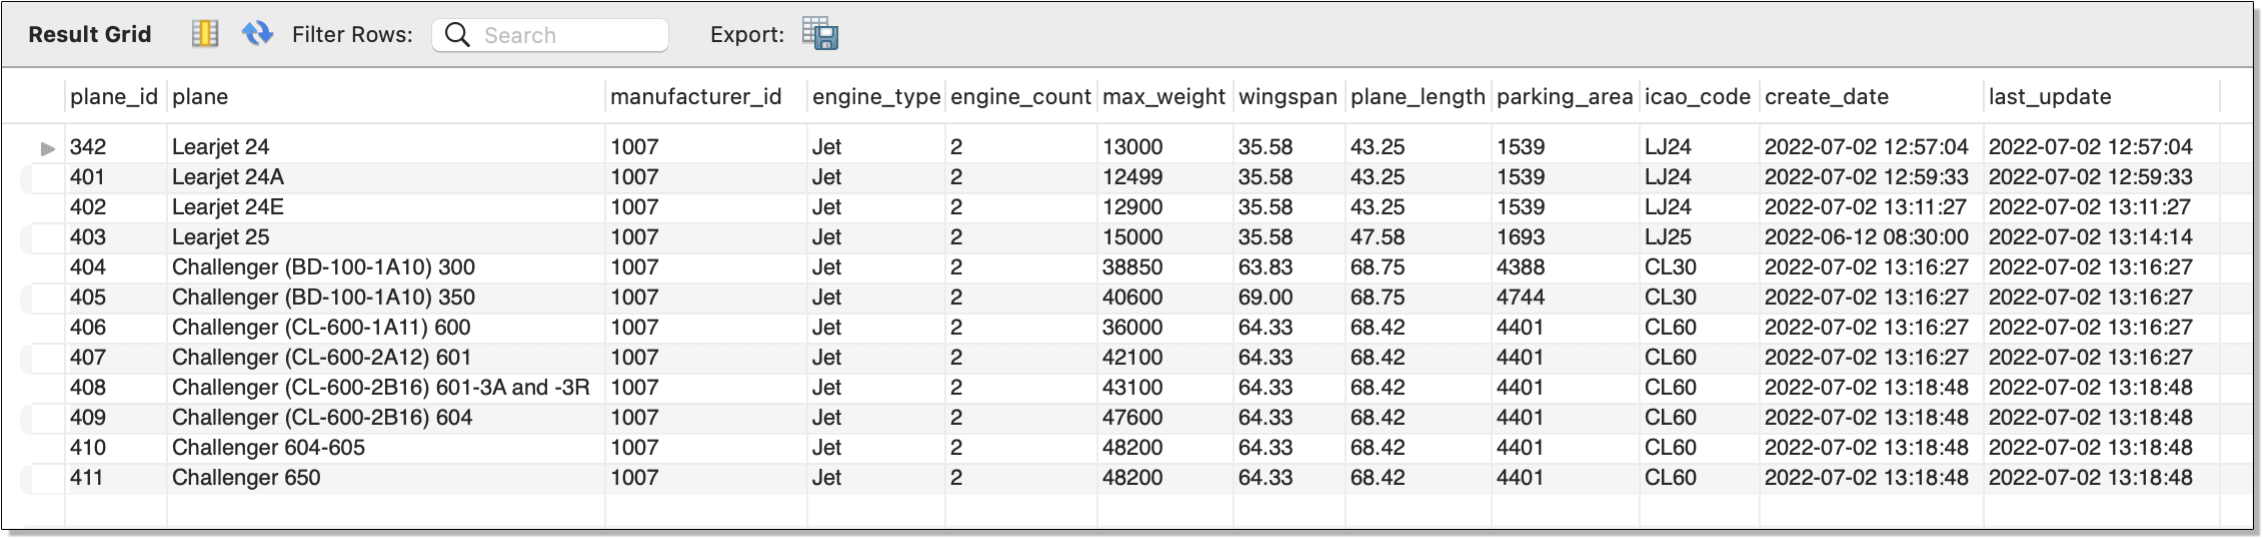 Figure 8. Inserting data from a
 SELECT statement
You might have noticed that the SELECT statement embedded in the INSERT statement was retrieving all rows and columns from the airplanes_temp table. In situations such as this, you can use a TABLE statement instead of a SELECT statement:
|
1 2 3 4 |
INSERT INTO airplanes (plane, manufacturer_id, engine_type, engine_count, wingspan, plane_length, max_weight, icao_code) TABLE airplanes_temp; |
This INSERT statement achieves the same results as the preceding INSERT statement. The TABLE statement itself is comparable to the following query:
|
1 |
SELECT * FROM airplanes_temp; |
Although the TABLE statement simplifies the INSERT statement, you must be sure that the columns in the column list are in the same order as those returned by the TABLE statement and that there are the same number of columns.
Working with the INSERT statement
For the most part, you should have little problem working with the INSERT statement, as long as you’re careful when specifying your column list and value list. Once you get comfortable with the basics, you can then incorporate the statement into other objects. For example, you might create a stored procedure that inserts data into a table.
You can also explore other aspects of the INSERT statement, such as adding data to a partitioned table or updating a row with a duplicate primary key. To learn more about the options available to the statement, check out the INSERT Statement topic in the MySQL reference manual. Just be sure you have a good handle on the basics before moving on to the more advanced features available to that statement.


Load comments