Although SQL Compare, for SQL Server, is one of Redgate’s best-known products, there are also ‘sister’ tools that allow you to compare and synchronise MySQL and Oracle databases. MySQL Compare was originally a ‘down-tools’ project, so never had the extra features or lavish documentation of its siblings. In respect for a highly useful tool, we publish simple instructions of how to use it.
The database comparison tools for MySQL from Redgate are quite new. At present, they are not quite as feature-rich as their cousins for SQL Server and Oracle; Nonetheless MySQL Compare and MySQL Data Compare bring to the MySQL platform the same core functionality as their more established cousins: the ability to quickly and easily detect and synchronize differences between databases. Because there is no official documentation available at this time, this article on MySQL Compare and its follow-on covering MySQL Data Compare provide all the details you need to get up and running quickly. If you read the two articles in quick succession, you will have a strong feeling of déjà vu: the similar nature of the user experience for both utilities makes parallel articles only natural. In fact, not only do these two utilities share a similar user experience but there is a strong family resemblance with all the other SQL Server comparison products. Thus, I have occasional references to the official SQL Compare documentation scattered throughout as supplemental material that is quite relevant.
In a nutshell, MySQL Compare lets you specify a source and a target database, then select what objects to analyze for differences, and finally deploy auto-generated change scripts to synchronize your source to your target (Figure 1).
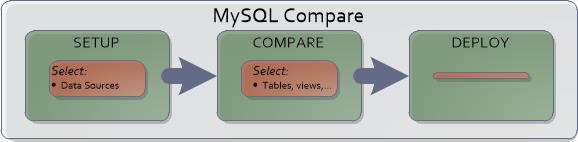
Figure 1 MySQL Compare’s process flow to synchronize schema changes.
Setup: Configuring What and How to Compare Databases
Once you have installed MySQL Compare and launched it, you will see the New Project dialog (Figure 2). Projects allow you to repeat routine operations easily. The creation of a project consists of specifying two complete database connections (server, credentials, transport mechanism, and database). Here I have selected two databases on my local machine, one that is the test version and one that is the live version, simulating a real-world scenario. MySQL Compare defaults to a standard TCP/IP transport mechanism but it also supports SSH and named pipes, as indicated by the other tabs. Note that the two databases are quite independent so each side may specify a different network transport.
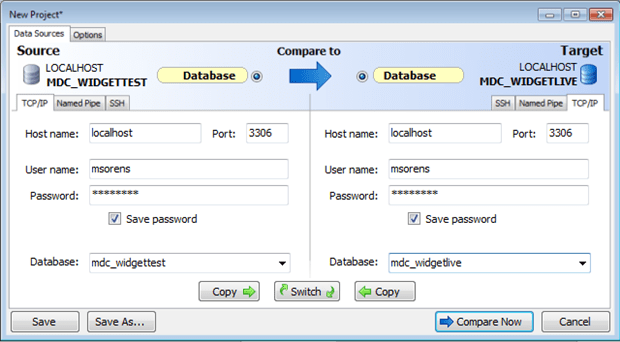
Figure 2 MySQL Compare’s new project dialog.
At the top center of the dialog, you are shown that you are comparing database to database but in a curious way-with radio buttons. The reason for this is somewhere between legacy and futures: SQL Compare supports four types of data sources: database, backup, snapshot, and source control. At present, MySQL Compare supports only the first but I presume Redgate is leaving the door open to add support for one or more of the others in the future.
Just below the database details you have 3 convenience buttons (two labeled Copy and one Switch) that let you copy or swap the details between the right and left sides of the window. The buttons at the very bottom are your main controls, allowing you to save the project (left side) and execute a comparison (right side).
Besides the data sources, there are a variety of options you may customize to fine-tune your comparison. These are available on the Options tab of the New Project dialog. Once you finish the New Project dialog, you can always return to the Options dialog from the main window either from the toolbar (Edit Project… >> Options), from the Menu (Tools >> Project Options), or from the keyboard (Ctrl+J).
By hovering the mouse pointer over each item in the list of options, you’ll see a description for that item. For those who like to see everything at one time, here is a summary of the available project options.
| Option | Description |
| Include synchronization script header* | Includes a comment header at the top of the synchronization script. |
| Force column order* | If additional columns are inserted into the middle of a table, this option forces a rebuild of the table so the column order is correct following deployment. Data will be preserved. |
| Include database name in deployment script | Include the database name in the deployment script. Turn this off if you want to be able to run the script on a different target database than originally specified. |
| Ignore white space* | Ignores white space (newlines, tabs, spaces, and so on) during comparison. White space will be synchronized when you run the deployment. |
| Ignore case differences | Ignore case differences in tokens that are not string or double-quoted identifiers. |
| Ignore backticks | Ignore backticks around identifiers. |
| Ignore comments in SQL* | Ignore comments when comparing views, stored procedures, etc., during comparison. Comments will be synchronized when you run the deployment. |
| Ignore constraint names* | Ignores constraint names during comparison. Names will be synchronized when you run the deployment. |
| Ignore auto increment | Ignore differences in the auto-increment values for tables. |
| Ignore collations and charsets | Ignore differences in collations and charsets. |
| Ignore comments on tables | Ignore comments in the DDL of CREATE TABLE statements. This option ignores comments on both tables and their columns. |
This list is optimized for MySQL, but many of the options-marked with an asterisk(*)-have comparable options in SQL Compare.
Comparison Results
When setting up a new project the New Project dialog presents the Compare Now button in the lower right to perform the actual comparison. If you come back in later (via the Edit Project button on the main window) this button will simply say OK unless and until you make some changes, then it will again say Compare Now.
Once you run the comparison, MySQL Compare closes the New Project dialog, returning you to the main window with the comparison results (Figure 3).
Figure 3 MySQL Compare’s comparison results.
This window packs a lot of information and controls in a small area. Here it is piece by piece.

From left to right, the toolbar includes:
- The familiar new, open, and save icons that operate on project files.
- Filter Setup opens a dialog that lets you include or exclude database objects by type: events, triggers, procedures, functions, views, and tables.
- Edit Project button lets you go back to the project dialog to modify the source or target databases.
- Refresh analyzes the databases again in case things have changed.
- Deployment Wizard is the engine to synchronize your target with your source.
- Find lets you type in arbitrary text and it removes from the display any objects whose names do not contain your phrase as a substring.
- Group by (not shown) lets you modify the display of the tables (middle of the window) to be either grouped by type of difference, type of object, or ungrouped; more details on this below.
The Filter and Find controls are similar but for distinctly different purposes. Besides the selectivity difference (Filter includes/excludes all objects or no objects of a given type, whereas Find resolves to individual objects) Filter affects not just your current view but also what the deployment wizard will operate on; Find only affects your current view.

This panel confirms the servers and the databases for your source and target. It also gives you a count of how many database objects are excluded by your current filter selection as well as how many objects are selected for deployment.

Next, with the Group By selector above set to Type of difference, you see from one to four optional sections showing the comparison results at an object level. The four sections correspond to the possible difference types: objects that are different, objects that are only in the source or only in the target, and objects that are identical in both databases. This section shows objects that exist in both databases but are different. You then have checkboxes on each item to allow you to individually select which objects to synchronize. You also have a master check box in the header to let you select or deselect all objects.

This is another of the four differences, here showing objects that are the same. No synchronization is necessary here, hence no checkboxes. Notice that each line begins at left with a name and an icon for the type of object. I am not sure of the full set of icons for MySQL but you can see the comparable set for SQL Compare to give you some idea.
If you set Group By to Type of object, instead of the four possible difference groups, you get objects grouped into those that are tables, those that are views, etc. Set Group By to No Groups and you will just get one list containing all your database objects. Note that in any of the three modes, you can sort within the displayed groups by clicking on a column header.
The bottom panel shows comparison results at higher resolution, i.e. within each object. It presents a visual difference viewer for the currently selected object in the middle pane, highlighting both lines and words in the object’s DDL that are different. This panel boasts a number of convenience features:
First, the Show button offers:
- Line Numbers: Attaches line numbers to each line in the file.
- Line Differences: Displays a subpanel showing the current row from each database on top of each other; often this is handy to spot differences more quickly.
- Groups: Similar to how grouping works in the middle pane for grouping by object, you can group the line-by-line differences as well (see SQL Compare’s Viewing Differences for details).
- Find: Displays a subpanel to search either source or target script.
- Text: Three sizing buttons allow enlarging or reducing the font size.
The Previous and Next buttons that follow let you navigate easily amongst the line differences in the scripts. Note that in the panel above-the list of objects-you can use the up and down arrows to move amongst the objects. In this panel there are no such shortcuts; it would be nice, perhaps, if the Alt key with the up or down arrow let you move amongst differences. Then you could navigate through objects and through differences without using the mouse!
Finally, at the extreme right you have sizing options for the difference panel. You can minimize it, restore it, or maximize it with the first three buttons (which do have handy shortcut keys) and you can even expand it into a separate window with the rightmost button.
Deploying/Synchronizing Changes
Once you have fully specified what you want to synchronize, and you have confirmed that the identified changes are all appropriate, the next step is to deploy those changes from your source database to your target database. The deployment wizard is a very simple 3-step process. First, choose whether to actually modify your target database or just to generate a script to do it. As Figure 4 shows, even if you choose to deploy directly you can still save a copy of the script for proper record keeping, putting in source control, etc.
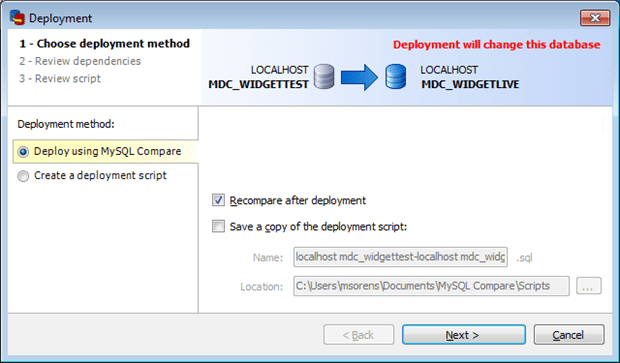
Figure 4 The deployment wizard, page 1.
The next page, Review Dependencies (not shown), gives you a chance to examine your object dependencies (foreign key relations and so forth) and make sure everything still looks good. The third and final page, Review Script, lets you examine the finished script before deployment-and gives you yet another chance to save it off to your file system (Figure 5). The page includes a search box to help you find things in the script.
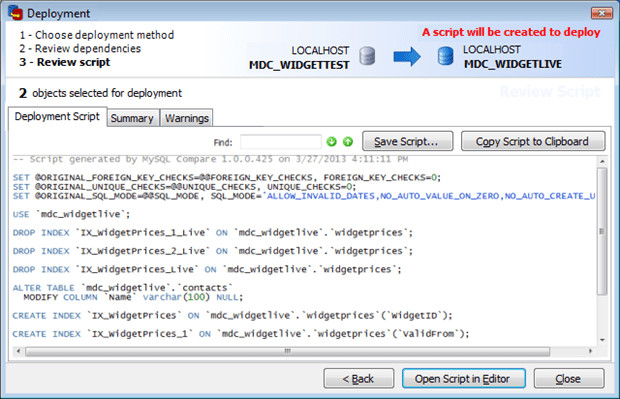
Figure 5 The deployment wizard, page 3a.
But wait! There are more tabs on this page, so the script is not quite your last line of defense. You have a Summary tab and a Warnings tab from which you might glean additional information. The Warnings tab, in my example, was empty, which is a good sign. The Summary tab for my example appears in Figure 6. Here it recapitulates what the deployment script will do. It is a nice abstraction of the script, giving you a functional view of what will change in your database.
I have also shown in this figure that the principal action button will perform a different function depending on what you selected on the first page of the wizard. If you chose Deploy using MySQL Compare the button will be labeled Deploy Now, whereas if you chose Create a deployment script the button will read Open Script in Editor.
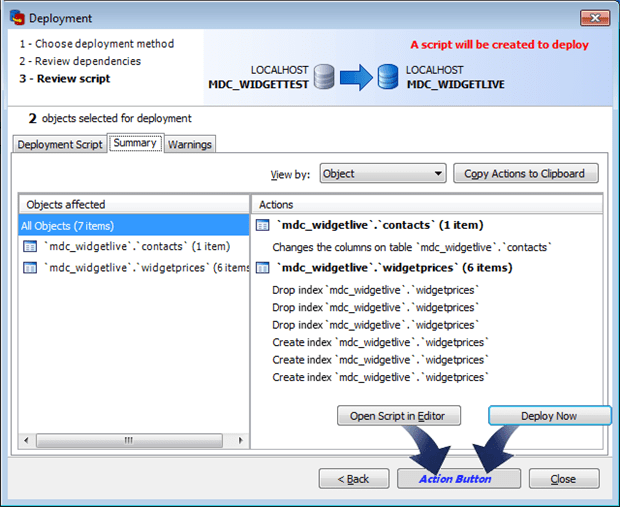
Figure 6 The deployment wizard, page 3b. The action button will differ depending on your selection from page 1 of the wizard.
A successful deployment is quite anticlimactic. Sometimes in life, though, boring is good-see figure 7.
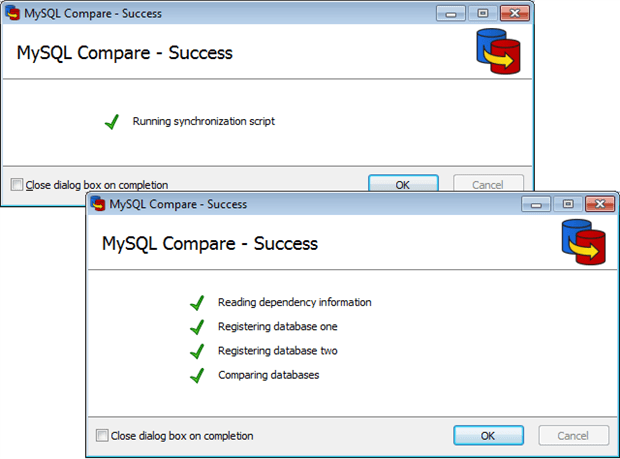
Figure 7 A successful deployment delivers the message quite succinctly.
Automating the process
MySQL Compare is designed to be automated. This is particularly useful for routine jobs such as keeping changes in source control and for doing automated deployments. This allows MySQL Compare to be used in a batch job and in a PowerShell script. It can be called from any language capable of executing a command-line script. You can get all the switches from the command line.
|
1 |
Mc /? /v |
Note that the installer does not automatically register the command line executable in your search path-you will find it under \Program Files (x86)\Redgate\MySQL Compare 1 (even though the installer claims it will be \Program Files\Redgate !).
It is from the command line that the value of having a project file becomes more obvious. There is no direct way to specify the server and database to compare: Rather, store these together in an XML-based project file. In order to do a particular job all you need is to specify the path to the project file using…
|
1 |
/project:<project> (Alias: /pr) |
… and you get a consistent automated result.
If you merely want to find out if two databases are the same omit the /deploy option when you run the comparison and examine the application’s exit code: it returns 61 if differences were found during comparison or 0 if the databases are identical.
The switches are summarised here:
| Option | Description |
| /help (Alias: /?) |
Displays this help message. Use in conjunction with… /verbose …for more detailed information. When you use /help all other switches (except for /verbose) are ignored. |
| /verbose (Alias: /v) |
Verbose mode. |
| /quiet (Alias: /q) |
Quiet mode; no output. |
| /project:<project> (Alias: /pr) |
Uses a MySQL Compare project file for comparison. |
| /report:<filename> (Alias: /r) |
Generate a report and write it to the specified file. The type of report is defined by the /reporttype switch. If the file already exists an error will occur, unless you have also used the /force switch. |
| /reporttype:<reporttype> (Alias: /rt) [Default: XML] |
Defines the style of report, defined by the /report switch.
Values:
|
| /reportAllObjectsWithDifferences (Alias: /rad) |
Includes just objects with differences in the reports, rather than all selected objects. |
| /scriptfile:<scriptfile> (Alias: /sf) |
Writes a SQL change migration script to the specified file. This option allows you to generate an SQL script to migrate the changes which can be executed at a later time. If the file already exists an error will occur, unless you have also used the /force switch. |
| /deployScriptEncoding:<encoding> (Alias: /depenc) [Default: UTF8] |
Character encoding to use when writing the script file with /scriptfile.
Values:
|
| /deploy (Alias: /dep) |
Synchronizes the databases after comparison. |
Conclusion
That wraps up about everything you need to know to use MySQL Compare effectively. The next installment discusses the partner application, MySQL Data Compare, which lets you work with data synchronization rather than schema synchronization.
Load comments