
In this article I’ll build a .NET COM assembly following the recommended best practices, and show you how to deploy it with a Visual Studio Setup and Deployment Project. I’ll also show you two types of client for the COM object (early binding and late binding) and discuss the advantages and disadvantages of each. Sometimes I’ll use terminology from traditional COM, because COM client programs still behave the way that COM clients have always behaved. I won’t go into too much internal COM detail because this article is primarily about .NET classes as COM classes, but I’ll provide some explanation of that traditional behavior because (for example) a C++ client program is still dependent on it.
Building the Assembly
First, we’ll build the .NET class library that exposes COM interfaces. Now you might be a .NET programmer, but what we’re doing here is COM programming, and that’s based on interfaces, so declare an interface:
|
1 2 3 4 5 6 7 |
[ComVisible(true), GuidAttribute("137AD71F-4657-4362-B9E4-C6D734F1F530")] [InterfaceType(ComInterfaceType.InterfaceIsDual)] public interface IGetMyString { string GetMyString(); } |
I’ll come back to the attributed items shortly, but the main point here is that we are declaring an interface called IGetMyString, which will implement the GetMyString method. The point of interface-based programming, apart from a level of abstraction from the implementation, is that we can revise this interface later (say to IGetMyString2) in such a way that older clients that use IGetMyString continue to work, and newer clients can use the IGetMyString2 extension without breaking those older clients.
Next, define a class that implements the interface:
|
1 2 3 4 5 6 7 8 9 10 11 |
[ComVisible(true), GuidAttribute("89BB4535-5A89-43a0-89C5-19A4697E5C5C")] [ProgId("CallPDW.Class1")] [ClassInterface(ClassInterfaceType.None)] public class Class1 : IGetMyString { string GetMyString() { ...... } } |
Notice that there is also a collection of attributes on the class.
The ComVisible attribute indicates whether the class is visible to COM (True meaning it is). Note that the interface declaration also has this attribute. The result is that when reflection is used to locate exported COM types, (for example with programs such as Regasm.exe and Tlbexp.exe) these two types will be found.
A Guid value is defined on the interface and on the class. These values are used by COM clients to locate the assembly that implements the COM class.
In the context of this article, Guids are unique values used to identify COM classes and interfaces. When used to identify COM classes they are called class ids (or CLSID) and when installed on a system are used to locate a COM server program (typically a DLL) in HKEY_CLASSES_ROOT\CLSID\{Guid}
Specifically, the Guid on the class is the class id that will be installed at HKEY_CLASSES_ROO\CLSID, and the interface Guid will be installed at HKEY_CLASSES_ROOT\Interface. The deployment project will install these values in the registry. If you don’t specify a Guid, you won’t easily know what value Visual Studio will generate for you, and consequently you won’t easily be able to look in the registry if you need to debug your application. In addition, changing the interface or the method parameters may result in enough difference that Visual Studio will generate a new Guid, if you don’t specify one yourself. In other words, you’ll have an unpredictable series of Guids that make diagnosing problems rather difficult.
The ProgId is also defined. Again, you will get a default ProgId based on the namespace and the class name, but ProgIds need to be unique to a system, so the best practice is to base them on a company name and a product name rather than let the default be generated.
A ProgId is a human-readable way to identify a COM class. Like a COM class id they must be unique on a system. Their main use is with Visual Basic languages (such as scripts) that don’t offer a direct way to instantiate a COM class using its class id. COM registration installs a class id in the registry as well as the ProgId string that provides a mapping to a the class id.
There are probably plenty of ProgIds out there already called something like ClassLibrary.Class1 and there’s no need to add to the confusion.
Having defined the interface, IGetMyString, there’s no point in having the infrastructure generate any other interfaces here. Specifying ClassInterfaceType.None means that there will be no other interfaces than ours.
On the interface declaration, ComInterfaceType.InterfaceIsDual means that this interface supports both early and late binding. Early binding is probably familiar to most developers. It means that the compiler and the IDE know, at development time, the structure of the interfaces and methods and can perform type checking and be validated at compile time. Late binding is based on the IDispatch COM interface. It means that the code does not know at compile time whether the methods that are being called actually exist or whether the parameters are correct. As a prime example of this, consider use of a scripting language such as VBScript where you use CreateObject on a ProgId and then call methods by name because the VBScript language does not provide API support for creating COM classes using their class id – the ProgId is used instead with the CreateObject function. I’ll come back to both of these cases later with code examples.
One of the identifying attributes of an assembly is its assembly version, and this is one of the attributes that determines whether the assembly is the one required by client programs. The COM infrastructure locates the registration entries using the class id or ProgId registration entries, but when the .NET framework takes over to load the assembly it will try to match your assembly version with the registered assembly version. As we’ll see, the deployment registration of your assembly for COM clients will record the assembly version. To get to the point here, if you leave the assembly version as the default of 1.0.*, then the version will change every time you build, and this will make your registration entries invalid as soon as you build another version of the assembly. So specify an assembly version. It’s a good idea to specify a strong name for your assembly too. Apart from the standard reasons for using a strong name, it also makes your assembly unique because assembly name, strong name and assembly version are all used to identify a unique assembly.
Updating the Interface
When updating a COM interface, the contract on the original interface must remain the same, otherwise you risk shipping a new version of your assembly and immediately breaking existing client programs. Yet there is also a requirement that new client programs can use the new methods. Here is an example of an updated interface that adds a new method but preserves the interface for existing clients:
|
1 2 3 4 5 6 7 8 9 10 11 12 13 14 15 16 17 |
[ComVisible(true), GuidAttribute ("02933794-5001-4f5b-B771-975F222F265C")] [InterfaceType(ComInterfaceType.InterfaceIsDual)] public interface IGetMyString2:IGetMyString { string GetAnotherString(); } [ComVisible(true), GuidAttribute("E8E9F986-97AA-4c22-A3A3-8C67991BD152")] [ProgId("CallPDW.Class1.1")] [ClassInterface(ClassInterfaceType.None)] [ComDefaultInterface(typeof(IGetMyString2))] public class ClassUpdate1 : Class1, IGetMyString2 { public string GetAnotherString() { return "Another string " + this.GetMyString(); } } |
I’ve declared here an additional interface IGetMyString2 that inherits from IGetMyString, and a new class ClassUpdate that inherits from the original Class1. The Guids and the ProgId are new. This structure preserves the original interface while creating a new one the extends the original one. New clients can use the new ProgID and call both old and new methods, while existing clients can continue to use the original interface with the original class id and ProgId.
Deployment
Most documentation will refer you to the use of Regasm.exe to register a .NET COM assembly, but I’ll show you how to achieve the same results with a Visual Studio Setup and Deployment project that builds an MSI file. Windows Installer setups based on MSI files are the standard way to install applications. They provide audited installation and rollback in case of an installation failure and resilience of the installed application.
When run with the default command line, Regasm does two main things in order to register an assembly:
- It creates COM registration entries that register the Class Guids. These are the entries in HKCR\CLSID\{Your Guid} that allow COM client programs to find your classes and your assembly, either by ProgId or by your Class Guid.
- It creates type library information from the assembly’s metadata and registers that type library information. These registry entries are in HKCR\Interface\{Your interface Guid}
So these are the steps that also need to be done to register the assembly without running Regasm. You might be wondering what’s wrong with running Regasm during an installation, and I’ll discuss that in a later section.
Registering the GUID of the COM class
To achieve step 1 in a Setup and Deployment project, browse to the location of the assembly to add it to your Application Folder, then set the Register property of your assembly to vsdraCOM, as shown in Figure 1.
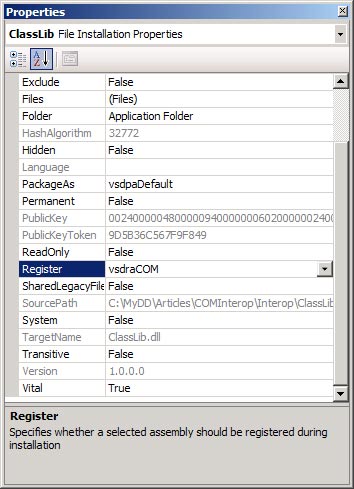
Incidentally, one of the choices of input to a setup project is the project output of another project such as the assembly itself. In this case you should set the Register option to vsdrpCOM instead. I don’t use the project output option because I find it more useful and informative to see the actual files being installed in the Visual Studio IDE.
How does Visual Studio work out the COM class registration entries? Well, if you have configured the Fusion Log Viewer (Fuslogvw.exe in the .NET 2.0 SDK) to record assembly loading, run it after the build of your setup and you’ll notice that Regasm.exe actually runs during the build of your setup project. However, it doesn’t perform any registration. What happens is that Visual Studio runs Regasm with the /regfile option to create a .reg file containing the registry entries required to get the information for step 1, and this .reg file is internally imported into the setup project. So if you want to see what class registration entries Visual Studio will create in the MSI setup, you can run Regasm yourself with the /regfile option.
Creating and Registering the Type Library
A type library is a binary representation of the methods and parameters of a class and its interfaces. These were originally (and still are) generated from Microsoft’s Interface Description Language, IDL, a textual description of the interface methods. .NET assemblies contain metadata describing interfaces and methods so a type library can be generated from an assembly by reading its metadata, making IDL unnecessary. Type libraries are used when method calls are made between different environments (known as apartments) because the type library describes the call stack, the structure of which both caller and callee need to understand.
To state the obvious, in order to register the type library information describing your COM interfaces you first need a type library. Although you could use Regasm to produce a type library, I prefer to use Tlbexp.exe (from the .NET Framework SDK) to generate one. Run it with the default command line against your assembly and it will produce a type library with a .tlb suffix. Your command line will be something like:
|
1 |
Tlbexp <path to your assembly> |
This generated type library then needs to be added to your setup project (in the application folder is fine). If you look at the properties for the type library file you’ll see that Visual Studio automatically marks it for registration. See Figure 2.

If you build this setup project you now have an MSI setup that will register your assembly the same way that Regasm.exe does because it will install the COM registration entries and the type library information.
There is an interesting twist here. If you use a Visual Studio 2005 Setup and Deployment Project and add a class library to the application folder, Visual Studio will try to find the associated type library. If it is actually registered on the system it will automatically add it to the application folder when you add the assembly. When I first saw this behavior I thought for a moment that Visual Studio was generating the type library for me automatically, but it wasn’t. My assembly and its type library were already installed and registered on the development system, and Visual Studio located the type library (in the installation directory, not in my development directory) and included it in the build of the MSI file. Similarly, if there is a type library file in the same directory as your assembly with a matching name, Visual Studio adds it automatically. So if you see this behavior of adding a type library automatically when you add the class library, it means Visual Studio has found what appears to be the associated type library and has included it in your setup project.
In this example I installed the assembly into the application folder, and the resulting registry entries (which we’ll look at later) will have a CodeBase hint that points to the installed location of the assembly. In other words the assembly is not being installed into the GAC. Not only is it unnecessary, it can be difficult to replace files in the GAC because the default file replacement rules are based on the assembly version, not the file version. If you want to install the assembly into the GAC, you’ll need to select the context menu from the File System on Target Machine view in the setup project’s IDE, choose Add Special Folder, then Global Assembly Folder. The GAC will then appear in the list of destinations where you can choose to install files. There seems to be a belief that an .NET COM assembly needs to be installed in the GAC for it to be available to COM clients, but it can be installed in an application directory.
What’s the Type Library For?
Type libraries have always been used in COM programming, but the reason type libraries are a bit more prominent in the .NET COM Interop world is because they are less hidden than in the traditional COM world. If you were to build a traditional COM Dll in C++ with the help of (for example) Visual Studio’s ATL (Active Template Library) wizards, the type library is automatically generated and included in the resources section of the generated Dll. When you register this Dll (with Regsvr32.exe) the DllRegisterServer function is called and it registers both the COM class and the type library. So type libraries are carried around inside those traditional COM Dlls. However in the .NET world, assemblies contain metadata, and so you use a tool like Regasm.exe or Tlbexp.exe to explicitly generate a type library. Note also that Regasm and Regsvr32 are similar because they both perform class registration and type library registration, the former for .NET assemblies and the latter for traditional COM Dlls.
A type library has two main uses. First, a type library can be used by developers building COM client programs to enable early binding and type checking at build time. When tools like Visual Basic 6.0 add a COM reference they are really adding a reference to the type library registration, so that both you and the compiler can see the interfaces and methods. I’ll show you later how a Visual C++ program uses a type library during development.
The second main use of a type library is for marshaling of parameters between the COM client and the object’s methods. Without going into too much detail, in many cases a COM call will involve copying data in the call stack from caller to callee and vice versa. The COM caller needs to understand the structure of the data so that it can be correctly mapped between caller and callee. In any event, registering a type library has always been a part of COM registration, so it does no harm to install and register one – that’s exactly what Regasm would do anyway in the case of our .NET assembly.
Class Registration Entries
If you look at the registry entries for the class you’ll see something like Figure 3.
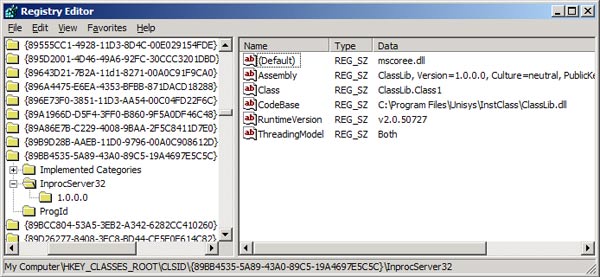
If you’re familiar with traditional COM registration, all those entries will be new except for the usual InprocServer32 entry that, in this case, points to mscoree.dll. What’s happening here is straightforward in principle, ignoring the details of the implementation. The framework Dll, mscoree.dll, is being used to intercept the client’s activation of the COM object. Mscoree.dll uses these other registry entries to locate the assembly, instantiate the class, and provide a COM-Callable Wrapper (CCW) for the client to call the class methods in your assembly. Note that the assembly attributes here are used to locate the assembly and its COM class and must be an exact match, so you see if you don’t specify an explicit assembly version as discussed earlier, this might result in failing to find the required assembly if the assembly version changes and you don’t re-register it. Earlier, I referred to the fact that the setup project is installing the assembly into the application folder. Not the GAC, and that’s why there is a CodeBase entry referring to the assembly’s location.
A couple of warnings here: First, the CodeBase entry is a hint, not an absolute rule. When the framework searches for your assembly it uses the standard framework search rules, and that means that if there is an assembly in the GAC with the exact same attributes as the assembly in the CodeBase, the one in the GAC will be used. This shouldn’t really matter because if the attributes are exactly the same, then the assembly is the same, right? Well not always – it depends how fastidious you are about changing attributes such as assembly version when the assembly has functionally changed. In a testing environment, it can also lead to confusion where you’ve replaced the assembly at CodeBase only to find that the behavior hasn’t changed, and that’s because you didn’t realize that the assembly in the GAC is the one that’s really being used. The second area to beware of is that RuntimeVersion value – it’s informational only. If you built your assembly with Visual Studio 2003, the RuntimeVersion in the registration will refer to the 1.1 framework, so you might assume that this is the runtime version that will be used when your assembly is used by COM clients, but it is not. If you have a 1.1 assembly registered in this way, and the 2.0 framework is installed on the system, the 2.0 runtime will be used to run your assembly. When Windows is running (say) a C++ client program to call your assembly it will use the 2.0 framework. This is simply because Windows default behavior in this situation is to use the highest framework version on the system. In other words, you’ll see your assembly running in the 2.0 framework when both 1.1 and 2.0 frameworks are installed.
Finally, under the InprocServer32 key in the left pane in Figure 3 there is a 1.0.0.0 key. That was generated by Regasm and imported into the setup project. This is version-dependent registration that allows for side-by-side versions of the .NET COM assembly based on its version. I’m not going into this topic here (see Version-Dependent Registry Keys in MSDN for more info) but note that this is another place where the version of your assembly is significant.
Per-User and Per-System Registration
When you install a product from an MSI setup, you may have noticed that you get a choice of whether to install the product for the whole system or for the current interactive user. In a setup generated by Visual Studio these choices are called “Everyone” and “Just me” in the Select Installation Folder dialog. This choice is applied to the COM class registration at install time. This makes good sense – if a COM server, like this .NET assembly, is installed for the interactive user, there’s no point in registering it for other users on the system – you could probably consider this a security breach. So if you choose “Just me” on the installation dialog, the COM class registration will be available just to you because it will be registered into the HKCU\Software\Classes\{Your class Guid}. Installing for “Just me” is the default, so beware that you don’t install a COM class just for you and expect it to be available for all users on the system.
An MSI setup can choose per-user or per-system because there is infrastructure that supports it at install time and gives the installing user a choice. Other registration methods (Regsvr32 and Regasm) do not give you that choice because they have no per-user or per-system context, so they always install per-system.
MSI vs Regasm
It’s also worth pointing out that when you install a .NETCOM assembly in the way described here, none of the code in the assembly actually runs at install time. The assembly gets copied to the system and the registry entries are put directly into the registry. If the code in your assembly was being called, you’d have to worry about whether any dependent assemblies are on the system yet. It means that if the install were to fail and roll back, your assembly isn’t called, and at uninstall time your assembly doesn’t even need to be on the system for MSI to uninstall the registration. These are some of the reasons why an MSI setup that doesn’t call any of your code can be more robust.
Type Library Registration Entries
Type library registration is all about registering interfaces, and the corresponding registry entries are in HKLM\Interface\{Interface Guid}. These entries are about interface marshaling, describing what classes are used to marshal data between COM client and COM interface methods. In the example case, the type library registration entry has an InprocServer32 class that is used to marshal the interface, and it refers to oleaut32.dll, the OLE Automation Dll. All this is mostly transparent, being created by the registration of the type library. Internally, in the generated MSI file, there is a TypeLib table that Windows Installer uses to register type libraries. This is really all that needs doing to register a type library (just like the RegisterTypeLib Win32 API) but interestingly enough, Visual Studio also has the interface registration in the registry table of the MSI file. In other words, a Visual Studio setup program creates the Interface entries twice, once via type library registration and again via entries in the MSI file’s registry table. This doesn’t seem to do any harm, although it is redundant.
A C++ Client
An early binding client knows at build time the definition of the interface, its methods and parameters. For COM clients, such as the C++ one I’m building here, a type library is what provides that definition. The example C++ client imports the type library using the import statement. In our code we have:
|
1 2 |
#import "classlib.tlb" using namespace ClassLib; |
Internally, the import statement disassembles the binary type library and creates two header files that are automatically included – classlib.tlh and classlib.tli in our case. The .tlh file is a header file containing, amongst other things, definitions of Guids; the .tli file contains wrapper methods to call the interface methods. Once included, they provide the definitions that allow calling the COM interfaces in a meaningful way.
The code that calls the IGetMyString interface in the .NET COM assembly is conventional C++ COM code. It has to be, how could it be otherwise? COM client programs have no need to change in order to call COM class that happen to be written with .NET. The implementation of a COM interface is not known to its clients, so any COM client can call a COM object and not care whether it is served up from a traditional COM Dll or a .NET COM assembly.
|
1 2 3 4 5 6 7 8 9 10 11 12 13 14 15 16 17 |
HRESULT hr = 0; CLSID cls; IGetMyString* getit=NULL; hr = CLSIDFromProgID (L"CallPDW.Class1", &cls); if (SUCCEEDED(hr)) { hr = CoCreateInstance (cls, NULL, CLSCTX_INPROC_SERVER, __uuidof(IGetMyString),(void**)&getit); if (SUCCEEDED(hr)) { USES_CONVERSION; CComBSTR mystring; hr = getit->raw_GetMyString (&mystring); getit->Release(); MessageBox (NULL, OLE2CT(mystring), TEXT("Message is..."), MB_OK); } } |
The code simply gets the class ID from the ProgId, and uses it in a CoCreateInstance call. If successful, it calls the raw_GetMyString method (defined in that classlib.tli file) and displays the message after releasing its use of the interface.
The string parameter type here is the COM string BSTR, in this case used with the ATL CComBSTR wrapper class, but the bstr_t type can also be used. In general strings will be marshaled between .NET COM assemblies and COM clients as BSTR types. One of the ways you can see what’s happening in Win32 COM terms is to use OleView.exe, the OLE/COM Object Viewer tool from the Windows Platform SDK. This has a View Typelib choice on the File menu that you can use to open the type library generated by Tlbexp.exe. Among other things, you’ll see a description of the IGetMyString method looking like this:
|
1 2 3 |
interface IGetMyString : IDispatch { [id(0x60020000)] HRESULT GetMyString([out, retval] BSTR* pRetVal); |
This confirms that the type being returned is a BSTR. This representation reported by OLEView is based on the Interface Definition Language, IDL, that can be use to generate type libraries. IDL is used less these days as a standalone tool to describe COM interfaces and build type libraries, although it is still used in Visual Studio projects that create C++ COM servers (such as the ATL wizards mentioned previously).
The BSTR type is the de facto COM string, and is usually the best way to marshal strings in a COM environment. If your client programs are Visual Basic 6.0 or VBScript you might require that your interface be marshaled using the BSTR type, because it corresponds to the internal types used in Visual Basic 6.0 that can be marshaled using standard COM automation. Internally it’s a wide string (Unicode, in other words) and therefore more neutral. It’s not always the default as it is this GetMyString method case. If you pass a structure as a parameter:
|
1 2 3 4 5 6 |
public struct stuff { public Guid someguid; public string somestring; public long somelong; } |
The string in this case is instead marshaled as a LPSTR type. You can force marshaling as a BSTR by defining the structure like this:
|
1 2 3 4 5 6 7 |
public struct stuff { public Guid someguid; [MarshalAs(UnmanagedType.BStr)] // Defaults to LPSTR without this public string somestring; public long somelong; } |
Late Binding with a VBScript Client
Late-binding is so called because you don’t know if the methods exist until run-time. Late binding is based on the standard COM IDispatch interface, which has methods that return information about the methods and properties on an interface so that they can be discovered at run time. As an analogy, it’s somewhat the equivalent of using .NET reflection to find the structure and methods of .NET classes.
This is the VBScript:
|
1 2 3 4 |
dim obj,amsg set obj = CreateObject ("CallPDW.Class1") amsg = obj.GetMyString msgbox amsg |
Just to state the obvious, there’s no checking that any of the methods such as GetMyString actually exist with that parameter structure when you write that script. This is discovered when you run the script using the IDispatch interface on the object.
A C# Late Binding Client
Late binding can also be done with a managed client like the C# example here. As you’ll see, late binding in C# is a little more cumbersome, but with the aid of a helper class we can encapsulate a call to our simple example COM object. This is the helper class:
|
1 2 3 4 5 6 7 8 9 10 11 12 13 14 15 16 17 18 19 20 21 |
public class CreateObject { private Type comType; public object comObject; public CreateObject(string ProgID) { comType = Type.GetTypeFromProgID(ProgID); comObject = Activator.CreateInstance(comType); } public object Execute(string Method, params object[] Parameters) { return comType.InvokeMember(Method, BindingFlags.InvokeMethod, null, comObject, Parameters); } public object GetProperty(string Prop) { PropertyInfo myPropInfo = comType.GetProperty(Prop); return myPropInfo.GetValue(comObject, null); } }//class CreateObject |
The constructor contains the initialization code that uses Type.GetTypeFromProgID to return a Type for our ProgId. This, together with the static method Activator.CreateInstance is what builds the object and makes it available for use. Although it doesn’t look much like other code we looked at to locate and instantiate a COM object, this is COM client code. The Execute method on this CreateObject class uses the Type.InvokeMemember method on the instance to actually call the GetMyString method.
|
1 2 |
CreateObject cnet = new CreateObject("CallPDW.Class1"); string str = cnet.Execute("GetMyString", null).ToString(); |
There is no IntelliSense here to help you discover methods and properties, no checking that the method actually exists, so when I describe it as cumbersome, I’m really referring to the development. Just like VBScript, checking of methods and parameters occurs at run time, not compile time. There are however some advantages in deployment. There are no build time references to Dlls or COM interop assemblies to use this COM object in a late-binding scenario. Just as in VBScript, the client is completely disassociated from the COM object until it is actually called at runtime. In some scenarios this can be very useful. One example is automation of Microsoft Office 2003. You can use .NET together with the Office 2003 Primary Interop Assemblies (PIAs) to write applications that automate Microsoft Office 2003, and this means you need to arrange to get those PIAs installed onto the client system. But what if you just want to use Outlook to send an email? It turns out that this is relatively straightforward using the late binding methods that scripters have been using for years – remember those script-based worms that enumerated your address book and used it to propagate themselves? The equivalent C# is cumbersome, to use that word again, but it can ease the deployment issues considerably.
It probably helps to start with the VBScript code to send email using Outlook:
|
1 2 3 4 5 6 7 |
Dim theApp, theMailItem set theApp = CreateObject("Outlook.Application") Set theMailItem = theApp.CreateItem(0) theMailItem.Recipients.Add "phil@somewhere.org" theMailItem.Subject = "Your Subject Here" theMailItem.Body = "Your message here." theMailItem.Send |
It can be a useful technique to first use a scripting language to get your functionality working. Needless to say, perhaps the most important task here is not the coding so much as understanding the object model that is being used to accomplish the goal. In this case, the Outlook object model requires us to start with the application object and use it to create a mail item object. What’s not too obvious without checking the Office documentation is that CreateItem is a method, the Recipients object is a property, Recipients.Add is a method call, Subject and Body are properties, and Send is a method. The reason it’s important to know these things is that the late binding calls from managed code require that you specify whether you’re referring to a method or a property. This is the C# code corresponding to that VBScript:
|
1 2 3 4 5 6 7 8 9 10 11 12 13 14 15 16 17 18 19 20 21 22 23 24 25 26 27 28 29 30 31 32 33 34 35 36 37 |
CreateObject co = new CreateObject("Outlook.Application"); object [] parms = new object [1]; parms[0] = 0; object mailitem = co.Execute("CreateItem", parms); // Get the Recipients property object recipients = mailitem.GetType().InvokeMember("Recipients", BindingFlags.GetProperty, null, mailitem, null); string addy = "phil@somewhere.org"; object[] address = new object[1]; address[0] = addy; // Invoke the Add method on Recipients recipients.GetType().InvokeMember ("Add", BindingFlags.InvokeMethod, null, recipients, address); string subject = "Mail Message Subject"; parms [0] = subject; // Set the Subject property of the mail item mailitem.GetType().InvokeMember("Subject", BindingFlags.SetProperty, null, mailitem, parms); string msg = "Just a message saying hello"; parms[0] = msg; // Set the Body property of the mail item mailitem.GetType().InvokeMember("Body", BindingFlags.SetProperty, null, mailitem, parms); // Invoke the Send method of the mail item. mailitem.GetType().InvokeMember("Send", BindingFlags.InvokeMethod, null, mailitem, null); |
Once we have the mail item object from calling the CreateItem method, we use the Type.InvokeMemember method to get the Recipients property, specifying in the BindingFlags parameter that we are getting a property. This general pattern is repeated in the rest of the code. We name the method or property being used, and specify whether we’re calling a method or getting or setting a property value. As you can see, this code isn’t particularly compact and is rather repetitive, so there is plenty of scope for encapsulating this code in such a way that you’re not spelling everything out all the time.
However, the point about doing it this way is that you don’t need to deploy anything except your program and the supporting .NET framework, and in particular you don’t need to get the Office 2003 PIAs installed onto client systems because you are using the standard COM automation features of Office, not the early binding COM interfaces.
Conclusion
That was a tour of the basics of building a COM object provided by a .NET assembly, deploying it and using it from a variety of client program. I hope the basics are covered enough that you can build your own .NET COM assemblies and understand how they work in a variety of contexts.
This document contains proprietary information and is protected by copyright law.
Copyright © 2026 Red Gate Software Limited. All rights reserved
Load comments