
The world is over-populated with articles and blog posts that emphasize the importance of user-experience (UX) beyond imagination. So often, this describes an ideal world; in reality, too many web sites fall short of providing even a decent, let alone a great, experience to their users. Whereas designers are putting much effort in improving certain aspects of UX such as the plain presentation of data, other important aspects such as Data entry is not yet receiving the design attention that it deserves. Hopefully, it’s only a matter of time.
For a long time, web input forms have been built around the FORM tag and a browser-led content submission. This originates an HTTP POST call to the target URL; data is received, massaged into easy-to-use data structures and becomes ready for further use. In this regard, the model binding layer of ASP.NET MVC does really a fantastic job.
The problem is that this fantastic job takes place over a full page refresh and in some cases over two HTTP requests-original POST and redirect to GET the same page. This is the popular PRG pattern (Post-Redirect-Get) introduced so that, out of a form post, the last operation tracked by the browser is a GET. If the user hits F5 (or selects ‘Refresh‘) the browser repeats the last operation which is now an innocuous GET rather than a potentially-unsafe POST.
Is there a way to implement input forms without a full page refresh? There a few ways; but all of them have quirks and therefore are subject to personal preferences. In general, I use two possible approaches for building my own forms: plain old form posts over PRG and modal input forms via Ajax. In this article, I’ll discuss how I build modal input forms. Technologies involved are Twitter Bootstrap for the user interface (and modal popup infrastructure), jQuery Validate for client-side checks, and XmlHttpRequest (XHR) for posting.
Preliminaries
Bootstrap is a UI framework developed by Twitter that you can download from http://getbootstrap.com/. It consists of CSS and JavaScript files and allows you to style HTML elements with predefined CSS classes. The overall idea is similar to jQuery UI and jQuery Mobile; the results are more compact markup and, more importantly, support for responsive design. All you need to do is linking the bootstrap CSS file and also the JavaScript file(s) if you plan to use some of the styles that are bound to script code. Bootstrap works on top of jQuery and uses some jQuery plugins for more advanced tasks. Bootstrap has its own default gray-ish theme; you can create your own theme following the Customize link from the Bootstrap home page or go to http://bootswatch.com for a few free options.
Step 1: Displaying the Modal Popup
In the layout page(s) of your ASP.NET MVC application, you link the bootstrap files, as below:
|
1 2 3 4 5 6 7 8 9 |
<link rel="stylesheet" href="@Url.Content("~/Content/Styles/bootstrap.min.css")"></link> <link rel="stylesheet" href="@Url.Content("~/Content/Styles/bootstrap-responsive.min.css")"></link> <script src="@Url.Content("~/Content/Scripts/jquery-1.8.3.min.js")" type="text/javascript"></script> <script src="@Url.Content("~/Content/Scripts/bootstrap.min.js")" type="text/javascript"></script> |
At some point in your web page you should have a trigger for the modal popup. This is likely a button or an anchor the user clicks on. For example, you can have the following:
|
1 2 3 4 |
<a type="button" class="btn" href="#article-editor" data-toggle="modal">Click me</a> |
The attributes type and data-toggle are meaningful to Bootstrap and are blissfully ignored by browsers. The class attribute is just the standard attribute used to attach a CSS style to the element. Finally, the href attribute points to the next markup as expected.
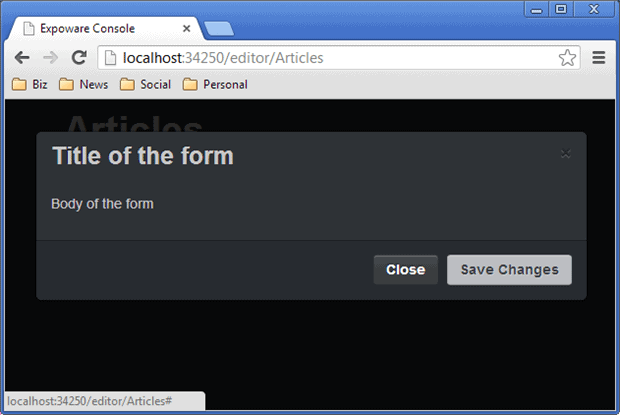
In particular, the btn name refers to one of the predefined Bootstrap classes that render out anchors as buttons. The most significant attribute here is data-toggle. Set to “modal” it tells the framework that the markup referenced by href should be displayed as a modal popup when the anchor is clicked. In the example, “article-editor” is the ID of a plain DIV element within the page that will be popped up. Here’s some possible content for the modal popup:
|
1 2 3 4 5 6 7 8 9 10 11 12 13 |
<div class="modal fade" id="article-editor""> <div class="modal-header"> <a class="close" data-dismiss="modal">×</a> <h3>Title of the form</h3> </div> <div class="modal-body"> <p>Body of the form</p> </div> <div class="modal-footer"> <a href="#" class="btn" data-dismiss="modal">Close</a> <a href="#" class="btn btn-primary">Save Changes</a> </div> </div> |
The combined effect of anchor and DIV is shown by the figure below. (As a side note, I’m using here the Slate theme for Bootstrap from the aforementioned http://bootswatch.com site.)
There are a few things to notice in the markup for the DIV. The DIV must be marked with the modalhide CSS classes to avoid it is displayed upon page loading. You can replace hide with fade to enable slide (yes, right) transitions. By default, the popup slides from the top. You can change that by editing some of the Bootstrap classes in your app. Here’s how to force the popup to kick in from the left.
|
1 2 3 4 5 6 7 8 9 10 11 12 |
<style> #container .modal.fade { left: -25%; -webkit-transition: opacity 0.3s linear, left 0.3s ease-out; -moz-transition: opacity 0.3s linear, left 0.3s ease-out; -o-transition: opacity 0.3s linear, left 0.3s ease-out; transition: opacity 0.3s linear, left 0.3s ease-out; } #container .modal.fade.in { left: 50%; } </style> |
Note that #container here refers to the DIV that contains the modal markup. The markup below, instead, sets a custom maximum height for the body of the modal popup. For the real height, you should consider also header and footer.
|
1 2 3 4 5 |
<style> #container .modal-body { max-height: 50px; } </style> |
Should the required height exceed the maximum set programmatically, scrollbars will be used. To customize the width you also need to fix the margins and not just the width. In addition, to control width you should work at the modal DIV level:
|
1 2 3 4 5 |
#article-editor { width: 600px; margin-left: -300px; margin-right: -300px; } |
The modal-header and modal-footer classes just add some predefined graphics to header and footer. The data-dismiss attribute, instead, runs no action on a button click and just dismisses the popup.
Step 2: Defining the Input Form
It is no big deal to create the HTML form to be hosted within the modal popup. It boils down to wrapping the body of the popup with the usual BeginForm call:
|
1 2 3 4 |
@using (Html.BeginForm("articles", "editor", FormMethod.Post, new { id="span" class="codedarkred">"articleForm" })) { ... } |
Bootstrap, however, may help a bit in laying out input fields. At the worst, though, you might want to use the ASP.NET built-in Editor-for-Model. It’s quick and often it’s good enough but in doing so it should be clear that you’re missing entirely the whole point of a good UX. The skeleton of the form is presented below. Layout is defined using Bootstrap predefined classes.
|
1 2 3 4 5 6 7 8 9 10 11 12 13 14 15 16 17 18 19 20 21 22 23 24 25 |
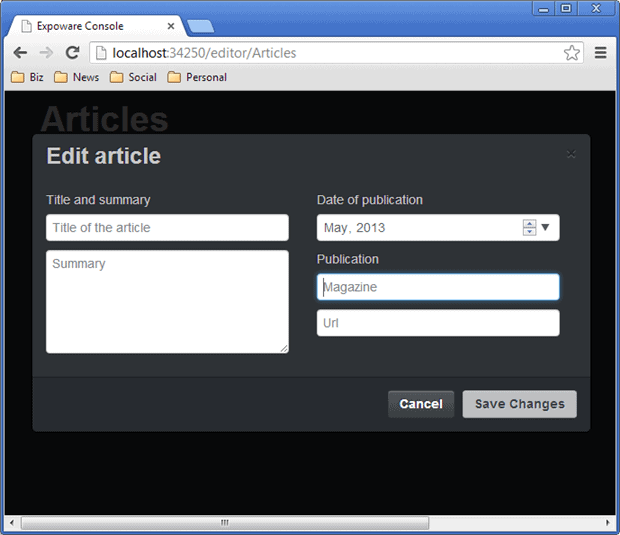
<div class="modal-body"> <div class="row-fluid"> <div class="controls span6"> <label class="control-label" for="Title">Title and summary</label> <input type="text" class="input-xlarge" id="Title"" id="Title"" placeholder="Title of the article" /> <textarea class="input-xlarge" id="Summary"" id="Summary"" rows="5" cols="0" placeholder="Summary"></textarea> </div> <div class="controls span6"> <label class="control-label" for="Title">Date of publication</label> <input type="month" class="input-xlarge" id="PubMonth"" id="PubMonth"" /> <label class="control-label" for="Magazine">Publication</label> <input type="text" class="input-xlarge" id="Magazine"" id="Magazine"" placeholder="Magazine" /> <input type="text" class="input-xlarge" id="Url"" id="Url"" placeholder="Url" /> </div> </div> </div> <div id="validationSummary"" class="validation-summary"> <ul></ul> </div> |
In particular, the class controls groups controls together and is ideal for label and input to go hand in hand. A few predefined classes exist for input field sizing such as input-xlarge and input-mini. Unless you have special needs for width you might want to go with these.
A bit more of attention deserves the span6 class. Bootstrap defines horizontal fluid rows split in up to 12 regions. The spanX class indicates how large each should be. By using span6 on two DIV elements you indicate you want them to be placed side by side on the same logical row as two TD cells in a TABLE. All in all, I think this is the best way to explain the concept to most developers. (And this is the way I learned it myself.) Note also the use of the HTML5 month input field to pick up only month and year. The resulting form is in the figure below.
Step 3: Initializing the Input Form
When displaying a form within a regular HTML page, you can leverage the Razor facilities to initialize fields. If you intend to use a modal popup, you likely need to perform dynamic initialization of the fields as you’ll be using the same form to edit multiple records. In addition, you probably want to set up things for client-side validation. In this example I’m writing my own jQuery Validate code. To do both things, you need to run some initialization code in the document’s ready event of the page that hosts the modal popup:
|
1 2 3 4 5 |
<script type="text/javascript"> $(document).ready(function () { gladiatorApp.initArticleModal(); }); </script> |
In the initialization code you need to do two basic things. First, you set up validation rules; second, you initialize input fields to the values of the record to edit. Assuming you’re using jQuery Validate, here’s some code you can use with the form of the figure above:
|
1 2 3 4 5 6 7 8 9 10 11 12 13 14 15 16 17 18 19 20 21 |
gladiatorApp.initArticleModal = function () { $("#articleForm").validate({ rules: { Title: { required: true, minlength: 4 }, Magazine: { required: true, minlength: 4 }, PubMonth: { required: true, date: true } }, messages: { Title: "Article title is required (at least 4 chars).", Magazine: "Magazine name is required is required (at least 4 chars)." }, errorContainer: "#validationSummary", errorLabelContainer: "#validationSummary ul", wrapper: "li", submitHandler: function (form) { gladiatorApp.addArticle($(form)); } }); // More here ... } |
Title and magazine are required fields along with the month of publication. Errors should be displayed in the given and wrapped in a UL list.
A very common scenario for using a modal popup is to edit a record you select from a list in a drill-down mode. You can place a remote call to a JSON endpoint to retrieve the details to edit. However, this requires you know at least the ID of the element to retrieve. Here’s a way to rewrite the trigger of the modal:
|
1 2 3 4 5 6 7 8 9 10 11 12 13 |
<table style="width:50%"> @foreach (var a in Model.Articles) { <tr> <td> <a type="button" class="btn mylink" href="#article-editor" data-toggle="modal" data-id="@a.Id">@a.Title</a> </td> </tr> } </table> |
The data-id element stores the unique identifier to be used to download details of the data element-the article in this case. You also noticed that I added an extra class to the anchors-the mylink class. The class isn’t defined anywhere and just serves the purpose of quickly and reliably identifying all and only the anchors of the current list. I’m using this class in the rest of the initArticleModal script function.
|
1 2 3 4 5 6 7 8 9 10 11 12 13 14 |
$(".btn.mylink").on("click", function () { var articleId = $(this).data('id'); $.ajax({ url: "/article/get/" + articleId, cache: false }).done(function (data) { $("#Title").val(data.Title); $("#Summary").val(data.Summary); $("#Magazine").val(data.Magazine); $("#Url").val(data.Url); $("#PubMonth").val(data.Year.toString() + "-" + ("00"+data.Month.toString()).slice(-2)); }); }); |
The function attaches a handler for the click event of all article buttons. When the button is clicked, JSON for the article matching the ID is downloaded and input fields in the modal popup are updated. This happens for every article you click to edit through the popup. To serve JSON, you need an ad hoc controller method:
|
1 2 3 4 5 6 7 8 9 10 11 12 13 14 |
public class ArticleController : Controller { private readonly ArticleRepository _repository; public ArticleController() { _repository = new ArticleRepository(); } public JsonResult Get(Int32 id) { return Json(_repository.Get(id), JsonRequestBehavior.AllowGet); } } |
We’re almost done. Before we attack the final step let’s have a look at the modal popup when users try to submit incomplete data and client validation fails.

Step 4: Posting the Form
The JavaScript code shown earlier contains in the section where jQuery Validate was set up an assignment to submitHandler. This is a property of jQuery Validate that sets a function of yours as the handler which gets control of the form submission.
|
1 2 3 |
submitHandler: function (form) { gladiatorApp.addArticle($(form)); } |
In light of this, the addArticle JavaScript function is where the upload takes place. By using Ajax to post the form, you gain total control of the process.
|
1 2 3 4 5 6 7 8 9 10 11 12 13 |
gladiatorApp.addArticle = function (form) { var url = "/editor/articles"; var postData = form.serialize(); $.post(url, postData, function (data) { if (data.toLowerCase() == "ok") { alert("Data saved!"); return; } alert("Something went wrong. Please retry!"); }); }; |
The screenshot below shows that the code posts correctly to the ASP.NET MVC backend and breakpoints are hit and model binding works as expected.

Note that the controller method returns a plain string; this can be whatever you want, from a plain OK to a complex list of error messages. Messages are received as a string and JavaScript code is in charge of displaying that to the user.
The Bottom Line
Modal dialog boxes are cool and useful because they contribute to reduce requests pollution and save the HTTP planet. However, we are still lacking consolidated workflows and patterns to code modal input forms around ASP.NET MVC. This approach that relies on Bootstrap and underlying jQuery plugins is my favorite at the moment. Your thoughts?
This document contains proprietary information and is protected by copyright law.
Copyright © 2026 Red Gate Software Limited. All rights reserved
Load comments