
SQL Server has two primary T-SQL statements for loading large datasets from files: BULK INSERT (the classic dedicated statement, supports text, CSV, native-BCP, and Unicode formats) and INSERT…SELECT with OPENROWSET(BULK) (more flexible, supports the same formats plus any OLE DB or ODBC data source, and can be composed with WHERE clauses and joins). Both offer broadly similar performance when correctly tuned.
The tuning levers that matter most: (1) TABLOCK acquires a bulk-update lock instead of per-row locks, dramatically reducing overhead; (2) minimal logging (Simple or Bulk-Logged recovery + TABLOCK + empty target or heap) reduces log volume by 10-100x; (3) dropping non-clustered indexes before the load and rebuilding afterwards is faster than loading with indexes when loading 20%+ of the existing table; (4) ORDER hints match the bulk-load sort order to the clustered index to avoid a sort step; (5) WITH (CHECK_CONSTRAINTS, FIRE_TRIGGERS) controls whether constraint checking and trigger firing run during the load (disabled by default for speed).
This article walks through both statements, then each of these five tuning options with measured examples.
In a past article on the bcp command-line utility, I demonstrated how to use the utility to bulk load external data into a SQL Server database. The advantage of using bcp is that you can quickly and easily import data from a windows command-line process without having to open an Integrated Development Environment (IDE) such as SQL Server Management Studio, or use SQLCMD, to issue a Transact-SQL statement. However, there might be times when you want to use Transact-SQL to bulk load data, in which case, you can use one of two statements supported by SQL Server:
BULK INSERT-available in SQL Server 2005 and 2008INSERT...SELECT * FROM OPENROWSET(BULK...)– available in SQL Server 2005 and 2008.
In this article, I show you how to use both statements to bulk import external data, and then I discuss some of the performance considerations to take into account when using these methods. I’ve included a number of examples, which I created on a local instance of SQL Server 2008 (using the AdventureWorks2008 sample database). To develop these examples, I first used the following Transact-SQL to create and populate the dbo.Employees table:
|
1 2 3 4 5 6 7 8 9 10 11 12 13 14 15 16 17 18 19 |
USE master; IF DB_ID('EmployeeDB') IS NOT NULL DROP DATABASE EmployeeDB; CREATE DATABASE EmployeeDB; GO USE EmployeeDB; IF OBJECT_ID ('Employees', 'U') IS NOT NULL DROP TABLE dbo.Employees; CREATE TABLE dbo.Employees ( EmployeeID INT NOT NULL, FirstName NVARCHAR(50) NOT NULL, LastName NVARCHAR(50) NOT NULL, JobTitle NVARCHAR(50) NOT NULL, City NVARCHAR(30) NOT NULL, StateProvince NVARCHAR(50) NOT NULL, CountryRegion NVARCHAR(50) NOT NULL, CONSTRAINT PK_Employees PRIMARY KEY CLUSTERED (EmployeeID ASC) ); |
In addition to creating the Employees table, I used the bcp utility to export data from the vEmployee view in the AdventureWorks2008 database. I saved the data to a folder on my local drive (C:\Data\). I then created format files based on the newly created Employees table.
The first bcp command I ran exports the data as character data to a file named EmployeeData_c.dat:
|
1 |
bcp "SELECT BusinessEntityID, FirstName, LastName, JobTitle, City, StateProvinceName, CountryRegionName FROM AdventureWorks2008.HumanResources.vEmployee ORDER BY BusinessEntityID" queryout C:\Data\EmployeeData_c.dat -c -t, -r \r\n -S localhost\SqlSrv2008 -T |
(For these commands, you’ll need to change the location of the file and the name of the server, you may also need to change ‘AdventureWorks2008’ to the current name of the database: The BusinessEntityID, introduced for Entity Framework, has now been changed back to EmployeeID so you might need to rename this too!)
The second bcp command creates a format file named EmployeeFormat_c.fmt, based on character data:
|
1 |
bcp EmployeeDB.dbo.Employees format nul -c -t, -r \r\n -f C:\Data\EmployeeFormat_c.fmt -S localhost\SqlSrv2008 -T |
Next I exported the data in the wide native format and saved the data to the EmployeeData_n.dat file:
|
1 |
bcp "SELECT BusinessEntityID, FirstName, LastName, JobTitle, City, StateProvinceName, CountryRegionName FROM AdventureWorks2008.HumanResources.vEmployee ORDER BY BusinessEntityID" queryout C:\Data\EmployeeData_n.dat -N -S localhost\SqlSrv2008 -T |
Finally, I created a format file based on the wide native format and named the file EmployeeFormat_n.fmt:
|
1 |
bcp EmployeeDB.dbo.Employees format nul -N -f C:\Data\EmployeeFormat_n.fmt -S localhost\SqlSrv2008 -T |
You now have all the setup information you need to try out the examples in this article. Even if you don’t run the examples, the Transact-SQL and bcp commands will at least help you better understand how the external data was prepared in order to import that data back into the database.
NOTE: For most of the examples, you’ll need to truncate the Employees table after each bulk load to prevent primary key errors when loading the data. This is because you’re loading the same source data into the same target table for each example.
BULK INSERT
The first statement we’ll look at is BULK INSERT, which lets you import data from a data file into a table or view. You can specify the format of the imported data, based on how that data is stored in the file. In the following example, I import the data from the EmployeeData_c.dat file into the Employees table:
|
1 2 3 4 5 6 7 8 9 |
BULK INSERT EmployeeDB.dbo.Employees FROM 'C:\Data\EmployeeData_c.dat' WITH ( DATAFILETYPE = 'char', FIELDTERMINATOR = ',', ROWTERMINATOR = '\r\n' ); |
Notice that I begin the statement by first specifying the BULK INSERT keywords, followed by the name of the target table, that is, the table in which the data will be loaded. In the next line, I define a FROM clause that includes the full path to the source data file.
The last part of the statement is the optional WITH clause, which is where you define any additional arguments, such as those related to formatting. In this case, I specify that the data file type is char data, which means that the data has been saved in the character format. Next, I specify that each field is terminated with a comma and each line terminated with a newline (\r\n) character.
That’s all there is to using the BULK INSERT statement to import data from a file. In some cases, however, you might want to use a format file when importing your data. In such situations, rather than specifying the formatting details in the WITH clause, you specify the name of the format file, as shown in the following example:
|
1 2 3 4 5 6 7 |
BULK INSERT EmployeeDB.dbo.Employees FROM 'C:\Data\EmployeeData_c.dat' WITH ( FORMATFILE = 'C:\Data\EmployeeFormat_c.fmt' ); |
As you can see, when you use a format file to import data, you don’t need to know the format of the source data; you need only to know the location of the format file.
In the previous examples, I imported data that had been saved in the character format. However, when possible, you should import your data in native format to help make your bulk load more efficient. In the following example, I specify the data file that’s been saved in the wide native format:
|
1 2 3 4 5 6 7 |
BULK INSERT EmployeeDB.dbo.Employees FROM 'C:\Data\EmployeeData_n.dat' WITH ( DATAFILETYPE = 'widenative' ); |
As you can see, I specified only one argument in the WITH clause and used the widenative option to indicate that the source data is stored with native data types, except char, varchar, and text columns, which are stored as Unicode.
I can also use a format file to import data saved in the wide native format, as shown in the following example:
|
1 2 3 4 5 6 7 |
BULK INSERT EmployeeDB.dbo.Employees FROM 'C:\Data\EmployeeData_n.dat' WITH ( FORMATFILE = 'C:\Data\EmployeeFormat_n.fmt' ); |
In this case, my only argument in the WITH clause is the location of the format file, just like you saw when I used a format file to import character data.
That’s all there is to using the BULK IMPORT statement to bulk load data into a SQL Server database. There are, of course, additional arguments you can specify in the WITH clause, some of which I cover later in the article. However, for a description of all arguments available to the WITH clause, check out the topic “BULK INSERT (Transact-SQL)” in SQL Server Books Online.
INSERT…SELECT
Starting with SQL Server 2005, the OPENROWSET function supports bulk operations through the use of the BULK provider. You can use the function and provider within an INSERT…SELECT statement to bulk load data from a data file into a table or view, just like you saw with the BULK INSERT statement. In the following INSERT…SELECT statement, I call the OPENROWSET function and BULK provider in order import data from the EmployeeData_c.dat file:
|
1 2 3 4 5 6 7 8 |
INSERT INTO EmployeeDB.dbo.Employees SELECT * FROM OPENROWSET(BULK 'c:\data\EmployeeData_c.dat', FORMATFILE = 'C:\Data\EmployeeFormat_c.fmt' ) AS e; |
I start the statement as I would any other INSERT…SELECT statement: I first specify the INSERT INTO keywords, followed by the name of the target table. I then define the SELECT statement.
Within the SELECT statement, I use the OPENROWSET function in the FROM clause. Notice that in the function’s first argument I invoke the BULK provider, followed by the name of the source file. For the second argument, I specify the path to the format file. When you use OPENROWSET to bulk load data, you must specify a format file as the second argument. Unlike the BULK INSERT statement, you cannot simply specify formatting information.
Another important point to note about the example above is that I provide an alias (e) for the output of the OPENROWSET function. The alias is required in order to use the function in this way.
In the example above, I import data that’s been saved in the character format. However, I can also use INSERT…SELECT to import data saved in the native format, as shown in the following example:
|
1 2 3 4 5 6 7 |
INSERT INTO EmployeeDB.dbo.Employees SELECT * FROM OPENROWSET(BULK 'c:\data\EmployeeData_n.dat', FORMATFILE = 'C:\Data\EmployeeFormat_n.fmt') AS e; |
As you can see, there’s little difference between this statement and the preceding one. In the case of the latter, I simply specify the source data file that was saved in the native format and the format file that works with the native data. For more details about using the OPENROWSET function in your statements, see the topic “OPENROWSET (Transact-SQL)” in SQL Server Books Online.
Performance
When bulk importing data into a SQL Server database, there are several steps you can take to maximize performance. One of these steps I mentioned earlier, and that is, when possible, work with data in SQL Server native format. Native format retains SQL Server’s native data types. Even if you use wide native format (preserving the Unicode), as I did in several of the examples above, you’re still taking advantage of the non-character native data types.
Of course, you can’t always control whether the source file is in native or wide native format, but there are other steps you can take to maximize performance. In this section, we’ll look at several of those steps and review examples that demonstrate how to implement them.
NOTE: Microsoft documentation on bulk loading operations can often be confusing, especially when trying to understand the BULK INSERT and the SELECT…INTO statements-and the differences between them. In researching these statements, you might find contradictory or inaccurate information, or information that simply doesn’t make sense. Whenever you’re developing a bulk load solution, you’re best bet is to test different scenarios and see for yourself what works best.
Table Locking
One way you can help to improve performance in your bulk load operations is to specify table locking for the duration of the data load. You can do this by including the TABLOCK argument with your statement. The argument issues a bulk update (BU) lock on the table. In the following BULK INSERT statement, I’ve included the TABLOCK argument in the WITH clause:
|
1 2 3 4 5 6 7 8 |
BULK INSERT EmployeeDB.dbo.Employees FROM 'C:\Data\EmployeeData_n.dat' WITH ( FORMATFILE = 'C:\Data\EmployeeFormat_n.fmt', TABLOCK ); |
Notice that I simply specify the TABLOCK keyword in the WITH clause. However, to use the TABLOCK option in an INSERT…SELECT statement, you must include it as part of the INSERT clause, as shown in the following example:
|
1 2 3 4 5 6 7 |
INSERT INTO EmployeeDB.dbo.Employees WITH(TABLOCK) SELECT * FROM OPENROWSET(BULK 'C:\Data\EmployeeData_n.dat', FORMATFILE = 'C:\Data\EmployeeFormat_n.fmt') AS e; |
As you can see, I’ve simply added a WITH subclause, with the TABLOCK hint enclosed in parentheses. Now when I run either of these statements, a BU lock will be issued on the table.
The TABLOCK argument can be particularly useful if you want to perform parallel data loads into a single table. However, you should use TABLOCK for parallel operations only if the table is unindexed (is a heap). For nonparallel operations, TABLOCK is useful whether or not the table is indexed. The lock prevents operations that are not related to bulk loading data from accessing the table.
Minimal Logging
Another method you can use to maximize performance is to minimally log the operation when bulk loading data. Minimal logging can make bulk load operations more efficient and minimize the risk that the transaction log will fill up. To minimally log a bulk load operation, the TABLOCK option must be specified and the table must not be being replicated. In addition, the operation can be minimally logged only under one of the following conditions:
- If the table has no indexes, the data pages can be minimally logged.
- If the table has no clustered indexes, has nonclustered indexes, and is empty, data pages and index pages can be minimally logged.
- If the table has no clustered indexes, has nonclustered indexes, and has data, data pages can be minimally logged but index pages cannot.
- If the table has a clustered index but is empty, data pages and indexed pages can be minimally logged. (Both types of pages are fully logged whenever the table contains data.)
To support minimal logging, you must change the database’s recovery mode to BULK_LOGGED. You should then change the recovery mode back to its original state as soon as the bulk load operation is over. In the following example, I set the recovery mode before and after I issue a BULK INSERT statement:
|
1 2 3 4 5 6 7 8 9 10 11 12 13 14 |
ALTER DATABASE EmployeeDB SET RECOVERY BULK_LOGGED; BULK INSERT EmployeeDB.dbo.Employees FROM 'C:\Data\EmployeeData_n.dat' WITH ( FORMATFILE = 'C:\Data\EmployeeFormat_n.fmt', TABLOCK ); ALTER DATABASE EmployeeDB SET RECOVERY FULL; |
Notice that I issue an ALTER DATABASE statement before and after my BULK INSERT statement. The ALTER DATABASE statement includes the SET RECOVERY clause, which first sets the recovery mode to BULK_LOGGED, and then sets it back to FULL
You can do the same thing when you issue an INSERT…SELECT statement, as shown in the following example:
|
1 2 3 4 5 6 7 8 9 10 11 12 13 |
ALTER DATABASE EmployeeDB SET RECOVERY BULK_LOGGED; INSERT INTO EmployeeDB.dbo.Employees WITH(TABLOCK) SELECT * FROM OPENROWSET(BULK 'C:\Data\EmployeeData_n.dat', FORMATFILE = 'C:\Data\EmployeeFormat_n.fmt') AS e ALTER DATABASE EmployeeDB SET RECOVERY FULL; |
Note that, if you bulk load data in batches, the table is considered empty only at the start of the first batch, which means that minimal logging will apply to only the first batch. For this reason, it is better to bulk load your data in a single batch, when possible. If it’s not possible, then you should maintain a close watch on your transaction logs. Again, you want to be sure to test different scenarios when preparing to bulk load data.
Dropping Indexes
Bulk load operations can be affected by the indexes defined on a table, not only with regard to minimally logging your operations, but also when you’re importing a large amount of data compared to the amount already in the table. In such cases, it is sometimes useful to drop the indexes before you load the data, and then re-create those indexes after the operation has completed.
Dropping indexes can significantly improve the performance of a bulk load operation. However, it’s not always a clear-cut decision when to drop them. If you’re importing a small amount of data compared to the amount of data in the table, then you probably shouldn’t drop the indexes; otherwise, you’ll spend more time rebuilding the indexes than it takes to load the data. However, when the situation is reversed, you’ll often benefit from dropping the indexes.
In the following example, I first include an ALTER TABLE statement that drops the primary key constraint (and its associated clustered index) and then include a second ALTER TABLE statement that re-creates the constraint and its index:
|
1 2 3 4 5 6 7 8 9 10 11 12 13 14 15 16 17 18 19 20 |
ALTER DATABASE EmployeeDB SET RECOVERY BULK_LOGGED; IF OBJECT_ID ('PK_Employees', 'PK') IS NOT NULL ALTER TABLE Employees DROP CONSTRAINT PK_Employees; BULK INSERT EmployeeDB.dbo.Employees FROM 'C:\Data\EmployeeData_n.dat' WITH ( FORMATFILE = 'C:\Data\EmployeeFormat_n.fmt', TABLOCK ); ALTER TABLE Employees ADD CONSTRAINT PK_Employees PRIMARY KEY CLUSTERED (EmployeeID); ALTER DATABASE EmployeeDB SET RECOVERY FULL; |
As you can see, I drop the clustered index, run the BULK INSERT statement, and then re-create the clustered index. I take the same approach in the next example, except that I issue an INSERT…SELECT statement:
|
1 2 3 4 5 6 7 8 9 10 11 12 13 14 15 16 17 18 19 20 |
ALTER DATABASE EmployeeDB SET RECOVERY BULK_LOGGED; IF OBJECT_ID ('PK_Employees', 'PK') IS NOT NULL ALTER TABLE Employees DROP CONSTRAINT PK_Employees; INSERT INTO EmployeeDB.dbo.Employees WITH(TABLOCK) SELECT * FROM OPENROWSET(BULK 'C:\Data\EmployeeData_n.dat', FORMATFILE = 'C:\Data\EmployeeFormat_n.fmt') AS e ALTER TABLE Employees ADD CONSTRAINT PK_Employees PRIMARY KEY CLUSTERED (EmployeeID); ALTER DATABASE EmployeeDB SET RECOVERY FULL; |
If a table has an index other than one associated with a primary key or unique constraint, you should use the DROP INDEX statement to remove the index and then use the CREATE INDEX statement to re-create the index.
Ordering
By default, SQL Server assumes that the source data is unordered when you perform a bulk load operation. However, in some cases, you can improve the performance of that operation by specifying the sort order of the imported data. But you can do this only if the target table has a clustered index and the source data file is sorted in the same way as defined by the index. If these conditions are met, you can add an ORDER option to your bulk load statement to help increase the speed of the operation. The ORDER option specifies the sort order of the incoming data. The columns listed along with that option should match the columns as defined in the clustered index and be in the same order.
In the following BULK INSERT statement, I’ve added an ORDER option to the WITH clause and specified the EmployeeID column as the sort column:
|
1 2 3 4 5 6 7 8 9 10 11 12 13 14 15 |
ALTER DATABASE EmployeeDB SET RECOVERY BULK_LOGGED; BULK INSERT EmployeeDB.dbo.Employees FROM 'C:\Data\EmployeeData_n.dat' WITH ( FORMATFILE = 'C:\Data\EmployeeFormat_n.fmt', TABLOCK, ORDER (EmployeeID ASC) ); ALTER DATABASE EmployeeDB SET RECOVERY FULL; |
The EmployeeID column, as it’s listed with the ORDER option, matches how the clustered index is defined on the Employees table. Because the data in the source file matches the clustered index, I’m able to use the sort order to improve the performance of the bulk load operation, without having to drop the index.
I can do the same thing with the SELECT…INTO statement, as shown in the following example:
|
1 2 3 4 5 6 7 8 9 10 11 12 13 14 15 |
ALTER DATABASE EmployeeDB SET RECOVERY BULK_LOGGED; INSERT INTO EmployeeDB.dbo.Employees WITH(TABLOCK) SELECT * FROM OPENROWSET(BULK 'C:\Data\EmployeeData_n.dat', FORMATFILE = 'C:\Data\EmployeeFormat_n.fmt', ORDER (EmployeeID ASC) ) AS e; ALTER DATABASE EmployeeDB SET RECOVERY FULL; |
Notice that I’ve included the ORDER option in the FROM clause and, as with the BULK INSERT statement, specified the EmployeeID as the sort column.
There’s one other action you can take with an INSERT…SELECT statement when bulk loading data into a table with a clustered index. You can turn on trace flag 610, which controls minimal logging of a bulk load operation. Under certain circumstances, you can achieve minimal logging when inserting data into an indexed table. For instance, when a new page is allocated, all the rows added sequentially to that page are minimally logged, which can lead to improved performance.
In the following example, I turn on trace flag 610, issue the INSERT…SELECT statement, and then turn off the trace flag:
|
1 2 3 4 5 6 7 8 9 10 11 12 13 14 15 16 17 18 |
ALTER DATABASE EmployeeDB SET RECOVERY BULK_LOGGED; DBCC TRACEON(610); INSERT INTO EmployeeDB.dbo.Employees WITH(TABLOCK) SELECT * FROM OPENROWSET(BULK 'C:\Data\EmployeeData_n.dat', FORMATFILE = 'C:\Data\EmployeeFormat_n.fmt', ORDER (EmployeeID ASC) ) AS e; DBCC TRACEOFF(610); ALTER DATABASE EmployeeDB SET RECOVERY FULL; |
As you can see, I simply issued a DBCC statement and specified the TRACEON option to turn on the trace flag, and then issued a DBCC statement and specified the TRACEOFF option to turn off the trace flag.
Constraints and Triggers
When running BULK INSERT and INSERT…SELECT statements, you can control whether check constraints and triggers are enforced during the bulk load operation. By disabling the constraints and triggers, you can see an improvement in the bulk load operations. However, if you do, you must be sure to follow up on any critical operations the constraints and triggers perform, after you’ve completed your bulk load operation.
When it comes to check constraints and triggers, the default behavior of the BULK INSERT and INSERT…SELECT statement is different:
- By default, the BULK INSERT statement ignores constraints and disables triggers.
- By default, the INSERT…INTO statement executes check constraints and triggers.
For both statements, you can override the default behavior. For instance, in the following BULK INSERT statement, I override the default behavior in order to run the check constraints and triggers:
|
1 2 3 4 5 6 7 8 9 10 11 12 13 14 15 16 17 18 19 20 21 22 23 |
ALTER DATABASE EmployeeDB SET RECOVERY BULK_LOGGED; IF OBJECT_ID ('PK_Employees', 'PK') IS NOT NULL ALTER TABLE Employees DROP CONSTRAINT PK_Employees; BULK INSERT EmployeeDB.dbo.Employees FROM 'C:\Data\EmployeeData_n.dat' WITH ( FORMATFILE = 'C:\Data\EmployeeFormat_n.fmt', TABLOCK, CHECK_CONSTRAINTS, FIRE_TRIGGERS ); ALTER TABLE Employees ADD CONSTRAINT PK_Employees PRIMARY KEY CLUSTERED (EmployeeID); ALTER DATABASE EmployeeDB SET RECOVERY FULL; |
Notice that I’ve added the CHECK_CONSTRAINTS and FIRE_TRIGGERS arguments to the WITH clause. Now when I use the BULK INSERT statement to load data, the check constraints and triggers will run, which can affect the performance negatively of the bulk load operation, but it does ensure that the constraint and trigger operations are performed.
I take an opposite approach in the following INSERT…SELECT statement by specifying that constraints and triggers be ignored:
|
1 2 3 4 5 6 7 8 9 10 11 12 13 14 15 16 17 18 19 20 21 |
ALTER DATABASE EmployeeDB SET RECOVERY BULK_LOGGED; IF OBJECT_ID ('PK_Employees', 'PK') IS NOT NULL ALTER TABLE Employees DROP CONSTRAINT PK_Employees; INSERT INTO EmployeeDB.dbo.Employees WITH(TABLOCK, IGNORE_CONSTRAINTS, IGNORE_TRIGGERS) SELECT * FROM OPENROWSET(BULK 'C:\Data\EmployeeData_n.dat', FORMATFILE = 'C:\Data\EmployeeFormat_n.fmt') AS e ALTER TABLE Employees ADD CONSTRAINT PK_Employees PRIMARY KEY CLUSTERED (EmployeeID); ALTER DATABASE EmployeeDB SET RECOVERY FULL; |
Notice that I’ve added the IGNORE_CONSTRAINTS and IGNORE_TRIGGERS arguments to the WITH subclause of the INSERT clause. Now check constraints and triggers will be ignored. However, whenever ignoring constraints and triggers, be sure that the time and effort it takes to revalidate the data and take any other necessary actions doesn’t outweigh the gains you made during the bulk load operation.
Conclusion
As you can see, trying to determine the best way to bulk load data can be a complicated process. It often takes testing various scenarios to come up with the best approach. In addition, it’s not always clear, based on Microsoft documentation, whether to use BULK INSERT or INSERT…SELECT * FROM OPENROWSET(BULK…) when importing external data. Some information indicates that INSERT…SELECT will not support concurrent bulk load operations into a single table. (I haven’t tested this scenario.) It also appears that INSERT…SELECT doesn’t let you specify multiple batches in a single operation (no BATCHSIZE option). Even so, for most bulk load operations, you’ll probably do fine with either statement, as long as you take other steps to improve performance. You’ll have to take each operation on a case-by-case basis and determine what works best for your specific circumstances.
Appendix
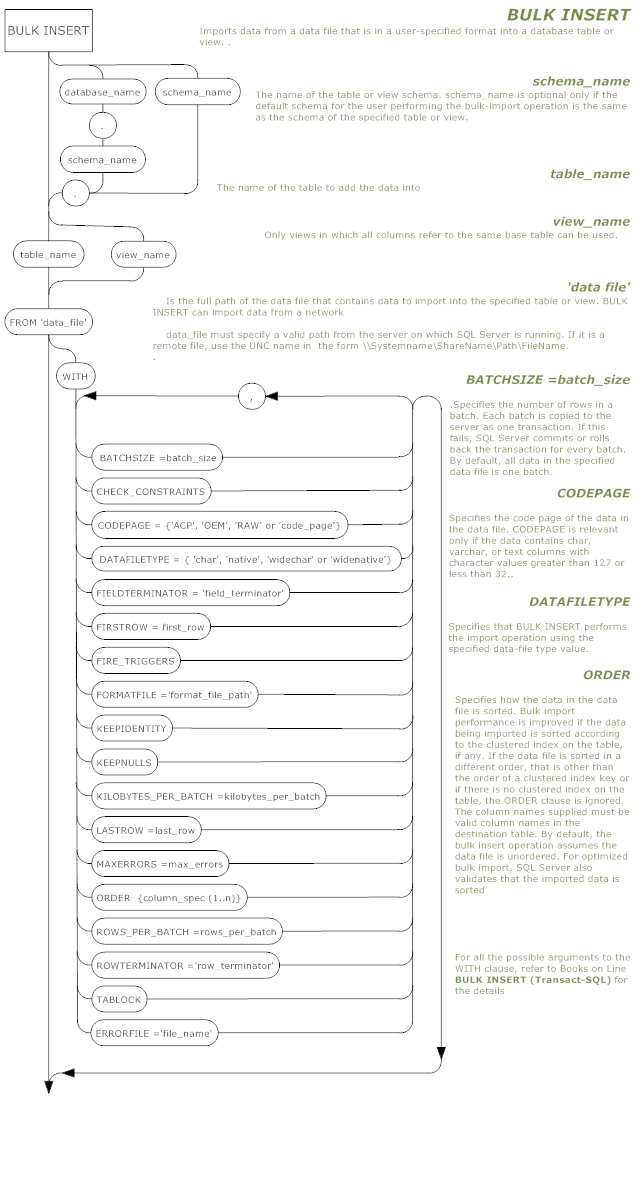
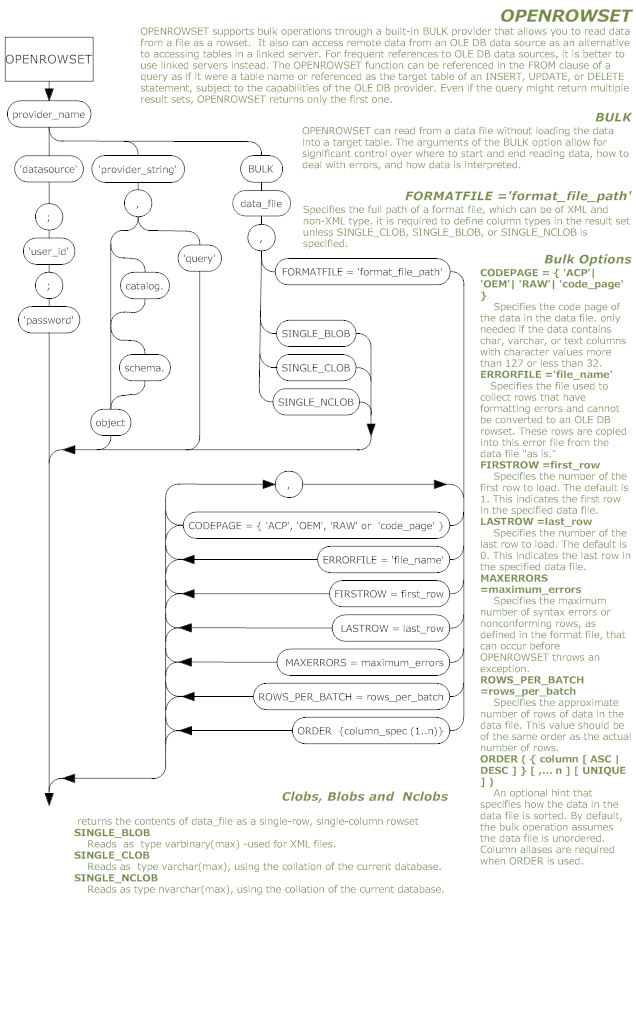
Here are the railroad diagrams for Bulk Insert and OpenRowSet. The PDF versions are attached as files to this article. For completeness, the OpenRowSet diagram shows all the available syntax as well as the BULK functionality.
BULK INSERT
OpenRowSet
This document contains proprietary information and is protected by copyright law.
Copyright © 2026 Red Gate Software Limited. All rights reserved


Load comments