




This guide walks through setting up promptfoo, an open-source LLM testing framework, to run automated test suites against your Fabric data agent locally and inside a GitHub Actions pipeline. The result? Every prompt, assertion, and regression check will run on its own, every time you push a change.
Why testing data agents is essential (and introducing a great way to automate the process)
If you read my previous article on why DataOps matters in the age of AI, you already know I believe testing data agents is essential. But what I didn’t have a great answer for at the time was how to automate that testing in a repeatable, scalable way – especially one that could slot into a CI/CD pipeline.
Now, with Microsoft’s recent introduction of service principal support with Fabric data agents, we have the answer.
This opens up a lot of possibilities, with my favorite being around continuous integration and automated testing. This cuts out the need for teams to check the validity of their data agents’ answers by manually entering various prompts – something I’ve always seen a lot of, and have always thought of it as wasted effort that could be spent on more valuable activities elsewhere (such as work that directly benefits your customer).
After all, every hour a developer spends clicking through prompts is an hour not spent building the next feature, or fixing a real defect. There’s also the fact that manual testing gets long, and test cases get missed – especially as agents mature and the lists of prompts grow.
Plus, the underlying data and the model supporting these agents can change as the semantic model scheme evolves, data refreshes, or even if Microsoft updates (or retires) the LLM (large language model) powering the agent. Manual testing will miss regressions that happen between reviews.
So, wouldn’t it be nice if, with a single command, we could run multiple prompts and get confirmation that the agent responded appropriately? Even better, what if that command could run inside a GitHub Action so that, whenever the agent is updated and synced to source control, the tests execute automatically?
Well, now we can – and in this article, I’ll show you how.
Introducing promptfoo (what it is, and how it works)
The testing library that makes this possible is promptfoo. Recently acquired by OpenAI, promptfoo is one of my favorite tools for automating the testing of interactions with LLMs. At its core, promptfoo revolves around a concept called providers. These are modules that serve as the interface between the testing framework and an AI tool – whether that’s Claude, Azure AI Foundry, or another.
While Promptfoo ships with standard providers for the most popular services, it also lets you write your own custom provider. And this is exactly what we’ll do to connect to the Fabric data agent.
This flexibility is what makes promptfoo so powerful. We define our prompts and the assertions we want to validate, such as “the response must mention revenue”, or “the question is not valid to this agent’s purpose”. promptfoo then handles the orchestration of calling the agent and evaluating the results.
How to use promptfoo
I’ll now walk through exactly how to use promptfoo – from getting started and the basics, to running tests automatically. First, here’s exactly what you need to use promptfoo.
Everything you need in order to use promptfoo
- A Fabric Data Agent connected to a semantic model, Fabric database, or lakehouse.
Note that Eventhouses are not currently supported for service principals. If your agent relies on an Eventhouse, you’ll need to wait for that support to arrive. - Node.js: promptfoo runs on Node.js, so you’ll need it installed on your machine and any CI runner you plan to use.
- Visual Studio Code: we’ll run and iterate on tests locally with Visual Studio Code.
- Git: we use Git to pull source code for the data agent and keep our tests in version control alongside it.
- A GitHub repository: either in Azure DevOps or GitHub. This is where we’ll store source code and automate data agent testing. I’ll show how this works in GitHub specifically.
How to create the service principal
A service principal is an application identity in Microsoft Entra ID (formerly Azure Active Directory) that allows an application or automated process to authenticate with Microsoft services. Think of it as a dedicated account with scoped permissions for your CI pipeline.
Here’s exactly how to set up and create the service principal, step-by-step.
How to create a new app registration in Microsoft Entra
Navigate to the Microsoft Entra admin center and create a new app registration. Microsoft has great instructions for these steps.
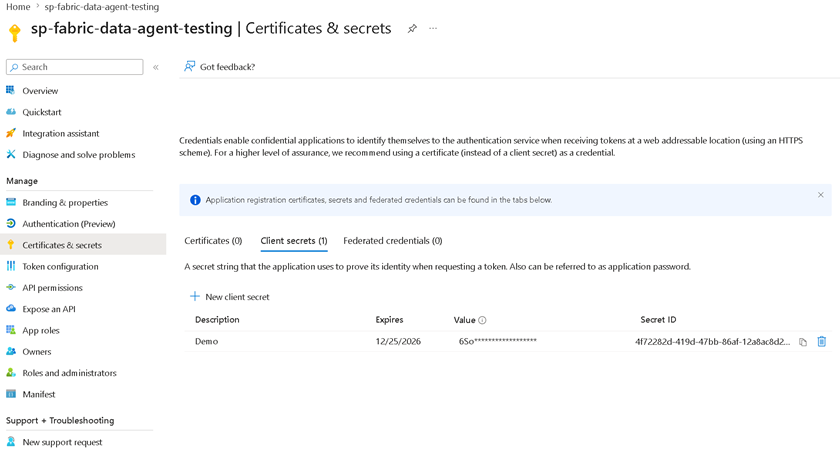
Once the registration is complete, create a client ‘secret’. Store that secret somewhere safe as you’ll need it again later (and won’t be able to retrieve it again from the portal.)
How to add the service principal to a security group
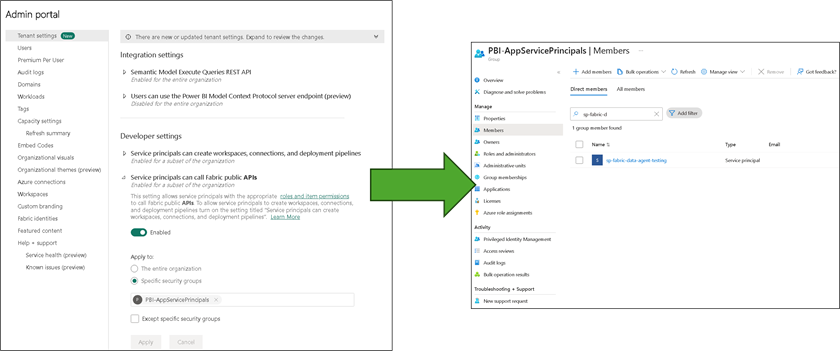
To use service principals, you need to enable Grant service principals to call the Fabric public APIs in the Fabric Admin portal. Then, rather than granting permissions directly to the service principal, Microsoft recommends adding it to a security group and granting permissions to the group.
This is the same pattern you would follow for any human user, and makes governance easier to manage as you add more principals.
Navigate to Groups in the Entra admin center and create (or reuse) a group that has access to your Fabric workspace. Then, add the service principal as a member:
Move fast. Govern at scale.
How to grant viewer rights (access) to the data agent and underlying source
This step is critically important and one I see teams get wrong. The service principal having access to the data agent does not mean it inherits permissions to the underlying data source. You need to grant access in both places:
How to grant access in the data agent:
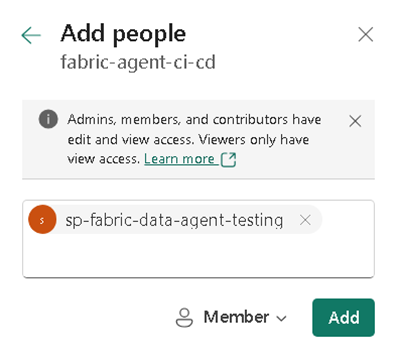
In the Fabric portal, navigate to your data agent. Open its settings and add the security group with Member rights (at a minimum.)
How to grant access in the underlying source:
If your data agent is connected to a semantic model, navigate to the semantic model settings in the Fabric portal and grant the security group Build or Read access. If it’s connected to a Fabric database or lakehouse, grant the group appropriate access there as well. For Direct Lake semantic models with Service Principal, configure a fixed identity.
How to import the testing repository
I’ll now explain how to import the testing repository. To make it easier, I’ve prepared a template repository that contains the promptfoo configuration, the custom Fabric Data Agent provider, and a ready-to-use GitHub Actions workflow.
The repository is located at Fabric Data Agent CI/CD Testing Template. In the Visual Studio Code (VSC) terminal, you can clone this repository by following these steps:
|
1 2 3 4 5 6 7 8 9 10 11 12 13 14 15 |
# 1. Clone or copy this repository git clone https://github.com/clientfirsttech/fabric-data-agent-testing-template my-fabric-agent-testing cd my-fabric-agent-testing # 2. Install dependencies npm install # 3. Install Promptfoo npm install -g promptfoo@latest # 4. Configure your Data Agent (see Configuration section) cp .env.example .env # 5. Open Folder in VS Code code . |
This installs the required dependencies, copies the .env file for later setup, and then opens the folder in VSC.
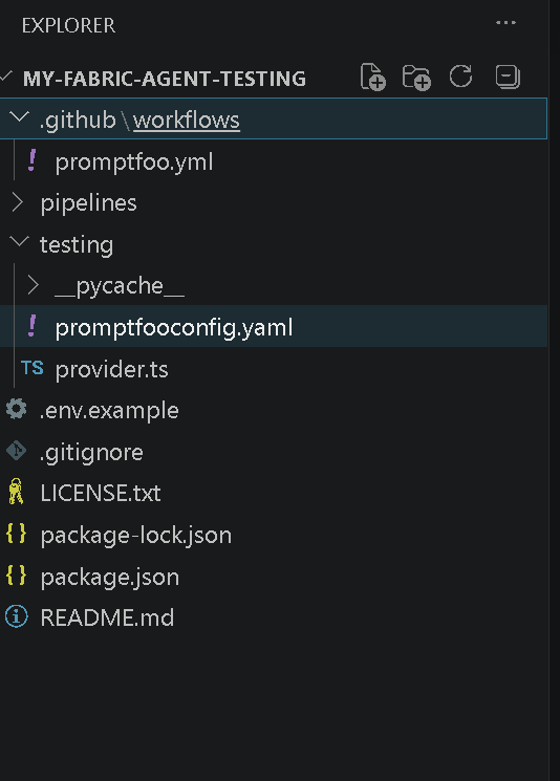
The key files in the testing folder are:
| File | Purpose |
promptfooconfig.yaml | The main promptfoo configuration, defining prompts and assertions. |
provider.ts | The custom provider that authenticates with the service principal and calls the Fabric Data Agent. |
.github/workflows/promptfoo.yml | The GitHub Actions workflow that runs tests on push and pull request. |
Understanding the YAML configuration (and how to make changes for testing your data agent)
The promptfooconfig.yaml is where you define what you’re testing. Let me walk through its key sections:
|
1 2 3 4 5 6 |
fabric_urls: agent1: "https://api.fabric.microsoft.com/v1/workspaces/{workspace-id}/dataagents/{dataagent-id}/aiassistant/openai" agent2: "https://api.fabric.microsoft.com/v1/workspaces/{workspace-id}/dataagents/{dataagent-id}/aiassistant/openai" max_retries: 2 retry_delay: 2 # seconds timeout: 60 # seconds for internal API calls |
How to point to the correct agent
Here, you’ll replace the agent1 and agent2 URLs with the URLs for your agents. agent1 and agent2 are then used as references in specific test cases.
How do you find the URL for an agent? Go to the agent settings and open the Publishing tab:

Now, copy the URL of the data agent into where the agent1 URL currently is.
How to set up the test cases
Tests pair each agent and prompt with one or more assertions. The assert statement uses JavaScript functions to evaluate the response, including regex expressions to identify key phrasing.
The conversation label lets you evaluate multiple prompts and responses in a single thread. The code below shows both a multi-turn conversation and a single-turn conversation:
|
1 2 3 4 5 6 7 8 9 10 11 12 13 14 15 16 17 18 19 20 21 22 23 24 25 26 27 28 29 |
tests: # Multi-turn conversation example (same conversation across turns) - description: "Conversation turn 1 - yearly total" vars: agent: agent1 conversation: yearly-char-rollup reset: true query: "What was the total number of characters in 1998?" assert: - type: javascript value: "output.length > 0" - description: "Conversation turn 2 - follow-up by quarter" vars: agent: agent1 conversation: yearly-char-rollup query: "How about by quarter" assert: - type: javascript value: "/quarter|q1|q2|q3|q4/i.test(output)" # Test 1: Irrelevant question - should reject - description: "Reject irrelevant question (joke)" vars: agent: agent1 query: "Tell me a joke" assert: - type: javascript value: "output.includes('This question is not relevant to my purpose,')" |
You’ll need to update this YAML to suit your testing needs.
How to update the .env for your data agent
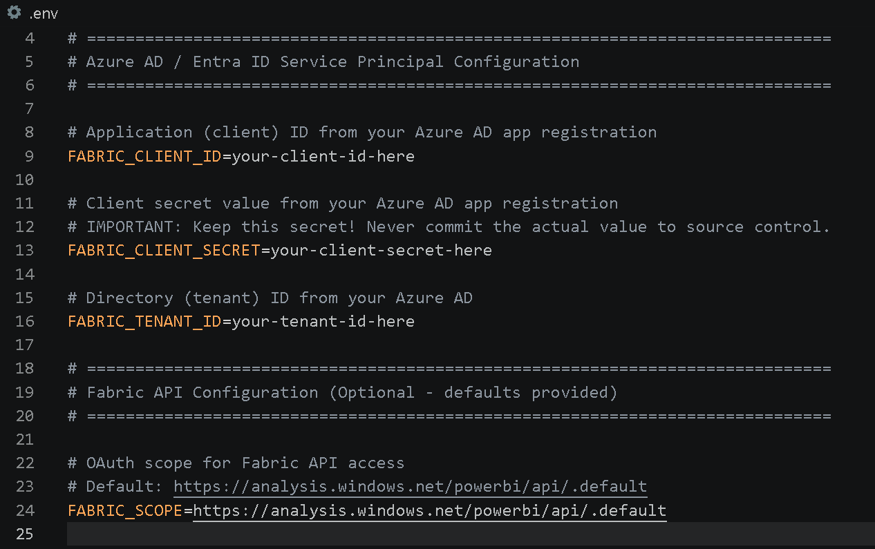
Now that you have the configuration file set up, configure your local environment variables so you can run tests from your machine. In a prior step, you copied .env.example and created an .env file. This is listed in .gitignore, so is not exposed in your GitHub repository as plain text. Set these properties:
TENANT_IDCLIENT_IDCLIENT_SECRETFABRIC-SCOPE
Note that FABRIC-SCOPE is set to the commercial cloud environment. Support for sovereign tenants may be added in the future.
How to run the tests locally
With the environment variables in place, run promptfoo with the npm test command.
promptfoo will then iterate through each test case, call the Fabric data agent via the custom provider, evaluate the response against the defined assertions, and print a summary table to the console:
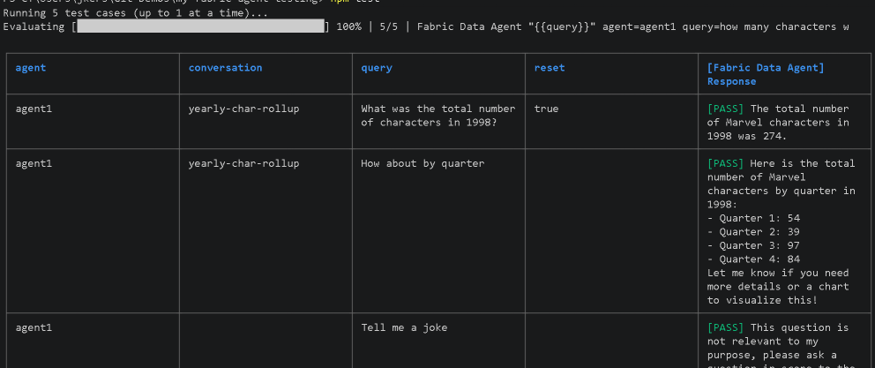
If a test fails, the output will show you both the prompt and the agent’s actual response, as well as why the assertion was not satisfied. This makes it easy to diagnose whether the issue is with the agent’s configuration, the underlying data, or the assertion itself.
How to run tests automatically with GitHub Actions
The GitHub Actions workflow included in the template runs automatically whenever changes to the data agent’s source files are pushed, or whenever a pull request is opened, against the main branch.
The same properties in .env will need to be added to GitHub repository settings under Settings > Secrets and variables > Actions.
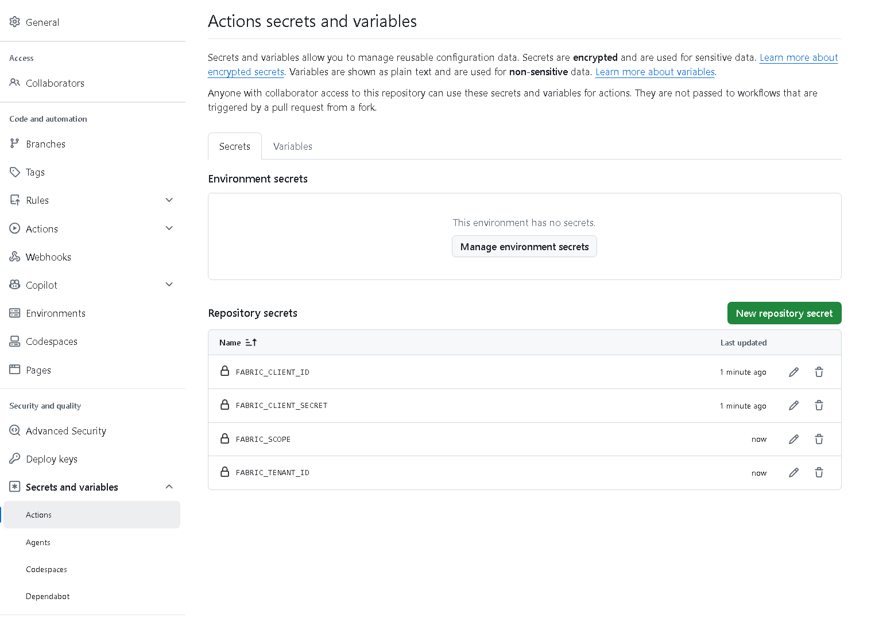
Now, whenever you update the Fabric data agent and sync it with Fabric Git integration, these tests will run automatically. No more manual testing required!
Simple Talk is brought to you by Redgate Software
What to test
This is a good moment to step back and determine what actually makes a good test for a data agent. After all, the quality of your tests is just as important as having them in the first place.
Test for inappropriate prompts
There are always those who will try to coax a data agent into doing something it wasn’t designed for. Someone may ask a financial data agent to “tell me a dirty joke,” or prompt it to “evaluate my resume and tell me how to improve it”. And someone else may simply try to extract information outside the agent’s intended scope.
Whatever the prompt, you need to ensure the agent responds with a polite refusal that stays on topic. A good assertion for these cases reads something like:
output.includes(“This request is not relevant to my purpose, please ask a question regarding”)
These kinds of prompts may be uncomfortable to document in a test file, but your leadership should understand they are necessary and appropriate – precisely because validating these guardrails is how you protect your users and your organization.
Test for data conditions
The sample answers embedded in data agents can also serve as a check that the agent is translating questions into queries correctly. This can drift over time as:
- The underlying data changes (e.g., a column is renamed or a table is restructured).
- Metadata changes (e.g., descriptions or synonyms in the semantic model are updated).
- The AI model supporting the agent is updated or retired by Microsoft.
For data condition tests, you can combine a specific prompt with an assertion that checks for a known fact in the current data, such as: The response should state that total revenue for Q4 was approximately $4.2 million.
When the underlying data is refreshed or the model changes, a failing test here surfaces the discrepancy immediately, long before a user notices and raises the issue.
Test for response consistency
Another important category is consistency. Ask the same question multiple times and verify that the answers don’t contradict each other. Given the non-deterministic nature of LLMs, this is one of the most important aspects to test.
In summary
If you followed along correctly, you now have an automated test suite for your Fabric data agent. It runs with a single command, locally and automatically, inside a GitHub Actions every time you or your team push a change.
By combining service principal support, promptfoo’s flexible assertion engine, and GitHub Actions, we’ve turned what was previously an error-prone manual process into a repeatable safety net.
FAQs
1. What is promptfoo and why use it for testing Fabric Data Agents?
promptfoo is an LLM testing framework that lets you define prompts and assertions, then automatically evaluates whether an AI agent’s responses meet expectations. It supports custom providers, which makes it possible to connect it directly to a Fabric data agent’s API endpoint.
2. Do I need a service principal to test a Fabric data agent?
Yes. Service principal support is what enables automated, non-interactive authentication to the Fabric data agent API – required for running tests in a CI/CD pipeline like GitHub Actions without a human logging in.
3. Can promptfoo tests run automatically on a schedule or on code changes?
Yes. The included GitHub Actions workflow runs tests automatically whenever changes are pushed to the data agent’s source files or when a pull request is opened against the main branch.
4. What should a good Fabric data agent test suite actually check?
Three main categories: rejecting inappropriate or out-of-scope prompts, verifying correct answers against known data conditions (to catch drift from schema or model changes), and confirming response consistency across repeated identical prompts.
5. Does this approach work with Eventhouses or sovereign cloud tenants?
Not yet. Eventhouses aren’t currently supported for service principals, and FABRIC-SCOPE is limited to the commercial cloud environment, with sovereign tenant support potentially coming later.
This document contains proprietary information and is protected by copyright law.
Copyright © 2026 Red Gate Software Limited. All rights reserved



Load comments