
The INSERT statement lets you add one or more rows to a table or view in a SQL Server database. The statement is one of the primary data modification language (DML) statements available in Transact-SQL, along with UPDATE, MERGE, and DELETE. You can use the INSERT statement to add data that you specifically define, or you can add data that you retrieve from other tables or views. You can also include an OUTPUT clause in your INSERT statement to capture the statement’s results for auditing or verification purposes.
In this article, I explain how to use the INSERT statement to add data to SQL Server tables. The examples I show are based on the AdventureWorks2008 sample database, installed on a local instance of SQL Server 2008. However, you can run most of these examples against the AdventureWorks database in SQL Server 2005, with minor modifications, such as changing the database name. Where appropriate, I note which features are not supported in 2005.
NOTE: One of the views I reference in the AdventureWorks2008 database (the SalesPerson view) includes the BusinessEntityID column. This column is referred to as the SalesPersonID column in the AdventureWorks database.
Performing a Basic Insert
In a basic INSERT statement you must specify the name of the target table and the data values you want to insert into that table. When necessary, you should qualify that table name with the name of the server, database, or schema.
To demonstrate how to create a basic INSERT statement, I first used the following code to create the SalesStaff1 table in the AdventureWorks2008 database:
|
1 2 3 4 5 6 7 8 9 10 |
USE AdventureWorks2008; IF OBJECT_ID('SalesStaff1', 'U') IS NOT NULL DROP TABLE SalesStaff1; CREATE TABLE SalesStaff1 ( StaffID INT NOT NULL PRIMARY KEY, FirstName NVARCHAR(30) NOT NULL, LastName NVARCHAR(30) NOT NULL ); |
The table itself is fairly straightforward, and so is the INSERT statement necessary to add a row of data. The statement requires the INSERT keyword, the name of the target table, the VALUES keyword, and the values to be inserted, as shown in the following example:
|
1 |
INSERT INTO SalesStaff1 VALUES (1, 'Stephen', 'Jiang'); |
Notice that the statement begins with the INSERT keyword, followed by the INTO keyword. The INTO keyword is optional. Often you’ll see it used. Often you will not. After the INSERT keyword and optional INTO keyword, you specify the name of the target table, which in this case is SalesStaff1.
Next you specify the VALUES keyword and then the values themselves. Notice that the values are enclosed in parentheses and separated by commas. In addition, string values are enclosed in single quotation marks. The values are inserted into the table in the order they’re specified in the clause. That means the values must be in the same order as the columns are defined in the table. In this case, 1 is inserted into the table’s first column (StaffID), Stephen is inserted into the second column (FirstName), and Jiang is inserted into the third column (LastName).
That’s all there is to inserting a row into a table. However, as is often the case, you might want to add multiple rows to a table in a single statement. Prior to SQL Server 2008, this was not possible, but now the INSERT statement let’s you specify multiple rows, as shown in the following example:
|
1 2 3 4 |
INSERT SalesStaff1 VALUES (2, 'Michael', 'Blythe'), (3, 'Linda', 'Mitchell'), (4, 'Jillian', 'Carson'), (5, 'Garrett', 'Vargas'); |
As you can see, you must still specify the INSERT keyword, the name of the target table, and the VALUES keyword. However, instead of a single set of parentheses, you now have a set for each row to be inserted into the table. The value sets are then separated with commas. Now when you run the statement, all four rows will be added to the SalesStaff1 table.
Inserting Specific Column Values
The examples in the previous section are INSERT statements at their simplest. They assume that you will add one value to each column in the table for each row you plan to insert. However, it’s not always that easy. In many cases, you’ll want to insert values into specific columns, but not all columns. For example, if you have an IDENTITY column, you might not want to insert a value into that, but instead allow the database engine to generate the next value automatically. However, the INSERT statement, as it is used in the previous examples, requires one value for each column. If you do not specify an appropriate value for each column, you will generate an error.
To address this issue, the INSERT statement supports an additional component that lets you specify which columns should receive values. The values you specify are then inserted into those columns. Columns that are not specified are assumed to generate their own values, as is the case with IDENTITY columns, calculated columns, or columns for which a default value has been defined.
For example, the following code creates the SalesStaff2 table, which includes columns that do not require values to be explicitly added:
|
1 2 3 4 5 6 7 8 9 10 11 12 13 |
USE AdventureWorks2008; IF OBJECT_ID ('SalesStaff2', 'U') IS NOT NULL DROP TABLE SalesStaff2; CREATE TABLE SalesStaff2 ( StaffID INT NOT NULL IDENTITY PRIMARY KEY, StaffGUID UNIQUEIDENTIFIER NULL, FirstName NVARCHAR(30) NOT NULL, LastName NVARCHAR(30) NOT NULL, FullName AS (FirstName + ' ' + LastName), ModifiedDate DATETIME NOT NULL DEFAULT GETDATE() ); |
As you can see, StaffID is an IDENTITY column, FullName is a calculated column, and ModifiedDate has been defined with a default value (retrieved through the GETDATE function). Now let’s look at an INSERT statement that provides values for the other three columns-StaffGUID, FirstName, LastName:
|
1 2 3 4 5 |
INSERT INTO SalesStaff2 (StaffGUID, FirstName, LastName) VALUES (NEWID(), 'Stephen', 'Jiang'); SELECT StaffID, StaffGUID, FullName, ModifiedDate FROM SalesStaff2; |
Notice that I add the list of columns after I specify the INSERT INTO keywords and the name of the target table. The columns are enclosed in parentheses and separated with commas. The data that I specify in the VALUES clause must then correspond to these columns. In this case, the VALUES clause includes three values. The first is the NEWID function, which generates a GUID for the StaffGUID column. The second value, Stephen, is inserted into the FirstName column, and the third value, Jiang, is inserted into the LastName column.
As you can see, I do not include the column names or values for any of the columns whose values are generated automatically. I can include a value for the StaffID column, if the database is configured to allow me to override IDENTIY values. I can also include a value to override the default ModifiedDate value. In either case, I must include the name of the column after the INSERT clause and include the value in the VALUES clause, in the correct order.
As you’ve no doubt noticed, I’ve added a SELECT statement after the INSERT statement in the example above. The statement returns the values that were generated automatically when I inserted the rows, as shown in the following results:
|
StaffID |
StaffGUID |
FullName |
ModifiedDate |
|
1 |
C96716E5-2DEE-4887-80C9-F0C3A1D38B98 |
Stephen Jiang |
2010-09-21 07:56:59.487 |
That’s all there is to adding data to specific columns. You simply provide the name of the columns that should receive values and then you specify those values. You can specify the column names in any order. Just be sure that the data in the VALUES clause corresponds to the column order. Now let’s look at what happens when you don’t explicitly define your values.
Retrieving Data from External Tables
In the previous examples, the VALUES clause includes a set of values that are enclosed in parentheses and separated by commas. But you don’t always have to explicitly specify the values. You can instead retrieve the values through a SELECT statement or through a stored procedure. To demonstrate how this works, I first created the SalesStaff3 table, shown in the following code:
|
1 2 3 4 5 6 7 8 9 10 |
USE AdventureWorks2008; IF OBJECT_ID ('SalesStaff3', 'U') IS NOT NULL DROP TABLE SalesStaff3; CREATE TABLE SalesStaff3 ( StaffID INT NOT NULL PRIMARY KEY, FullName NVARCHAR(60) NOT NULL, ModifiedDate DATETIME NOT NULL DEFAULT GETDATE() ); |
Suppose I want to insert data into the SalesStaff3 table that I retrieve from the Sales.vSalesPerson view in the AdventureWorks2008 database. Instead of specifying a VALUES clause, I can specify a SELECT statement that retrieves data directly from the vSalesPerson view, as shown in the following example:
|
1 2 3 4 5 6 7 8 |
INSERT SalesStaff3 (StaffID, FullName) SELECT TOP 5 BusinessEntityID, FirstName + ' ' + LastName AS FullName FROM Sales.vSalesPerson ORDER BY BusinessEntityID; SELECT * FROM SalesStaff3; |
You can replace the VALUES clause with any valid SELECT statement that returns the appropriate data. In this case, I’m retrieving the BusinessEntityID values and names of the top five salespeople, based on BusinessEntityID. After the INSERT statement, I run a SELECT statement to confirm that the data has been inserted into the SalesStaff3 table, as shown in the following results:
|
StaffID |
FullName |
ModifiedDate |
|
274 |
Stephen Jiang |
2010-09-21 08:15:48.927 |
|
275 |
Michael Blythe |
2010-09-21 08:15:48.927 |
|
276 |
Linda Mitchell |
2010-09-21 08:15:48.927 |
|
277 |
Jillian Carson |
2010-09-21 08:15:48.927 |
|
278 |
Garrett Vargas |
2010-09-21 08:15:48.927 |
A SELECT statement that’s used within an INSERT statement can reference a common table expression (CTE) as well as a table or view, as long as that CTE precedes the INSERT statement (as opposed to being part of the SELECT statement itself). For instance, in the following example, I first define a CTE and then define the INSERT statement, which pulls data from the CTE through a SELECT statement:
|
1 2 3 4 5 6 7 8 9 10 11 12 13 14 15 |
WITH cteSalesStaff (StaffID, FullName) AS ( SELECT BusinessEntityID, FirstName + ' ' + LastName AS FullName FROM Sales.vSalesPerson WHERE BusinessEntityID BETWEEN 279 AND 283 ) INSERT SalesStaff3 (StaffID, FullName) SELECT StaffID, FullName FROM cteSalesStaff; SELECT * FROM SalesStaff3 WHERE StaffID BETWEEN 279 AND 283; |
Notice that the CTE retrieves data from the vSalesPerson view. The SELECT statement in the INSERT statement then retrieves the contents of the CTE, as it would retrieve data directly from a table. That data is then inserted into the SalesStaff3 table. The final SELECT statement confirms that the data has been added, as shown in the following results:
|
StaffID |
FullName |
ModifiedDate |
|
279 |
Tsvi Reiter |
2010-09-21 08:26:04.340 |
|
280 |
Pamela Ansman-Wolfe |
2010-09-21 08:26:04.340 |
|
281 |
Shu Ito |
2010-09-21 08:26:04.340 |
|
282 |
José Saraiva |
2010-09-21 08:26:04.340 |
|
283 |
David Campbell |
2010-09-21 08:26:04.340 |
Instead of using a SELECT statement to retrieve data, you can call a stored procedure in your INSERT statement. For instance, the following stored procedure-spSalesStaff-retrieves data from the vSalesPerson view:
|
1 2 3 4 5 6 7 8 9 10 11 12 |
USE AdventureWorks2008; IF OBJECT_ID('spSalesStaff', 'P') IS NOT NULL DROP PROCEDURE spSalesStaff; GO CREATE PROCEDURE spSalesStaff AS SELECT BusinessEntityID, FirstName + ' ' + LastName AS FullName FROM Sales.vSalesPerson WHERE BusinessEntityID BETWEEN 284 AND 288; |
I can then call this stored procedure from within an INSERT statement, as shown in the following example:
|
1 2 3 4 5 |
INSERT SalesStaff3 (StaffID, FullName) EXEC spSalesStaff; SELECT * FROM SalesStaff3 WHERE StaffID BETWEEN 284 AND 288; |
Notice that in place of a VALUES clause or SELECT statement, I’ve included an EXECUTE (EXEC) statement that calls the spSalesStaff stored procedure. When I run the INSERT statement, the procedure is executed and the returned data is inserted into the SalesStaff3 table. The following results confirm that the data has been inserted:
|
StaffID |
FullName |
ModifiedDate |
|
284 |
Tete Mensa-Annan |
2010-09-21 08:36:30.207 |
|
285 |
Syed Abbas |
2010-09-21 08:36:30.207 |
|
286 |
Lynn Tsoflias |
2010-09-21 08:36:30.207 |
|
287 |
Amy Alberts |
2010-09-21 08:36:30.207 |
|
288 |
Rachel Valdez |
2010-09-21 08:36:30.207 |
As you can see, inserting data through a SELECT statement or stored procedure provides a simple way to add multiple rows to a table, without having to explicitly define each value.
Adding an OUTPUT Clause
Starting with SQL Server 2005, DML statements supported the OUTPUT clause, which lets you output the modified table to another table or variable. In the case of the INSERT statement, you can use the OUTPUT clause to track the data that is being inserted into your table. For example, the following INSERT statement uses the OUTPUT clause to output the inserted values to a table variable:
|
1 2 3 4 5 6 7 8 9 10 11 12 13 14 15 16 17 18 19 |
DECLARE @InsertOutput TABLE ( StaffID INT, FullName VARCHAR(60) ); INSERT INTO SalesStaff3 (StaffID, FullName) OUTPUT INSERTED.StaffID, INSERTED.FullName INTO @InsertOutput SELECT BusinessEntityID, FirstName + ' ' + LastName AS FullName FROM Sales.vSalesPerson WHERE BusinessEntityID > 288; SELECT * FROM SalesStaff3 WHERE StaffID > 288; SELECT * FROM @InsertOutput; |
I first declare the @InsertOutput variable and configure it with two columns: StaffID and FullName. These two columns correspond to the same two columns in the SalesStaff3 table used in the examples in the previous section.
After I declare the variable, I define the INSERT statement, which uses a SELECT statement to retrieve data from the vSalesPerson view. The INSERT statement also includes an OUTPUT clause, which follows the INSERT clause and list of columns. The OUTPUT clause captures the data inserted into the StaffID and FullName columns and saves them to the @InsertOutput variable.
NOTE: For a full discussion of the OUTPUT clause, see the Simple-Talk article “Implementing the OUTPUT Clause in SQL Server 2008” (http://www.simple-talk.com/sql/learn-sql-server/implementing-the-output-clause-in-sql-server-2008/).
After the INSERT statement, I include a SELECT statement to verify that the data was inserted into the SalesStaff3 table. The statement returns the following results:
|
StaffID |
FullName |
ModifiedDate |
|
289 |
Jae Pak |
2010-09-21 08:49:03.983 |
|
290 |
Ranjit Varkey Chudukatil |
2010-09-21 08:49:03.983 |
I also include a second SELECT statement to retrieve the contents of the @InsertOutput, after the outputted data has been saved to the variable. The following table shows the contents of the variable:
|
StaffID |
FullName |
|
289 |
Jae Pak |
|
290 |
Ranjit Varkey Chudukatil |
That’s about all there is to implementing an OUTPUT clause in your INSERT statement. In fact, that’s about all there is to working with the INSERT statement. Note, however, that the INSERT statement supports a few other features. So be sure to check out the topic “INSERT (Transact-SQL)” in SQL Server Books Online. You can also find additional examples of the INSERT statement in the topic “INSERT Examples (Transact-SQL)” in SQL Server Books Online.
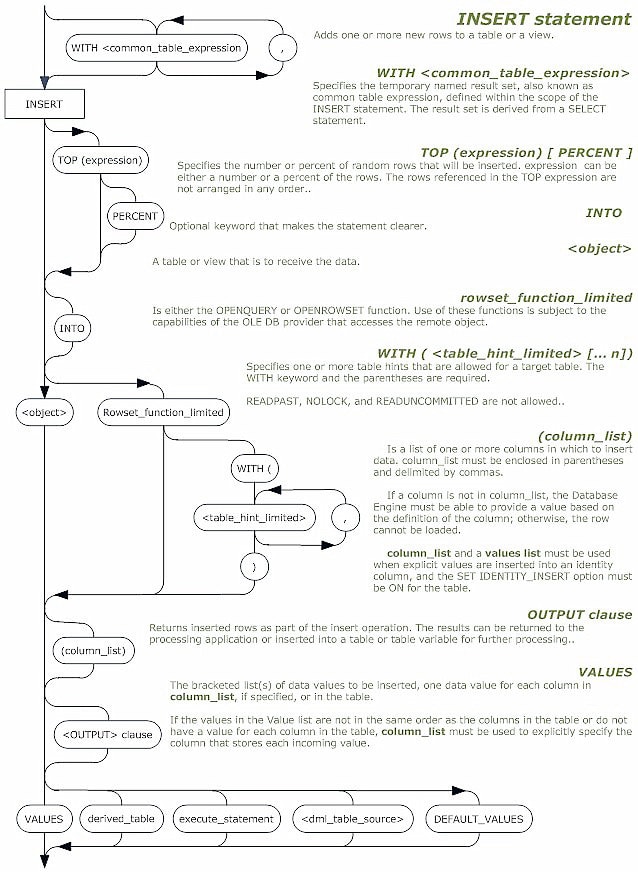
We have supplied the full-size railroad diagrams for the INSERT and OUTPUT clauses as PDF files which can be downloaded below.


Load comments