
In previous articles, I discussed ways in which you can use the bcp utility and the Transact-SQL statements BULK INSERT and INSERT…SELECT (with the OPENROWSET function) to bulk load external data into a SQL Server database. Another effective-and indeed the most flexible-method you can use to bulk load data is SQL Server Integration Services (SSIS). SSIS can read from a variety of data sources, data can be easily transformed in memory, and you can bulk load the data without needing to stage it. Because SSIS runs as a process separate from the database engine, much of the CPU-intensive operations can be preformed without taxing the database engine, and you can run SSIS on a separate computer. As a result, you can easily scale out your bulk load operations in order to achieve extremely high throughput.
SSIS provides several task and destination components that facilitate bulk load operations:
- SQL Server destination
- OLE DB destination
- BULK INSERT task
In this article, I provide an overview of each of these components and show you how they work. To demonstrate the components, I first created the following three tables in the AdventureWorks2008 database:
|
1 2 3 4 5 6 7 8 9 10 11 12 13 14 15 16 17 18 19 20 21 22 23 24 25 26 27 28 29 30 31 32 33 34 35 36 37 38 39 40 |
IF OBJECT_ID('Employees1', 'U') IS NOT NULL DROP TABLE dbo.Employees1; CREATE TABLE dbo.Employees1 ( EmployeeID INT NOT NULL, FirstName NVARCHAR(50) NOT NULL, LastName NVARCHAR(50) NOT NULL, JobTitle NVARCHAR(50) NOT NULL, City NVARCHAR(30) NOT NULL, StateProvince NVARCHAR(50) NOT NULL, CountryRegion NVARCHAR(50) NOT NULL, CONSTRAINT PK_Employees1 PRIMARY KEY CLUSTERED (EmployeeID ASC) ); IF OBJECT_ID('Employees2', 'U') IS NOT NULL DROP TABLE dbo.Employees2; CREATE TABLE dbo.Employees2 ( EmployeeID INT NOT NULL, FirstName NVARCHAR(50) NOT NULL, LastName NVARCHAR(50) NOT NULL, JobTitle NVARCHAR(50) NOT NULL, City NVARCHAR(30) NOT NULL, StateProvince NVARCHAR(50) NOT NULL, CountryRegion NVARCHAR(50) NOT NULL, CONSTRAINT PK_Employees2 PRIMARY KEY CLUSTERED (EmployeeID ASC) ); IF OBJECT_ID('Employees3', 'U') IS NOT NULL DROP TABLE dbo.Employees3; CREATE TABLE dbo.Employees3 ( EmployeeID INT NOT NULL, FirstName NVARCHAR(50) NOT NULL, LastName NVARCHAR(50) NOT NULL, JobTitle NVARCHAR(50) NOT NULL, City NVARCHAR(30) NOT NULL, StateProvince NVARCHAR(50) NOT NULL, CountryRegion NVARCHAR(50) NOT NULL, CONSTRAINT PK_Employees3 PRIMARY KEY CLUSTERED (EmployeeID ASC) ); |
The tables are identical except for their names and the names of the primary key constraints. After I added the tables to the AdventureWorks2008 database (on a local instance of SQL Server 2008), I ran the following bcp command to create a text file in a local folder:
|
1 |
bcp "SELECT BusinessEntityID, FirstName, LastName, JobTitle, City, StateProvinceName, CountryRegionName FROM AdventureWorks2008.HumanResources.vEmployee ORDER BY BusinessEntityID" queryout C:\Data\EmployeeData.csv -c -t, -S localhost\SqlSrv2008 -T |
The bcp command retrieves data from the vEmployee view in the AdventureWorks2008 database and saves it to the EmployeeData.csv file in the folder C:\Data. The data is saved as character data and uses a comma-delimited format. I use the text file as the source data in order to demonstrate the three SSIS components.
I next created an SSIS package named BulkLoadPkg.dtsx and added the following two connection managers:
- OLE DB. Connects to the AdventureWorks2008 database on the local instance of SQL Server 2008. I named this connection manager AdventureWorks2008.
- Flat File. Connects to the EmployeeData.csv file in the C:\Data folder. I named this connection manager EmployeeData.
After I added the connection managers, I added three Sequence containers to the control flow, one for each bulk insert operation. Each operation is associated with one of the tables I created above. For example, the first Sequence container will contain the components necessary to bulk load data into the Employees1 table.
To each container I added an Execute SQL task that includes a TRUNCATE TABLE statement. The statement truncates the table associated with that bulk load operation. This allows me to execute the container or package multiple times in order to test different configurations, without having to be concerned about primary key violations. I then added to each of the first two containers a Data Flow task, and to the third container I added a Bulk Insert task. Figure 1 shows the control flow of the BulkLoadPkg.dtsx package. Notice that I connected the precedence constraint from each Execute SQL task to the Data Flow or Bulk Insert task.
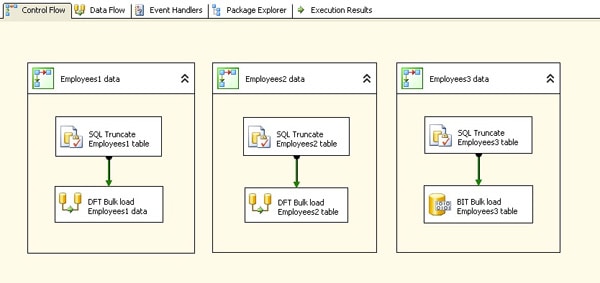
Figure 1: Control flow showing three options for bulk loading data
After I created the basic package, I configured the Data Flow task and Bulk Insert task components, which I describe in the following sections. You can download the completed package from the speech-bubble at the head of this article. In the meantime, you can find details about how to create an SSIS package, configure the control flow, set up the Execute SQL task, or add tasks and containers in SQL Server Books Online. Now let’s look at how to work with the components necessary to bulk load the data.
SQL Server Destination
The first SSIS component that we’ll look at is the SQL Server destination. You should consider using this component within the data flow if you must first transform or convert the data and bulk load that data into a local instance of SQL Server. You cannot use the SQL Server destination to connect to a remote instance of SQL Server.
To demonstrate how the SQL Server destination works, I added a Flat File source and Data Conversion transformation to the data flow. The Flat File source uses the Flat File connection manager EmployeeData to connect the EmployeeData.csv file.
The Data Conversion transformation converts the first column of the source data to four-byte signed integer-an SSIS data type-and renames the outputted column to BusinessEntityID (to match the source column in the vEmployee view). The transformation converts the other columns to the Unicode string data type and again renames the columns to match the column names in the view. In addition, I’ve set the length to 50 in all the string columns except City, which I’ve set to 30. The Data Conversion Transformation Editor should now look similar to what is shown in Figure 2.
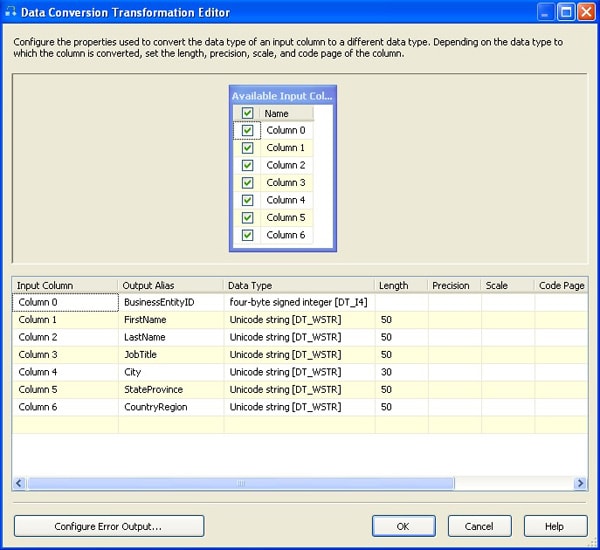
Figure 2: Data Conversion Transformation Editor
After I configured the Data Conversion transformation, I added a SQL Server destination to the data flow. The data flow should now look similar to the data flow in Figure 3.
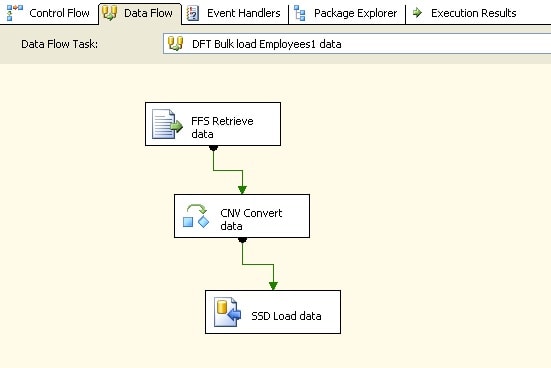
Figure 3: Data flow that uses the SQL Server destination component to load data
Now I can configure the SQL Server destination. To do so, I double-click the component to launch the SQL Destination editor, which opens in the Connection Manager screen. I then select the OLE DB connection manager I created when I first set up the SSIS package (AdventureWorks2008). Then I selected Employees1 as the destination table. Figure 4 shows the Connection Manager screen after it’s been configured.
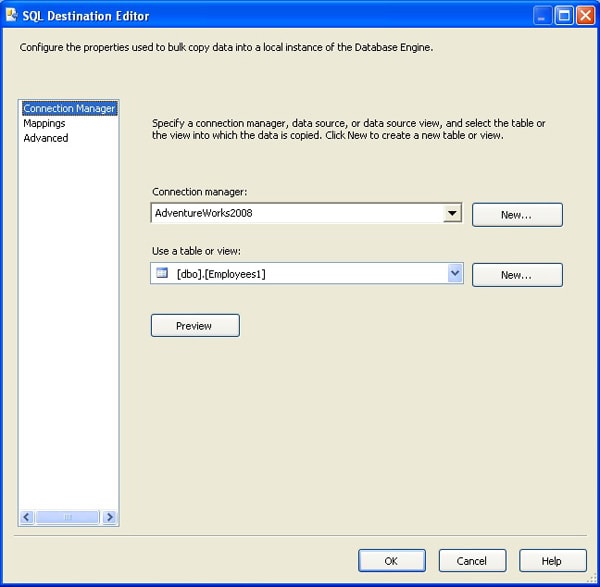
Figure 4: Connection Manager screen of the SQL Server Destination editor
Next, I want to ensure that my source columns properly sync up with my destination columns. I do this on the Mappings screen of the SQL Destination editor and map the columns I outputted in the Data Conversion transformation with the columns in the Employee1 target table, as shown in Figure 5.
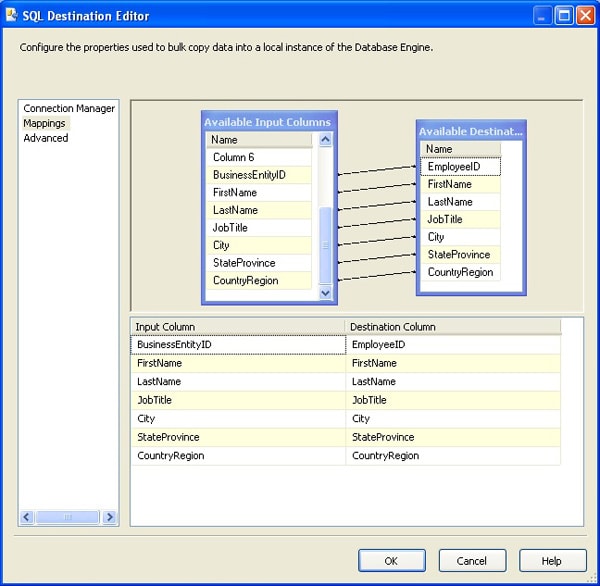
Figure 5: Mappings screen of the SQL Server Destination editor
Notice that I mapped the BusinessEntityID source column to the EmployeeID destination column. All other column names should match between the source and destination.
After you ensure that the mapping is correct, you can configure the bulk load options, which you do on the Advanced screen of the SQL Destination editor, shown in Figure 6. On this screen, you can specify such options as whether to maintain the source identity values, apply a table-level lock during a bulk load operation, or retain null values.
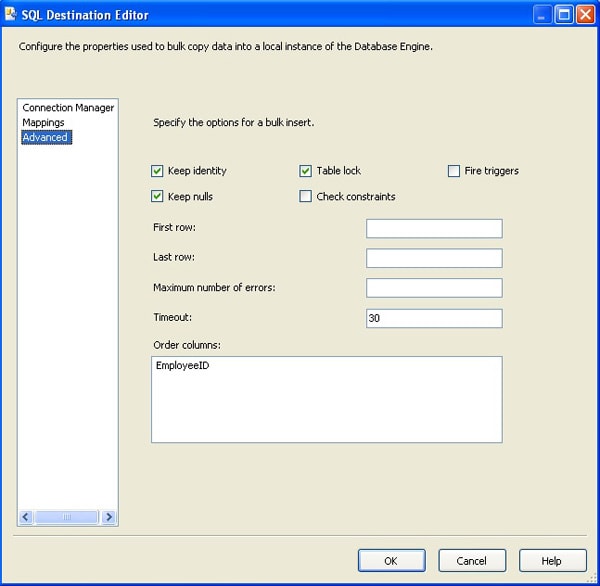
Figure 6: Advanced screen of the SQL Server Destination editor
As you can see, for this bulk load operation, I am choosing to retain identity and null values and to apply a table-level lock on the destination table during the bulk load operation. In addition, I’m not checking constraints or firing triggers during the operation. I’m also specifying that the data is ordered according to the EmployeeID column. Because I sorted the data (based on the ID) when I exported the data to the CSV file, I can now use the Order columns option to specify that sort order. This works just like the ORDER option of the BULK INSERT statement.
You might have noticed that the Advanced screen does not include any options related to batch sizes. SSIS handles batch sizes differently from other batch-loading options. By default, SSIS creates one batch per pipeline buffer and commits that batch when it flushes the buffer. You can override this behavior by modifying the Maximum Insert Commit Size property in the SQL Server Destination advanced editor. You access the editor by right-clicking the component and then clicking Show Advanced Editor. On the Component Properties tab, modify the property with the desired setting:
- A setting of 0 means the entire batch is committed in one large batch. This is the same as the BULK INSERT option of BATCHSIZE = 0.
- A setting less than the buffer size but greater than 0 means that the rows are committed whenever the number is reached and also at the end of each buffer.
- A setting greater than the buffer size is ignored. (The only way to work with batch sizes larger than the current buffer size is to modify the buffer size itself, which is done in the data flow properties.)
For a complete description of how to configure the SQL Server destination, see the topic “SQL Server Destination” in SQL Server Books Online.
OLE DB Destination
The OLE DB destination is similar to the SQL Server destination except that you’re destination is not limited to a local instance of SQL Server (and you can connect to OLE DB target data sources other than SQL Server). One advantage of using this task is that you can run SSIS on a computer other than where the target table is located, which lets you more easily scale out your SSIS solution.
To demonstrate how the OLE DB destination works, I set up a data flow similar to the one I set up for the SQL Server destination. As you can see in Figure 7, I’ve added a Flat File source and Data Conversion transformation, configured just as you saw above.
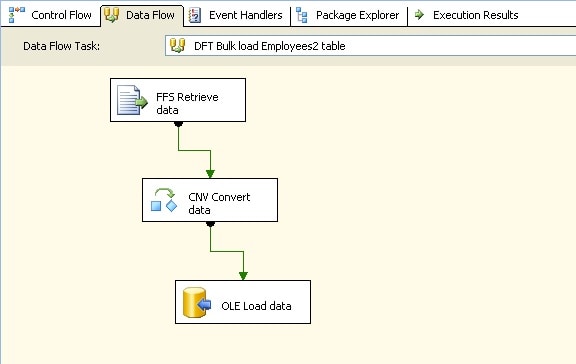
Figure 7: Data flow that uses the OLE DB Destination component to load data
After I added and configured the Data Conversion transformation, I added an OLE DB destination, opened the OLE DB Destination editor, and configured the settings on the Connection Manager screen, as shown in Figure 8.
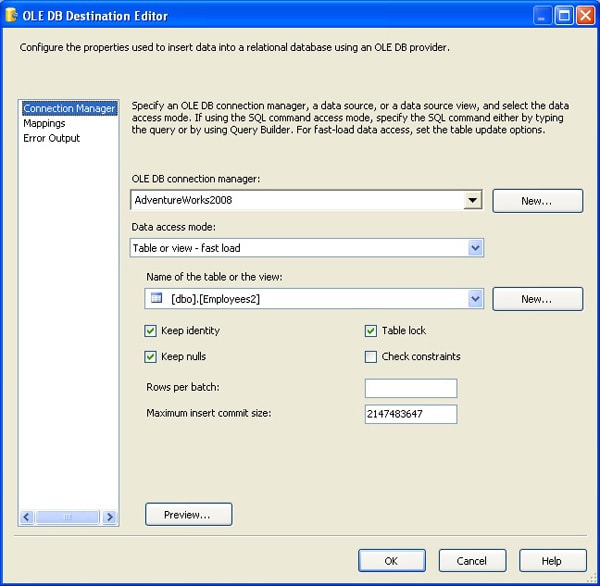
Figure 8: Connection Manager screen of the OLE DB Destination editor
As you can see, I specified the AdventureWorks2008 connection manager and Employee2 as the target table. Notice also that in the Data access mode drop-down list, I selected the option Table or view – fast load. The OLE DB destination supports two fast-load options-the one I’ve selected and one that lets you specify the name of the table or view within a variable: Table name or view name variable – fast load. You must specify a fast-load option for data to be bulk inserted into the destination.
When you select one of the fast-load options, you’re provided with options related to bulk loading the data, such as whether to maintain the identity or null values or whether to implement a table-level lock. Notice in Figure 8 that you can also specify the number of rows per batch, without having to access the advanced settings. As with the SQL Server destination, the rows per batch are tied to the SSIS buffer.
NOTE: The OLE DB Destination editor does not include an Advanced screen like the SQL Destination editor, but it does include an Error Output screen that lets you specify error handling options, something not available in the SQL Destination editor.
I next used the Mappings screen to ensure that my source columns properly sync up with my destination columns, as I did with the SQL Server destination. Figure 9 shows the mappings as they appear in the OLE DB Destination editor.
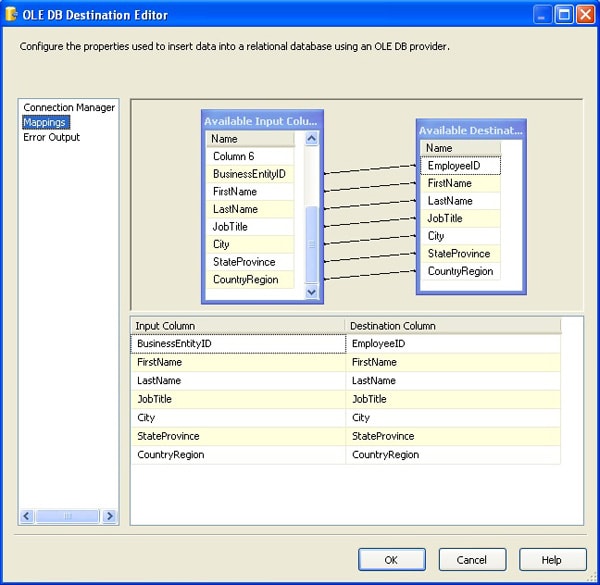
Figure 9: Mappings screen of the OLE DB Destination editor
Not all properties related to bulk loading are available through the OLE DB Destination editor. For instance, if you what to specify a sort order, as I did for the SQL Server destination, you must use the advanced editor. To access the editor, right-click the component and click Show Advanced Editor, and then select the Component Properties tab, shown in Figure 10.
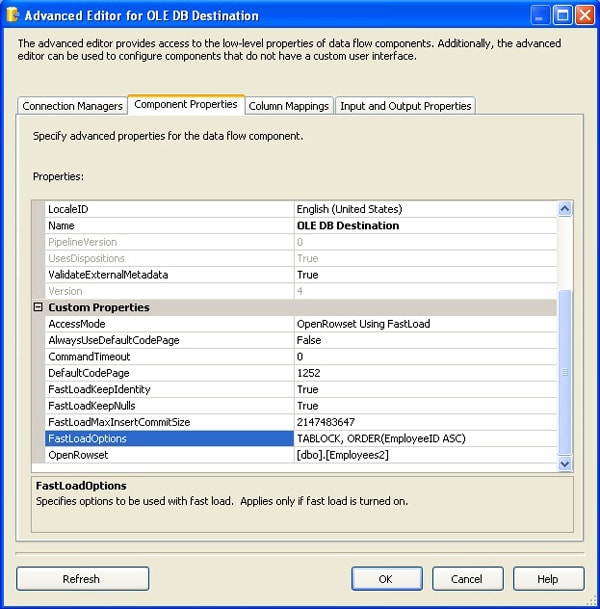
Figure 10: Advanced Editor for the OLE DB Destination editor
Notice that the FastLoadOptions property setting is TABLOCK, ORDER(EmployeeID ASC). The TABLOCK argument was added when I selected the Table lock option on the Connection Manager screen of the OLE DB Destination editor. However, I added the ORDER argument, along with the name of the column and the sort order (ASC). Also note that I used a comma to separate the TABLOCK argument from the ORDER argument. You can add other arguments as well. For a complete description of how to configure the OLE DB destination, see the topic “OLE DB Destination” in SQL Server Books Online.
Bulk Insert Task
Of those SSIS components related to bulk loading, the simplest to implement is the Bulk Insert task. What makes it so easy is the fact that you do not have to define a data flow. You define both the source and destination within the task itself. However, you can use the Bulk Insert task only for data that can be directly imported from the source text file. In other words, the data must not require any conversions or transformations and cannot originate from a source other than a text file.
As you’ll recall from Figure 1, I added the Bulk Insert task to the third Sequence container, right after the Execute SQL task. To configure the task, double-click it to launch the Bulk Insert Task editor, which opens on the General screen, as shown in Figure 11.
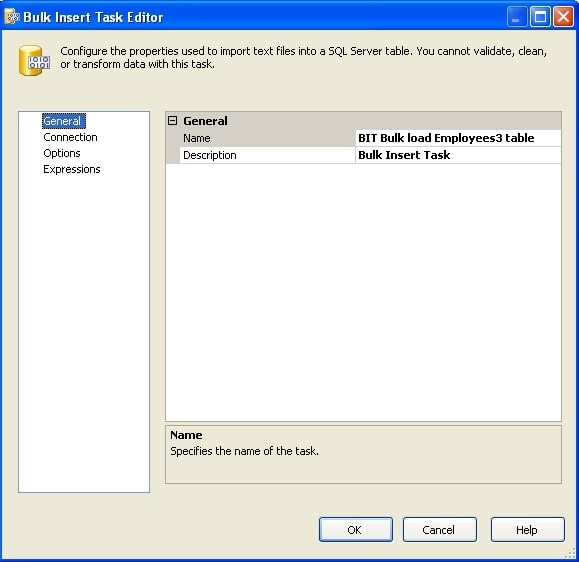
Figure 11: General screen of the Bulk Insert Task editor
On the General screen, you simply provide a name and description for the task. It’s on the Connection screen, shown in Figure 12, that you specify how to connect to both the source and destination.
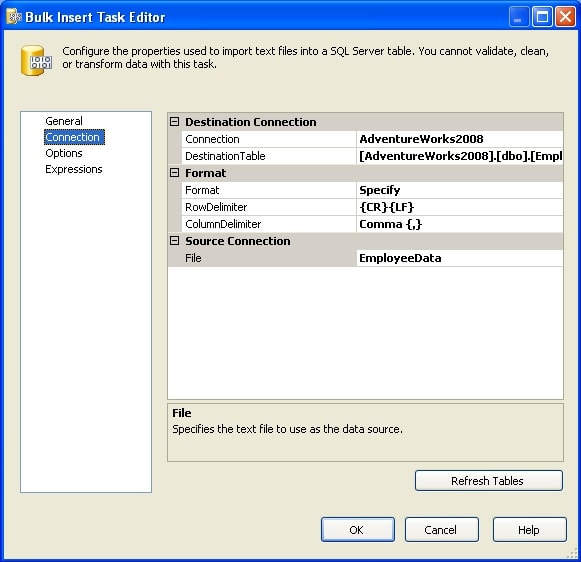
Figure 12: Connection screen of the Bulk Insert Task editor
As the figure indicates, I specified AdventureWorks2008 as the OLE DB connection manager. I also specified the Employees3 table as the target table.
In the Format section of the Connection screen, I select the Specify option, which indicates that I will specify the format myself, rather than use a format file. If I wanted to use a format file, I would have selected the Use File option and then specified the format file to use. When you select the Specify option, you must also specify the row delimiter and column delimiter. In this case, I selected {CR}{LF} and comma {,}, respectively. These settings match how the source CSV file was created.
Finally, in the Source Connection section of the Connection screen, I specify the name of the Flat File connection manager I created when I set up the package (EmployeeData). Note, however, that the Bulk Insert task editor uses the connection manager only to locate the source file. The task ignores other options you might have configured in the connection manager, which is why you must specify the row and column delimiters within the task.
After I configured the Connection screen of the Bulk Insert Task editor, I selected the Options screen, as shown in Figure 13. The screen lets you configure the options related to your bulk load operation.
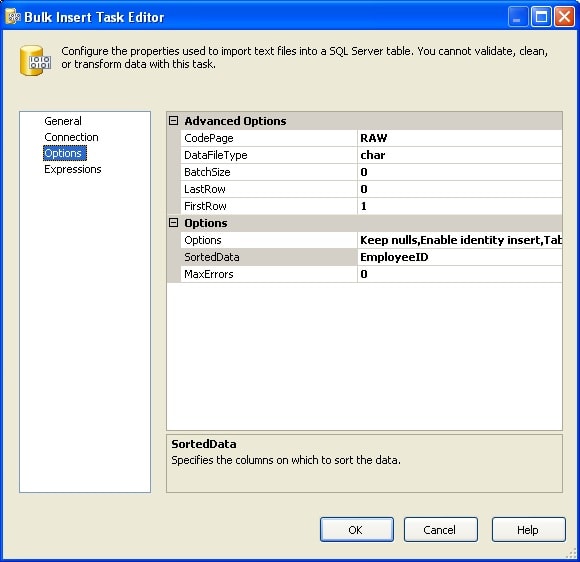
Figure 13: Options screen of the Bulk Insert Task editor
Notice that for the DataFileType property I selected char (character) because that’s how the source file was created. I also specified the EmployeeID column in the SortedData property because the source data was sorted by ID. Most of the other properties, I left with their default values. However, for the Options property, I selected specific bulk load options. To do so, I clicked the down arrow associated with the property to open a box of options, shown in Figure 14.
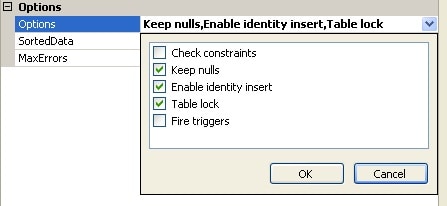
Figure 14: Selecting load options in the Bulk Insert Task editor
As you can see, you can choose whether to fire triggers, check constraints, maintain null or identity values, or apply a table-level lock during the bulk load operation. The options you select are then listed in the Options box, with the options themselves separated by commas.
Once you’ve configure your options, you’re ready to bulk load your data. For a complete description of how to configure the Bulk Insert task, see the topic “Bulk Insert Task” in SQL Server Books Online.
Bulk Inserting Data into a SQL Server Database
Clearly, the three SSIS components available for bulk loading data into a SQL Server database offer a great deal of flexibility in terms of loading the data and scaling out your solution. If you’re copying data out of a text file and that data does not need to be converted or transformed in any way, the Bulk Insert task is the simplest solution. However, you should use the SQL Server destination or OLE DB destination if you must perform any conversions or transformation or if you’re retrieving data from a source other than a text file. As for which of the two to choose, if you’re loading the data into a local instance of SQL Server and scaling out is not a consideration, you can probably stick with the SQL Server destination. On the other hand, if you want the ability to scale out your solution or you must load data into a remote instance of SQL Server, use the OLE DB destination. Keep in mind, however, that if your requirements are such that more than one scenario will work, you should consider testing them all and determining from there what solution is the most effective. You might find that simpler is not always better-or visa versa.
This document contains proprietary information and is protected by copyright law.
Copyright © 2026 Red Gate Software Limited. All rights reserved


Load comments