
Unity games that need persistent data shared across players (high scores, leaderboards, matchmaking, shared progression) typically use a server-side database rather than local storage (PlayerPrefs, save files) – which only persist per-device. This article demonstrates a complete Unity + MySQL high-score system using a three-tier architecture.
Update (May 2026): This article’s architecture (MySQL + PHP + UnityWebRequest) is a valid pattern and still works, but Unity developers have additional modern options:
(a) direct MySQL connections from Unity via the MySqlConnector NuGet package – simpler code but requires exposing MySQL to internet-facing Unity clients, usually undesirable;
(b) managed game backends like PlayFab, Firebase Realtime Database, or AWS GameLift – handle authentication, persistence, and matchmaking without building your own server tier;
(c) custom REST APIs via ASP.NET, Node.js, or Python Flask instead of PHP – same three-tier pattern with a different middle-tier language.
The PHP approach in this article remains suitable for small projects, game jams, and learning exercises. Production games typically use managed backends.
A brief introduction
SQL is the language of data management, and Unity is a game engine. The two seem to have very different goals, with one focusing on managing a database while the other is built primarily for the creation of video games. Can the two work together? As is so often the case in the world of programming, the answer is a resounding “yes.”
As far as the games industry is concerned, databases are most useful in applications that require items like leader boards, stat tracking, and more. While a single-player focused adventure game may not need database integration, a massive racing game with thousands of players might.
With this in mind, a demonstration is in order. An app will be created that can receive the high scores stored within a MySQL database as well as put new data into it. Within the app itself, the top five players and their scores will be displayed. A variety of tools will be used to accomplish this.
This demonstration uses WampServer and phpMyAdmin to create the database, PHP for server scripts, and of course, Unity and C# for app creation. If you’re more comfortable with other database management and creation tools, then those should work just as well for this project.
Database creation
Start by creating your database. Open your database management program of choice and create a new database, giving it the name highscores.

Figure 1: Creating a new database in WAMP using phpMyAdmin
Next, create a table containing the data needed. Since the goal is just to display the player’s name and their score, you can leave the table at that. Go into the SQL tab and enter the following SQL command to create this table:
|
1 2 3 4 5 |
CREATE TABLE scores ( name VARCHAR(15) NOT NULL DEFAULT 'anonymous', score INT(10) UNSIGNED NOT NULL DEFAULT 0 ) ENGINE=MyISAM |
It’s recommended that you enter in some data for testing the application. While you could simply enter five new scores within the Unity app itself, it’ll be easier to test high score retrieval if there’s already some data within the database. You can use the below SQL command to quickly add some test data.
|
1 2 |
INSERT INTO scores (name, score) VALUES ('John', 100), ('Sally', 110), ('Phil', 90), ('Katy', 130), ('Jack', 150) |
Now that the database is set up, you’ll need some PHP scripts to both retrieve and insert data into the database. These scripts will act something like the communicator between Unity and the MySQL database.
Server scripts – display.php
First, inside your server (this example’s file path is the WampServer folder, then www folder), create a folder named HighScoreGame for storing your PHP scripts. Then create a new PHP script called display and place it within this folder. Open the file in a code editor such as Notepad++ and enter the following code. Note that you may have to change the values of hostname, username, and password depending on your configuration.
|
1 2 3 4 5 6 7 8 9 10 11 12 13 14 15 16 17 18 19 20 21 22 23 24 25 26 27 28 29 |
$hostname = 'localhost'; $username = 'root'; $password = ''; $database = 'highscores'; try { $dbh = new PDO('mysql:host='. $hostname .';dbname='. $database, $username, $password); } catch(PDOException $e) { echo '<h1>An error has occurred.</h1><pre>', $e->getMessage() ,'</pre>'; } $sth = $dbh->query('SELECT * FROM scores ORDER BY score DESC LIMIT 5'); $sth->setFetchMode(PDO::FETCH_ASSOC); $result = $sth->fetchAll(); if (count($result) > 0) { foreach($result as $r) { echo $r['name'], "\n _"; echo $r['score'], "\n _"; } } |
This script is pretty straightforward. It’s just establishing a connection to the database before going through the scores table and retrieving the top five scores and their respective players. You’ll notice the echo statements at the end add in a newline and underscore. These might seem like strange additions to the results, but they will actually be used to help organize and display the results in a nice looking manner in the Unity app.
Server scripts – addscore.php
The next PHP script will be called addscore. As the name implies, this script will be responsible for adding data to the highscores database. All data that addscore tries to insert into the database will originate from within the Unity app. Like before, you may need to edit some of the variables to accommodate your specific setup. The important thing to note is the value of secretKey, which can be anything you like so long as the Unity app uses this value as well. This is because it will be used later on to create a secure hash which verifies that the scores being sent are indeed coming from the Unity app. If the Unity app uses a different value, then the script will not insert the input.
|
1 2 3 4 5 6 7 8 9 10 11 12 13 14 15 16 17 18 19 20 21 22 23 24 25 26 27 28 29 30 31 32 33 34 35 36 37 38 |
$hostname = 'localhost'; $username = 'root'; $password = ''; $database = 'highscores'; $secretKey = "mySecretKey"; try { $dbh = new PDO('mysql:host='. $hostname .';dbname='. $database, $username, $password); } catch(PDOException $e) { echo '<h1>An error has ocurred.</h1><pre>', $e->getMessage() ,'</pre>'; } $hash = $_GET['hash']; $realHash = hash('sha256', $_GET['name'] . $_GET['score'] . $secretKey); if($realHash == $hash) { $sth = $dbh->prepare('INSERT INTO scores VALUES (null, :name , :score)'); try { $sth->bindParam(':name', $_GET['name'], PDO::PARAM_STR); $sth->bindParam(':score', $_GET['score'], PDO::PARAM_INT); $sth->execute(); } catch(Exception $e) { echo '<h1>An error has ocurred.</h1><pre>', $e->getMessage() ,'</pre>'; } } |
To keep things tidy, make sure this script is within the same folder as display. Once you have this code prepared, it’ll be time to open up Unity and begin creating the app that your users would use.
Enjoying this article? Subscribe to the Simple Talk newsletter
Unity App – User Interface
Now comes the part where the Unity app is made. This section is focused on making the user interface, which means using the editor to place buttons, input fields, and text. Start by creating a new project from the Unity Hub.
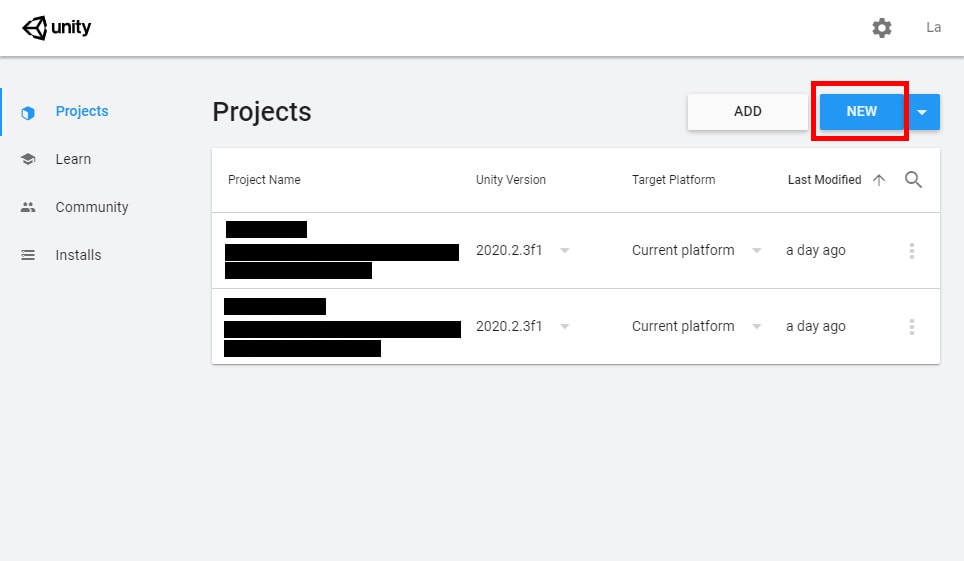
Figure 2: Creating a new project in Unity
Any of the templates will work fine for this project, but the example here will use the basic 3D template. Give the project a name and set the location, then click the Create button.
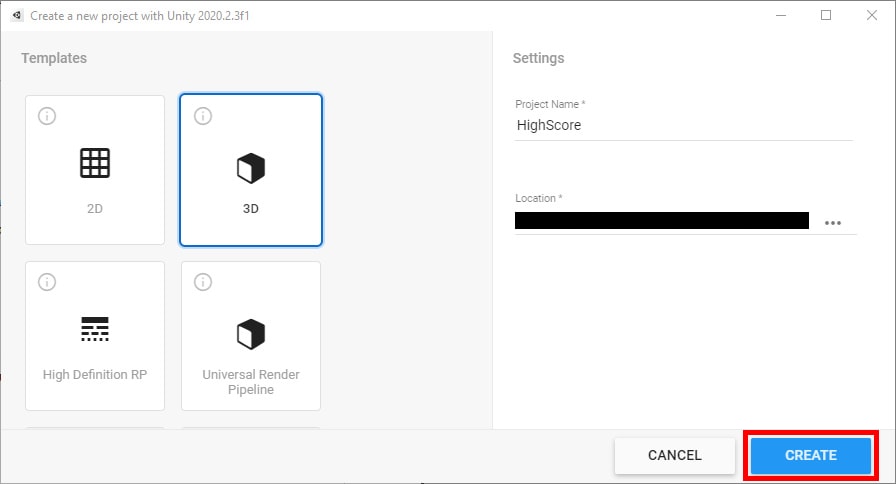
Figure 3: Project name, template, and location
This app’s user interface is a little involved, consisting of nine elements total. There are two buttons, one for retrieving the top five scores from a database and the other for sending a new score. Speaking of sending, there are two input fields asking for a name and score. There will also be a few text labels, with two of them containing the names and scores of the top five players. Start by creating the elements, and then they’ll be positioned in a way that looks appealing.
To create user interface (UI) elements, click the Create button in the Hierarchy window, indicated by the plus icon with a downward arrow next to it. From there, select UI, and then the UI element of choice. You will need five Text objects, two Input Field objects, and two Button objects.
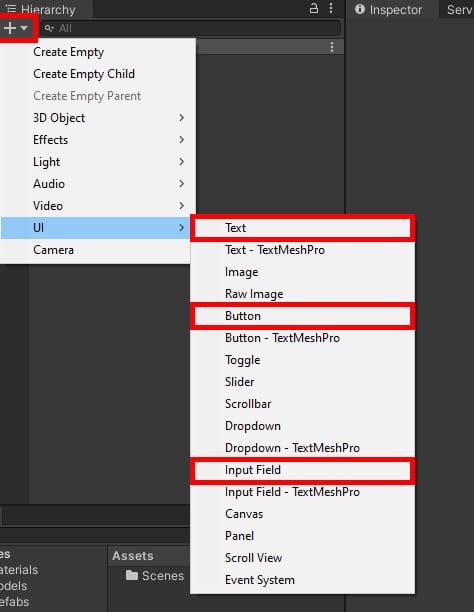
Figure 4: Creating UI objects
Next, you’ll position and resize the objects. Doing this requires editing properties in the Rect Transform component, located in the Inspector window while an object is selected. Changing the values is as simple as selecting the designated field and changing the value within it. Alternatively, you can use the Scene window to click and drag objects where you want them.
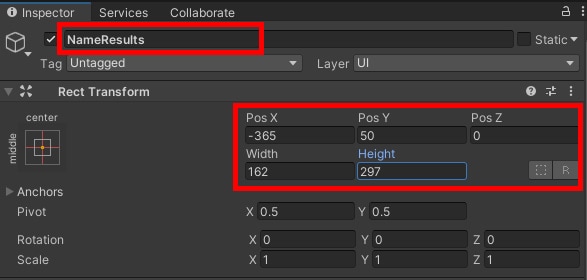
Figure 5: Setting the location, size, and name of an object
Below is a table listing all the objects and the position and size values of each object you’ve just created. They have also been assigned names to help you know which object is which. If you wish to match the names, then renaming the object is done by right clicking the object and choosing Rename. Additionally, what type of object each item is will be noted in this table.
|
Name |
Object Type |
Pos X |
Pos Y |
Width |
Height |
|
NameResults |
Text |
-365 |
50 |
162 |
297 |
|
ScoreResults |
Text |
-202 |
50 |
162 |
297 |
|
NameField |
Input Field |
245 |
58 |
160 |
30 |
|
ScoreField |
Input Field |
245 |
-36 |
160 |
30 |
|
NameFieldLabel |
Text |
108 |
58 |
103 |
30 |
|
ScoreFieldLabel |
Text |
108 |
-35 |
103 |
30 |
|
InputDirections |
Text |
246 |
148 |
274 |
51 |
|
SendScoreButton |
Button |
240 |
-130 |
170 |
65 |
|
RefreshHighScoreButton |
Button |
-287 |
-130 |
170 |
65 |
Table 1: All UI elements and their positions and sizes
Now all the objects need some proper placeholder text. This can be adjusted by selecting an object in the Hierarchy window, then navigating to the Text component in the Inspector window. For NameResults and ScoreResults, those can be left with empty text for now. You’ll need to edit their placeholder text for the input fields, which is found by clicking the arrow next to their name in the Hierarchy. This brings up all child objects found under the parent.
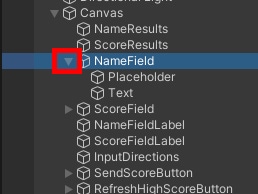
Figure 6: Revealing child objects
Find Placeholder, then edit the text to say “Enter Player’s Name.” Do the same with ScoreField, but the text should say “Enter Player’s Score” instead.
Next, find the text objects being used to label the input fields, and change their text to reflect which field is being edited. For InputDirections, you’ll ask the player to “Enter a New Score!” To make it stand out a little more, adjust the font size property to thirty for InputDirections.
Finally, the text for the buttons should be changed to better indicate what the buttons do. Starting with the SendScoreButton object, click the arrow next to it to show the child Text object. Enter the text “SEND SCORE” and fill in the button by adjusting the text size to twenty-five.
As for the RefreshHighScoreButton, that button’s text can say “REFRESH HIGH SCORES” and be given a size of twenty. Once you’re finished, the user interface should look similar to the one seen in figure 7.

Figure 7: The finished UI
While not required, if you wish to change the alignment and size of any other text, all you need to do is find the Text component in each object and adjust the size, alignment, and other properties to your liking.
After that, all that’s left before returning to coding is making the scripts themselves. You will need just a single C# scripts, called HighScoreControl. Creating scripts is done by right-clicking in the Assets window and navigating to Create->C# Script. This script will be called HighScoreControl.

Figure 8: Creating a new C# script
Once you have created your script, open it by double clicking the script in the Assets window.
Unity App – HighScoreControl script
The HighScoreControl script is responsible for both sending and retrieving data to and from the MySQL database. Of these two actions, getting the scores is likely the easiest, as it involves creating a UniyWebRequest to send an HTTP request. That’s the point in which the display PHP script from earlier comes in. The server script will be executed and send data back into Unity to later display in the UI created earlier. Posting a new score follows a similar pattern, but requires you use the POST method to send data to addscore.php.
Before doing this, the user’s input is also hashed using the SHA256 algorithm as a basic security measure. In real-world applications, you would likely need to do more than just hash your values to secure them. But, for the purpose of this example, this process will be kept simple. Once the values are sent through the HTTP request, addscore will handle the process of adding the score to the database.
For this script to function correctly, you’ll need the following using statements added at the top of your script:
|
1 2 3 4 5 6 7 |
using System; using System.Collections; using System.Security.Cryptography; using System.Text.RegularExpressions; using UnityEngine; using UnityEngine.Networking; using UnityEngine.UI; |
Within the HighScoreControl class itself, add these variables:
|
1 2 3 4 5 6 7 8 9 |
private string secretKey = "mySecretKey"; public string addScoreURL = "http://localhost/HighScoreGame/addscore.php?"; public string highscoreURL = "http://localhost/HighScoreGame/display.php"; public Text nameTextInput; public Text scoreTextInput; public Text nameResultText; public Text scoreResultText; |
You may recognize the secretyKey value from the addscore.php script. Make sure that this value matches the version seen in addscore exactly. Additionally, the two URL strings will be used to point Unity to where the server scripts are so data can be sent and retrieved from the database using those PHP scripts.
Finally, four Text objects are set up in code. These will be used to change the text seen in the UI. Later on, Unity will be told which objects in the editor are to be changed using these variables.
Next come two methods, one for getting scores, the other for sending. These will be the methods tied to your buttons in the UI. Both methods start coroutines that will soon be defined, while quickly resetting some text to their defaults.
|
1 2 3 4 5 6 7 8 9 10 11 12 13 |
public void GetScoreBtn() { nameResultText.text = "Player: \n \n"; scoreResultText.text = "Score: \n \n"; StartCoroutine(GetScores()); } public void SendScoreBtn() { StartCoroutine(PostScores(nameTextInput.text, Convert.ToInt32(scoreTextInput.text))); nameTextInput.gameObject.transform.parent.GetComponent<InputField>().text = ""; scoreTextInput.gameObject.transform.parent.GetComponent<InputField>().text = ""; } |
Speaking of coroutines, now would be a good time to go ahead and create the first one. The GetScores coroutine, as the name implies, will be responsible for communicating with the MySQL database in order to retrieve the top five scores along with player names currently stored in the database.
As mentioned before, an HTTP request will be sent to communicate with the display.php script, which will then query the database. This PHP script will organize the data before Unity wetakes that data and separates the returned information to neatly fit it into the texts of nameResultText and scoreResultText. Those curious underscores found in the echo statements at the end of display will be used to more easily separate this data.
|
1 2 3 4 5 6 7 8 9 10 11 12 13 14 15 16 17 18 19 20 21 22 23 24 25 26 |
IEnumerator GetScores() { UnityWebRequest hs_get = UnityWebRequest.Get(highscoreURL); yield return hs_get.SendWebRequest(); if (hs_get.error != null) Debug.Log("There was an error getting the high score: " + hs_get.error); else { string dataText = hs_get.downloadHandler.text; MatchCollection mc = Regex.Matches(dataText, @"_"); if (mc.Count > 0) { string[] splitData = Regex.Split(dataText, @"_"); for (int i =0; i < mc.Count; i++) { if (i % 2 == 0) nameResultText.text += splitData[i]; else scoreResultText.text += splitData[i]; } } } } |
Next comes PostScores, which will handle the process of putting new data into the database. It takes two parameters which correspond to the inputs in the UI input fields. It will first hash the input along with the secret key, then construct a POST URL to send the player’s name and score with alongside the newly created hash.
Like with GetScore, another HTTP request is sent, this time calling upon addscore.php to enter the new data into the database. The PHP script handles the rest from there, comparing the hash it received with the one it creates using similar data before inserting the data.
|
1 2 3 4 5 6 7 8 9 10 11 12 |
IEnumerator PostScores(string name, int score) { string hash = HashInput(name + score + secretKey); string post_url = addScoreURL + "name=" + UnityWebRequest.EscapeURL(name) + "&score=" + score + "&hash=" + hash; UnityWebRequest hs_post = UnityWebRequest.Post(post_url, hash); yield return hs_post.SendWebRequest(); if (hs_post.error != null) Debug.Log("There was an error posting the high score: " + hs_post.error); } |
PostScores is still looking for the HashInput method at this point, so you’ll need to finish the script by adding this method. All it’s doing is taking a single input string, which is constructed using the player’s name, score, and your secret key, and constructing a hash based on that string using the SHA256 algorithm. It will then return this hash to PostScores to be sent in the HTTP request.
|
1 2 3 4 5 6 7 8 9 |
public string HashInput(string input) { SHA256Managed hm = new SHA256Managed(); byte[] hashValue = hm.ComputeHash(System.Text.Encoding.ASCII.GetBytes(input)); string hash_convert = BitConverter.ToString(hashValue).Replace("-", "").ToLower(); return hash_convert; } |
The HighScoreControl script is now complete. Be sure to save your work, then return to the Unity editor for a few final tasks.
Unity app – Finishing UI
Start by attaching the HighScoreControl script to the Main Camera object, as seen in figure 9.
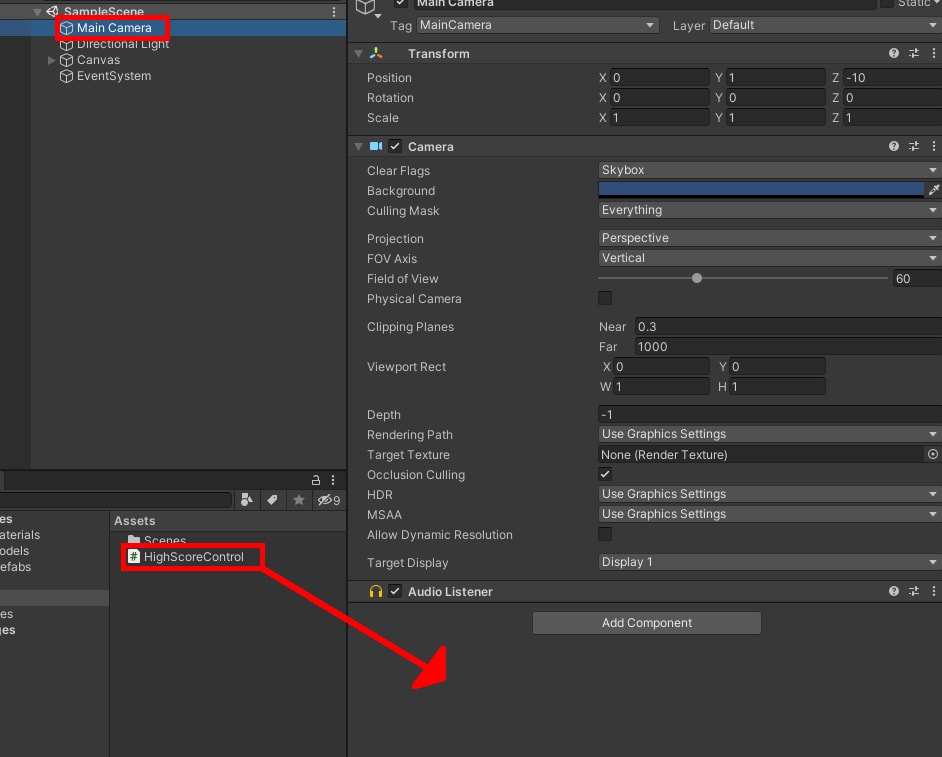
Figure 9: Assigning HighScoreControl to Main Camera
Make sure Canvas is expanded to show all the UI elements underneath it, then drag the Text objects of both NameField and ScoreField into Name Text Input and Score Text Input, respectively. Then bring NameResults to Name Result Text, and ScoreResults to Score Result Text.
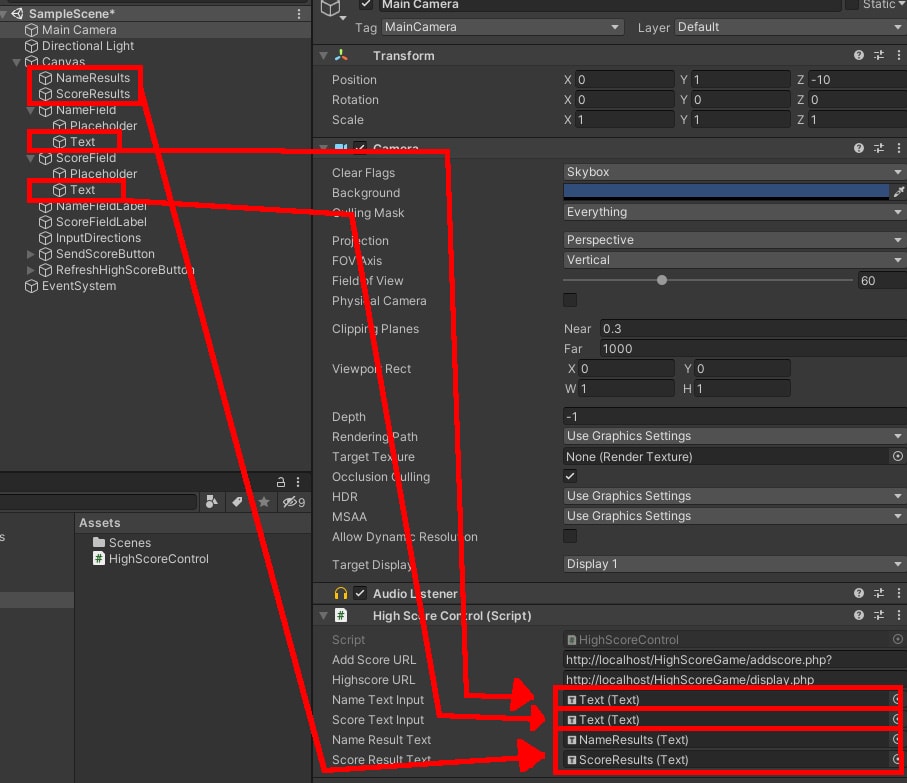
Figure 10: Setting all HighScoreControl fields
Next, choose the SendScoreButton and assign it the SendScoreBtn method. To do this, navigate to the Button component in the Inspector window and find the OnClick event list. There, click the plus icon to add a new event.
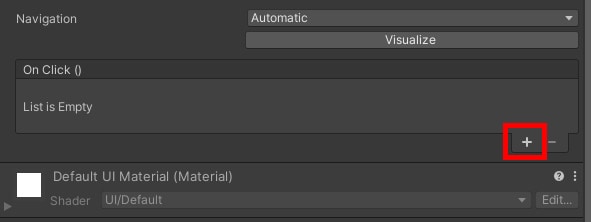
Figure 11: Creating a new OnClick event
Drag the Main Camera object into the object field. Why the Main Camera object in particular? Because it’s the object with the HighScoreControl script attached to it.
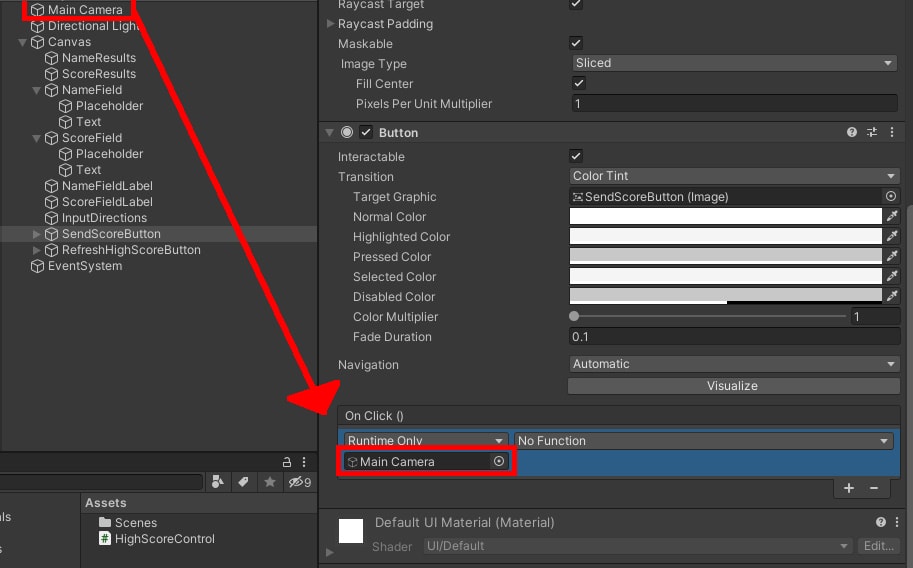
Figure 12: Assigning an object to get the function from
Click on the No Function drop down menu, and then navigate to HighScoreControl->SendScoreBtn to set the method for this button.
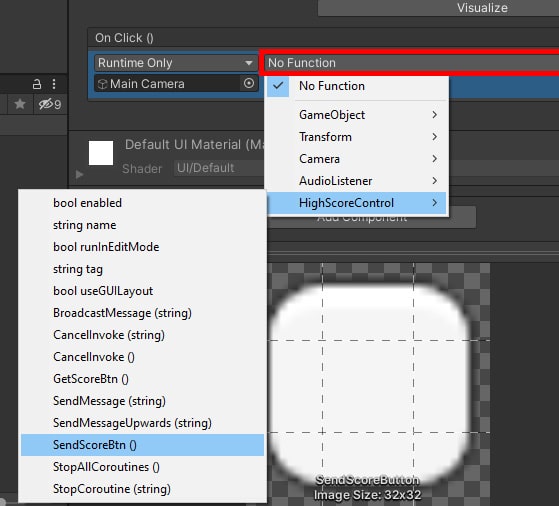
Figure 13: Assigning the button function
Do the same for the RefreshHighScoreButton object, using the GetScoreBtn method instead. Once you’ve done that, try out the project using the play button at the top of the editor. Start by seeing if you can retrieve the current set of high scores. Then, try entering a score of your own, then refresh the top five to see the change.
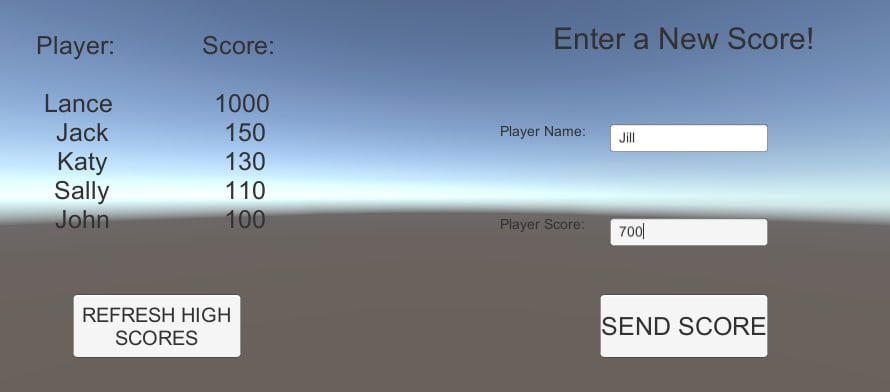
Figure 14: The completed app
Using MySQL with Unity
A database can be easily made to store all kinds of data, whether it be interesting stats from various players or rankings. Now that you’ve been shown how to set up a basic database with a Unity app, you can expand this knowledge by experimenting with different database value types, multiple tables, and more. On the Unity side, you can try using data from a database to change a game in different ways. For instance, what if a player of higher rank meets one of a lower rank? What would you change within the game itself to reflect this scenario? While Unity is designed as a game engine, there’s also applications outside of video games that you can use it for that utilize these same database integration concepts. There’s much that can be done with this tech, some knowledge, and a little creativity.
If you liked this article, you might also like Saving Game Data with Unity.
Simple Talk is brought to you by Redgate Software
This document contains proprietary information and is protected by copyright law.
Copyright © 2026 Red Gate Software Limited. All rights reserved
Load comments