
Unity games typically need to persist data between sessions – player progress, settings, high scores, inventory, unlocked content. Unity provides two main built-in approaches:
(1) PlayerPrefs – a simple key-value store accessible via PlayerPrefs.SetInt/GetInt, SetFloat/GetFloat, SetString/GetString, persisted automatically to platform-appropriate storage (Registry on Windows, NSUserDefaults on iOS/macOS, SharedPreferences on Android). Easy to use but limited to primitive types – you can’t store arrays, complex objects, or custom classes directly;
(2) C# serialization – writing complex objects to a file as binary or text.
This article covers BinaryFormatter-based serialization for full object graphs.
Update (May 2026): Since this guide was written, BinaryFormatter has been deprecated by Microsoft due to security concerns (arbitrary code execution via deserialization of untrusted input). For new Unity projects, use JsonUtility (Unity’s built-in, lightweight), System.Text.Json (for more advanced JSON scenarios), or a dedicated serialization library (Newtonsoft.Json, MessagePack, Protocol Buffers) instead. The techniques shown here remain conceptually valid – save to file, read from file, handle errors – just substitute the serialization mechanism. This article walks through both approaches with complete scripts demonstrating save and load operations.
Introduction: the need for save data in games
Back in the day, many games had little need for saving data since you could finish a game in about an hour. At best, a game would save a high score and leave it at that. But it didn’t take long for technology to improve, and thus games got longer and more complex. The need for saving all kinds of data, ranging from how much progress the player made in-game or their character’s statistics, became universal – whether the game be a simple, linear adventure from beginning to end, or if it consists of a huge open world.
Many games require multiple play sessions to see to the end, and it’s now expected that developers include ways to save the game and come back later. Only when a game is short enough that it can be completed in a single session does the need for saving data diminish, but even in those scenarios, the feature can be very handy.
Unity’s methods of saving game data
Unity provides two ways to save a game’s data. They can be quickly described as “the easy way” and “the not so easy way.” The easy way involves Unity’s built-in PlayerPrefs system. Give a value to a key, call Save, and you’re done. On the other hand, the not so easy way involves serializing data and writing to a file for later use. Both methods have their pros and cons, which will be covered as the practices are explored.
There’s minimal setup involved in testing these out. You just need a project and a couple of scripts. For this project, you will want to use the 2D template for the easiest setup as shown in Figure 1.
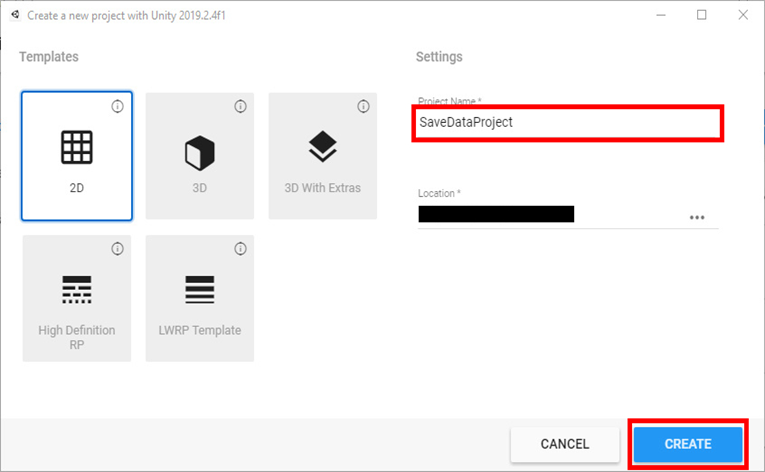 Figure 1: Project creation
Once you create the project, you’ll need two scripts. You create scripts by right-clicking in the Assets window and selecting Create->C# Script as shown in Figure 2. Call these scripts SavePrefs and SaveSerial.
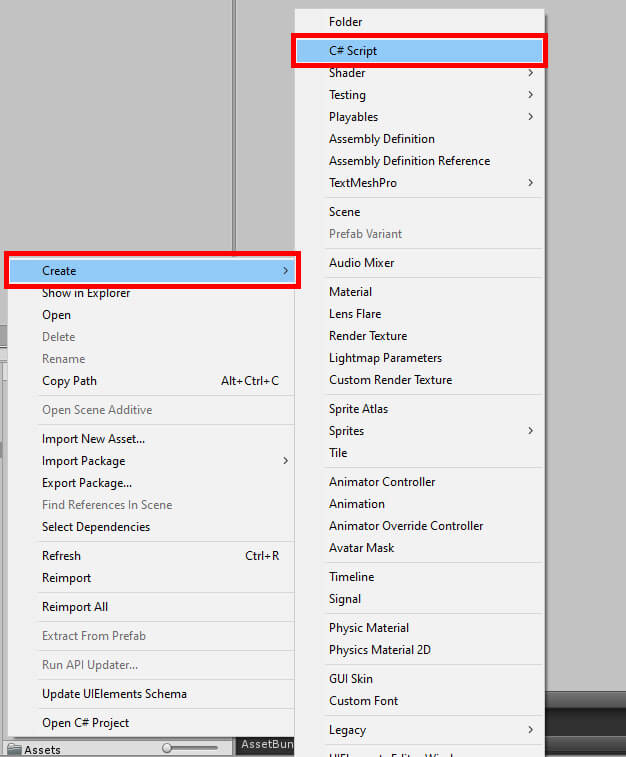
Figure 2: Script creation
To see what saving a game entails, start with the SavePrefs script. Double-click the script to open Visual Studio.
PlayerPrefs: the ‘easy’ way
To begin, the Start and Update methods can be commented out or deleted as they will not be used to demonstrate the save functionality. Next, some variables to hold the values to save will be needed.
|
1 2 3 |
int intToSave; float floatToSave; string stringToSave = ""; |
Next, the OnGui method will create a Graphical User Interface (GUI) from code to manipulate these values. Two buttons created in the method will increase intToSave and floatToSave, and a text field will be made for stringToSave. The code will also create a few labels made to show the current values of these variables.
Finally, three more buttons will be made that save, load, and reset data.
|
1 2 3 4 5 6 7 8 9 10 11 12 13 14 15 16 17 18 19 20 21 22 23 |
void OnGUI() { if (GUI.Button(new Rect(0, 0, 125, 50), "Raise Integer")) intToSave++; if (GUI.Button(new Rect(0, 100, 125, 50), "Raise Float")) floatToSave += 0.1f; stringToSave = GUI.TextField(new Rect(0, 200, 125, 25), stringToSave, 15); GUI.Label(new Rect(375, 0, 125, 50), "Integer value is " + intToSave); GUI.Label(new Rect(375, 100, 125, 50), "Float value is " + floatToSave.ToString("F1")); GUI.Label(new Rect(375, 200, 125, 50), "String value is " + stringToSave); if (GUI.Button(new Rect(750, 0, 125, 50), "Save Your Game")) SaveGame(); if (GUI.Button(new Rect(750, 100, 125, 50), "Load Your Game")) LoadGame(); if (GUI.Button(new Rect(750, 200, 125, 50), "Reset Save Data")) ResetData(); } |
The last three buttons all call methods whenever they are clicked, but those methods have not been defined yet. This will be fixed now, starting with the SaveGame method.
|
1 2 3 4 5 6 7 8 |
void SaveGame() { PlayerPrefs.SetInt("SavedInteger", intToSave); PlayerPrefs.SetFloat("SavedFloat", floatToSave); PlayerPrefs.SetString("SavedString", stringToSave); PlayerPrefs.Save(); Debug.Log("Game data saved!"); } |
No, your eyes do not deceive you. The actual act of saving your game takes only a few lines of code. So, what’s happening?
Well, as promised, PlayerPrefs saves the player’s game. First, you must set some variables for PlayerPrefs to save. As seen above, three variables were set, all of them given a name, or key, followed by the variable to save.
Once PlayerPrefs is given all its information, Save is called and, as you may have guessed, saves the data. A message is also printed to Unity’s debug console as a little note to the developer saying the save was successful.
You may be wondering where this save data is on the computer. On Windows, PlayerPrefs can be found in the Registry under HKEY_CURRENT_USER\Software\Unity\UnityEditor\[company name]\[project name] (Figure 3), where company name and project name are names set up in the project settings.
Bear in mind, this is the location for when the game was run from the editor. In an exe they can be found at HKEY_CURRENT_USER\Software\[company name]\[project name]. On Mac OS, according to the Unity documentation, the PlayerPrefs is found at ~/Library/Preferences folder, in a file namedunity.[company name].[product name].plist.
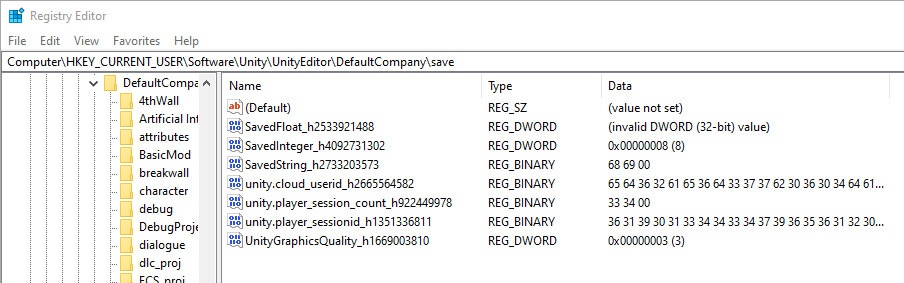 Figure 3: PlayerPrefs variables in the Windows Registry
Loading data is essentially saving data done in reverse. You set your variables of choice to whatever is in PlayerPrefs, and you’re good to go. A good practice is to make sure that the PlayerPrefs for your game has at least one of the keys you’re looking for. In other words, you’re checking that there’s any save data to be found.
The code sample below uses HasKey to search for one of the keys declared in the SaveGame method, those keys being SavedInteger, SavedFloat, and SavedString. Looking for just one will be sufficient. So long as PlayerPrefs has one of those, it’s safe to assume it will have the remaining data. Otherwise, it will print an error to the Unity console.
|
1 2 3 4 5 6 7 8 9 10 11 12 |
void LoadGame() { if (PlayerPrefs.HasKey("SavedInteger")) { intToSave = PlayerPrefs.GetInt("SavedInteger"); floatToSave = PlayerPrefs.GetFloat("SavedFloat"); stringToSave = PlayerPrefs.GetString("SavedString"); Debug.Log("Game data loaded!"); } else Debug.LogError("There is no save data!"); } |
Finally, if you wish to remove the save data stored in PlayerPrefs, all you need to call is PlayerPrefs.DeleteAll and the work is complete. In the following method, DeleteAll is put to use along with resetting the variables and ending by printing a message to the debug console.
|
1 2 3 4 5 6 7 8 |
void ResetData() { PlayerPrefs.DeleteAll(); intToSave = 0; floatToSave = 0.0f; stringToSave = ""; Debug.Log("Data reset complete"); } |
To try it out in-game, save your code and return to the Unity editor. Attach the SavePrefs script to an object, such as Main Camera as shown in Figure 4.
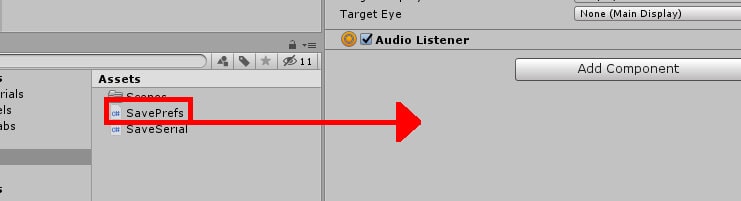 Figure 4: Attaching the SavePrefs script.
Begin playing the game and tinkering with the GUI on-screen, changing variables to whatever you wish. When ready, save your game. Then, try stopping and replaying the game, this time clicking the Load Your Game button.
Provided everything works correctly, you should see the variables immediately change to whatever was saved to PlayerPrefs. In addition, you can wipe PlayerPrefs clean by clicking the Reset Save Data button. Figure 5 shows the game in action:
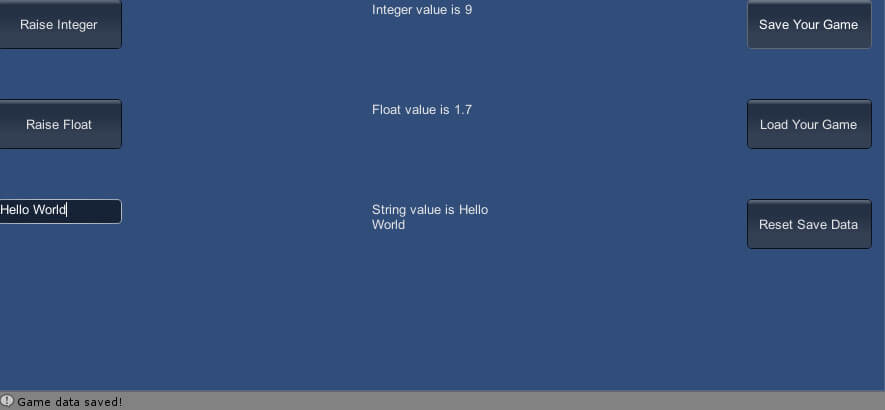 Figure 5: The project in action, using PlayerPrefs
This method seems simple and effective, so why wouldn’t you use PlayerPrefs all the time?
Well, PlayerPrefs is one of the least secure ways to save your data, and thus you wouldn’t want to save anything in PlayerPrefs that you absolutely do not want a potential player tampering with. This could be things like how much in-game currency the player currently possesses or stats in a role-playing game.
As the name implies, best practices for PlayerPrefs is typically storing a player’s preferences and other trivial data. For example, if you’re letting the user customize the look and size of the game’s UI, PlayerPrefs would be an excellent way to store those preferences.
There’s also the issue of flexibility. The project’s SaveGame method saves an int, float, and string. These are all the data types you can save to PlayerPrefs, so if you wish to save variables of other types, you may be out of luck. Fortunately, there is the “not so easy way” of doing things that allows more flexibility in what you can save, not to mention a little extra security.
Serialization – the ‘not so easy way’
Open up the SaveSerial script to begin trying out the next method. Much of the code will be the same as the last script with some minor differences to prove certain points. Here’s the variables and OnGUI method that will be used. All remaining methods will be different.
|
1 2 3 4 5 6 7 8 9 10 11 12 13 14 15 16 17 18 19 20 21 22 23 24 25 26 27 |
int intToSave; float floatToSave; bool boolToSave; void OnGUI() { if (GUI.Button(new Rect(0, 0, 125, 50), "Raise Integer")) intToSave++; if (GUI.Button(new Rect(0, 100, 125, 50), "Raise Float")) floatToSave += 0.1f; if (GUI.Button(new Rect(0, 200, 125, 50), "Change Bool")) boolToSave = boolToSave ? boolToSave = false : boolToSave = true; GUI.Label(new Rect(375, 0, 125, 50), "Integer value is " + intToSave); GUI.Label(new Rect(375, 100, 125, 50), "Float value is " + floatToSave.ToString("F1")); GUI.Label(new Rect(375, 200, 125, 50), "Bool value is " + boolToSave); if (GUI.Button(new Rect(750, 0, 125, 50), "Save Your Game")) SaveGame(); if (GUI.Button(new Rect(750, 100, 125, 50), "Load Your Game")) LoadGame(); if (GUI.Button(new Rect(750, 200, 125, 50), "Reset Save Data")) ResetData(); } |
To start, a few using statements will be needed to save data using serialization.
|
1 2 3 |
using System; using System.Runtime.Serialization.Formatters.Binary; using System.IO; |
Next, in order to save data, a new class within this script will be created. This class will be made serializable and will consist of the data to be saved.
|
1 2 3 4 5 6 7 |
[Serializable] class SaveData { public int savedInt; public float savedFloat; public bool savedBool; } |
I’ve included a screenshot (Figure 6) here to make it easier to understand where this code will go:
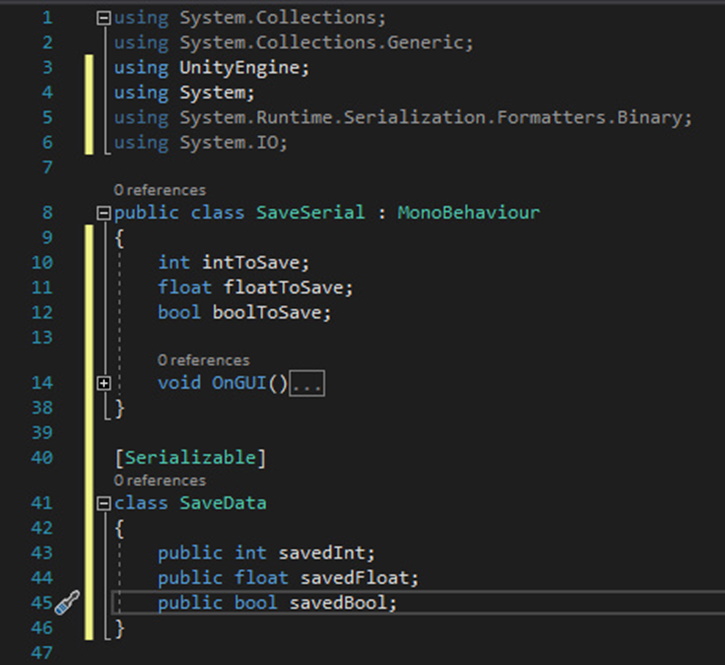
Figure 6: SaveSerial script
The goal now is to create the remaining methods that will allow you to save, load, and reset save data. You might notice that the three variables in the SaveData class correspond with the three variables in SaveSerial. Saving data will work by passing SaveSerial's variable values into SaveData and then serializing the SaveData class itself. Returning to the SaveSerial class, create the following method under the OnGUI method.
|
1 2 3 4 5 6 7 8 9 10 11 12 13 |
void SaveGame() { BinaryFormatter bf = new BinaryFormatter(); FileStream file = File.Create(Application.persistentDataPath + "/MySaveData.dat"); SaveData data = new SaveData(); data.savedInt = intToSave; data.savedFloat = floatToSave; data.savedBool = boolToSave; bf.Serialize(file, data); file.Close(); Debug.Log("Game data saved!"); } |
The BinaryFormatter is used to perform the act of serialization and deserialization. When serializing the data, BinaryFormatter is responsible for converting the information to a stream of 1s and 0s. FileStream and File are used to create a save file with the dat extension under the application’s “persistent data path” followed by any remaining path you wish to make. The persistent data path is C:\Users\[user]\AppData\LocalLow\[company name].
A new instance of SaveData is created, and the variables within SaveData are given the variables in SaveSerial. The BinaryFormatter serializes that data to the file defined in the FileStream. The file is then closed, and a message is printed to the debug console saying the data was saved. Like before, the LoadGame method is very much the same but in reverse.
|
1 2 3 4 5 6 7 8 9 10 11 12 13 14 15 16 17 18 19 |
void LoadGame() { if (File.Exists(Application.persistentDataPath + "/MySaveData.dat")) { BinaryFormatter bf = new BinaryFormatter(); FileStream file = File.Open(Application.persistentDataPath + "/MySaveData.dat", FileMode.Open); SaveData data = (SaveData)bf.Deserialize(file); file.Close(); intToSave = data.savedInt; floatToSave = data.savedFloat; boolToSave = data.savedBool; Debug.Log("Game data loaded!"); } else Debug.LogError("There is no save data!"); } |
Your save file by the name of MySaveData.dat is searched for in the same path given in the SaveGame method. Assuming it’s found, it will open the file and deserialize it using BinaryFormatter. Then the variables found in the save file will be fed into SaveSerial's variables. At the end, a message is printed to the debug console saying the load was performed successfully. If there is no file found at the file path, an error message will display instead.
Finally, there’s the act of deleting and resetting save data. This is extremely similar to the PlayerPrefs method but with a couple of extra steps. Unity will first check to make sure there’s a file at the save location before attempting any deleting of files. Assuming there is a file to delete, the variables in this script will also be reset to some default values and a message printed to the console. Like within the LoadGame method, an error message will be printed to the console if there is no file to be found.
|
1 2 3 4 5 6 7 8 9 10 11 12 13 14 15 |
void ResetData() { if (File.Exists(Application.persistentDataPath + "/MySaveData.dat")) { File.Delete(Application.persistentDataPath + "/MySaveData.dat"); intToSave = 0; floatToSave = 0.0f; boolToSave = false; Debug.Log("Data reset complete!"); } else Debug.LogError("No save data to delete."); } |
This concludes this script showcasing saving via serialization. Once again, save the code and go back to Unity. Attach SaveSerial to the same object as before and disable the SavePrefs script component.
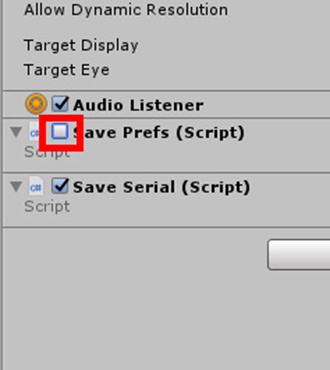
Figure 7: Disabling the Save Prefs component.
When you run the game, the same UI from earlier appears with some alterations. Tinker with the variables like last time and try saving the game. This time a file is saved to the “persistent data path” of the game, which can be found at C:\Users\username\AppData\LocalLow\project name on Windows and ~/Library/Application Support/companyname/productname on Mac, according to the Unity documentation. Close and reopen the game, then click the load button to bring those values back into the game. And of course, you can delete the saved data entirely if you so desire.
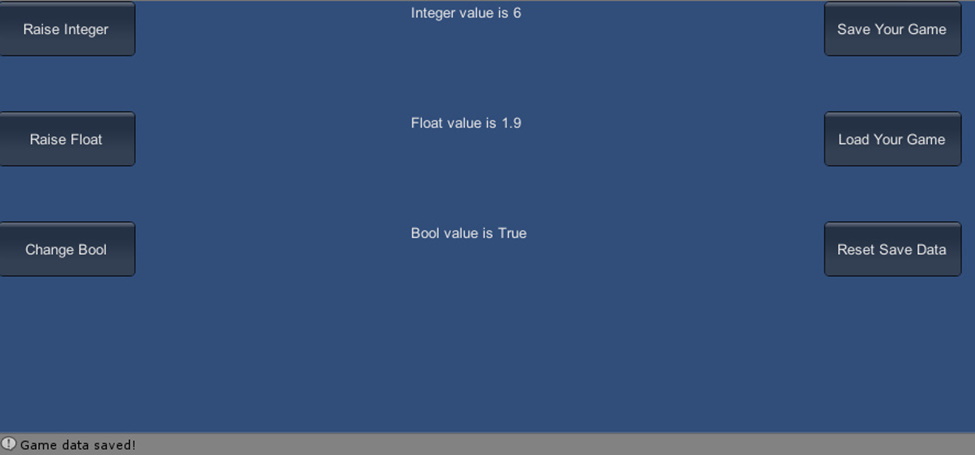 Figure 8: The project in action, using serialization
Conclusion
Barring some very specific exceptions, such as games designed around short play sessions or “perma-death” (perma-death is a game mechanic where once the player loses the game they have to start completely over and everything resets), saving data will be crucial for user retention. Even in those aforementioned examples, most games will at least save a high score or an achievement. What data is saved and how you save that data is down to you and your project’s needs.
Though less secure and limited in what it can save, PlayerPrefs can be helpful for saving a player’s in-game preferences or for games where it doesn’t matter much if the user tinkers with the variables outside the game. In addition, it’s very simple to use which can help save some development time.
Meanwhile, serializing data to a file is more complicated but in return, you can save many other types of data and have more security.
Like many things in game development, the tools available to you can be utilized in a variety of ways. However you choose to save your game’s data, there will be options available to you. In the end, the best method is the one that helps you and your project the most.
Simple Talk is brought to you by Redgate Software
This document contains proprietary information and is protected by copyright law.
Copyright © 2026 Red Gate Software Limited. All rights reserved
Load comments