Prototyping with HTML
In my previous article “Rapid Prototyping, the MVC Working Model” I discussed the benefits of using HTML to create prototypes. Now I’d like to share a technique that uses Git source control with HTML prototypes to quickly explore and test different design ideas. I find this technique to be helpful for brainstorming new user-interface ideas, and testing multiple layouts to find the best possible user-experience.
Exploiting the advantages of source control
It is more usual to think of source control in terms of its value in branching for feature completion, or for fixing bugs. However, the branching and merging support that source control gives you can be used to make it easier to explore design concepts quickly. Branching allows us to break off on several different paths and introduce new ideas, we can then choose the best of our ideas and merge them back into our project.
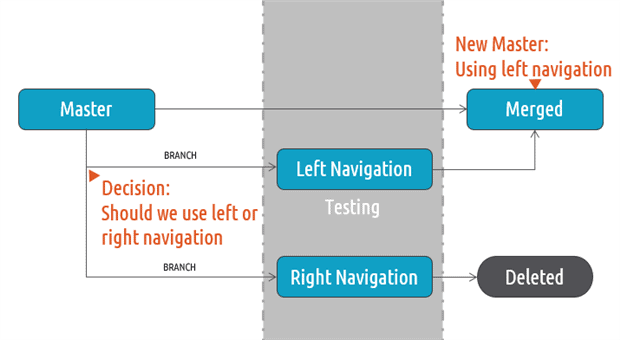
Example: Exploring left vs. right navigation.
Introducing GitHub for windows
GitHub for Windows is a Git GUI client built specifically for Windows developers. GitHub for Windows is my personal preference for this phase in a project because I will frequently create and switch between branches, and the GUI helps me visualize what is happing in the project. If you are more comfortable with the Git command line experience, it will work just fine as well.
Prototyping workflow basics
GitHub for Windows provides an excellent interface for managing branches in our project.
The master
The master is a clean copy of our code, from which we begin new branches. New sets of branches can be thought of as a “decision” and we will build a version of prototype that represents a possible solution for that decision.
Branching
Prototyping is most effective when done in short iterations, trading one idea for another to find the best solution to the problem. By using Source control and branching in Git, we get complete control over the job of creating copies of the master project that we can then modify in various ways. Each branch is essentially a copy of our master prototype that has been modified with different design choices.
|
1 |
$ git branch MobileLayOutB |
Creating a new branch using the command line.
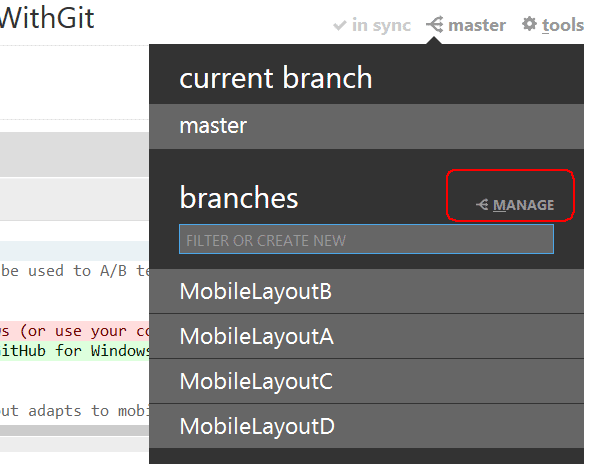
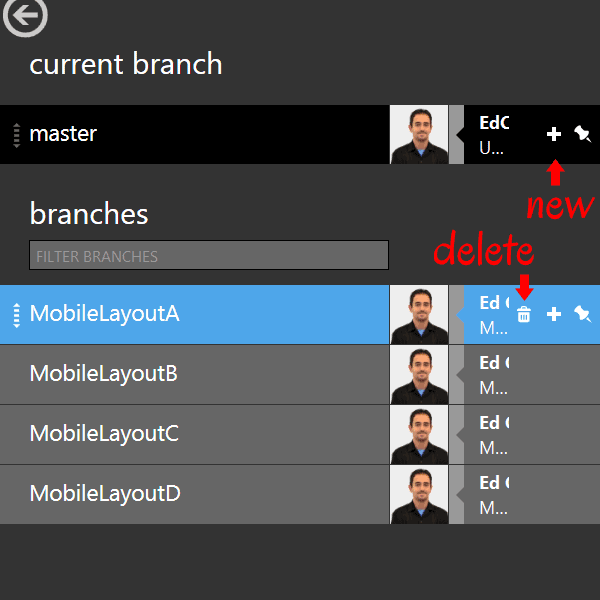
The branch manager is an essential tool, allowing us to simply click and swap branches on the fly.
Exploring & Testing
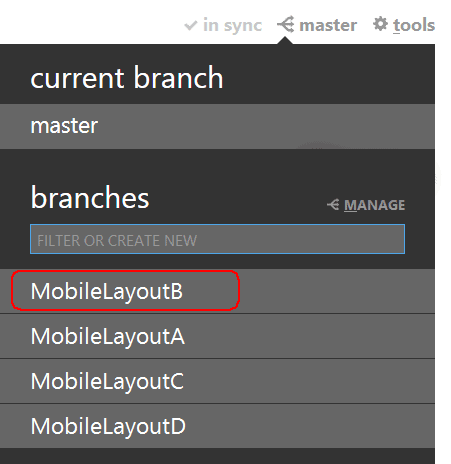
Selecting the branch from GitHub for Windows
Once multiple versions of the prototype have been created, you can begin testing. The test can be as simple as loading the prototype in the browser and exploring its behavior, or more a more advanced approach like pushing the code to a server and conducting user tests with a focus group. The type of testing you do is really up to your organization, resources and needs.
Since each version of the prototype is contained and controlled with in a branch under source control, changing the test case is as easy as checking out the desired branch.
|
1 |
$ git checkout MobileLayoutB |
Switching branches with git from the command line
Merging
After making the decision to move forward with a prototype, the successful code is merged back into the master branch. Once the code has been merged, then the next iteration of prototypes can be built. When prototyping, each merge consolidates our best ideas back into the master project, from there we can begin branching again to explore the next set of options.

Merging with GitHub for Windows
|
1 2 |
$ git checkout master $ git merge MobileLayoutB |
Merging with git from the command line
Deleting
Once a decision has been made on selecting a prototype branch, and the successful branch is then merged, those branches that contain failed prototypes can be quickly discarded in order to leaving a clean slate ready to start the next cycle of prototypes.
Sample scenario: Navigation choices
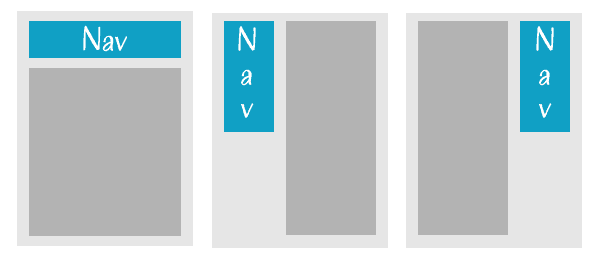
Let’s look at an example where we are making a UX decision for our application. In this scenario, we are building a web application that has several activities. The activity that the user wants must be selected by navigating a menu. To give users the best experience possible, we need to decide the best location for the navigation element.
At this point our project we are on the master branch and the prototype has no navigation, our team has decided that there are three options which should be explored: top, left and right navigation. We will be building a version prototype for each style of navigation and then evaluating which works best for our application.
We will start by creating a new branch for top navigation, and then continue by adding markup for the top navigation element to the layout. Once the top navigation prototype is complete, we will commit the changes and switch back to the main branch. Then, we will repeat this process for the left and right navigation.
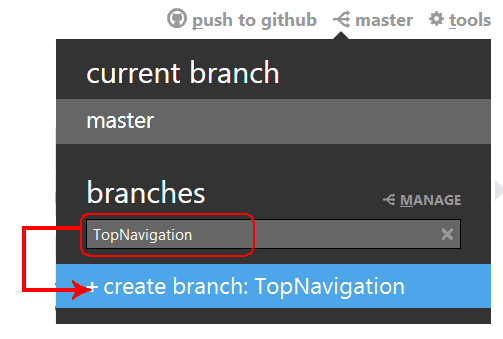
Creating a new branch with the GUI
The process is as follows:
- From the master branch, a new branch called TopNavigation is created
- The TopNavigation branch is checked out
- The HTML prototype is modified to include TopNavigation
- The changes are committed
- The master branch is checked out
- The process is repeated until all versions of the prototype are complete
|
1 2 3 4 5 |
$ git checkout master $ git branch TopNavigation $ git checkout TopNavigation ... Modify the HTML $ git commit -a -m 'added top navigation to prototype' |
Creating a new branch with git using the command line
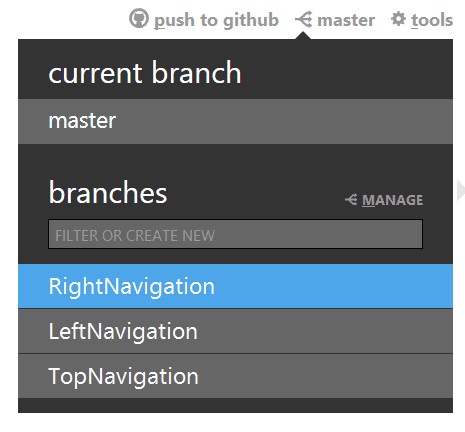
Once each branch has been completed, we can easily switch between them quickly using the GUI.
With all three prototypes complete we can examine the user experience of each by checking out the desired branch. When we change branches we are essentially opening a copy of our prototype with a specific element that has been changed. Using this technique can present our prototypes to other parts of the team, to stake holders, or focus groups for feedback and make more informed decisions about the design. At any point the branch can be switched to make comparisons.
Example review process:
- Check out the TopNavigation branch
- In a group setting with your team view the prototype in the browser
- Interact with the prototype and collect feedback from the group
- Repeat the process until all of the branches have been discussed and the team is finished providing feedback
After the best branch has been chosen, it can be merged back in to the project and the remaining branches can be deleted.
Sample scenario: Responsive design
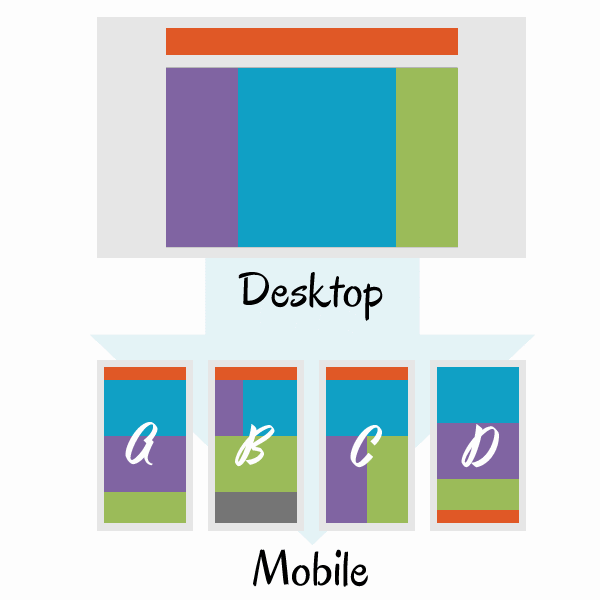
Responsive design layout: Top Navigation (orange), Left Navigation (purple), Main Content (blue), Aside (green)
Next, let’s take a look at how we can apply the technique to responsive design. We’ll imagine that we have a layout that has four elements. Each element fits comfortably on a wide screen desktop; however when viewed from a mobile device we need to adapt the layout so it can fit the device’s view port. When this happens, our elements must be rearranged, and we need to choose the layout that works best.
For example, our application may have a primary navigation, secondary navigation, main content and an aside.
An aside is content that is related to the surrounding content within an article or web page, but could still stand alone in its own right. This type of content is often represented in sidebars.
An example is a “pull quote” from a longer article. A pull quote (also known as a lift-out quote or a call-out) is a quotation or edited excerpt from an article that is placed in a larger typeface on the same page, serving to lead readers into an article and to highlight a key topic.
The <aside> tag is now part of HTML along with <article> <header> and <footer> to form semantic markup.
Our possible choices for mobile layout are:
- We can choose to stack each item vertically.
- We may be able to retain side-by-side columns for the left navigation and main content if space permits.
- It may be useful to place the left navigation and aside in side-by-side.
- Another version could move the primary navigation to the bottom of the screen, making navigation more accessible for touch screen users.
Because we can display each item in several alternative ways, we need to make an informed decision about which mobile layout is best. Using HTML prototyping and Git, we can examine each mobile layout possibility. Our master has a working desktop layout, but the mobile layout isn’t optimal. We’ll be building four versions of our prototype, each with different mobile layouts.
The process is as follows:
- From the master branch, create a new branch called MobileLayoutA
- Checkout to the MobileLayoutA branch
- The HTML prototype is modified so that it stacks vertically (See Figure n: A)
- The changes are committed
- The master branch is checked out
- The process is repeated until all versions of the prototype are complete
Next we test each version individually. Since the code is contained and controlled within Git, we can switch to a branch and deploy the code where it can be accessed from a mobile device. Being able to interact physically with the prototype will help determine if the layout achieves its goal.
For each version of our prototype we can ask the following:
- Is our main content the users focus?
- Is the navigation easily accessible?
- Does the aside content remain less important than the main content?
- How does the prototype respond to touch?
- How does the prototype respond to rotation?
When we’ve answered these questions about each layout we can then use the data to choose the best solution. Once a decision has been made, the best version can be merged back into the master. The remaining branches will be deleted, keeping the project clean and organized. At this point the project can be continued until a new decision is necessary.
A full example of this scenario can be found on GitHub. The project uses ASP.NET MVC and prototyping tools to create explore multiple responsive design layouts. https://github.com/EdCharbeneau/ExploringPrototypesWithGit
Conclusion
By including Git with your prototyping process, you can improve your decision making process. Git allows for faster iteration and better decision making by keeping your design decisions focused, maintainable and easily accessible.
GitHub for Windows simplifies git because it provides an excellent GUI for the basic functions needed for creating, deleting, merging and swapping branches. It is an excellent way to visualize what decisions are available and to manage multiple branches.
In addition to prototyping, as with any project under Git source control, separate branches can also be worked on independently for other tasks such as completing features, eliminating bugs, or testing. This can help move a project along by removing dependencies, because components that are unrelated to the prototype can be completed without holding up the project. As an example of this, the backend APIs can be worked on while the UX is being developed, without any interference between tasks.
Load comments