Input forms play a significant part in the organization of most web views. Although input forms often contain images and require the specific placement of fields, there are plenty of times that they don’t.
Sometimes, there isn’t any need to spend much time on laying out elements. When you’re writing the admin panel for the data in a site, for example, a plain CRUD-inspired set of views are quite good enough.
ASP.NET MVC offers a few conventions and built-in tools to speed up this aspect of form development. These tools include data annotations and template-based HTML helpers; conventions include some predefined CSS classes that designers can overwrite to introduce a more appealing look-and-feel.
Where you don’t need a special form layout, data annotations can save you a lot of time.
Using Data Annotations
Data annotations are attributes that instruct listeners on how to display or edit data. By using data annotations, you decorate your classes with metadata. Data annotations include both rendering and validation attributes. To start using data annotations, you need to reference the System.ComponentModel.DataAnnotations assembly. Here’s a sample class annotated with a few attributes.
|
1 2 3 4 5 6 7 8 9 10 11 12 13 14 15 16 17 18 |
public class Article { [ReadOnly(true)] public Int32 Id { get; set; } [DisplayName("Title of the article")] public String Title { get; set; } [DisplayName("Brief description of the article")] public String Summary { get; set; } [DisplayName("URL of the article")] public String Url { get; set; } public String Publisher { get; set; } public Int32 Month { get; set; } public Int32 Year { get; set; } } |
This class can produce a good enough input form at the cost of a single line of markup code. Suppose you have the following action method in the controller that invokes the view:
|
1 2 3 4 5 6 7 |
[HttpGet] [ActionName("articles")] public ActionResult ArticlesViaGet() { var model = _service.GetArticlesViewModel(); return View("articles", model); } |
And suppose also that the model for the view is obtained as follows:
|
1 2 3 4 |
public ArticleViewModel GetArticlesViewModel() { return new ArticleViewModel(); } |
The article view model class just creates and exposes an instance of the Article class: just the class being featured in the view and decorated with data annotation attributes.
|
1 2 3 4 5 6 7 8 |
public class ArticleViewModel { public ArticleViewModel() { Current = new Article(); } public Article Current { get; set; } } |
The articles.cshtml view file sets up a form block and invokes the built-in editor template available in ASP.NET MVC. The resulting code is surprisingly simple and compact:
|
1 2 3 4 5 6 7 8 9 10 11 |
@model Expoware.Gladiator.Server.ViewModels.Editor.ArticleViewModel <div class="container-fluid"> <div class="gladiator-form-container"> <h1>Edit article</h1> <form method="POST" action="@Url.Content("~/editor/articles")"> @Html.EditorFor(m => m.Current) <hr/> <button type="submit" class="btn">Update</button> </form> </div> </div> |
As a side note, imagine that this code is an excerpt from a page taken from a personal site-codenamed Gladiator. The CSS classes you see in the code snippet that are not prefixed with “gladiator” are all coming from the Twitter’s popular Bootstrap framework.
As you can see, the core of the form is in the call to Html.EditorFor. This is one of the predefined editor helpers that gets an object-in the sample, an instance of the Article class-and renders it out within a fixed template. Figure 1 shows the actual result:
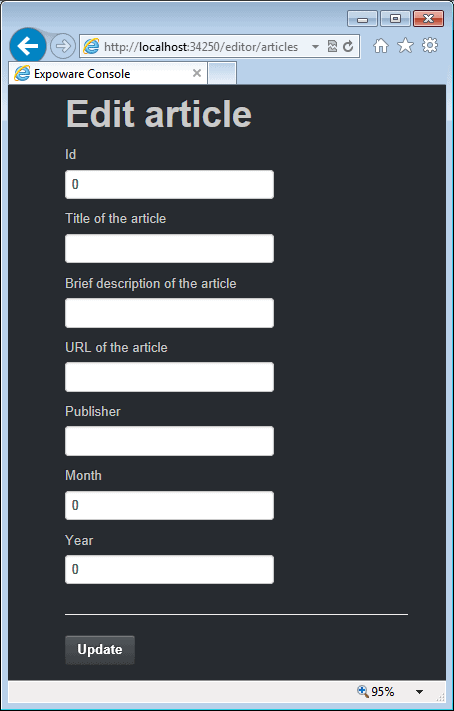
FIGURE 1. Using Html.EditorFor with an annotated view model class.
You may notice that each public property gets an “editor” in the form of ad hoc markup. Most of the time, the editor is a textbox but a Boolean property would require a checkbox. There are a couple of things to notice about the two attributes used in the current version of the class Article. The DisplayName attribute sets the text to be used as the label of the input field. The ReadOnly attribute, instead, is ignored. If you test the view, no matter the ReadOnly attribute that decorates the Id field you can happily type into the textbox.
The first lesson one can learn about data annotations is that data annotations is one thing and default in ASP.NET MVC is something else. In ASP.NET MVC, default display and editor helpers simply consume only a few of the possible annotations. However, the metadata information is there, and if you override default templates you have available a lot more meta information that you can consume at your leisure. Let’s see what you can do to achieve the following two results:
- Turn the template into a table-based template with label and input on the same row;
- Make the new template handle property the ReadOnly attribute
Display and editor helpers come with their own default template, but it is relatively easy to define a custom template. You just need to write a file named object.cshtml and place it under the folder Views/[Controller]/EditorTemplates.
Applying Custom Editor Templates
Here’s some sample code for an editor template that renders properties within a multi-column HTML table.
|
1 2 3 4 5 6 7 8 9 10 11 12 13 14 15 16 17 18 19 20 21 22 23 24 25 26 27 28 29 30 31 32 |
@inherits System.Web.Mvc.WebViewPage @if (Model == null) { <span>@ViewData.ModelMetadata.NullDisplayText</span> } else { <table cellpadding="0" cellspacing="0" class="editor-table"> @foreach (var prop in ViewData .ModelMetadata .Properties .Where(pm => pm.ShowForDisplay && !ViewData.TemplateInfo.Visited(pm))) { <tr> <td> <div class="editor-label" style="text-align: right;"> @prop.GetDisplayName() </div> </td> <td width="10px"> @(prop.IsRequired ? "*" : "") </td> <td> <div class="editor-field"> <span>@Html.Editor(prop.PropertyName)</span> <span>@Html.ValidationMessage(prop.PropertyName)</span> </div> </td> </tr> } </table> } |
A bit of reflection allows us to determine information about public properties and their metadata. For example, the IsRequired property checks the existence of the Required attribute on the property and enables the “*” symbol close to the input field. (See Figure 2.)
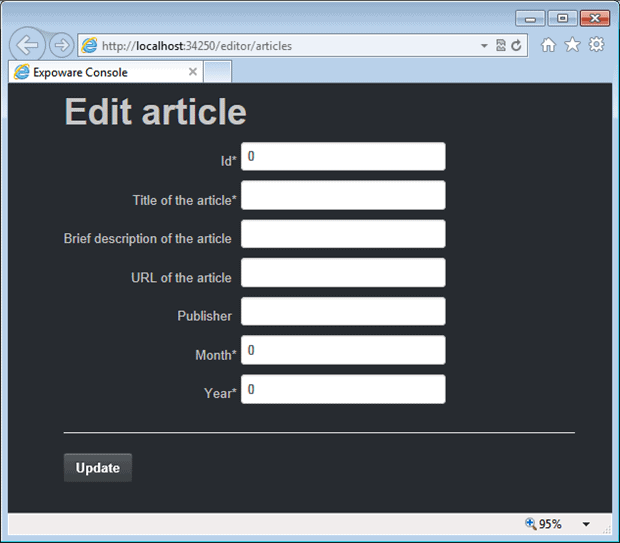
FIGURE 2. A revisited HTML editor formatted as a table.
The ReadOnly Annotation
The Id property of the Article is rendered with a textbox, albeit decorated with the ReadOnly data annotation attribute. You would likely expect that a member with such an annotation be not editable in the form and rendered using the display template for the data type. As you know, this is not the case. But there’s more to it.
Data annotations are connected to ASP.NET MVC through the services of a special component known as the metadata provider. The metadata provider reads information about a given class and exposes that to ASP.NET MVC templated editors. The ReadOnly attribute is properly recognized by the metadata provider, and related information is stored in the metadata available for the model. For some reason, this information is just ignored by default templates. There are a few workarounds to this problem.
First and foremost, you can use the UIHint data annotation to decorate the read-only property. Here’s an example:
|
1 2 3 |
[ReadOnly(true)] [UIHint("readonly")] public Int32 Id { get; set; } |
The UIHint attribute gets a string that indicates the name of the template to be used when editing or rendering the property. The string used in the example “readonly” refers to a readonly.cshtml file that must be available in the Views/[Controller]/EditorTemplates folder. The content of readonly.cshtml can be as simple as below:
|
1 |
<span>@Model</span> |
The final result is shown in Figure 3.
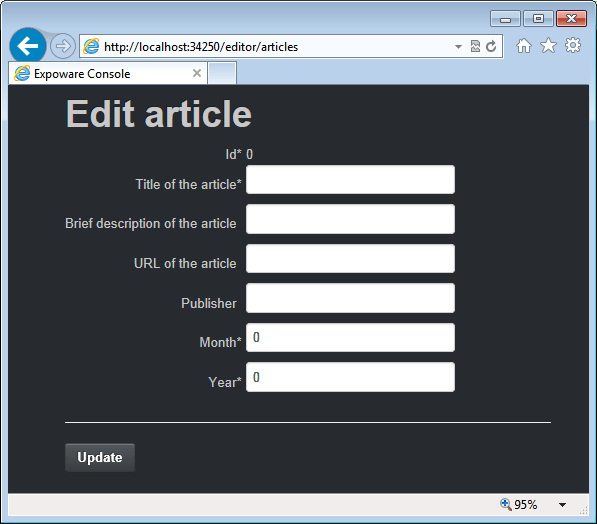
FIGURE 3. A read-only field made non-editable.
As the ReadOnly attribute is ignored, there’s no reason for using it. So if you opt for using UIHint then you can dismiss the ReadOnly attribute.
While effective, this solution sounds more like a trick than a clean way of working around a bug. Another solution consists in the following extension being made to the aforementioned object.cshtml template.
|
1 2 3 4 5 6 7 8 9 10 11 12 13 |
<td> <div class="editor-field"> @if(prop.IsReadOnly) { <span class="readonly-field">@Html.Display(prop.PropertyName)</span> } else { <span>@Html.Editor(prop.PropertyName)</span> <span>@Html.ValidationMessage(prop.PropertyName)</span> } </div> </td> |
Based on my experience, I’d suggest that this workaround is the best compromise you can get. For one thing, the view model editor discussed here is not used frequently on web pages and, when used, it is mostly on admin pages. In such pages, the tabular view rendered by our sample object.cshtml is highly preferable to the default DIV-based template. At that point, you employ the customized version of object.cshtmlpresented here and you’re all set.
Anyway, and only to be picky, there’s also another way to support the ReadOnly attribute that works irrespective of UIHint and object templates. It consists in writing a different metadata provider that detects read-only properties and sets the name of the template to use. The name of the template can be any name-you define the convention here-and you are responsible for making this necessarily custom template available. A custom metadata provider based on data annotations is a class that inherits from DataAnnotationsModelMetadataProvider and overrides the CreateMetadata method.
|
1 2 3 4 5 6 7 8 9 10 11 12 13 14 15 16 17 18 19 20 |
public class MyAnnotationsMetadataProvider : DataAnnotationsModelMetadataProvider { protected override ModelMetadata CreateMetadata(IEnumerable<Attribute> attributes, Type containerType, Func<Object> modelAccessor, Type modelType, String propertyName) { var metadata = base.CreateMetadata( attributes, containerType, modelAccessor, modelType, propertyName); if (metadata.IsReadOnly) metadata.TemplateHint = "readonly"; // Template name is arbitrary return metadata; } } |
The implementation is fairly trivial-you call the base method and if the property is marked read-only you set the name of the template to use. To force ASP.NET MVC to use this provider you must register it in global.asax:
|
1 |
ModelMetadataProviders.Current = new MyAnnotationsMetadataProvider(); |
When you use the view model editor-that is a generic editor for a view model type-you run into pros and cons. A big pro is certainly the inherent simplicity of the resulting code. A con is the limited control you have on the style of HTML elements. Let’s see what you can do to improve this aspect too.
Adding Style to Editors
Both the standard and the reworked tabular editor template use a bunch of predefined CSS classes to style elements. Templates just link some CSS classes by name to elements-defining content and style for those CSS classes is another story. It’s up to your pages to define those classes in some referenced style sheets. Some predefined CSS classes are in the table below
If you want to style a specific input field-for example, making an input field larger-then you must resort to advanced CSS capabilities and locate the element by tag and position.
Using Data Annotations for Validation
Data annotations also feature a list of attributes useful for validation. The table below lists the most commonly used data annotation attributes that express a condition to verify on a view model class.
|
Data annotation |
Description |
|
Compare |
Checks whether two specified properties in the model have the same value. |
|
CustomValidation |
Checks the value against the specified custom function. |
|
EnumDataType |
Checks whether the value can be matched to any of the values in the specified enumerated type. |
|
Range |
Checks whether the value falls in the specified range. It defaults to numbers, but it can be configured to consider a range of dates, too. |
|
RegularExpression |
Checks whether the value matches the specified expression. |
|
Remote |
Makes an Ajax call to the server, and checks whether the value is acceptable. |
|
Required |
Checks whether a non-null value is assigned to the property. It can be configured to fail if an empty string is assigned. |
|
StringLength |
Checks whether the string is longer than the specified value. |
All of these attributes derive from the same base class-ValidationAttribute-which can also be used as the base class for creating your own custom validation attributes.
If you assign, the Required and StringLength attributes to a property then the form will successfully post only if the corresponding field is not empty and the value matches the specified length. Here’s an example:
|
1 2 3 |
[StringLength(100, MinimumLength = 4)] [Required(ErrorMessage = "Can't be empty")] public String Title { get; set; } |
Each validation attribute can be enhanced with an error message to display when the form is posted and some of the posted data doesn’t pass validation. In this case, the message is displayed and styled using predefined CSS classes such as input-validation-error and field-validation-error.
To display error message in case of failed validation, some coding is necessary in the controller methods that activate the page with the form:
|
1 2 3 4 5 6 7 8 9 10 11 |
[HttpPost] [ActionName("articles")] public ActionResult ArticlesViaPost(ArticleViewModel model) { if (ModelState.IsValid()) { // Do some work ... } return View("articles", model); } |
The user attempts to post; the POST occurs but validation fails; no action is taken and the page is rendered back. However, this time validation messages are automatically displayed. Figure 4 shows the final result.

FIGURE 4. Validation messages.
The refresh of the page occurs over a HTTP postback. With little effort you can also enable client-side validation that might even prevent a postback if data is patently invalid. All you need to do is linking a couple of script files to your pages:jquery.validate and jquery.validate.unobtrusive. In addition, you should make sure that the following settings are in web.config.
|
1 2 3 4 |
<appSettings> <add key="ClientValidationEnabled" value="true" /> <add key="UnobtrusiveJavaScriptEnabled" value="true" /> </appSettings> |
Note that entries in appSettings are usually created by any Visual Studio template you use to start creating an ASP.NET MVC site.
Summary
ASP.NET MVC offers templated helpers for auto-generated input forms. Input validation can be largely streamlined if you build your user interface around view-model objects annotated with display and validation attributes. These attributes-known as data annotations-are recognized by the ASP.NET MVC infrastructure and processed to produce templated helpers and feedback messages for the user. This article only scratched the surface and didn’t address additional concerns that may be raised around data annotations. But this makes just good fodder for another article!
Load comments