


An SCD Type 2 dimension preserves history by inserting a new record every time a tracked column changes, rather than overwriting the old value. Building one by hand usually means writing custom merge logic, but dbt’s built-in dbt snapshot feature can do this for you without any extra code.
This article picks up where my previous guide on loading a Type 1 slowly changing dimension with macros left off. This time, we’ll use dbt snapshots to build a full SCD Type 2 customer dimension in a Microsoft Fabric warehouse: from the underlying view, through the snapshot configuration, to the final dimension model.
First – a refresher, if you need one. Feel free to skip this section.
This article is part of Koen Verbeeck’s complete guide to dbt (data build tool) – click here for the full series.
What is dbt?
In recent years, dbt (data build tool) has become popular in the data engineering world for handling ELT (extract-transform-load) processes.
dbt takes on the role of the “T”, meaning it’s responsible for transforming the data in a data store. You can learn a lot more in my introduction article here.
What are slowly changing dimensions?
Slowly changing dimensions (SCDs) are typically used in dimensional modelling for data warehouses. There are two types: Type 1 and Type 2.
Here’s the breakdown:
- Type 1: no history is kept. When a row has a field that changes value, the row is updated in the dimensions. For example, when a customer modifies their e-mail address, it’s updated in the customer dimension, and the old address is no longer available.
- Type 2: history is kept by inserting a new record every time a column changes a value. When a customer moves to a new address, instead of updating the address fields like in a type 1 dimension, we insert a new record for that customer, along with timestamps that indicate when the record is valid. This enables accurate time-variant analysis.
Let’s illustrate with an example. In the following table, we have a couple of customer records:

At some point in time, Sarah moves to a new address, which will lead to a new record in the dimension (and with a new surrogate key):

The old record is “closed” by putting a date in the Valid To field, and the current flag is updated as well. It’s important to note that both the Valid To and the Current Flag fields are optional. Both can be derived from the Valid From field.
There are actually more types of slowly changing dimensions, but those are out of scope for this article. If you want to learn more, check out the Kimball book The Data Warehouse Toolkit.
Thus far, we have only created dbt models that are essentially a SQL SELECT statement, but SCD Type 2 dimensions seem much more complicated.
However, in this guide, I’ll show how to use the dbt snapshot feature to cut away this complication. With it, SCD Type 2 dimensions can be loaded far more elegantly.
How to write the business logic for an SCD Type 2 dimension
We’ll use the customer dimension as an example of how to use dbt snapshots. Just like in our type 1 dimension, we’ll first create a view that contains all the business logic that we need for our customer dimension.
Rename the DimCustomer.sql model to vw_DimCustomer.sql and enter the following SQL SELECT statement:
|
1 2 3 4 5 6 7 8 9 10 11 12 13 14 15 16 17 18 19 20 21 22 23 24 25 26 27 28 29 30 31 32 33 34 35 36 37 38 39 40 41 42 43 44 45 46 47 48 49 50 51 52 53 |
{{ config( materialized = 'view' ) }} WITH cte_mainoffices AS ( SELECT ca.CustomerID ,a.City ,a.StateProvince ,a.CountryRegion ,a.PostalCode FROM {{ source('adventureworkslt', 'CustomerAddress') }} ca JOIN {{ source('adventureworkslt', 'Address') }} a ON ca.AddressID = a.AddressID WHERE ca.AddressType = 'Main Office' ) , cte_cols AS ( SELECT c.CustomerID ,CustomerName = CONCAT_WS(' ',c.Title, c.FirstName, c.MiddleName, c.LastName, c.Suffix) ,CustomerCompanyName = ISNULL(c.CompanyName,'N/A') ,CustomerSalesPerson = ISNULL(c.SalesPerson,'N/A') ,CustomerEmail = ISNULL(c.EmailAddress,'N/A') ,CustomerPhone = ISNULL(c.Phone,'N/A') ,CustomerPostalCode = ISNULL(m.PostalCode,'N/A') ,CustomerCity = ISNULL(m.City,'N/A') ,CustomerStateProvince = ISNULL(m.StateProvince,'N/A') ,CustomerCountryRegion = ISNULL(m.CountryRegion,'N/A') FROM {{ source('adventureworkslt', 'Customer') }} c LEFT JOIN cte_mainoffices m ON c.CustomerID = m.CustomerID ) SELECT * ,SCD2_Hash = CONVERT(CHAR(66), HASHBYTES('SHA2_256' ,CONCAT( CustomerName ,'||',CustomerSalesPerson ,'||',CustomerCompanyName ,'||',CustomerSalesPerson ,'||',CustomerEmail ,'||',CustomerPhone ,'||',CustomerPostalCode ,'||',CustomerCity ,'||',CustomerStateProvince ,'||',CustomerCountryRegion )) ,1) FROM cte_cols |
Marked in bold is an extra column added to the view that doesn’t exist in the original DimCustomer model: SCD2_Hash. This column contains a hash (converted to text) calculated from the concatenation of all columns. We’ll use this hash to efficiently determine if any of the columns’ values have changed.
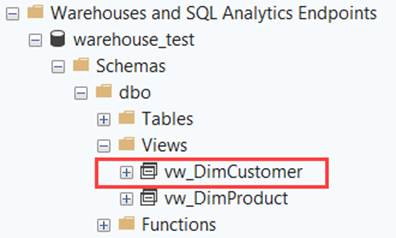
When we now build the model, we can see a new view will be created in our Fabric warehouse:
How to create an SCD Type 2 table with dbt snapshot
Now that the groundwork for our SCD Type 2 dimension has been laid, the view will calculate any necessary business logic and will return the latest state of each dimension member as currently known in the source system.
For this, dbt has a built-in feature to keep track of history for a model: the snapshot. Creating a snapshot of a model will create a SCD Type 2-like table, with added metadata fields, such as a valid from and a valid to.
Don’t mistake the concept of snapshots in dbt with snapshot fact tables from dimensional modelling – they’re not the same.
Create a new file
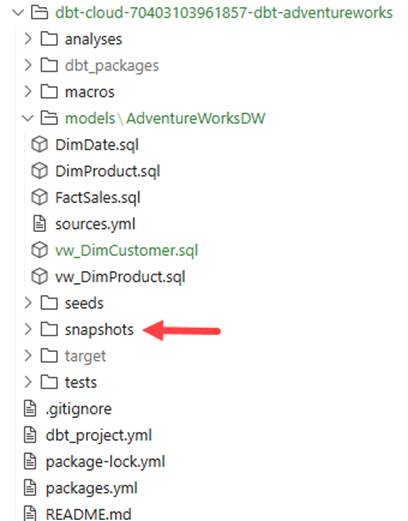
Let’s create a snapshot using the DimCustomer view as a source. In the dbt project, go to the snapshots folder and create a new file:
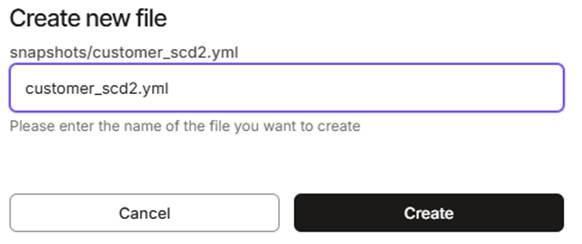
Name the file customer_scd2.yml:
A snapshot is not a SQL SELECT statement like the other models we created earlier, but rather a specification.
In the YAML file, add the following:
|
1 2 3 4 5 6 7 8 9 10 11 12 |
snapshots: - name: customer_scd2 relation: ref('vw_DimCustomer') config: schema: snapshots unique_key: CustomerID strategy: check check_cols: ["SCD2_Hash"] hard_deletes: "new_record" dbt_valid_to_current: "CONVERT(DATE,'9999-12-31')" # Specifies that current records should have `dbt_valid_to` set to `'9999-12-31'` instead of `NULL`. |
Let’s go over this config line-by-line:
- We will add a snapshot named
customer_scd2. - The source for this snapshot is the
vw_DimCustomerview. We’ll reference it using the built-in ref function (keeping lineage intact). You can also reference source tables, if you want, by using the source function.
(See Loading Models from Source Data with dbt to learn more about how you can define source tables in dbt.) - The snapshot will be put in a database schema named snapshots.
- The
CustomerIDcolumn will be used to identify unique dimension members. This is the business key of your dimension. - We’ll use the check strategy to determine if a row needs to be updated or inserted. This strategy uses the columns defined in
check_colsto verify if a row has changed. There’s also the timestamp strategy, which uses adatetimecolumn indicating the last time a row was changed (i.e. a last modified date). - Since we don’t have such a column in our source data, the check strategy is the preferred option.
- The column used for the check strategy is the
SCD2_Hashcolumn we defined in our view. If you use the timestamp strategy instead, you need to specify the name of thedatetimecolumn. - The
hard_deletesconfig specifies how deletes should be handled. The default isignore, which means the last known value of the record will remain the active one in the snapshot. - Another option is
invalidate, where thevalid tofield will be set to the current time (indicating there’s no longer a “current” record). - The last option is
new record, where a new record is inserted with thedbt_is_deletedmetadata set to True. - The
dbt_valid_to_currentis an optional configuration. The most current record for a dimension member doesn’t have avalid tovalue, since it has not yet been closed off. With this config, you can specify a dummy value instead of having aNULLvalue. Here, we choose for the date 9999-12-31.
Subscribe to the Simple Talk newsletter
Creating the snapshot table
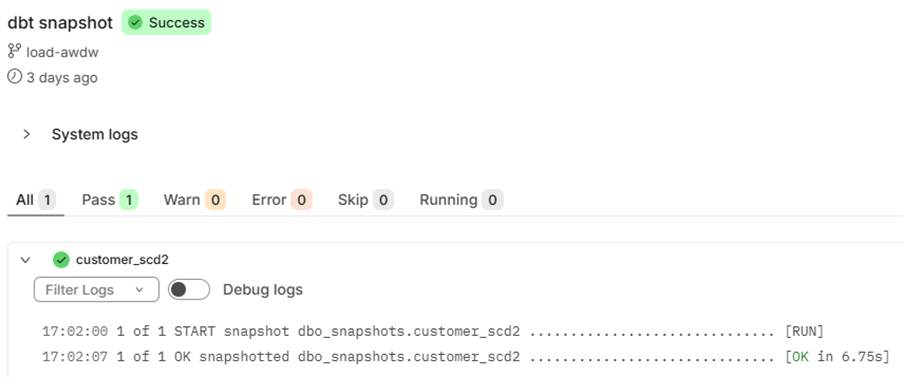
We can create the snapshot table itself using the command dbt snapshot. Running this command will refresh any snapshots created in the project.
If the snapshot table doesn’t yet exist, it’ll be created in the configured schema:
In the Fabric warehouse, we can see the following table has been created:
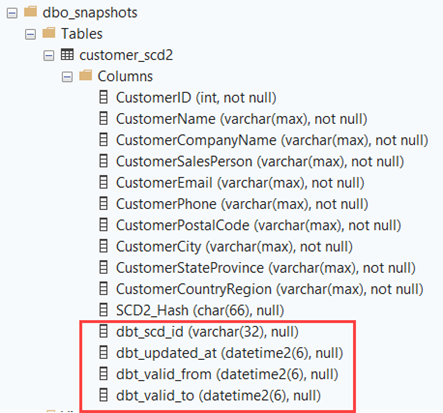
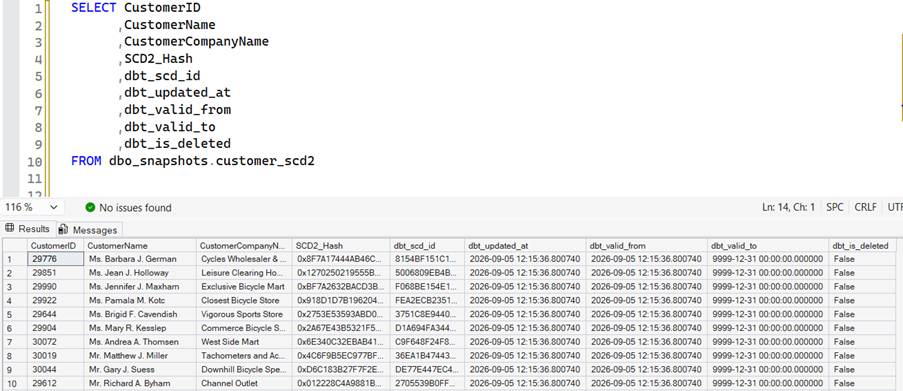
The columns in the red square are metadata columns added by dbt:
dbt_scd_id: a unique id for each dimensions member. This can act as a surrogate key.dbt_updated_at: a timestamp from when the row was last modified (as a result of running dbt snapshot).dbt_valid_fromanddbt_valid_to:datetimecolumns marking the period a certain row was active.dbt_is_deleted: flag for marking soft deletes
How to add history to the snapshot table
Let’s now create some history by first inserting a new customer record, updating it by change a value, and then deleting it.
After each SQL DDL (data definition language) statement, we can run dbt snapshot to capture the current state:
|
1 2 3 4 5 6 7 8 9 10 11 12 13 14 15 16 17 18 19 20 21 22 23 24 25 |
-- insert original record INSERT INTO [SalesLT].[Customer] ([FirstName] ,[LastName] ,[CompanyName] ,[PasswordHash] ,[PasswordSalt]) VALUES ('Peter' ,'Parker' ,'Student' ,'N/A' ,'N/A'); -- run dbt snapshot! UPDATE [SalesLT].[Customer] SET CompanyName = 'Parker Industries' WHERE CustomerID = 30120; -- check which ID is used in your database -- run dbt snapshot! DELETE FROM SalesLT.Customer WHERE CustomerID = 30120; -- run dbt snapshot! |
This should create 3 records in the snapshot table:
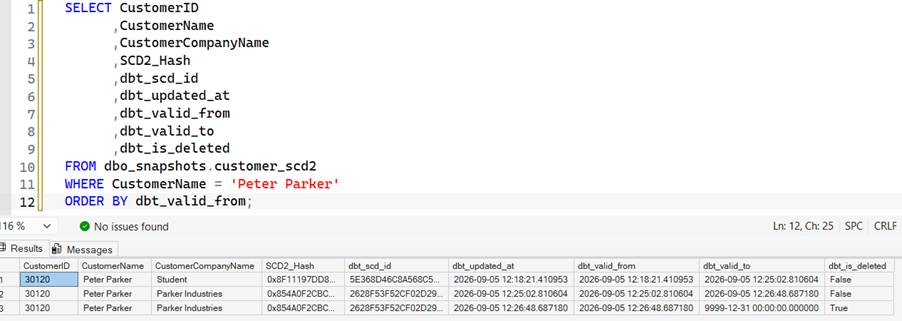
In your dbt projects, you can run dbt snapshot as often as needed to capture the level of historical granularity you want for your SCD Type 2 table.
If you run dbt build, meanwhile, this also includes running the snapshots of your project (but dbt run on the other does not.) See the docs for more info.
How to build the dimension model
With our snapshot history table finished, we can build our final DimCustomer model. We will use a similar macro as the one we used in the previous article to load the model.
Duplicate the load_dimension macro and rename it to load_dimension_scd2. Change its definition to the following code:
|
1 2 3 4 5 6 7 8 9 10 11 12 13 14 15 |
{% macro load_dimension_scd2(dimension_name) %} {%- set relname = dimension_name.lower() + '_scd2' -%} {%- set columns = adapter.get_columns_in_relation(ref(relname)) -%} SELECT {{ 'SK_' + dimension_name }} = dbt_scd_id {%- for col in columns if not col.column.lower().startswith('dbt_') -%} ,{{col.column}} {% endfor -%} ,ValidFrom = dbt_valid_from ,ValidTo = dbt_valid_to ,IsDeletedf = dbt_is_deleted ,InsertDate = dbt_updated_at ,UpdateDate = dbt_updated_at FROM {{ ref(relname) }} {% endmacro %} |
We slightly changed the naming convention for relname. This is because the source for our dimension isn’t a view – it is, in fact, the snapshot table we created earlier.
For the surrogate key, we can just reuse the dbt_scd_id metadata column. We again loop over all columns of the relation, but exclude the dbt_* metadata columns. Instead, those are added manually to the end of the SELECT statement with the appropriate aliases.
The model for the Customer dimension then becomes {{ load_dimension_scd2('Customer') }}. Add this to a file named DimCustomer.sql:
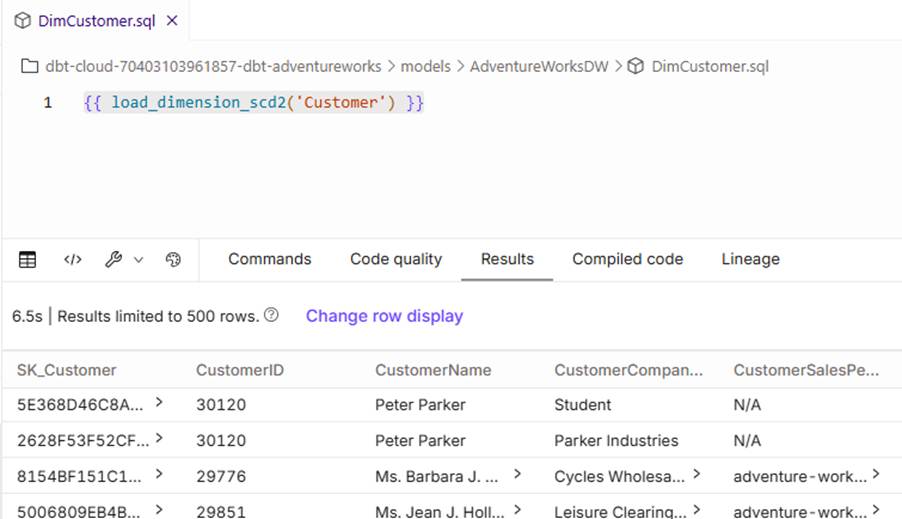
Running this model will recreate the dimension each time but, since we’re using the dbt_scd_id column from the snapshot table, we get an idempotent result.
It’s also possible to combine the load_dimension and load_dimension_scd2 macros into a single one – it just requires some additional parameters (for example, SCD type) and code, if you want to centralize the logic.
Alternatives to using dbt snapshot for SCD Type 2
The way we have set up our SCD Type 2 dimension using snapshots in dbt means that history will be tracked for all columns of the dimension.
However, if you want a mix of SCD Type 1 and Type 2 columns in one dimension – for example, if you only need history on a handful of columns – you can create a snapshot for just the SCD Type 2 columns.
Then, create a regular view for the Type 1 columns (as we did for the Product dimension), join the two together, and you’ve got a single combined dimension.
You also don’t have to use snapshots to create your Type 2 dimensions. You can create custom code to do this yourself if you want more control, or if you have a specific set of requirements. Learn more in this blog post.
FAQs
1. What's the difference between SCD Type 1 and SCD Type 2?
An SCD Type 1 dimension overwrites a column’s old value when it changes, so no history is kept. An SCD Type 2 dimension inserts a new record instead, with valid-from and valid-to dates marking when each version was active. Type 2 is the right choice when you need to analyze data as it looked at a specific point in time.
2. What does dbt snapshot actually do?
dbt snapshot turns a regular dbt model into an SCD Type 2-style table. It compares the current source data against the existing snapshot, and inserts a new row whenever tracked columns change. dbt adds metadata columns automatically, including dbt_valid_from, dbt_valid_to, and a surrogate key, so you don’t have to build that logic yourself.
3. Can I combine SCD Type 1 and Type 2 columns in one dimension?
Yes. Create a snapshot for just the columns that need history, then build a regular view for the Type 1 columns that don’t. Join the two together on the business key, and you get a single dimension with a mix of tracked and untracked columns.
4. Does dbt snapshot work with Microsoft Fabric?
Yes. dbt snapshot runs against any warehouse dbt supports, including Microsoft Fabric. The snapshot table is created in your configured schema, with the same metadata columns you’d get on other platforms, so the workflow doesn’t change based on the destination warehouse.
5. What happens when a source row is deleted?
That depends on the hard_deletes config. The default, ignore, leaves the last known record active. invalidate closes the record by setting its valid-to date. new_record inserts an extra row flagged with dbt_is_deleted, so you can see exactly when the delete happened.
Conclusion
dbt snapshot gives you an SCD Type 2 dimension without writing custom merge logic: it handles change detection, valid-from and valid-to dates, and deletes, all from a short YAML config.
If you need more control, or want to mix Type 1 and Type 2 columns in the same dimension, you can still combine snapshots with regular views or write custom code. For most use cases, however, the built-in feature is the fastest path to reliable history tracking.
Simple Talk is brought to you by Redgate Software
This document contains proprietary information and is protected by copyright law.
Copyright © 2026 Red Gate Software Limited. All rights reserved




Load comments