
Pipelining is an important technique when the operation you are performing, such as reading files of indeterminate length, or processing collections of large objects, requires you to conserve memory resources by breaking a large task into its atomic components. If you get it wrong, you don’t get that benefit. While PowerShell provides an ample supply of constructs for pipelining, it is all too easy to write code that simply does not pipeline at all.
So why is pipelining important?
- As mentioned, pipelining is helpful to conserve memory resources. Say you want to modify text in a huge file. Without a pipeline effect you might read the huge file into memory, modify the appropriate lines, and write the file back out to disk. If it is large enough you might not even have enough memory to read the whole thing.
- Pipelining can substantially improve actual performance. Commands in a pipeline are run concurrently-even if you have only a single processor, because when one process blocks, for example, while reading a large chunk of your file, then another process in the pipeline can do a unit of work in the meantime.
- Pipelining can have a significant effect on your end-user experience, enhancing the perceived performance dramatically. If your end-user executes a sequence of commands that takes 60 seconds, then without pipelining the user sees nothing until the end of that 60 seconds, while with pipelining output might start appearing in just a couple seconds.
To illustrate pipelining as simply as possible, I’ll introduce a simple pipeline that takes a sequence of inputs through three successive functions, mapping a sequence of inputs to a sequence of outputs.
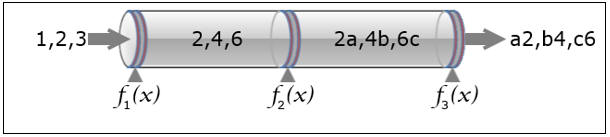
Figure 1:
Each pipeline function, called a filter, performs a transformation on the inputs fed to it and passes on the result. The operations performed as shown are deliberately simple and nonsensical: It is purely to illustrate the process. It is the pipeline itself that deserves attention here, rather than the particular transformations. Nonetheless, here to start us off are the simple implementations of each operation so you can follow along.
|
1 2 3 4 5 6 7 8 |
# double the input Function f1($x) { $x * 2 } # concatenate the nth letter to the input where n is half the input value Function f2($x) { "$x" + [char]([byte][char] "A" + $x/2 - 1) } # reverse the 2-character string Function f3($x) { $x[1..0] -join '' } |
As written, these are standard PowerShell functions that are not , by themselves suitable for pipelining. If you try 1, 2, 3 | f1 | f2 | f3 you will get an incorrect result.
Right and Wrong
Instead of writing this ….
|
1 |
1, 2, 3 | f1 | f2 | f3 |
… you will need to execute this:
|
1 |
1, 2, 3 | %{ f1 $_ } | %{ f2 $_ } | %{ f3 $_ } |
(meaning:
- %
-
{– start of process block -
f1– execute the function F1 … -
$_– ….on the object passed down the pipeline -
}– end of process block)
…or you could, as we will soon do in this article, create filters to do it all more neatly
|
1 |
1, 2, 3 | f1Runner | f2Runner | f3Runner |
… where the given filters have yet to be defined.
In each of the examples that follow, you will see implementations of the functions that act as filters mentioned above ( f1Runner , f2Runner , and f3Runner ). Within each scenario, all of the functions are essentially identical except for the statement that produces a calculation. After the calculation, the value is output twice : once with Write-Host , just to see what is going on, and once with Write-Output to allow it to feed the next function in the pipeline. To be clear, if you do not care about viewing intermediate results you can delete the Write-Host statements and the pipeline will work just the same. Also, note that the f3Runner does not use the Write-Host call because it is at the end of the pipe and you will get the results on the console from just the Write-Output call itself.
In order to make it simpler to see what is going on, we will add another filter, showInputs , that merely displays the values at the start of the pipeline
Scenario #1 – Generate all pipelineable output before emitting any
The special variable $input is available within a function as a provider of pipeline data. So we just loop through that pipeline data, calculating a result, and then writing it out. This is a very common coding pattern seen in many questions on StackOverflow. It is perfectly reasonable for some languages, but generally it should be avoided in PowerShell. Even if data is coming in nicely through the pipeline to the first function, the pipeline dries up completely, because each function is processing the entire pipeline input until the pipeline is empty, and only then sending its results onward en masse to the next pipeline participant.
|
1 2 3 4 5 6 7 8 9 10 11 12 13 14 15 16 17 18 19 20 21 22 23 24 25 26 27 28 |
function showInputs { $result = @() foreach ($value in $input) { $result += $value } Write-Host $result Write-Output $result } function f1Runner { $result = @() foreach ($value in $input) { $result += f1 $value } Write-Host $result Write-Output $result } function f2Runner { $result = @() foreach ($value in $input) { $result += f2 $value } Write-Host $result Write-Output $result } function f3Runner { $result = @() foreach ($value in $input) { $result += f3 $value } #Write-Host $result Write-Output $result }} |
Here is what happens when you execute. showInputs displays all of its inputs (1 2 3). (It is an artifact of Write-Host that it combines all of the values in to a single, space-separated string.) Then f1Runner displays all of its calculations (2 4 6). Then f2Runner does all of its work, yielding (2A 4B 6C). Finally,f3Runner lets its results stream out the end of the pipeline, so you see that there are still 3 values being processed (because they are emitted one-per-line).
|
1 2 3 4 5 6 7 |
PS> 1,2,3 | showInputs | f1Runner | f2Runner | f3Runner 1 2 3 2 4 6 2A 4B 6C A2 B4 C6 |
Note that there is often more than one way to do the same thing in PowerShell: for example, the loop in f3Runner could be replaced with this line (and the others similarly) and it would produce exactly the same result-namely, no pipelining! Here the special $_ variable indicates the current item in the loop.
|
1 |
$input | ForEach-Object { $result += f3 $_ } |
Scenario #2 – Collect all pipeline input before processing any
The way to fix the previous example is to emit each value as soon as it is calculated. The point to catch from the previous example is that there’s no need for you to explicitly aggregate the results; PowerShell will implicitly do that with the pipeline itself. This set of functions seemingly does just that, emitting one value at a time:
|
1 2 3 4 5 6 7 8 9 10 11 12 13 14 15 16 17 18 19 20 21 22 23 24 25 26 27 28 29 30 31 32 |
Function showInputs { $input | ForEach-Object { $result = $_ Write-Host $result Write-Output $result } } Function f1Runner { $input | ForEach-Object { $result = f1 $_ Write-Host $result Write-Output $result } } Function f2Runner { $input | ForEach-Object { $result = f2 $_ Write-Host $result Write-Output $result } } Function f3Runner { $input | ForEach-Object { $result = f3 $_ # Write-Host $result Write-Output $result } } |
When you execute the test line, however, it reveals essentially the same result as before (though there are now newlines between the intermediate results since they are being emitted individually): the output is not being pipelined!
|
1 2 3 4 5 6 7 8 9 10 11 12 13 |
PS> 1,2,3 | showInputs | f1Runner | f2Runner | f3Runner 1 2 3 2 4 6 2A 4B 6C A2 B4 C6 |
While these functions do not suffer the deficiency of the previous example (generating all the output before emitting anything), the converse is actually the problem here: these functions are waiting for all the input before calculating anything!
As you learn more about advanced PowerShell functions, you’ll discover that you actually have to put code in one of three blocks: the begin, process, or end blocks. The begin block runs before any pipeline input is accepted; the process block runs once for each pipeline input; and the end block runs after all pipeline input has been processed. If you do not explicitly specify a block, all your code is implicitly in the end block. And that explains why this scenario did no pipelining: each function waits until the pipeline empties and the function has collected all of its inputs, then it runs the end block code, emitting all its output in one chunk to the next pipeline participant. Thus, again we have no pipelining benefit.
Scenario #3 – Process each input when received and emit its output promptly
Scenario #2 moved a bit closer to real pipelining, and you might surmise from the discussion above that the final piece of the problem can be resolved by moving from the end block to the process block. And that would be quite correct; the set of functions below show how. Notice there is no loop here because the process block runs once for each input; in other words, there is a loop but it is handled by PowerShell itself. Within a process block, use the special $_ variable to access the current pipeline item.
|
1 2 3 4 5 6 7 8 9 10 11 12 13 14 15 16 17 18 19 20 21 22 23 24 25 26 27 28 29 30 31 32 33 34 35 36 |
Function showInputs { process { $result = $_ Write-Host $result Write-Output $result } } Function f1Runner { process { $result = f1 $_ Write-Host $result Write-Output $result } } Function f2Runner { process { $result = f2 $_ Write-Host $result Write-Output $result } } Function f3Runner { process { $result = f3 $_ # Write-Host $result Write-Output $result } } |
And indeed, with this approach, the output is properly pipelined, corresponding to Figure 3 above:
|
1 2 3 4 5 6 7 8 9 10 11 12 13 |
PS> 1,2,3 | showInputs | f1Runner | f2Runner | f3Runner 1 2 2A A2 2 4 4B B4 3 6 6C C6 |
Because the process block is so central to pipelining, there is a special syntax to reduce the amount of code you have to write. As noted above using the Function keyword with no explicit begin, process, or end block executes the code in the context of the end block. Similarly, if you use the Filter keyword with no explicit block then the code executes in the process block. Thus, this more concise code produces exactly the same result:
|
1 2 3 4 5 6 7 8 9 10 11 12 13 14 15 16 17 18 19 20 |
Filter showInputs { $result = $_ Write-Host $result Write-Output $result } Filter f1Runner { $result = f1 $_ Write-Host $result Write-Output $result } Filter f2Runner { $result = f2 $_ Write-Host $result Write-Output $result } Filter f3Runner { $result = f3 $_ # Write-Host $result Write-Output $result } |
Summary
As you have seen, it is very easy to think you are pipelining when, in fact, you are not. You could, instead, be waiting for all input to be received, or you might be processing all received inputs before sending any output. If, however, you are aware of the underlying concepts of the pipeline, it is straightforward to get true pipelining behavior in PowerShell.
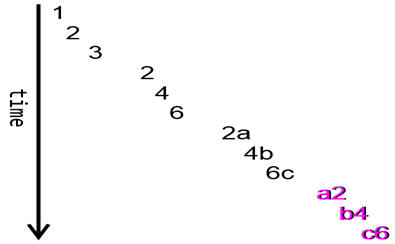
Figure 2:
Compare conceptually how the data moves without pipelining (scenarios 1 and 2)…
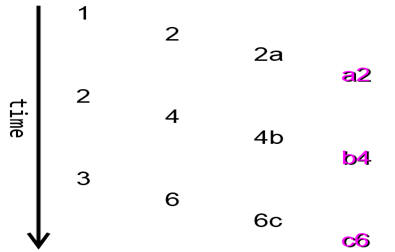
Figure 3:
and with proper pipelining:
For many situations-and particularly for time-consuming operations-you want to use proper pipelining so your end-user starts getting results as soon as possible. On the other hand, some operations actually require you to collect up the input and perform some operation on them together. Sorts are a classic example of something that can’t be done on an object-by-object basis: there is, of course a Cmdlet that does it for you but if there wasn’t …
|
1 |
5, 6, 7, 2, 3, 0, 9 |% -begin { $v = @() } { $v += $_ } -end { [array]::Sort($v); $v } |
I would be remiss, however, if I did not mention that the filter solution is not optimal in all situations. If you only need data to come through the pipeline, it is sufficient. But PowerShell provides the capability to accept input from either the pipeline or as direct arguments. That is, you often want to be able to execute either of these and get the same output:
|
1 2 |
PS> 1,2,3 | showInputs PS> showInputs 1,2,3 |
Alas, the filters above will not accept direct arguments. Here is a template for showInput that does (the other 3 filters can be adapted just as before, by changing the name and the calculation line). It is a bit more complicated, but that’s the trade-off for being more versatile.
|
1 2 3 4 5 6 7 8 9 10 |
Filter showInputs( [Parameter(ValueFromPipeline = $True)] [array]$item) { $item | ForEach-Object { $result = $_ Write-Host $result Write-Output $result } } |
Again, this is not the only syntax that would work. Take a look at Down the Rabbit Hole: A Study in PowerShell Pipelines, Functions, and Parameters to see other possible variations of pipelineable function templates, discussing their pros and cons.
This document contains proprietary information and is protected by copyright law.
Copyright © 2026 Red Gate Software Limited. All rights reserved
Load comments