
- PowerShell Desired State Configuration – Part 1: The Basics
- PowerShell Desired State Configuration – Part 2: LCM and Push Management Model
- PowerShell Desired State Configuration – Part 3: Pull Mode
- PowerShell Desired State Configuration – Part 4: Automating and Monitoring Pull Mode
Contents
- Configuring the Local Configuration Manager (LCM)
- Push management model
In my previous article, I described the basic ideas behind Desired Sate Configuration, Now I’ll be describing the components that are essential for the good functioning of Desired State Configuration (DSC). At the time that I’m writing this, the latest version of Windows Management Framework 5.0 (WMF) is available in a “Preview” version, so the examples in this chapter will be based on WMF 4.0. However, I will indicate the major points where DSC has evolved within WMF 5.0.
Just to give you a feel for the changes, we will first display a table containing all of the cmdlets and functions supplied with the PSDesiredStateConfiguration module:
PS > Get-Command -Module PSDesiredStateConfiguration

CommandType     Name
-----------     ----
Function        Configuration
Function        Get-DscConfiguration
Function        Get-DscLocalConfigurationManager
Function        Get-DscResource
Function        New-DSCCheckSum
Function        Restore-DscConfiguration
Function        Test-DscConfiguration
Cmdlet          Set-DscLocalConfigurationManager
Cmdlet          Start-DscConfiguration
Now we will run the same PowerShell command with WMF 5.0 to show the difference
CommandType Name
----------- ----
Function    Configuration
Function    Disable-DscDebug
Function    Enable-DscDebug
Function    Find-DscResource
Function    Get-DscConfiguration
Function    Get-DscConfigurationStatus
Function    Get-DscLocalConfigurationManager
Function    Get-DscResource
Function    New-DscChecksum
Function    Remove-DscConfigurationDocument
Function    Restore-DscConfiguration
Function    Stop-DscConfiguration
Cmdlet      Invoke-DscResource
Cmdlet      Publish-DscConfiguration
Cmdlet      Set-DscLocalConfigurationManager
Cmdlet      Start-DscConfiguration
Cmdlet      Test-DscConfiguration
Cmdlet      Update-DscConfiguration
You can see that the functionality of DSC is expanding rapidly. A number of functions and Cmdlets have been added to help administrators with their management of DSC. We can illustrate this easily when lang:ps theme:powershell-ise all available cmdlets on WMF 5.0 preview:
You will notice that there are lots of innovations in WMF 5.0. Here is a quick description from Technet. I shall not comment on it for the time being as we shall study them gradually in this series.
| Cmdlet | Description |
|---|---|
| Disable-DscDebug | Stops debugging of DSC resources. |
| Enable-DscDebug | Start debugging of all DSC resources. |
| Find-DscRescource | Finds DSC resources (contained within modules) that match the specific criteria. |
| Get-DscConfiguration | Gets the current configuration of the node. |
| Get-DscConfigurationStatus | Retrieves data about completed configuration runs. |
| Get-DscLocalConfigurationManager | Gets Local Configuration Manager settings for the node. |
| Get-DscResource | Gets DSC resources present on the computer. |
| Invoke-DscResource | Executes a method of a specific DSC resource. |
| New-DSCCheckSum | Creates checksum files for DSC documents and resources. |
| Publish-DscConfiguration | Publishes a DSC configuration to a set of machines, but does not apply it. |
| Remove-DscConfigurationDocument | Removes a configuration document after configuration. |
| Restore-DscConfiguration | Restores the previous configuration for the node. |
| Set-DscLocalConfigurationManager | Applies Local Configuration Manager settings to nodes. |
| Start-DscConfiguration | Applies configuration to nodes. |
| Stop-DscConfiguration | Stops a configuration job that is currently running. |
| Test-DscConfiguration | Tests whether the actual configuration on the nodes matches the desired configuration. |
| Update-DscConfiguration | Runs the existing configuration on a computer. |
The first thing to understand about DSC is the way the configurations are applied on the nodes. The Local Configuration Manager (LCM) is the PowerShell DSC engine and runs on all nodes that has PowerShell 4.0 or above installed. It controls the execution of DSC configurations on target nodes. When the LCM receives the MOF files, it is responsible for calling the DSC resources that are used in the DSC configuration script. Then, LCM applies configuration to the node. The LCM has many settings that describes how DSC operates locally on the target node. These settings are called ” meta-configuration” and can be changed per machine or on all machines.
In this article, we will focus on the LCM and how one can configure some of its settings so as to adapt it to its environment. The number of properties of the LCM may vary with the PowerShell version. You can get the LCM properties by using the following Get-DSCLocalConfigurationManager cmdlet.
Here are the LCM properties on a node with PowerShell version 4:
AllowModuleOverwrite           : False
CertificateID                  :
ConfigurationID                :
ConfigurationMode              : ApplyAndMonitor
ConfigurationModeFrequencyMins : 30
Credential                     :
DownloadManagerCustomData      :
DownloadManagerName            :
RebootNodeIfNeeded             : False
RefreshFrequencyMins           : 15
RefreshMode                    : PUSH
PSComputerName                 :
And here is a node with PowerShell version 5 showing the equivalent list:
ActionAfterReboot              : ContinueConfiguration
AllowModuleOverWrite           : False
CertificateID                  :
ConfigurationDownloadManagers  : {}
ConfigurationID                :
ConfigurationMode              : ApplyAndMonitor
ConfigurationModeFrequencyMins : 15
Credential                     :
DebugMode                      : {NONE}
DownloadManagerCustomData      :
DownloadManagerName            :
LCMCompatibleVersions          : {1.0, 2.0}
LCMState                       : Idle
LCMStateDetail                 :
LCMVersion                     : 2.0
StatusRetentionTimeInDays      : 10
PartialConfigurations          :
RebootNodeIfNeeded             : False
RefreshFrequencyMins           : 30
RefreshMode                    : PUSH
ReportManagers                 : {}
ResourceModuleManagers         : {}
PSComputerName                 :
Common parameters between v4 and v5 are described in the first part of this series and some parameters will be explain in the next part. Numerous properties have been added in the latest version of PowerShell, but they are not all mandatory. Here are the new parameters:
RefreshMode: A new value has been added to this property: ‘Disabled’. This value allows the LCM to be deactivated so as to prevent it from applying the configuration on the node. What does it mean? Imagine, you have another third party tools such as Puppet or Chef and you are looking to avoid conflict with DSC on this node. You don’t want that DSC applies a new configuration at the same time. This parameter disables any kind of MOF file processing, so you can’t push configuration on the target node when the value is “disabled”.
ActionAfterReboot: This new property indicates to the LCM which action it should to carry out after the restart of the node. The accepted values are the following:
- “ContinueConfiguration”
- “StopConfiguration”
LCMState: Determines the state of the LCM
- “Busy” when it is in execution mode on the node
- “PendingReboot” when the LCM is awaiting a restart
- “Ready” when the LCM is available.
LCMCompatibleVersions: Since PowerShell v5, a new LCM version has been introduced. It is then possible to choose one’s version.
| WMF 4.0 | WMF 5.0 |
|---|---|
| LCM 1.0 | LCM 1.0 / LCM 2.0 |
LCMVersion: The applicable values are: 1.0 or 2.0. Especially useful in a test environment.
LCMStateDetail: This property contains more information about the LCM state.
StatusRetentionTimeInDays: The number of days the LCM keeps the status of the current configuration.
PartialConfiguration: This property works solely in the “Pull Mode”. It makes it possible to break up a DSC configuration into several parts. Imagine that you are deploying a new SQL server: The SQL administrators could then create the SQL configuration dedicated to SQL, and the system administrators could write the configuration dedicated to the operating system.
How do we write a metaconfiguration?
A metaconfiguration is very similar to a normal/standard configuration. It is carried out through the block “LocalConfigurationManager”. The properties present in this block will be updated on the LCM, but all the other properties will not be modified. Here is a simple example allowing us to configure the property “RebootNodelfNeeded” thus indicating that my workstation is allowed to restart after applying the configuration:
Configuration LCMConfiguration
Configuration LCMConfiguration
{
    Note Localhost
    {
        LocalConfigurationManager
        {
            RebootNodeIfNeeded = $True
        }
    }
}

LCMConfiguration
Note: PowerShell v5 introduces the “Settings” block instead of “LocalConfigurationManager”. But the latter may be used in PowerShell v5.
After the execution of my metaconfiguration “LCMConfiguration”, a file ‘localhost.meta.mof‘ is created. Indeed, a metaconfiguration implies the creation of a file with an extension “meta.mof“. The name of the node is inserted in the name of the file:
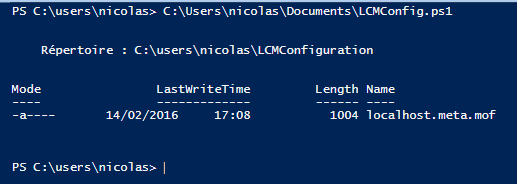
Figure 1 – meta.mof file
The file “localhost.meta.mof” contains the following:
/*
@TargetNode='localhost'
@GeneratedBy=nicolas
@GenerationDate=02/14/2016 17:18:28
@GenerationHost=Laptop01
*/

instance of MSFT_DSCMetaConfiguration as $MSFT_DSCMetaConfiguration1ref
{
RebootNodeIfNeeded = True;

};

instance of OMI_ConfigurationDocument
{
 Version="2.0.0";
 MinimumCompatibleVersion = "1.0.0";
 CompatibleVersionAdditionalProperties= {};
 Author="adm_npri";
 GenerationDate="02/14/2016 17:08:20";
 GenerationHost="Laptop01";
 id="LCMConfiguration"";
};
The only thing left to do is to apply our metaconfiguration to our node. For this one just needs to use the Set-DSCLocalConfigurationManager cmdlet. Here it is the main difference with a normal configuration for which you would have used the Start-DSCConfiguration cmdlet.
PS> Set-DSCLocalConfigurationManager -Path C:UsersNicolasLCMConfiguration
By displaying the properties of my LCM, the value is now equal to “TRUE”:
PS> Get-DSCLocalConfigurationManager


AllowModuleOverwrite           : False
CertificateID                  :
ConfigurationID                :
ConfigurationMode              : ApplyAndMonitor
ConfigurationModeFrequencyMins : 30
Credential                     :
DownloadManagerCustomData      :
DownloadManagerName            :
RebootNodeIfNeeded             : True
RefreshFrequencyMins           : 15
RefreshMode                    : PUSH
PSComputerName                 :
According to your requirements, you may also want to configure the LCM differently on your machines. If you wish to obtain the LCM properties of a machine without connecting to it, you only need to create a CIM session:
PS> $Session = New-CimSession -ComputerName "ADM11" -Credential DomainAdminAccount
In this case, I display the LCM properties of the ADM11 server:
PS> Get-DscLocalConfigurationManager -CimSession $Session

AllowModuleOverwrite           : False
CertificateID                  :
ConfigurationID                :
ConfigurationMode              : ApplyAndMonitor
ConfigurationModeFrequencyMins : 30
Credential                     :
DownloadManagerCustomData      :
DownloadManagerName            :
RebootNodeIfNeeded             : False
RefreshFrequencyMins           : 15
RefreshMode                    : PUSH
PSComputerName                 : ADM11
For those of you that are asking whether it is possible to integrate the LCM configuration with a normal configuration, the answer is yes. However, I advise you to separate these two aspects to simplify management.
The push management model
Let’s talk about the “Push mode” in detail. It is the simplest mode to put in place. It is ideal in a test environment or with servers whose configuration is applied once for a long period. The user decides to apply manually a configuration on one or more nodes. I have summarised the “Push mode” in a diagram:

Figure2 -Push management model
Authoring
This stage is about creating your DSC configuration. You may do it through a simple text editor such as Notepad or via the PowerShell ISE. When the configuration is created, one only needs to execute it so as to create one or several MOF files that will contain the necessary information for the configuration of the node. There can only be one MOF file per node. This allows the node to have the overall configuration at once and be certain to apply the correct configuration.
Staging
After the compilation of the MOF files on your workstation, they are “pushed” on the nodes with the help of the Start-DSCConfiguration cmdlet. There is one optional parameter -ComputerNamethat allows you to indicate the node on which to apply the configuration. If the latter is not indicated, then the LCM will verify each file that is present in the configuration folder (indicated with the help of the -Path parameter) so as to identify the nodes concerned.
Note: to avoid a deployment failure when applying a configuration, you must first actively check that the DSC resources are present on the node. That is the biggest disadvantage of the “Push mode” that requires a manual action to deploy the resources on the nodes.
Execution
The last step is to configure the node with the information received via the MOF files. The LCM immediately executes these files after it has analysed them. These files are placed on each node in the following directory: $env:systemRoot/system32/configuration
You have “pushed” one MOF file on to your node but you will get several MOF files appearing. Why? What is their purpose?
Here is a list:
PS> Get-ChildItem -Path 'C:WindowsSystem32Configuration' -File


    Directory: C:WindowsSystem32Configuration


Mode                LastWriteTime     Length Name
----                -------------     ------ ----
-a---        25.01.2016     15:17       1164 backup.mof
-a---        25.01.2016     15:17       1164 Current.mof
-a---        14.02.2016     14:55        198 DSCEngineCache.mof
-a---        23.01.2016     18:55       1130 MetaConfig.mof
-a---        25.01.2016     15:17       1292 Previous.mof
Or by accessing the directory directly…
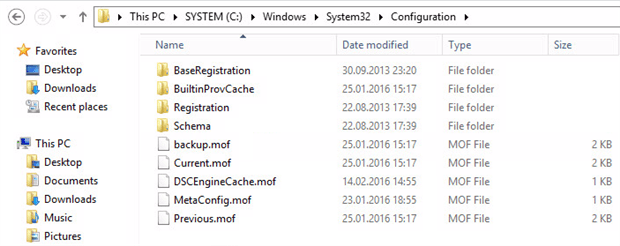
Figure3 -MOF Files folder
The files will have been created according to a specific process:
- The first step: the LCM receives and executes the MOF file. It renames it ‘pending.mof‘
- The second step (optional): if it exists, it renames the actual MOF file ‘current.mof ‘ to ‘previous.mof‘
- The third step: when this new configuration has been applied successfully, it renames ‘pending.mof‘ to ‘current.mof‘
- The last step: the ‘current.mof‘ is duplicated to ‘backup.mof‘
Note: if it fails, the file ‘ pending.mof’ is kept and re-executed.
Here is a diagram of the process to explain:
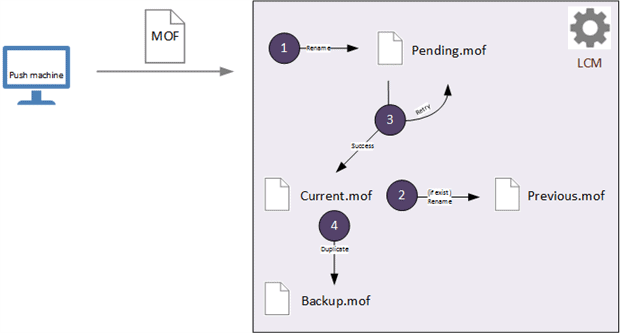
Figure4 -MOF Files workflow
In some circumstances, you may need to delete a file from the node. It could, for example, have become corrupted. To deal with this, a new cmdlet Remove-DSCConfigurationDocument has been implemented that allows their suppression from a script:
To delete all the MOF files present on the node:
PS> Remove-DSCConfigurationDocument -Stage Current, Previous, Pending -Verbose
To delete just the MOF file “previous.mof”:
PS> Remove-DSCConfigurationDocument -Stage Previous -Verbose
To go further
The ‘ Push mode’ is really very simple to set up when there is a ‘trust’ relationship between your workstation and the node. The trust relationship is obtained when the machines are members of the same Active Directory domain. The prerequisite to use DSC is the WinRM HTTP 5895 protocol (Windows Remote Management – that is the implementation of the standard WS-Management on the Windows platform). It is therefore necessary to assure the correct functioning of this component so as to allow the remote execution of the PowerShell code.
PS> Get-Service -ComputerName ADM11 -Name WinRM | fl *


Name                : WinRM
RequiredServices    : {RPCSS, HTTP}
CanPauseAndContinue : False
CanShutdown         : True
CanStop             : True
DisplayName         : Windows Remote Management (WS-Management)
DependentServices   : {}
MachineName         : ADM11
ServiceName         : WinRM
ServicesDependedOn  : {RPCSS, HTTP}
ServiceHandle       : SafeServiceHandle
Status              : Running
ServiceType         : Win32ShareProcess
Site                :
Container           :
Note: in the event that your WinRM service is not running, you just need to use the following command so as to activate it: Set-WSManQuickConfig
Before trying to “push” a configuration onto your node, I advise you to do a test to assure that WinRM is enabled. The command Test-WSMan should give you this:
PS C:Usersadmin> Test-WSMan -ComputerName ADM11


wsmid           : http://schemas.dmtf.org/wbem/wsman/identity/1/wsmanidentity.xsd
ProtocolVersion : http://schemas.dmtf.org/wbem/wsman/1/wsman.xsd
ProductVendor   : Microsoft Corporation
ProductVersion  : OS: 0.0.0 SP: 0.0 Stack: 3.0
Here, WinRM is active. If not, you will get an error.
If you have to deploy configurations on machines in a workgroup, the “Trust” relationship does not exist by default. Therefore, if you have to configure, for example, a web server located in a DMZ (Demilitarized zone), here are the steps:
- You must have a DNS resolution for the node located in DMZ. For this, you may edit your HOSTS file or create a static entry within your DNS server.
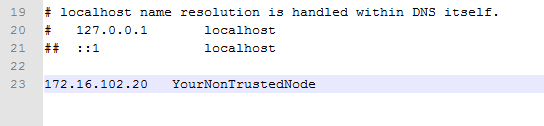
Figure5 – HOSTS file on your workstation
- Open an exception in your firewall so as to allow the WinRM port to communicate between your node and your workstation.
- Execute a CMD as administrator then enter the following command:
PS> Set winrm/config/client '@{TrustedHosts="YourNonTrustedNode"}'
This allows to add your node in the ‘Trust list’ of WinRM
- finally, you must use a local administrator’s account of the node when you use the command Start- DSCConfiguration with the parameter -Credential:
PS> Start-DSCConfiguration -Path << DSCFolder >> -Verbose -Credential (Get-Credential) -ComputerName 'YourNonTrustedNode'
Conclusion
We now have completed the analysis of the “Push mode” that has proved to be simple to implement. In the next sections, we will detail the “PULL mode” that is more adapted in a production environment with hundreds of machines to manage.
As for the LCM, it is a key component of the DSC framework and it will reappear in the next sections of this series. It is important to understand its use, and its central role in a DSC architecture. I am sorry if this article contained a lot of theory but it was necessary to run through the basics so as to describe all the logic of the DSC.
Load comments