
PowerSMO combines two new Microsoft technologies:
- PowerShell – an object based scripting engine and command-line shell
- SMO – SQL Server Management Objects, a .NET based object model, which can be used in the management of SQL Server.
In this article we’ll be looking firstly at the basics of using PowerShell, and then at how to combine SMO with PowerShell to make PowerSMO, and finally at how to use PowerSMO to manage SQL Server.
You will find that PowerSMO is in the spirit of scripting languages such as VBA or Perl. Ultimately, I think you’ll find PowerSMO easier to use and more powerful, but like any new technology it has a learning curve. The intention of this article is to help push you over the first hump of that curve.
All of the code examples I include here are available in the zip archive that comes with this article (see the CODE DOWNLOAD link in the box to the right of the article title), as well as on my own pluralsight.com web site.
Getting started
Besides the zip archive, you will need two other things in order to get started using PowerSMO, both of which are free downloads from Microsoft:
- The SMO assemblies – these form part of the SQL Server 2005 Features Pack. Go to http://www.msdn.com/sql and click on “Downloads” to find the Features Pack. The “SQL Server 2005 Management Objects Collections” are about half-way down the page. Download and install them.
- PowerShell – this is available in a number of languages/platforms. Search for Knowledge Base article “KB926139” on MSDN at http://support.microsoft.com/?kbid=926139 to find a list of the various versions of PowerShell. Download and install the one appropriate for your environment.
A brief tour of PowerShell
The PowerShell installation will add a “Windows PowerShell 1.0” entry to the “All Programs” part of your start menu. It contains a “Windows PowerShell” item you can use to start PowerShell, as shown in Figure 1:
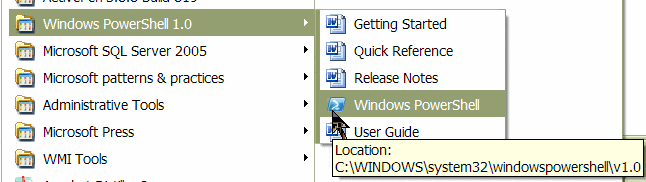
Figure 1: PowerShell Start Menu
Let’s start with some PowerShell basics. Starting PowerShell produces a command shell window, which looks a bit like the old Windows/DOS command shell. It will even respond to some of the old DOS commands you know and love, such as dir and echo, as shown in Figure 2:
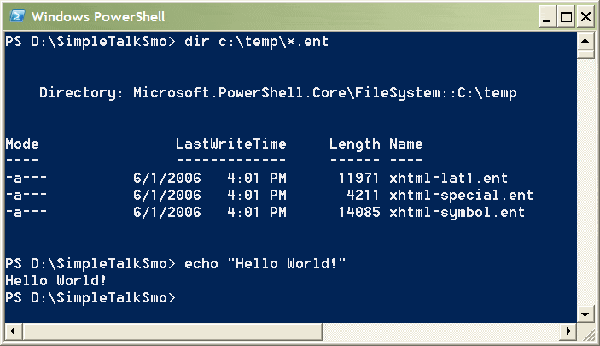
Figure 2: Command Shell
One of the things that make PowerShell different from the Windows command shell is that it is based on objects, not text. The echo example happened to use text objects so this difference was not apparent. However, PowerShell is capable of using any object that can be created by the .NET framework and it is this ability that will later allow us to integrate SMO into PowerShell to make PowerSMO.
Using strings, variables and objects
Figure 3 shows PowerShell creating an instance of the .NET Random class, and then using it to generate some numbers. I’ll be using simple text grabs going forward rather than full screen shots of the PowerShell.
|
1 |
PS D:\SimpleTalkSmo> $rand = New-Object “Random” PS D:\SimpleTalkSmo> $rand.Next() 839188457 PS D:\SimpleTalkSmo> $rand.Next() 693128074 PS D:\SimpleTalkSmo> Figure3: Random Object New-Object is what PowerShell calls a cmdlet; it is basically a command, like dir is in the Windows command shell. The New-Object command creates an instance of a .NET class, in this case, the Random class. Variables in PowerShell always have the $ character as a prefix. In Figure 3, $rand is a variable that, in this case, holds an instance of a Random object. PowerShell can call any method of an object using a simple dotted syntax as is shown in $rand.Next(). Each time you call Next() on a Random object it returns a different number. Whenever an object is returned, it is typically assigned to a variable or its value is printed on the screen. Figure 3 showed the object produced by New-Object being assigned to the variable $rand. You can also assign literal numbers or text to PowerShell variables:
|
1 |
PS C:\SimpleTalkSmo> $n = 8
PS C:\SimpleTalkSmo> $s = “Dan”
PS C:\SimpleTalkSmo> $n
8
PS C:\SimpleTalkSmo> $s
Dan
PS C:\SimpleTalkSmo>
Figure 4: Numeric and Text Values
PowerShell supports all of the arithmetic and string operations that you would expect. Figure 5 shows some of these:
|
1 |
PS C:\SimpleTalkSmo> $n = (3+4)/2 PS C:\SimpleTalkSmo> $n 3.5 PS C:\SimpleTalkSmo> $s = $s + ” Sullivan” PS C:\SimpleTalkSmo> $s Dan Sullivan PS C:\SimpleTalkSmo> Figure 5: Simple Operations PowerShell also lets you ignore types if you wish. Figure 6 shows string being “added” to a number, but still producing a numeric result:
|
1 |
PS C:\SimpleTalkSmo> $n = $n +”8″
PS C:\SimpleTalkSmo> $n
11.5
PS C:\SimpleTalkSmo>
Figure 6: Type Can Be Ignored
You can see in Figure 7 that PowerShell is based on objects, not strings. Here we see the type of $n and $s being returned:
|
1 |
PS C:\SimpleTalkSmo> $n.GetType().Name Double PS C:\SimpleTalkSmo> $s.GetType().Name String PS C:\SimpleTalkSmo> Figure 7: Objects Figure 7 also demonstrates another consequence of the fact that PowerShell works with objects, which is that we can access that object’s methods and properties. In this example we used the GetType() method to find the type of $n, then the Name property of its type to find its name. Back in Figure 3 we made an instance of the Random class from .NET. You might not know the documentation for the Random class so PowerShell includes a cmdlet called get-member that allows you to investigate what sort of features an object has. Figure 8 shows the use of get-member to find out what you can do with the $rand object.
|
1 |
PS C:\SimpleTalkSmo> $rand = New-Object “Random”
PS C:\SimpleTalkSmo> get-member -inputObject $rand
TypeName: System.Random
Name MemberType Definition
—- ———- ———-
Equals Method System.Boolean Equals(Object obj)
GetHashCode Method System.Int32 GetHashCode()
GetType Method System.Type GetType()
Next Method System.Int32 Next(), System.Int32 Ne
NextBytes Method System.Void NextBytes(Byte[] buffer)
NextDouble Method System.Double NextDouble()
ToString Method System.String ToString()
PS C:\SimpleTalkSmo>
Figure 8: get-member
The text in Figure 8 is chopped off on the right a little bit but you get the idea. You can see the methods supported by $rand, including the Next method we used in Figure 3. Figure 9 shows the results produced when get-member is used with a string variable.
|
1 |
PS C:\SimpleTalkSmo> $s = “Dan” PS C:\SimpleTalkSmo> get-member -inputObject $s TypeName: System.String Name MemberType Definition —- ———- ———- Clone Method System.Object Clone() CompareTo Method System.Int32 CompareTo(Object value), Contains Method System.Boolean Contains(String value) … Length Property System.Int32 Length {get;} PS C:\SimpleTalkSmo> Figure 9: String Methods and Properties In Figure 9, we see that a string has both methods and properties. Note that get-member applied to a string produces a lot more results than are shown. A string has a Length property which can be used to find out how long it is, as is shown in Figure 10:
|
1 |
PS C:\SimpleTalkSmo> $s.Length
12
PS C:\SimpleTalkSmo>
Figure 10: Using a Property
It’s fairly easy to find out what you can do with a variable by using get-member, but what if you need to know how to use one of the cmdlets in power shell? The get-help cmdlet in PowerShell is used to get the documentation of a cmdlet, as is shown in Figure 11:
|
1 |
PS C:\SimpleTalkSmo> get-help New-Object NAME New-Object SYNOPSIS Creates an instance of a .Net or COM object. SYNTAX New-Object [-typeName] <string> [[-argumentList] <Object[]>] … REMARKS For more information, type: “get-help New-Object -detailed”. For technical information, type: “get-help New-Object -full”. PS C:\SimpleTalkSmo> Figure 11: get-help Figure 11 does not show all of the documentation produced, a big chunk in the middle has been replaced with an ellipsis to reduce clutter. You can use you wildcard character, *, if you are not sure how to spell the cmdlet you want documentation for. For example you can use “get-help *name* to find all the help topics available that include the word “name”.
Pipelines
Pipelines are supported by PowerShell. Pipelines are a common feature of shells and allow the output of one segment to be used as the input in the next segment in the pipeline. Segments of a pipeline are connected together by the | character. A segment of the pipeline is often a script block. A script block is a PowerShell script wrapped in curly braces, prefaced by either a % or ?. There is a special variable, $_, that is used to represent the output of the previous segment of the pipeline. Figure 12 shows an example of a simple pipeline:
|
1 |
PS C:\SimpleTalkSmo> $s = “Dan”
PS C:\SimpleTalkSmo> $s | %{$_.Length}
3
PS C:\SimpleTalkSmo>
Figure 12: Simple Pipeline
In Figure 12, $s is passed into a script block prefaced by the % character. A script block prefaced by the % character is executed as though it were typed in on the command line without a pipeline. When a script block has no following pipeline segment its output is sent to the screen.
The $_ represents the input of the previous segment, in this case the $s variable. The length of the input object is accessed through its Length property. There is no following pipeline segment so the result, the number of characters in “Dan”, is output to the screen.
A script block can also be used to test to see whether or not further processing should be applied to the object that is passed in to it. A script block prefixed with the ? character executes the script inside of it and interprets the result as a Boolean. If the result is true the object is passed onto next segment of the pipeline, otherwise it is thrown away. Figure 13 shows examples of pipelines that test an input object:
|
1 |
PS C:\SimpleTalkSmo> $s = “Daniel” PS C:\SimpleTalkSmo> $s | ?{$_.Length -gt 3} | %{$_} Daniel PS C:\SimpleTalkSmo> $s = “Dan” PS C:\SimpleTalkSmo> $s | ?{$_.Length -gt 3} | %{$_} PS C:\SimpleTalkSmo> Figure 13: Testing Segment Input Figure 13 starts off by setting the variable type $s to the text “Daniel”. Next it passes $s into a script block that is prefaced by a ? character. This script block compares the value of the Length property of the object that was input to the number three. It does this comparison using a “greater than” test. PowerShell supports all the kinds of comparisons you’d expect but they are all specified using a syntax that begins with a dash followed by a few letters. The comparison is true so $s is passed into the code block in the next segment of the pipeline. The next segment of the pipeline evaluates the value of the object, that it executes the simple script $_. The result, “Daniel”, is typed out on the screen. The remainder of the example repeats the test but this time with the $s variable is set to “Dan”. In this case nothing is typed out on the screen because the length of the variable $s is not greater than three. We have barely scratched the surface of the capabilities of PowerShell, but it should be enough to get you going. The resources for learning about PowerShell are at the Microsoft Scripting Center. Browse to https://technet.microsoft.com/en-us/scriptcenter/bb410849.aspx and look for the link further down the page that says “Scripting for…”, “Windows PowerShell”.
PowerShell and WMI
There is one more feature of PowerShell that we need to look at before digging into PowerSMO; and that’s its support of WMI, Windows Management Instrumentation. WMI provides a standard way to access the administrative information about a Windows system, for example what user accounts are in a system…and so on. Later we are going to use this to automate the creation of SQL logins for accounts in a particular group of Windows system users. Prior to PowerShell, WMI was typically used with a Windows Scripting Host language such VBA. The PowerShell cmdlet get-WMIObject removes most of the detail work you would have to do a WMI query with Windows Scripting Host. Figure 14 is a PowerShell script that uses the get-WMIObject cmdlet to get all the instances of the Win32_Group class in the PARSEC5 Common Information Model or CIM. So, in effect, we are listing all the user groups on my computer (called PARSEC5):
|
1 |
PS C:\SimpleTalkSmo> $groups = Get-WmiObject -computerName
PARSEC5 Win32_Group
PS C:\SimpleTalkSmo> $groups | %{$_.Name}
Administrators
Backup Operators
Guests
Network Configuration Operators
Power Users
Users
PowerSQL
SQLServer2005MSFTEUser$PARSEC5$MSSQLSERVER
SQLServer2005MSSQLServerADHelperUser$PARSEC5
SQLServer2005MSSQLUser$PARSEC5$MSSQLSERVER
SQLServer2005NotificationServicesUser$PARSEC5
SQLServer2005SQLAgentUser$PARSEC5$MSSQLSERVER
SQLServer2005SQLBrowserUser$PARSEC5
PS C:\SimpleTalkSmo>
Figure 14: Finding User Groups with WMI
The Common Information Model is the industry-standard model of computer systems, on which WMI is based. You might recognize some of the SQL Server groups on this list and groups such as “administrators” or “users”. Note that there is a group named “PowerSQL”. We will be using that group later.
SMO + PowerShell = PowerSMO
Now that we have finished our introduction to PowerShell and a very brief introduction to WMI we can move on to using PowerSMO.
Configuring PowerSMO
In order to use PowerSMO you will need the InitPowerSMO.ps1 script file which is in the .zip archive mentioned at the beginning of this article.
NOTE:
This script uses a number of advanced features of PowerShell that we will not be discussing in this article, but the beginning of this script loads the SMO assemblies into PowerShell.
The default installation of PowerShell is locked down fairly tightly. You will have to change the configuration of PowerShell to allow the InitPowerSMO.ps1 script to be run. You can do this using the set-ExecutionPolicy cmdlet as shown in Figure 15:
|
1 |
PS C:\SimpleTalkSmo> Set-ExecutionPolicy RemoteSigned PS C:\SimpleTalkSmo> Figure 15: Execution Policy Next thing you need to do is initialize PowerSMO by running the InitPowerSMO.ps1 script. This is shown in Figure 16:
|
1 |
PS C:\SimpleTalkSmo> . D:\InitPowerSMO.ps1
PowerSMO! Copyright 2006 Danal Technology Inc
www.pluralsight.com
For Tutorial Purposes Only
PS C:\SimpleTalkSmo>
Figure 16: Initializing PowerSMO
The InitPowerSMO.ps1 script is run by typing its full path into PowerShell followed by a carriage return. Note carefully that the path is preceded by a period, “.”, and a space; this is required. Depending on the speed of your system it might take 20 or 30 seconds for this script to run. Besides loading the SMO assemblies it is also building helper functions that can be used to access SMO.
Using the ManagedComputer Class
In the SMO object model, one of the most important classes is the ManagedComputer class. It is “a top level class that represents Microsoft SQL Server services and network settings available through the WMI Provider“.
PowerSMO has a get-SMO_ManagedComputer cmdlet to give you access to the managed computer. Figure 17 shows use of get-SMO_ManagedComputer to get to the managed computer for the PARSEC5 the system and assign it to $mc.
|
1 |
PS C:\SimpleTalkSmo> $mc = get-SMO_ManagedComputer “PARSEC5” PS C:\SimpleTalkSmo> Figure 17: Managed Computer Now, via $mc, we have access to access to all of the methods and properties supported by ManagedComputer. But how do you know which properties and methods are supported and what they do? You could have used get-member to find the properties and methods but that wouldn’t have told you what they did. All of this information, however, is available in the BOL. Figure 18 shows the some of the BOL documentation for the ManagedComputer class: 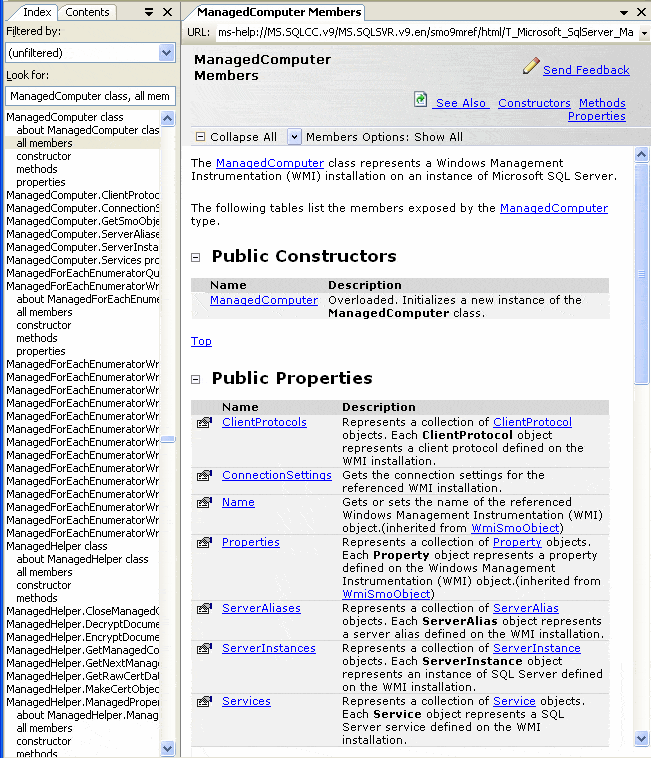 Figure 18: BOL SMO Documentation In Figure 18, we could drill into services or service instances to find out more about these properties. What this means is the documentation for PowerSMO is the same as it is for SMO, it is the BOL. PowerSMO makes helper functions, like get-SMO_ManagedComputer for most of the SMO classes. You can see the list of these helper functions the dir command as is shown in Figure 19:
|
1 |
PS C:\SimpleTalkSmo> dir Function:*SMO_*
CommandType Name
———– —-
Function Get-SMO_ExecutionStatus
Function Get-SMO_SmoApplication
…
Figure 19: SMO Functions
The listing shown in Figure 19 is truncated to save space; the actual list you will see when you type this on you system is quite a bit longer.
Listing all SQL Server instances on a computer
Now we can start using PowerSMO to perform some SQL Server management tasks. The first thing we will do is look for the instances of SQL Server that are on PARSEC5.
Server instances are in the ServerInstances property of the ManagedComputer, an instance of which we have saved in our $mc variable. Figure 20 shows the server instances on the PARSEC5 computer. Remember that you can always use something like get-member -inputObject $mc to find out what properties and methods a variable has:
|
1 |
PS C:\SimpleTalkSmo> $mc.ServerInstances ServerProtocols : {Np, Sm, Tcp, Via} Parent : Microsoft.SqlServer.Management.Smo.Wmi.ManagedComputer Urn : ManagedComputer[@Name=’PARSEC5′]/ServerInstance [@Name=’MSSQLSERVER’] Name : MSSQLSERVER Properties : {} UserData : State : Existing ServerProtocols : {Np, Sm, Tcp, Via} Parent : Microsoft.SqlServer.Management.Smo.Wmi.ManagedComputer Urn : ManagedComputer[@Name=’PARSEC5′]/ServerInstance [@Name=’TEST2′] Name : TEST2 Properties : {} UserData : State : Existing PS C:\SimpleTalkSmo> Figure 20: Server Instances Figure 20 shows that there are two SQL Server instances on PARSEC5; one is named “MSSQLSERVER” the other is named “TEST2”. We can make use of a pipeline to filter out the information we’re not interested in. Figure 21 shows the server instances being piped to a script block that extracts the name of the server instance:
|
1 |
PS C:\SimpleTalkSmo> $mc.ServerInstances | %{$_.Name}
MSSQLSERVER
TEST2
PS C:\SimpleTalkSmo>
Figure 21: Instance Names Only
When a segment of a pipeline produces more than one object, as is the case here, the objects are passed one at a time to the script block that follows the segment. So the $_.Named in the last segment in Figure 21 is executed twice, once for each of the instances produced by the first segment.
Starting and Stopping SQL Server
Let’s first look to see if the MSSQLSERVER server instance is running. To do that we need to access the service that is running this instance. The Services property of the managed computer is an array of all of the services on this managed computer. We index into this array just by using the name of the service we want and look at its ServiceState property to see if it is running. Figure 22 shows how to check the state of a service:
|
1 |
PS C:\SimpleTalkSmo> $mc.Services[‘MSSQLSERVER’].ServiceState Stopped PS C:\SimpleTalkSmo> Figure 22: Checking ServiceState In Figure 22, $mc.Services[‘MSSQLSERVER’] is accessing the service that is running MSSQLSERVER. By checking the ServiceState we can see that this instance is currently stopped. The next thing we can do with PowerSMO is start our instance of SQL Server. We can do this by typing $mc.Services[‘MSSQLSERVER’].Start() into PowerShell. Likewise we can stop SQL Server by typing $mc.Services[‘MSSQLSERVER’].Stop(). It’s worth noting at this point that a ManagedComputer object has all of the capabilities that the SQL Server Configuration Manager application has.
Using the Server Class
The SMO Server class is used to represent all of the objects in an instance of SQL Server, for example all of its databases. In PowerSMO we use get-SMO_Server to get an instance of the SMO server class as shown in Figure 23:
|
1 |
PS C:\SimpleTalkSmo> $server = get-SMO_Server PARSEC5
PS C:\SimpleTalkSmo> $server.Databases | %{$_.Name}
DBDemoSample
master
model
msdb
MyDB
sqlcourse
SQLLabs
tempdb
WFPersistance
PS C:\SimpleTalkSmo>
Figure 23: Databases on Server
In Figure 23, get-SMO_Server creates a SMO Server object for the default instance of SQL Server on PARSEC5, just as it is described in the BOL. The Databases property of the $server is an array of all of the databases in the server.
Creating logins
Now we will write a script that will create logins for all of the users in the Windows PowerSQL group. We will use WMI find all the user accounts on PARSEC5 that are a members of the PowerSQL group, and then create a login for each of them. Let’s start by creating a login for a single Windows user to see how that works. I know that there is a user named “Ralph” on PARSEC5 so let’s create a login for him, as shown in Figure 24:
|
1 |
PS C:\SimpleTalkSmo> $login = get-SMO_Login $server “PARSEC5\Ralph” PS C:\SimpleTalkSmo> $login.LoginType = “WindowsUser” PS C:\SimpleTalkSmo> $login.Create() PS C:\SimpleTalkSmo> Figure 24: Creating Logins We start off by getting a reference to the PARSEC5 server. Then we use the get-SMO_Login cmdlet to create a login object. We pass a reference to the server and the domain\name of the Windows user we want to create a login for, similar to what we would do using T-SQL to create a Windows login. Note that $server and domain\name are separated only by a whitespace and not by a comma. Next we set the login type to be a Windows user. Lastly the Create() command actually adds the login to SQL Server. Now the default server on PARSEC5 has a Ralph login. We could have also set Ralph’s default database and such if we had wanted to.
Automating login creation
We are at the point where we can automate creating a login for every user account in the PowerSQL group. In Figure 14 we used get-WMIObject to list all the groups on PARSEC5. We can also list all the users on PARSEC5. WMI keeps track of UserAccount objects for this purpose. Figure 25 shows the users on PARSEC5. You can see the Ralph user we used previous to demonstrate how to create a login for SQL Server.:
|
1 |
PS C:\SimpleTalkSmo> Get-WmiObject “Win32_UserAccount” | %{$_.name}
Administrator
ASPNET
Dan
dawn
don
Gort
Guest
HelpAssistant
IUSR_PARSEC5
IWAM_PARSEC5
Klatuu
MiniDan
Ralph
SMTP_USER
SomeUser
SQLAClient
SqlAdmin
PS C:\SimpleTalkSmo>
Figure 25: Listing Users
WMI keeps track of the relationships between users and groups with Win32_GroupUser objects. There is a group user object for each user, group pair. This means if Joe belongs to two different groups there will be two Win32_GroupUser objects to represent this.
Each Win32_GroupUser contains a GroupComponent property that identifies a Windows group and a PartComponent property that identifies a user account. A typical GroupCompenent looks as follows:
|
1 |
\\PARSEC5\root\cimv2:Win32_Group.Domain=”PARSEC5″,Name=”PowerSQL” and a PartComponent looks like this:
|
1 |
\\PARSEC5\root\cimv2:Win32_UserAccount.Domain=”PARSEC5″,Name=”Gort”
The only part of these properties that is of interest to us is id in Name=”id”. Since we are going to be looking for this over and over, we will create a function that retrieves it. Figure 26 shows a PowerShell function that can crack out the name value. Type this function into the command line to create it:
|
1 |
function get-WMIName($component) { $component.SubString(6 + $component.LastIndexOf(“Name=”””)).TrimEnd(“”””) } Figure 26: Name Cracker Function The get-WMIName function in Figure 26 names the input argument $component. It looks for the last occurrence of Name=”, extracts the string that comes after that, and then trims of the trailing quote character. We can test this function against an actual string, as is shown in Figure 27:
|
1 |
PS C:\SimpleTalkSmo> $s = “\\PARSEC5\root\cimv2:Win32_Group.
Domain=””PARSEC5″”,Name=””PowerSQL”””
PS C:\SimpleTalkSmo> get-WMIName($s)
PowerSQL
PS C:\SimpleTalkSmo>
Figure27: Cracking Name
Now we can use the get-WMIName function to build a test to find the users in the PowerSQL group as shown in Figure 28:
|
1 |
PS C:\SimpleTalkSmo> Get-WmiObject -computerName PARSEC5 Win32_GroupUser | ?{(get-WMIName($_.GroupComponent)) -eq “PowerSQL”} | %{get-WMIName($_.PartComponent)} Klatuu Gort PS C:> Figure 28: Finding Users in PowerSQL The script in Figure 28 uses get-WMIObject to pipe all of the Win32_GroupUser objects into a script block that tests to see if it GroupComponent is the PowerSQL group. If the Win32_GroupUser passes this test it is passed into the last script block that extracts the users name from the PartComponent. Here we see that both Gort and Klatuu are members of the PowerSQL users group. Extra points if you know the movie where they saved the Earth :). The easiest way to add logins for the users we found is to add one more segment to the pipeline shown in Figure 28 that will process the names, as shown in Figure 29:
|
1 |
PS C:\SimpleTalkSmo> Get-WmiObject Win32_GroupUser |
?{(get-WMIName($_.GroupComponent)) -eq “PowerSQL”} |
%{get-WMIName($_.PartComponent)} |
%{$login = SMO_Login $server (“PARSEC5\”+$_); $login.LoginType=
“WindowsUser”; $login.Create()}
PS C:\SimpleTalkSmo>
Figure 29: Adding Logins
The script block added to the pipeline in Figure 29 prefixes each user name passed into it with “PARSEC5\”, the domain for these users, and uses that name to create a login object. Then it makes the login a Windows login and creates it. Note that within a script block script expressions are separated by a semi-colon, “;”.
Just to make sure things are working as we expect we can start SSMS (SQL Server Management Studio) and use it to list the logins on PARSEC5. Figure 30 shows that SSMS sees that Gort and Klatuu have been added as logins to SQL Server:
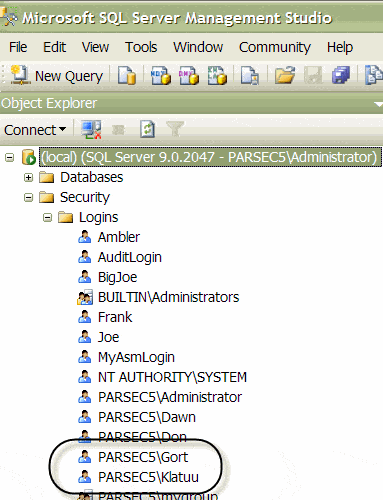
Figure 30: SSMS
Summary
We started by installing the SMO assemblies and PowerShell. Then we initialized PowerSMO by running the InitPowerSMO.ps1 script in PowerShell. We examined some of the features of PowerShell and its support of WMI. Then we looked at PowerSMO, which is in effect a set of helper functions that create SMO objects, which in turn can be used to manage SQL Server. We found that we can combine WMI with PowerSMO to help us manage SQL Server.
This has been a really short introduction into PowerShell, WMI, and PowerSMO. I hope it is enough to entice you into using them.
Load comments