A few years ago, I was tasked with fixing a broken an image conversion process for a hospital. As patient files were scanned in, as BMP files, the process converted them to JPEG and resized them. It could manage only about 200 images a minute, far slower than the image scanning rate, and the process crashed several times a day. Armed only with PowerShell and a few external libraries, plus a reasonable knowledge of .NET, I was able to create, quickly, a new image conversion process that processed over 2000 images a minute and never crashed. Suddenly it was the image scanning process that couldn’t keep up!
At the time, PowerShell wasn’t that popular, but this first project was a real eye-opener for me. I was immediately a PowerShell enthusiast and, from that point on, have been using it to automate as many of my routine SQL Server tasks as possible.
One near constant with any SQL Servers that fall under my care is that they are almost entirely undocumented, or the documentation was created once, a few years ago, and never kept up to date. No more excuses! This is a task crying out for automation, and in this article I’m going to show you how to automate the documentation of all your SQL Server instances using PowerShell and SQL Server Management Objects (SMO), and export the information for each SQL Server instance to a nicely formatted Excel spreadsheet.
Why document your servers
If you’re wondering why you need to make the effort to automate the documentation of your servers, ask yourself the following questions:
- If someone changes some setting or configuration on one of your servers, how quickly will you know about it?
- Do you have a list of databases with all their properties?
- When do the SQL Server agent jobs run?
- How would you find out the Edition of each of your SQL Server instances, and the hardware on which it is running?
- Do you know all the SQL Server logins and users with all their permissions?
- If asked to setup a new server, in an identical configuration to an existing server, how quickly could you do it?
Good documentation gives you control over your environment, and is an effective communication tool. A few examples of situations where documentation is important:
- Create baselines – gather performance information from your instance. A baseline can also be an initial configuration of your SQL Server instance installation.
- Comparing different servers – server documentation allows you to enforce standards. If someone sets up a server in a non-standard fashion, or changes some setting, it could cause unexpected behavior and/or performances issues, so you need to know about it (and ideally be alerted to the change)
- Database settings – creating an overview of all the databases with their properties makes it possible to see if the database has grown. Another reason would be to see if there are settings in the databases which are non-standard. For instance, which database run in SIMPLE recovery mode, which databases have a page verification option set to NONE or TORN_PAGE_DETECTION.
- License audits – Documenting your SQL Server editions and hardware will ensure that your organization is always license compliant.
- Security audits – If you work in a bank or other financial institution you are probably familiar with security audits. Can you show the auditor a list of all the people who have access to the database? Has there been any change in the last 6 months? How do you prove you are in control?
- Troubleshooting -the first question you ask in response to a performance issue is often “what changed?” It’s much harder to troubleshoot a performance issue without any server documentation.
What Needs Documenting?
At a minimum, I’d say you need to document the following for every server:
- Machine information
- Memory – Total memory, available memory.
- CPU – Amount of CPUs, amount of cores, architecture
- OS – Architecture, version, service pack, build
- Disks – Disk, name, size, free space
- SQL Server engine
- Configuration – Min and max memory, clr enabled, xp_cmdshell enabled
- Edition – Edition, build
- Collation – Default collation
- Logins – Present logins with server roles involved
- Databases
- Size – Size of database files, space available
- File configuration – Location of files. Different drives for data and log?
- Growth configuration – Growth settings for data and log files.
- Collation – Collation of the database. Is it different from the default server collation?
- Users – Created users and their database roles.
- SQL Agent
- Jobs – The job and job steps.
- Schedules – Schedules for jobs, next run date and time.
Of course, you might need more information depending on your own environment like clustering, replication or mirroring.
PowerShell can retrieve all of this information and a lot more, using just a few commands.
The Building Blocks
The two main components of this solution are PSSQLLIB, a custom PowerShell module that I built to gather the required SQL Server metrics, and ExcelPSLib, a PowerShell module avaible on CodePlex, for exporting our data to Excel. Let’s take a brief look at each, in turn.
PSSQLLIB: Custom PowerShell Functions to Return Server Information
I’d rather program for a few hours than do anything twice, so I created a PowerShell module called PSSQLLib that has all the functions necessary to retrieve the following information:
- Host hard disk information
- Host hardware
- Host operating system information
- SQL Server instance settings
- SQL Server instance configuration settings
- SQL Server login server privileges
- SQL Server databases
- SQL Server database files
- SQL Server database users
- SQL Server database user privileges
- SQL Server Agent jobs
- SQL Server disk latencies
Load-Assembly
Before you can use SMO you have to load it into your environment so PSSQLLIB contains a function called “Load-Assembly” that if supplied the assembly name will load SMO, and any other kind of assembly, assuming it’s not already loaded.
|
1 2 3 4 5 6 7 8 9 10 11 12 13 14 15 16 17 18 19 20 21 22 23 24 25 26 27 28 29 30 31 32 33 34 |
function Load-Assembly { <# .SYNOPSIS Check if a assembly is loaded and load it if necessary .DESCRIPTION The script will check if an assembly is already loaded. If it isn't already loaded it will try to load the assembly .PARAMETER name Full name of the assembly to be loaded .EXAMPLE Load-Assembly -name 'Microsoft.SqlServer.SMO' .INPUTS .OUTPUTS .NOTES .LINK #> param( [Parameter(Mandatory = $true)][ValidateNotNullOrEmpty()] [String] $name ) if(([System.AppDomain]::Currentdomain.GetAssemblies() | where {$_ -match $name}) -eq $null) { try{ [System.Reflection.Assembly]::LoadWithPartialName($name) | Out-Null } catch [System.Exception] { Write-Host "Failed to load assembly!" -ForegroundColor Red Write-Host "$_.Exception.GetType().FullName, $_.Exception.Message" -ForegroundColor Red } } } |
Listing 1: Load-Assembly
A Typical PSSQLLIB function: Get-SQLServerPrivileges
Most of the functions in PSSQLLIB use properties of the SMO server object. A few of the functions use T-SQL queries to retrieve the data.
Listing 2 shows the Get-SQLServerPrivileges function, to return the privileges for logins.
|
1 2 3 4 5 6 7 8 9 10 11 12 13 14 15 16 17 18 19 20 21 22 23 24 25 26 27 28 29 30 31 32 33 34 35 36 37 38 39 40 41 42 43 44 45 46 47 48 49 50 51 52 53 54 55 56 57 58 59 60 61 62 63 64 65 66 67 68 69 70 71 72 73 74 75 76 77 78 79 80 81 82 83 84 85 |
function Get-SQLServerPrivileges { <# .SYNOPSIS Returns each server login with their server roles .DESCRIPTION This function will return all the logins on the database server and check whether they are member of a server role. .PARAMETER instance This is the instance that needs to be connected .EXAMPLE Get-SQLServerPrivileges "SQL01" .EXAMPLE Get-SQLServerPrivileges "SQL01\INST01" .EXAMPLE Get-SQLServerPrivileges -inst "SQL01\INST01" .INPUTS .OUTPUTS System.Array .NOTES .LINK #> param ( [Parameter(Mandatory = $true, Position=1)] [ValidateNotNullOrEmpty()] [string]$inst = $null ) # Check if assembly is loaded Load-Assembly -name 'Microsoft.SqlServer.SMO' # Check if the instance object is already initiated if($server -eq $null) { try{ $server = New-Object ('Microsoft.SqlServer.Management.Smo.Server') $inst } catch [Exception] { Write-Host "$_.Exception.GetType().FullName, $_.Exception.Message" -ForegroundColor Red } } # Create the result array $result = @() # Create the array for the server roles $serverRoles = @() # Get all the logins $logins = $server.Logins # Loop through the logins foreach($login in $logins) { if(($login.Name -notlike "##*")) { # Get all the server $serverRoles = ($login.ListMembers()) -join "," # Make the result if($serverRoles.Count -gt 1) { $result += $login | Select ` Name,LoginType,CreateDate,DateLastModified,IsDisabled,` @{N="ServerRoles";E=([string]::Join(",", $serverRoles))} | Sort-Object Name } else { $result += $logn | Select ` Name,LoginType,CreateDate,DateLastModified,IsDisabled,` @{N="ServerRoles";E={$serverRoles}} | Sort-Object Name } # Clear the array $serverRoles = @() } } return $result } |
Listing 2: Get-SQLServerPrivileges
For those of you who are new to PowerShell, let’s step through the code. At the start of the function, we supply a parameter with the name of the SQL Server instance, and call the Load-Assembly function with the name of the assembly:
|
1 2 3 4 5 6 7 8 9 |
param ( [Parameter(Mandatory = $true, Position=1)] [ValidateNotNullOrEmpty()] [string]$inst = $null ) # Check if assembly is loaded Load-Assembly -name 'Microsoft.SqlServer.SMO' |
Before we can retrieve any information from the server we have to create a SMO Server object:
|
1 2 3 4 5 6 7 8 9 10 11 |
# Check if the instance object is already initiated if($server -eq $null) { try{ $server = New-Object ('Microsoft.SqlServer.Management.Smo.Server') $inst } catch [Exception] { Write-Host "$_.Exception.GetType().FullName, $_.Exception.Message" -ForegroundColor Red } } |
Two arrays are declared, one to hold the end result and one to iterate through the server roles:
|
1 2 3 4 5 |
# Create the result array $result = @() # Create the array for the server roles $serverRoles = @() |
To get the SQL Server logins, and associated server roles, we call the Logins property from the server object and save the values to the $logins variable, and then iterate through these login values (excluding system accounts, which start with “##”). If the login is a member of Windows group we create a comma separated list of all the server roles of which that group is a member. Finally, we clear the array of the server roles to be sure the data is correct, and then return the result.
|
1 2 3 4 5 6 7 8 9 10 11 12 13 14 15 16 17 18 19 20 21 22 23 24 25 26 27 28 29 30 31 |
# Get all the logins $logins = $server.Logins foreach($login in $logins) { if(($login.Name -notlike "##*")) { # Get all the server $serverRoles = ($login.ListMembers()) -join "," # Make the result if($serverRoles.Count -gt 1) { $result += $login | Select ` Name,LoginType,CreateDate,DateLastModified,IsDisabled,` @{N="ServerRoles";E=([string]::Join(",", $serverRoles))} | Sort-Object Name } else { $result += $login | Select ` Name,LoginType,CreateDate,DateLastModified,IsDisabled,` @{N="ServerRoles";E={$serverRoles}} | Sort-Object Name } # Clear the array $serverRoles = @() } } return $result } |
Install PSSQLLib PowerShell module
The module is free and can be downloaded from here and you can verify that PSSQLLIb installed correctly as follows:
Get-Command -Module PSSQLIb
This will show the following result:
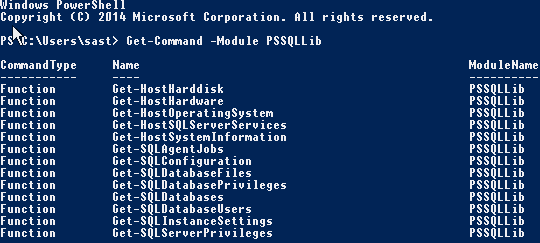
You see all the different functions available that we can call to return all the details of the SQL Server instance. The rest of the article will use this module, but you can of course create your own scripts that export the data you want.
ExcelPSLib: Exporting the Server Documentation to Excel
PowerShell is very good at exporting data to text files or XML.
Exporting to text files is a good solution for small pieces of data for singular tasks. You can create multiple text files for various types of data but this can get disorganized. For example, if you export all the pieces of information mentioned in the section “What Needs Documenting?” than you would end up with 15 files.
XML is very good for organizing data but it is harder to read than a simple text file. You would have to use another application to read the XML and output it in legible fomrat.
Therefore, my preference is to export the data to an Excel sheet. Unfortunately PowerShell has no native feature to allow us to create Excel sheets and export data to them. We have the Export-csv cmdlet, but then we still have the manul task of importing all the CSV files into an Excel spreadsheet.
We could also use PowerShell’s COM interface to export data to Excel, as described here. However, you’ll need Excel installed on the machine running the PowerShell script, and Excel should not be installed on a server, in my opinion.
Therefore the option I use is the ExcelPSLib PowerShell module, which can be downloaded from here. Microsoft decided a while ago to start using the OpenXML data format for Office documents. This PowerShell module can create an Excel document; create separate sheets, save the data to the sheets. You can even setup formatting for your tables. And the best thing is it is fast and you don’t need Excel to be installed on the running host.
Pulling it all together: Getting started with server documentation
The idea is to get an Excel document per SQL Server instance. The document contains multiple sheets, one sheet for every piece of information we want to retrieve; a sheet for the OS information, a separate sheet for the databases and so on.
So let’s start to retrieve the information from the database servers. I’ll show the major element of a PowerShell script called Get-MachineInformationExcel.ps1, which uses the functions defined in PSSQLLib to retrieve the information, and uses ExcelPSLib to export it to a nicely formatted Excel spreadsheet.
Setting the target server and output file properties
The idea is to automate the documentation of multiple SQL Server instances. To make this possible I’ll create a function that takes an argument for the server name, the instance name, and the destination to which to export the Excel file.
The code below shows the start of the function
|
1 2 3 4 5 6 7 8 9 10 11 12 |
function Generate-Documentation() { param( [Parameter(Mandatory=$true, Position=1)] [ValidateNotNullOrEmpty()] [string]$server, [Parameter(Mandatory=$true, Position=2)] [string]$instance = '', [Parameter(Mandatory=$true, Position=3)] [ValidateNotNullOrEmpty()] [string]$destination ) |
The name of the default instance can be “MSSQLSERVER” or be left out. To make sure the server object is created in the same way for both situation the following code will check the name and declare the target variable.
|
1 2 3 4 5 6 7 8 9 |
# Make up the target in case we have a default instance if(($instance -eq '') -or (($instance).ToUpper() -eq 'MSSQLSERVER')) { $target = $server } else { $target = "$server\$instance" } |
The next section of code specifies the details of the output Excel file. It will take the name of the server, the name of the instance and put a timestamp on the file. The timestamp is in the file is important to know when the file was created especially when you document your servers regularly.
|
1 2 3 4 5 |
# Create timestamp $timestamp = Get-Date -f yyyyddMMHHmmss # Set the destination $outputFile = $destination + '\MachineInformation_' + ($server).ToUpper() + '_' + ($instance).ToUpper() + '_' + $timestamp + '.xlsx' |
Creating and formatting the Excel spreadsheets
First, we need to set some variables, which we will use to indicate the row and tab position. These two values are used to place tables on the right row and to create new spreadsheets at the right position.
|
1 2 3 4 5 |
# Set the position of the first row $rowPosition = 1 # Set the number of the tab $tabPosition = 1 |
Next, we create the actual Excel package and workbook.
|
1 2 3 4 5 |
# Create a new Excel package [OfficeOpenXml.ExcelPackage]$excel = New-OOXMLPackage -author "Sander Stad" -title "Machine Information $target" # Create a new workbook [OfficeOpenXml.ExcelWorkbook]$book = $excel | Get-OOXMLWorkbook |
The next section of code is copied from the CodePlex ExcelPSLib website to create the stylesheets used in the Excel workbook.
|
1 2 3 4 5 6 7 8 |
# Set the different styles $styleGreen = New-OOXMLStyleSheet -WorkBook $book -Name "GirlStyle" -Bold -ForeGroundColor Black -FillType Solid -BackGroundColor Green -borderStyle Thin -BorderColor Black -NFormat "#,##0.00" $styleRed = New-OOXMLStyleSheet -WorkBook $book -Name "BoyStyle" -Bold -ForeGroundColor Black -FillType Solid -BackGroundColor Red -borderStyle Thin -BorderColor Black -NFormat "#,##0.00" $styleHeader = New-OOXMLStyleSheet -WorkBook $book -Name "HeaderStyle" -Bold -ForeGroundColor White -BackGroundColor Black -Size 12 -HAlign Center -VAlign Center -FillType Solid $styleHeader2 = New-OOXMLStyleSheet -WorkBook $book -Name "HeaderStyle2" -Bold -ForeGroundColor White -BackGroundColor Black -Size 11 -HAlign Left -VAlign Center -FillType Solid $styleNormal = New-OOXMLStyleSheet -WorkBook $book -Name "NormalStyle" -borderStyle Thin -BorderColor Black $styleNumber = New-OOXMLStyleSheet -WorkBook $book -Name "Float" -NFormat "#,##0.00" $styleConditionalFormatting = New-OOXMLStyleSheet -WorkBook $book -Name "ConditionalF" -Bold -ForeGroundColor Black -FillType Solid -BackGroundColor Orange -borderStyle Double -BorderColor Blue -NFormat "#,##0.0000" -Italic |
Not all styles are used but you can use and adjust any to your needs.
Now we have a working Excel workbook and can start formatting our data. In the different spreadsheets I use two kinds of methods to display information:
- Vertical tables with headers on the left – used for singular type information like system information or information about the operating system.
- Horizontal tables with headers on top – used for information like listing the databases, users and logins.
The vertical tables will look something like this:
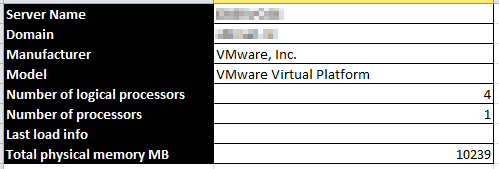
With the vertical tables I go through each row and setup the header and value at the same time.
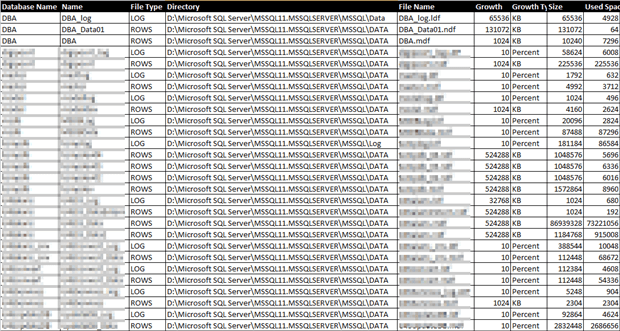
The horizontal tables look something like this:

For these kind of tables I will first setup the header and after than create a loop to get all the values in the table.
Because the script is over 850 lines long I will show only one example for each method (vertical and horizontal table).
Vertical table formatting
The script below will first create a new worksheet named “System Information”.
|
1 2 |
# Add a worksheet $excel | Add-OOXMLWorksheet -WorkSheetName "System Information" |
It will create that worksheet at the specified tab position.
|
1 2 |
# Set the worksheet as the first sheet $sheet = $book | Select-OOXMLWorkSheet -WorkSheetNumber $tabPosition |
The code for adding another worksheet to the workbook is the same every time. The only thing to do is increase the number of the tab position and give in the name of the tab.
For monitoring properties the script will print out that it is retrieving data.
|
1 |
Write-Host "Retrieving data for System Information" -ForegroundColor Green |
It will than set the local variable “$data” to null and it calls the appropriate function in PSSQLLIB to retrieve the information.
|
1 2 3 |
# Get the data from the function $data = $null $data = Get-HostSystemInformation -hst $server |
To make sure that some information has been retrieved the script will check if the length of the first field is at least 1 character. If so we can do something with the data.
|
1 2 |
if($data.Name.Length -ge 1) { |
The next part will be to fill up the first and second column with the header information and data from the servers.
The script below will fill the first column with header, in this case “Server Name”.
|
1 |
$sheet | Set-OOXMLRangeValue -row $rowPosition -col 1 -value "Server Name" -StyleSheet $styleHeader2 | Out-Null |
The next part is to get the value for the server name:
|
1 |
$sheet | Set-OOXMLRangeValue -row $rowPosition -col 2 -value $data.Name -StyleSheet $styleNormal | Out-Null |
The rest of the values are written in the same way. The full script can be seen below:
|
1 2 3 4 5 6 7 8 9 10 11 12 13 14 15 16 17 18 19 20 21 22 23 24 25 26 27 28 29 30 31 32 33 34 35 36 37 38 39 40 41 42 43 44 45 46 47 48 49 50 51 52 53 54 55 56 57 58 59 60 61 62 63 64 65 66 67 68 69 70 71 72 73 |
################################################################################################## # SYSTEM INFORMATION ################################################################################################## # Add a worksheet $excel | Add-OOXMLWorksheet -WorkSheetName "System Information" # Set the worksheet as the first sheet $sheet = $book | Select-OOXMLWorkSheet -WorkSheetNumber $tabPosition Write-Host "Retrieving data for System Information" -ForegroundColor Green # Get the data from the function $data = $null $data = Get-HostSystemInformation -hst $server if($data.Name.Length -ge 1) { # Fill the sheet with data from the system function $sheet | Set-OOXMLRangeValue -row $rowPosition -col 1 -value "Server Name" -StyleSheet $styleHeader2 | Out-Null $sheet | Set-OOXMLRangeValue -row $rowPosition -col 2 -value $data.Name -StyleSheet $styleNormal | Out-Null $sheet.Column(1).Width = 30 $sheet.Column(2).Width = 40 $rowPosition++ $sheet | Set-OOXMLRangeValue -row $rowPosition -col 1 -value "Domain" -StyleSheet $styleHeader2 | Out-Null $sheet | Set-OOXMLRangeValue -row $rowPosition -col 2 -value $data.Domain -StyleSheet $styleNormal | Out-Null $rowPosition++ $sheet | Set-OOXMLRangeValue -row $rowPosition -col 1 -value "Manufacturer" -StyleSheet $styleHeader2 | Out-Null $sheet | Set-OOXMLRangeValue -row $rowPosition -col 2 -value $data.Manufacturer -StyleSheet $styleNormal | Out-Null $rowPosition++ $sheet | Set-OOXMLRangeValue -row $rowPosition -col 1 -value "Model" -StyleSheet $styleHeader2 | Out-Null $sheet | Set-OOXMLRangeValue -row $rowPosition -col 2 -value $data.Model -StyleSheet $styleNormal | Out-Null $rowPosition++ $sheet | Set-OOXMLRangeValue -row $rowPosition -col 1 -value "Number of logical processors" -StyleSheet $styleHeader2 | Out-Null $sheet | Set-OOXMLRangeValue -row $rowPosition -col 2 -value $data.NumberOfLogicalProcessors -StyleSheet $styleNormal | Out-Null $rowPosition++ $sheet | Set-OOXMLRangeValue -row $rowPosition -col 1 -value "Number of processors" -StyleSheet $styleHeader2 | Out-Null $sheet | Set-OOXMLRangeValue -row $rowPosition -col 2 -value $data.NumberOfProcessors -StyleSheet $styleNormal | Out-Null $rowPosition++ $sheet | Set-OOXMLRangeValue -row $rowPosition -col 1 -value "Last load info" -StyleSheet $styleHeader2 | Out-Null if([string]::IsNullOrEmpty($data.LastLoadInfo)) { $sheet | Set-OOXMLRangeValue -row $rowPosition -col 2 -value '' -StyleSheet $styleNormal | Out-Null } else { $sheet | Set-OOXMLRangeValue -row $rowPosition -col 2 -value $data.LastLoadInfo -StyleSheet $styleNormal | Out-Null } $rowPosition++ $sheet | Set-OOXMLRangeValue -row $rowPosition -col 1 -value "Total physical memory MB" -StyleSheet $styleHeader2 | Out-Null $sheet | Set-OOXMLRangeValue -row $rowPosition -col 2 -value $data.TotalPhysicalMemoryMB -StyleSheet $styleNormal | Out-Null } else { Write-Host "No records fount for System Information" -ForegroundColor Red } ################################################################################################## ################################################################################################## |
Horizontal table formatting
As mentioned earlier, the code for adding another worksheet to the workbook is the same every time. The only difference is to reset the row number, increase the number of the tab position and give in the name of the tab as shown below:
|
1 2 3 4 5 6 7 8 9 10 |
# Reset row positions $rowPosition = 1 # Set the tabposition $tabPosition++ # Add a worksheet $excel | Add-OOXMLWorksheet -WorkSheetName "Database Privileges" #-AutofilterRange "A2:G2" # Set the worksheet as the first sheet $sheet = $book | Select-OOXMLWorkSheet -WorkSheetNumber $tabPosition |
Each of the headers is written before the data is retrieved from the variable:
|
1 2 3 4 |
$sheet | Set-OOXMLRangeValue -row $RowPosition -col 1 -value "Database Name" -StyleSheet $StyleHeader2 | Out-Null $sheet | Set-OOXMLRangeValue -row $RowPosition -col 2 -value "User Name" -StyleSheet $StyleHeader2 | Out-Null $sheet | Set-OOXMLRangeValue -row $RowPosition -col 3 -value "User Type" -StyleSheet $StyleHeader2 | Out-Null $sheet | Set-OOXMLRangeValue -row $RowPosition -col 4 -value "Database Roles" -StyleSheet $StyleHeader2 | Out-Null |
To retrieve the values for each row I use a foreach loop.
|
1 2 3 4 5 6 7 8 9 |
foreach($dbPriv in $data) { $sheet | Set-OOXMLRangeValue -row $rowPosition -col 1 -value $dbPriv.DatabaseName -StyleSheet $styleNormal | Out-Null $sheet | Set-OOXMLRangeValue -row $rowPosition -col 2 -value $dbPriv.UserName -StyleSheet $styleNormal | Out-Null $sheet | Set-OOXMLRangeValue -row $rowPosition -col 3 -value $dbPriv.UserType -StyleSheet $styleNormal | Out-Null $sheet | Set-OOXMLRangeValue -row $rowPosition -col 4 -value $dbPriv.DatabaseRoles -StyleSheet $styleNormal | Out-Null $rowPosition++ } |
Following is the full script for formatting the horizontal table
|
1 2 3 4 5 6 7 8 9 10 11 12 13 14 15 16 17 18 19 20 21 22 23 24 25 26 27 28 29 30 31 32 33 34 35 36 37 38 39 40 41 42 43 44 45 46 |
################################################################################################## # DATABASE PRIVILEGES ################################################################################################## # Reset row positions $rowPosition = 1 # Set the tabposition $tabPosition++ # Add a worksheet $excel | Add-OOXMLWorksheet -WorkSheetName "Database Privileges" #-AutofilterRange "A2:G2" # Set the worksheet as the first sheet $sheet = $book | Select-OOXMLWorkSheet -WorkSheetNumber $tabPosition Write-Host "Retrieving data for Database Privileges" -ForegroundColor Green $data = Get-SQLDatabasePrivileges -inst $target | Sort DatabaseName, LoginName if($data.Count -ge 1) { $sheet | Set-OOXMLRangeValue -row $RowPosition -col 1 -value "Database Name" -StyleSheet $StyleHeader2 | Out-Null $sheet | Set-OOXMLRangeValue -row $RowPosition -col 2 -value "User Name" -StyleSheet $StyleHeader2 | Out-Null $sheet | Set-OOXMLRangeValue -row $RowPosition -col 3 -value "User Type" -StyleSheet $StyleHeader2 | Out-Null $sheet | Set-OOXMLRangeValue -row $RowPosition -col 4 -value "Database Roles" -StyleSheet $StyleHeader2 | Out-Null $rowPosition++ foreach($dbPriv in $data) { $sheet | Set-OOXMLRangeValue -row $rowPosition -col 1 -value $dbPriv.DatabaseName -StyleSheet $styleNormal | Out-Null $sheet | Set-OOXMLRangeValue -row $rowPosition -col 2 -value $dbPriv.UserName -StyleSheet $styleNormal | Out-Null $sheet | Set-OOXMLRangeValue -row $rowPosition -col 3 -value $dbPriv.UserType -StyleSheet $styleNormal | Out-Null $sheet | Set-OOXMLRangeValue -row $rowPosition -col 4 -value $dbPriv.DatabaseRoles -StyleSheet $styleNormal | Out-Null $rowPosition++ } } else { Write-Host "No records found for Database Privileges" -ForegroundColor Red } ################################################################################################## ################################################################################################## |
Writing the Data
Now that we have the information written to the workbook we have to do the final thing and that’s to write the data to a file. We’ve already made up the filename and path to write to.
|
1 |
$excel | Save-OOXMLXMLPackage -FileFullPath $outputFile -Dispose |
The file will be written to the designated path.
Running the Script
When the entire script is executed you’ll see something like this:
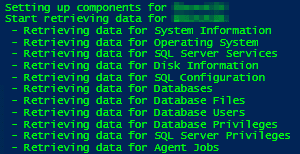
Of course you don’t want to run this on just a single server; you want to document all of your servers and instances in one go!
All of the code is in a function that takes three arguments. We can use this to execute this function for multiple machines.
I simply created a CSV file which is set up like this:
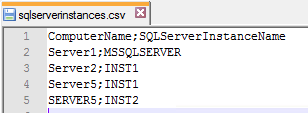
The code below will import the data from the CSV file and loop through each item and executing the function.
|
1 2 3 4 5 6 7 8 9 |
$items = Import-Csv "C:\sqlserverinstances.csv" -Delimiter ";" foreach($item in $items) { if(Test-Connection $item.ComputerName) { Generate-Documentation -server $item.ComputerName -instance $item.SQLServerInstanceName -destination 'H:\Mijn documenten\_Overdracht\Databasebeheer\SQL Server Inventarisatie' } } |
This will make it possible to get a complete overview of all the database servers within minutes.
Next steps
Now that we’ve discussed the basics you can consider expanding the solution to collect information about the backups, disk latencies, top running queries, errors from the log file and more.
You could make a solution get an instant view of your system at that point to troubleshoot a performance issue or optimize a query.
If the information is in SQL Server there is a way to retrieve that information using SMO. Let your imagination go wild to get a solution perfect for your situation.
The source to the PowerShell code can be accessed from the link below.

Load comments