
- Part 1: Trials and Tribulations of TDD
- Part 2: Naming Tests; Mocking Frameworks; Dependency Injection
- Part 3: Mocks vs. Stubs; Test Frameworks; Assertions; ReSharper Accelerators
- Part 4: Tests as Documentation; False Positive Results; Component Isolation
- Part 5: Tests vs. Code; Refactor Friendliness; Test Parameterization
- Part 6: Mini-Factory Pattern; Don’t Care Terms
This is part 3 of our exploration into practicing hands-on TDD. Unlike most of my multi-part series, it is not advisable to join this one in the middle. So if you are arriving fresh, please go back and review part 1 (a short introduction to TDD reasons and methods) and part 2 (implementing the first tests) before proceeding.
The code to date is shown immediately below. Points to review:
WidgetActivatoris the class-under-test.- The
WidgetActivatorneeds both a loader and a publisher to do its work. - The first test verifies that the loader is wired up correctly in the form of an
WidgetLoader. Using an interface for the type makes it easy to swap in a testing version (a mock) of a WidgetLoader in the test shown, whereas production code will use a genuine WidgetLoader. - The second test verifies that the
WidgetActivatoruses itsWidgetLoaderto do something. - The moq mocking framework lets you check if a particular method was called on the mock with moq’s Verify method.
|
1 2 3 4 5 6 7 8 9 10 11 12 13 14 15 16 17 18 19 20 21 22 23 24 25 26 27 28 29 30 31 32 33 34 35 36 37 38 39 40 41 42 43 44 45 46 |
using Moq; using NUnit.Framework; namespace TddDemoTests { public class WidgetActivatorTest { [Test] public void WidgetActivator_constructor_accepts_an_IWidgetLoader() { var mockWidgetLoader = new Mock<IWidgetLoader>(); var activator = new WidgetActivator(mockWidgetLoader.Object); } [Test] public void Execute_delegates_to_IWidgetLoader_to_load_widget_details() { var mockWidgetLoader = new Mock<IWidgetLoader>(); var activator = new WidgetActivator(mockWidgetLoader.Object); activator.Execute(); mockWidgetLoader.Verify(x => x.Load(), Times.Once()); } } public interface IWidgetLoader { void Load(); } public class WidgetActivator { private readonly IWidgetLoader _widgetLoader; public WidgetActivator(IWidgetLoader widgetLoader) { _widgetLoader = widgetLoader; } public void Execute() { _widgetLoader.Load(); } } } |
Now we introduce the IWidgetPublisher , which is analogous to the WidgetLoader. In the interests of brevity, from this point forward I am only going to show the relevant portions of the code rather than showing everything. So here we go!
TEST: Again start by creating a WidgetActivator . To compile we must supply an WidgetLoader argument. But this test does not care about an WidgetLoader so we use a stub for that. (Notice that when we pass in a stub, there is no final “.Object”, like we had to use with the mock object in the previous test.)
|
1 2 3 4 5 6 |
[Test] public void WidgetActivator_constructor_accepts_an_IWidgetPublisher() { var stubWidgetLoader = Mock.Of<IWidgetLoader>(); var activator = new WidgetActivator(stubWidgetLoader); } |
 Test Doubles
Here you see the notion of a stub mentioned in the commentary-and reflected in the variable name-yet it is still using the Mock class. The reason is that moq handles stubs as well as mocks. In part 2, you saw that moq provides two syntax choices to create mock objects: the Linq-to-Mocks approach, which is better suited for stubs and the traditional imperative syntax, which is better suited for mocks. Mocks and stubs are both more broadly described as test doubles, a term coined by Gerard Meszaros in his book xUnit Patterns. A test double is simply a test objects used in place of a real object in a test. On his web site, Meszaros has a detailed chart comparing and contrasting mocks and stubs, along with fakes and dummies in (what an eponymous coincidence!) a section entitled Mocks, Fakes, Stubs, and Dummies. Unfortunately, he quickly reveals that the nomenclature is haphazard at best, with different authors using different terms: a stub is sometimes called a mock, a dummy is sometimes called a stub (but at least a mock is always a mock :-). I mention that only so that as you do further reading on your own you are prepared to pay less attention to the names and more to the substance.
Briefly then, here is a good summary of mocks, fakes, stubs, and dummies according to Meszaros interpreted by Martin Fowler in Mocks Aren’t Stubs because he says it so well:
- Dummy objects are passed around but never actually used. Usually they are just used to fill parameter lists.
- Fake objects actually have working implementations, but usually take some shortcut which makes them not suitable for production (an in-memory database is a good example).
- Stubs provide canned answers to calls made during the test, usually not responding at all to anything outside what’s programmed in for the test…
- Mocks are… objects pre-programmed with expectations [that] form a specification of the calls they are expected to receive.

TEST: As I said, we do not care in this test about the loader so we used a stub. What we do care about is an IWidgetPublisher so let’s add a mock rather than a stub, just as we did in the first test, and also pass it to the WidgetActivator constructor.
|
1 2 3 4 5 6 7 |
[Test] public void WidgetActivator_constructor_accepts_an_IWidgetPublisher() { var mockWidgetPublisher = new Mock<IWidgetPublisher>(); var stubWidgetLoader = Mock.Of<IWidgetLoader>(); var activator = new WidgetActivator(stubWidgetLoader, mockWidgetPublisher.Object); } |
Generally speaking, I prefer to use the Mock-to-Linq syntax (i.e. Mock.Of<type>) for stubs and moq’s traditional syntax (new Mock<type>) for mocks as you see above. There is a lot of overlap in the capabilities of the two, so that rule is by convention not by necessity. I particularly like it, though, because anyone reading my tests will know which test doubles are important for a given test-the mocks rather than the stubs.
CODE: That completes the test; now we work on getting the production code to compile and the test to pass. This new test is quite analogous to the earlier WidgetLoader test, except now we need a two-argument constructor for WidgetActivator . But first, let’s add the new required interface.
|
1 2 3 |
publicinterfaceIWidgetPublisher { } |
A constructor change is one of many rote tasks where ReSharper really shines (and CodeRush and their ilk). Updating the constructor and adding a backing field for the IWidgetPublisher can be done with just a couple key strokes. With the cursor in the mockWidgetPublisher.Object text, Alt+Enter brings up this ReSharper “quick fix” menu:
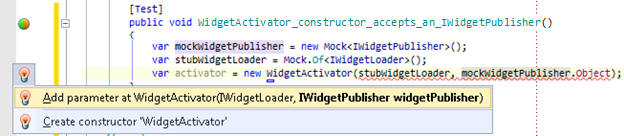
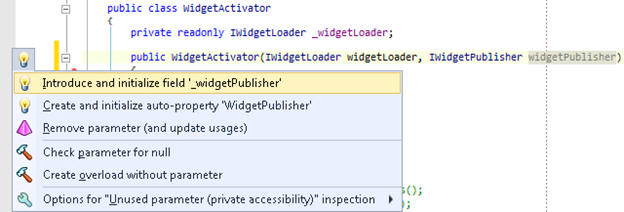
That default choice is what we want, so just press Enter to add it to the constructor’s signature, as you see below. Moving the cursor onto that new parameter in the constructor and again using Alt+Enter, ReSharper brings up the “quick fix” choices below and again, the first choice is the appropriate one, so Enter finishes up the code to match what you saw just above.
CODE: Here are the changes ReSharper implemented.
|
1 2 3 4 5 6 7 8 9 10 11 12 13 14 15 16 |
public class WidgetActivator { private readonly IWidgetLoader _widgetLoader; private readonly IWidgetPublisher _widgetPublisher; public WidgetActivator(IWidgetLoader widgetLoader, IWidgetPublisher widgetPublisher) { _widgetLoader = widgetLoader; _widgetPublisher = widgetPublisher; } public WidgetActivator(IWidgetLoader widgetLoader) { _widgetLoader = widgetLoader; } public void Execute() { _widgetLoader.Load(); } } |
TEST: Analogous to exercising the WidgetLoader, now we want the IWidgetPublisher to do some work.
|
1 2 3 4 5 6 7 8 9 10 11 |
[Test] public void Execute_delegates_to_IWidgetPublisher_to_publish_widget() { var mockWidgetPublisher = new Mock<IWidgetPublisher>(); var stubWidgetLoader = Mock.Of<IWidgetLoader>(); var activator = new WidgetActivator(stubWidgetLoader, mockWidgetPublisher.Object); activator.Execute(); mockWidgetPublisher.Verify(x => x.Publish(), Times.Once()); } |
CODE: To get a clean compile we add Publish to the IWidgetPublisher interface.
|
1 2 3 4 |
publicinterfaceIWidgetPublisher { void Publish(); } |
CODE: Now the Verify assertion fails-because we have not yet wired up the Publish method call. Add the call to Publish to make it pass.
|
1 2 3 4 5 6 7 8 9 10 11 12 13 14 15 16 17 18 19 20 21 22 |
public class WidgetActivator { private readonly IWidgetLoader _widgetLoader; private readonly IWidgetPublisher _widgetPublisher; public WidgetActivator(IWidgetLoader widgetLoader, IWidgetPublisher widgetPublisher) { _widgetLoader = widgetLoader; _widgetPublisher = widgetPublisher; } public WidgetActivator(IWidgetLoader widgetLoader) { _widgetLoader = widgetLoader; } public void Execute() { _widgetLoader.Load(); _widgetPublisher.Publish(); } } |
That final line of code made our test turn green! But wait a minute-the first test is failing now! How do I know? Because whenever I get the code to compile I run all tests, not just the latest test.
Test Runners
Visual Studio comes with a built-in test runner for unit tests, but it is only compatible with MSTest unit tests, not NUnit unit tests, as I prefer to use. Here is why:
|
# |
Feature |
MSTest |
NUnit |
|
1 |
Visual Studio support to run tests |
|
Requires NUnit Test Adapter |
|
2 |
Visual Studio test templates |
|
None |
|
3 |
Tests runnable outside VS |
No |
|
|
4 |
Much faster startup time for each run |
|
|
|
5 |
Fluent assertion interface |
|
|
|
6 |
Rich attribute set |
|
 Built-in
 Built-in
MSTest has a minor advantage in row 1, in that the test runner is built-in. But if you use ReSharper or NCrunch they provide built-in test runners as well-which are NUnit-compatible-so you would not even need the NUnit Test Adapter. MSTest also has a minor advantage in row 2, by having some project templates; however, test templates are not really a necessity as they are so simple to set up. The deal breakers to me, as indicated by the relative weightings in the table, are the fluent assertions and rich attribute set of NUnit. More details on those shortly.
Whichever unit test framework and ancillary tools you choose, you will have a test runner available in Visual Studio so it is a simple matter to re-run all tests as needed so you will be kept apprised of when your code changes have ripple effects into other tests.
The test under development passes, as I stated, but now the previous test fails on the Execute call. That test never supplied an IWidgetPublisher so attempting to call Publish on a null object throws an exception. This is apparently exposing a weakness in our set of behaviors thus far: in essence, the code is saying that we do not expect null objects passed in but we have not codified that into a test. In actuality, that was a system design choice on my part. When I do dependency injection I prefer to use an IoC container, as I mentioned in part 2. One advantage of using such a container to automate DI over using manual injection is that no IoC containers that I am aware allow nulls to be passed in as a constructor dependency.
TEST: So we just need to go back and give the prior test an IWidgetPublisher to avoid getting this exception. Notice how this test uses a mock and a stub exactly the opposite of the latest test.
|
1 2 3 4 5 6 7 8 9 10 11 12 13 14 15 16 17 18 19 20 21 22 23 |
[Test] public void Execute_delegates_to_IWidgetLoader_to_load_widget_details() { var mockWidgetLoader = new Mock<IWidgetLoader>(); var stubWidgetPublisher = Mock.Of<IWidgetPublisher>(); var activator = new WidgetActivator(mockWidgetLoader.Object, stubWidgetPublisher); activator.Execute(); mockWidgetLoader.Verify(x => x.Load(), Times.Once()); } [Test] public void Execute_delegates_to_IWidgetPublisher_to_publish_widget() { var mockWidgetPublisher = new Mock<IWidgetPublisher>(); var stubWidgetLoader = Mock.Of<IWidgetLoader>(); var activator = new WidgetActivator(stubWidgetLoader, mockWidgetPublisher.Object); activator.Execute(); mockWidgetPublisher.Verify(x => x. Publish(), Times.Once()); } |
Now both tests pass!
Here is the first time we introduce the refactor step of the Red-Green-Refactor process introduced in part 1. We have now outfitted 3 of the 4 unit tests for the two-argument constructor; only the very first test is still using the one-argument version. So to make it a bit tidier, let’s add a stub to that first test so it, too, can use the two-argument form, allowing us to delete the one-argument constructor.
TEST: Add a stub to pass to the two-argument constructor.
|
1 2 3 4 5 6 7 |
[Test] public void WidgetActivator_constructor_accepts_an_IWidgetLoader() { var mockWidgetLoader = new Mock<IWidgetLoader>(); var stubWidgetPublisher = Mock.Of<IWidgetPublisher>(); var activator = new WidgetActivator(mockWidgetLoader.Object, stubWidgetPublisher); } |
CODE: Delete the one-argument constructor.
|
1 2 3 4 5 6 7 8 9 10 11 12 13 14 15 16 17 18 |
public class WidgetActivator { private readonly IWidgetLoader _widgetLoader; private readonly IWidgetPublisher _widgetPublisher; public WidgetActivator(IWidgetLoader widgetLoader, IWidgetPublisher widgetPublisher) { _widgetLoader = widgetLoader; _widgetPublisher = widgetPublisher; } public WidgetActivator(IWidgetLoader widgetLoader) { _widgetLoader = widgetLoader; } public void Execute() { _widgetLoader.Load(); _widgetPublisher.Publish(); } } |
Run the tests again and they still pass, confirming that our refactor did not change the code’s behavior in any way. Whenever refactoring keep in mind the developer’s version of the Hippocratic Oath:
Cleanup your code-but do no harm!
Now that we have a loader and a publisher, the next most important behavior is that if there are no details for the loader to load, the Execute method should return false. In this test, I am using two stubs because neither of them is the focus of the test-here we are interested in what the Execute method is doing.
TEST: Create the basic test.
|
1 2 3 4 5 6 7 8 9 10 11 |
[Test] public void Execute_returns_false_if_no_details_to_load() { var stubWidgetLoader = Mock.Of<IWidgetLoader>(); var stubWidgetPublisher = Mock.Of<IWidgetPublisher>(); var activator = new WidgetActivator(stubWidgetLoader, stubWidgetPublisher); var result = activator.Execute(); Assert.That(result, Is.False); } |
Constraints and Fluent Assertions
The crux of this test is the assertion in the final line: the Assert.That() method call. This single method-albeit with a large number of overloads-is the method to use for most validation in NUnit tests. It has the general form:
|
1 |
Assert.That(actual, constraint ) |
The first argument is your actual result. The second argument is a Constraint object that specifies what about the result you are validating. This constraint-based model, introduced fairly recently with NUnit 2.4, is what provides the fluent API of NUnit. Here are a few other sample assertions possible with Assert.That (see the NUnit documentation for many more):
|
1 2 3 4 5 6 7 8 9 10 11 12 |
Numerical * Assert.That(2 + 2, Is.EqualTo(4) ); * Assert.That(2 + 2, Is.Not.EqualTo(5) ); * Assert.That( 5.5, Is.EqualTo( 5 ).Within(0.5) ); * Assert.That( 5.5, Is.EqualTo( 5 ).Within(15).Percent ); * Assert.That( 42, Is.InRange(1, 100) ); * Assert.That( 3, Is.LessThan( 5 ) | Is.GreaterThan( 10 ) ); String * Assert.That( "Hello!", Is.Not.EqualTo("HELLO!") ); * Assert.That( "Hello!", Is.EqualTo("HELLO!").IgnoreCase ); * Assert.That( phrase, Is.StringContaining( "fail" ) ); * Assert.That( phrase, Is.StringMatching("abc.*test" ) ); |
Earlier in this article I mentioned that NUnit’s fluent assertion interface weighed heavily in selecting NUnit as my choice of test framework. NUnit’s constraint-based model above provides this fluent interface (first introduced in 2005 by Martin Fowler). The key element to observe is the combination of method chaining (tying output of one method into the input of the next) and the readability that ensues due to the flow of text. As an example, above you see one Assert call that uses this constraint: Is.EqualTo( 5).Within(15).Percent. That chains together 4 elements nicely so that the entire statement, in English, reads “Assert that 5.5 is equal to 5 within 15 percent.”
A fluent interface lets you just read your tests. Why is this useful? Consider these two assertions, one using MSTest and one using NUnit. Contrast their readability-literally, read them out loud-and you will see why a fluent interface is advantageous:
|
MSTest |
Assert.IsNotNull(Players.Where(x => x.Name.Equals(“Cross”); |
|
NUnit |
Assert.That(Players, Has.Some.With.Property(“Name”).EqualTo(“Cross”); |
If you can read your tests when you write them, so can other members of your team. (And so can you two weeks from now :-). They are that much easier to comprehend. One more example-this is how to check for an expected exception with MSTest:
|
1 2 3 4 5 6 7 |
[TestMethod] [ExpectedException(typeof(ApplicationException))] public void OutOfBoundsMoveThrowsExceptionTest() { TicTacToeBoard b = new TicTacToeBoard(); b.MakeMove(4, 3, null); } |
And this is how to do the same thing with NUnit (actually this does even more; it also checks the message of the exception):
|
1 2 3 4 5 6 7 8 |
[Test] public void OutOfBoundsMoveThrowsExceptionTest() { TicTacToeBoard b = new TicTacToeBoard(); Assert.That(() => b.MakeMove(4, 3, null), Throws.Exception.TypeOf<ApplicationException>() .With.Message.Contains("Out of bounds")); } |
CODE: Make it pass by adding a return value to Execute. Notice there is no attempt to make it behave “correctly” from the perspective of the system-we only care about making it behave correctly for this test.
|
1 2 3 4 5 6 7 8 9 10 11 12 13 14 15 16 17 18 |
public class WidgetActivator { private readonly IWidgetLoader _widgetLoader; private readonly IWidgetPublisher _widgetPublisher; public WidgetActivator(IWidgetLoader widgetLoader, IWidgetPublisher widgetPublisher) { _widgetLoader = widgetLoader; _widgetPublisher = widgetPublisher; } public bool Execute() { _widgetLoader.Load(); _widgetPublisher.Publish(); return false; } } |
If this is your first exposure to TDD, returning a hard-coded value may seem odd (or, let’s face it, just plain wrong!). That is obviously wrong in the sense that the Execute method clearly needs to return a semantically-valid result, not just “false”. In the long run, that is true-and Execute will evolve to return something better. But the rules of TDD (enumerated in part 1) require that you write the least amount of code to make the current test pass. In this instance, returning false is it; the test now passes! If you can contain your skepticism over the value and usefulness of just returning false, you will see how this approach bears fruit as the journey continues next time, in part 4!
This document contains proprietary information and is protected by copyright law.
Copyright © 2026 Red Gate Software Limited. All rights reserved
Load comments