
Azure Data Factory’s custom .NET activities let you run arbitrary C# code as part of a data pipeline – extending ADF beyond its built-in activities for custom FTP downloads, data transformations, or API integrations. This guide walks through building a custom .NET activity from scratch: Batch Account and pool, activity class, linked services and outputs, pipeline composition, and Visual Studio deployment.
The series so far:
- Creating a Custom .NET Activity Pipeline for Azure Data Factory
- Using the Copy Wizard for the Azure Data Factory
- The Quick and the Dead Slow: Importing CSV Files into Azure Data Warehouse
Azure Data Factory is the integration tool in Azure that builds on the idea of Cloud-based ETL, but uses the model of Extract-and-Load (EL) and then Transform-and-Load (TL). To do this, it uses data-driven workflows called pipelines. These can collect data from a range of data stores and process or transform them. This data processing can use the available Azure-based computer services such as Hadoop, Spark, and Azure Machine Learning. It can then publish data to a variety of downstream data stores. In this article, I will show how to create a custom .net activity pipeline for Azure Data Factory.
I’ll start by describing a way to create a custom .NET activity to download files from an FTP server to a blob storage in Azure. For this we will use Visual Studio 2015 to create a ClassLibrary for our custom code, then we will add a DataFactoryApp to the project so we can create the ADF (Azure Data Factory) pipeline from Visual Studio so we can deploy the ADF pipeline directly after we are ready with the .NET class. We will be using a BatchService and a compute environment which will run the custom code on a set of Azure VMs which are brought on-demand as we schedule the pipeline.
For this article, I will be working with an FTP server provided by one of the Scandinavian mobile operators. The FTP server has anonymous access, and its original purpose is to test the speed of the internet connectivity. But this is more than enough for our purpose of building a custom .NET activity.
Note: Azure Data Factory currently supports an FTP data source and we can use the Azure portal and the ADF Wizard to do all the steps, as I will cover in a future article.
The point of this article, however, is to introduce the reader to the flexibility of the custom .NET pipelines and the possibilities they present for automating the ADF deployments from Visual Studio without introducing unnecessary complexity to the code. Note also that by creating a custom .NET activity and ADF deployment from Visual Studio, we can, if we want, create a common repository which can be used to automate and speed up the pipeline deployments in larger teams.
For this article, I have assumed that the reader already has an Azure subscription and is familiar with concepts such as .NET, dll files, FTP requests and Azure Data Factory.
About the source files
As mentioned above, the source files are stored on the server of one of the telecom companies: ftp://speedtest.tele2.net/. There are a range of files with different sizes in a folder, looking like this:
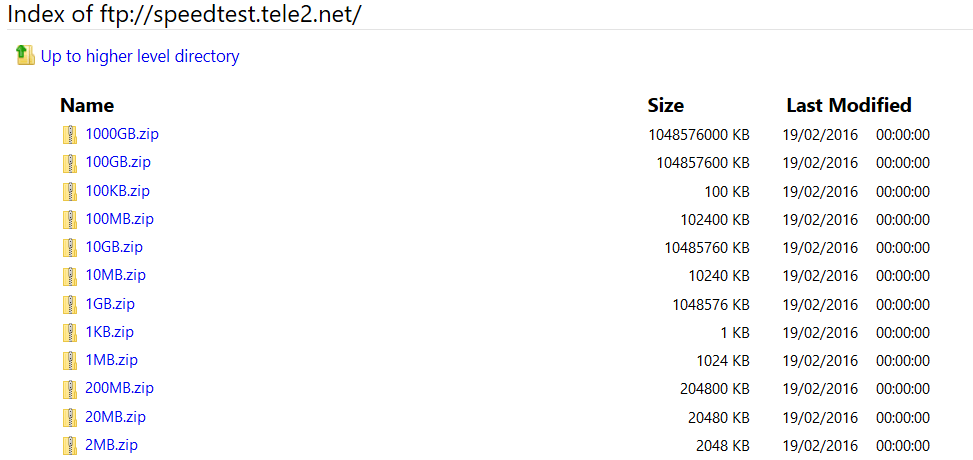
So, in our custom activity, we will have the class download the 20MB.zip and store it in our blob storage.
What we need:
Here is a high-level overview of what we need in order to setup the custom .NET activity to work:
- We need to create a Batch Account and a Batch Pool.
Azure Batch is a platform service which is used to run an application in the cloud. The work runs on a managed collection of virtual machines. For an introduction to Azure Batch, visit the documentation https://docs.microsoft.com/en-us/azure/batch/batch-technical-overview. In this case, we will create a batch pool with a very simple Windows server VM to carry out the FTP download task. In a real use-case, the Batch service is very flexible and can scale the pool of virtual machines automatically.
- a Blob storage where the files will be stored
- a Visual Studio project which will contain the custom code: This code will be compiled into a DLL, zipped and then stored in the blob storage; from where it will be accessed by the ADF pipeline
- a Data Factory App, so we can deploy the ADF directly from our solution (so we don’t have to manually zip and copy the DLLs to the blob storage every time we make changes to the C# code)
- a Data Factory for the weather data that can publish the pipeline from there.
- Debugging and logging of the pipeline activities. We will create a Batch App to help us debug the custom .NET activity locally.
So, let’s get started…
Create a Batch Account and a Batch Pool
The batch Account is a free service whereas the underlying resources (pools, VMs and storage usage) are paid for, per the Azure pricing.
To create a Batch Account, simply use the Azure portal and click ‘New’ ’Compute’ ‘Batch Service’.
The following tab will open:
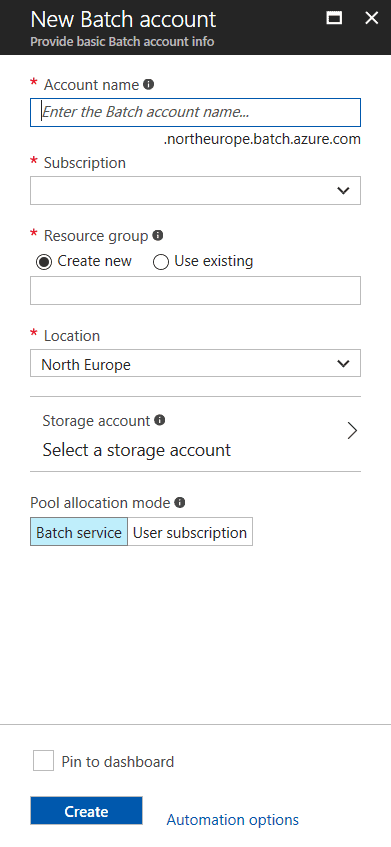
Enter the information in the required fields and create the account. Make sure that you create a linked storage account for the batch service, since it will be used later during the deployment of our ADF pipeline from Visual Studio.
Now we can create the Batch Pool by going to the Batch Service we just created and clicking on the Pools blade. In the Pools blade, click on ‘Add’ and fill in the required fields. In this case I am selecting a Windows 2008 server with the smallest available resources. In a real production environment, these settings should be carefully considered, since the choice will affect the result.
Note the Pool ID after creating it, since it will be used later in the ADF pipeline.
Create a Blob storage
For this article, we will be using a folder called ftpdata in a blob storage that we create in our Azure subscription. For details on how to create a blob storage, visit the Azure documentation: https://docs.microsoft.com/en-us/azure/storage/storage-create-storage-account
Create the custom activity code
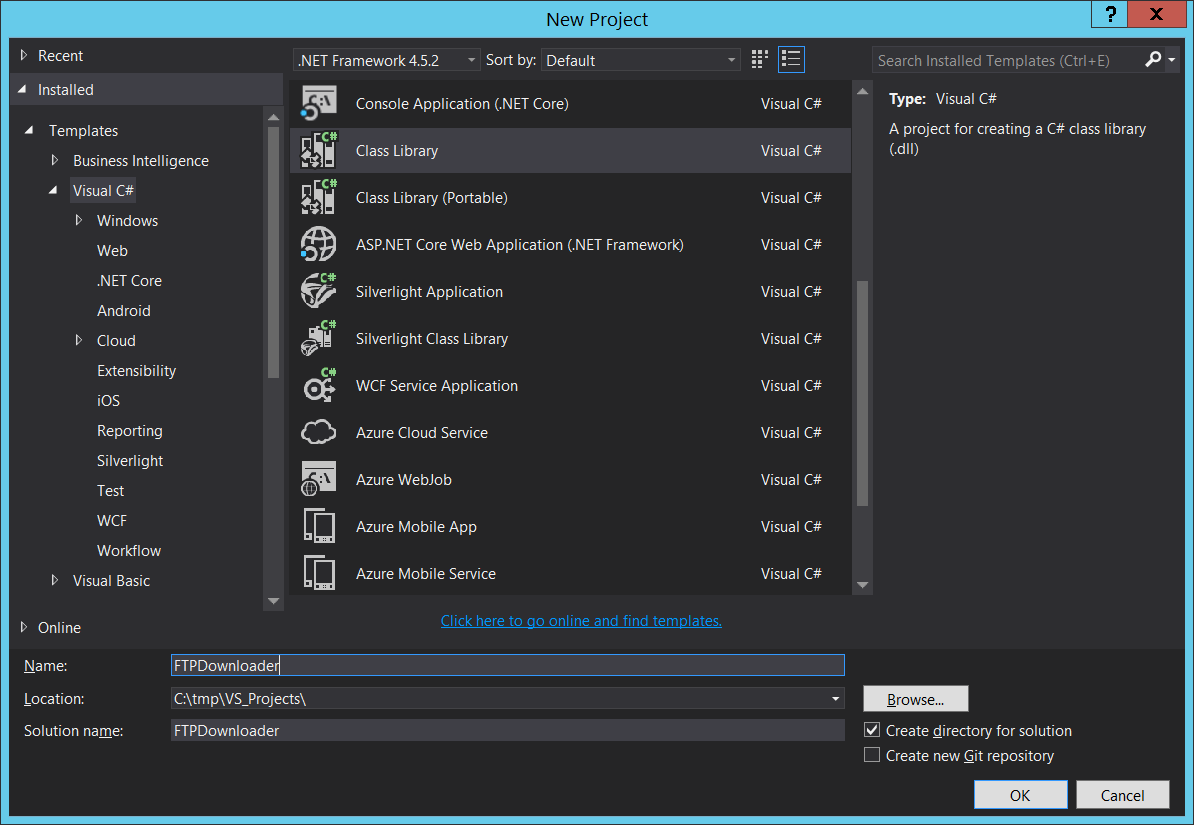
First, we need to open Visual Studio (In my case I am using VS2015) and create a new project of the type ClassLibrary called FTPDownloader. It is important to note that the Framework should be 4.5.2.
Secondly, we need to install the NuGet dependencies by entering the following lines in the NuGet Package Manager Console (to open the console, click on ‘Tools’ ‘NuGet Package Manager’ ‘Package Manager console’):
|
1 2 |
Install-Package Microsoft.Azure.Management.DataFactories Install-Package Azure.Storage |
As you run the above commands, you will see the References being added to the project.
After this is done, we are ready to write the custom code.
|
1 2 3 4 5 6 7 8 9 10 11 12 13 14 15 16 17 18 19 20 21 22 23 24 25 26 27 28 29 30 31 32 33 34 35 36 37 38 39 40 41 42 43 44 45 46 47 48 49 50 51 52 53 54 55 56 57 58 59 60 61 62 63 64 65 66 |
using Microsoft.Azure.Management.DataFactories.Models; using Microsoft.Azure.Management.DataFactories.Runtime; using Microsoft.WindowsAzure.Storage; using Microsoft.WindowsAzure.Storage.Blob; using System; using System.Collections.Generic; using System.IO; using System.Linq; using System.Net; namespace FTPDownloader { public class FTPActivity : IDotNetActivity { string ftpUserName = ""; string ftpPassword = ""; public IDictionary<string, string> Execute(IEnumerable<LinkedService> linkedServices, IEnumerable<Dataset> datasets, Activity activity, IActivityLogger logger) { //Get FTP URL from extended properties var currentActivity = (DotNetActivity)activity.TypeProperties; var extendedProperties = currentActivity.ExtendedProperties; var ftpFileUrl = extendedProperties["FTPFileUrl"]; //Get blob connection string from Output dataset var outputDataset = datasets.Single(dataset => dataset.Name == activity.Outputs.Single().Name); var outputLinkedService = linkedServices.Last(linkedService => linkedService.Name == outputDataset.Properties.LinkedServiceName) .Properties .TypeProperties as AzureStorageLinkedService; var blobConnectionString = outputLinkedService.ConnectionString; //Get blob folder from Output dataset var outputLocation = outputDataset.Properties.TypeProperties as AzureBlobDataset; var folderPath = outputLocation.FolderPath; //Upload file to blob UploadFileToBlob(ftpFileUrl, ftpUserName, ftpPassword, blobConnectionString, folderPath, logger); return new Dictionary<string, string>(); } public void UploadFileToBlob(string ftpFileUrl, string ftpUserName, string ftpPassword, string blobConnectionString, string blobFolderPath, IActivityLogger logger) { var request = (FtpWebRequest)WebRequest.Create(new Uri(ftpFileUrl)); request.Credentials = new System.Net.NetworkCredential(ftpUserName, ftpPassword); request.UseBinary = true; request.UsePassive = true; request.KeepAlive = true; request.Method = WebRequestMethods.Ftp.DownloadFile; var outputValue = string.Empty; using (var ftpResponse = (FtpWebResponse)request.GetResponse()) { using (var ftpStream = ftpResponse.GetResponseStream()) { logger.Write("connecting to the blob.."); var outputStorageAccount = CloudStorageAccount.Parse(blobConnectionString); var fileName = Path.GetFileName(ftpFileUrl); var outputBlobUri = new Uri(outputStorageAccount.BlobEndpoint, blobFolderPath + "/" + fileName); var outputBlob = new CloudBlockBlob(outputBlobUri, outputStorageAccount.Credentials); logger.Write("uploading to the blob URI: {0}", outputBlobUri.ToString()); outputBlob.UploadFromStream(ftpStream); logger.Write("upload succeeded"); } } request = null; } } } |
It is important to notice that the class implements the Execute method of the IDotNetActivity , and it expects 4 parameters: input list, output list, a dictionary for the extended properties and a logger. It returns a dictionary.
The above code is simply showing how to implement the interface, get extended properties from the pipeline JSON, how to get the connection string from the Output dataset and how to make a simple call to an FTP server and stream a file directly to our blob storage.
Debugging and logging
If you are a developer, you might probably know that there is no perfectly working code from the first execution. This means that very often we need to debug our code and any information available in the process will speed up our path to successful execution.
The challenge in this case is significant: how do we debug the custom .NET activity if it can be executed only in Azure, triggered by ADF and running in the context of the Batch environment?
There are couple of ways to go about it. One way is to write custom log messages during each step of the C# execution in a custom log file.
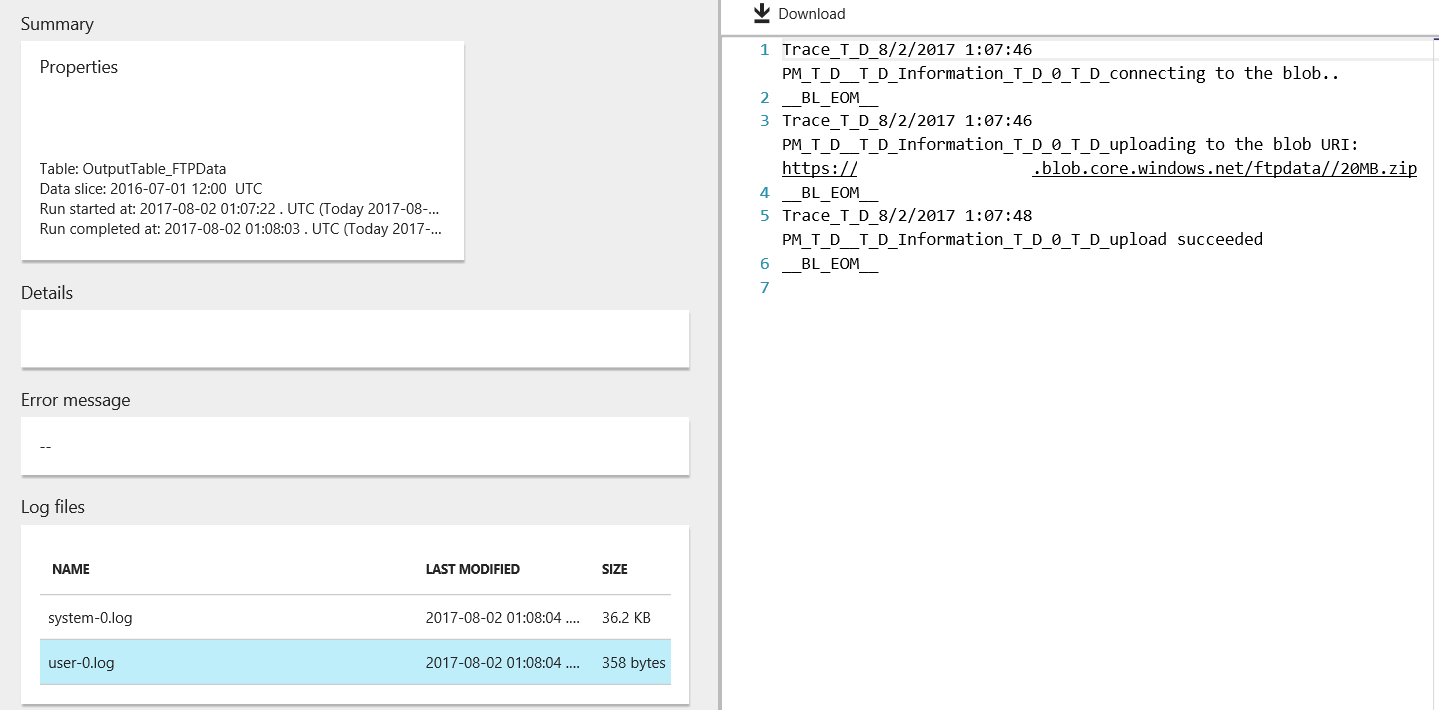
As you have noticed, the IActivityLogger is used in the code to write custom messages from the .NET custom execution to the logs for debugging later. These custom messages can be viewed in the ‘ADF Monitor and Manage’ page, by clicking on the pipeline, then by clicking on its execution slice and finally by looking at the ‘Log files’ section. There are two files, one is called system-0.log and the other one is user-0.log. The former is the default log generated by the system and the latter is the one we are writing to from the C# with the _logger.Write() method.
Another way to do local debugging is to create a console application in our solution and use it as if it was the ADF Pipeline, supplying the variables to our FTPDownloader app.
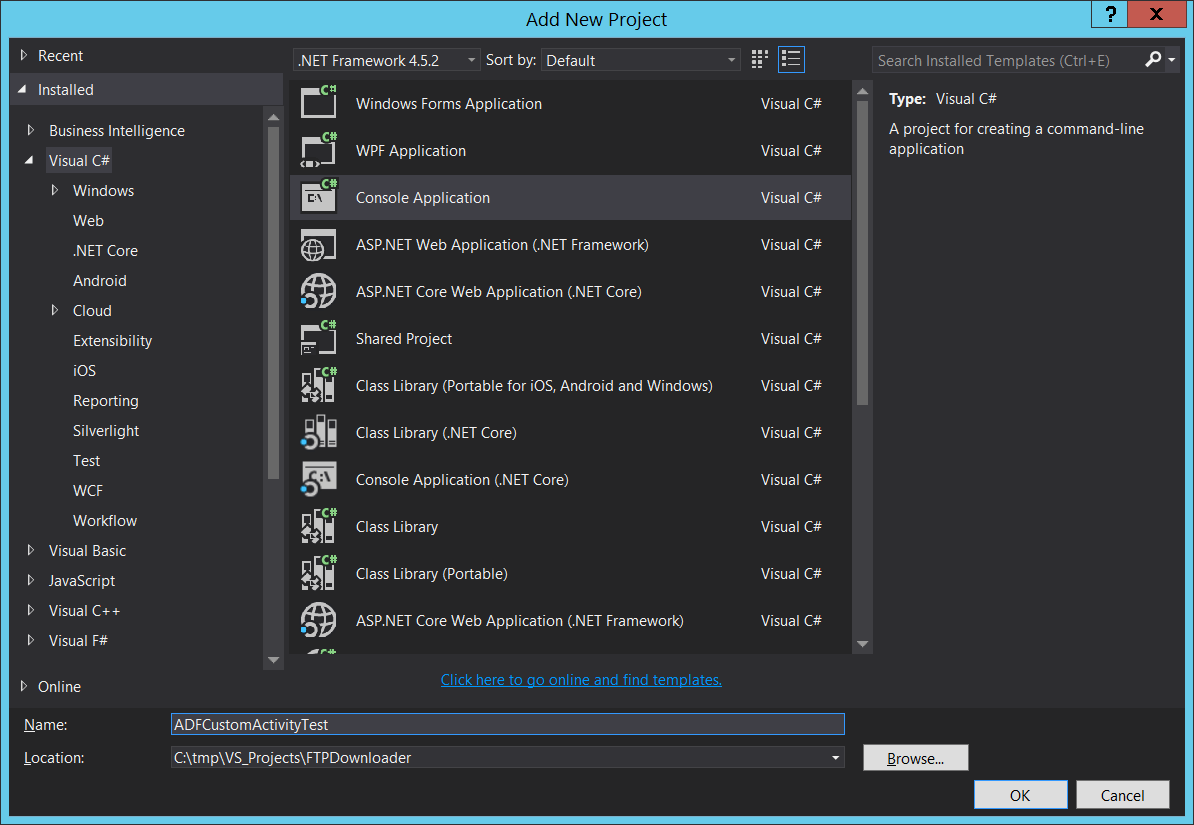
To do this, just create another console application in the solution called ADFCustomActivityTest, like this:
Again, we need to install the NuGet dependencies by entering the following lines in the NuGet Package Manager Console (to open the console, click on ‘Tools’ ’ NuGet Package Manager’ ‘Package Manager console’):
|
1 2 |
Install-Package Microsoft.Azure.Management.DataFactories Install-Package Azure.Storage |
Make sure to add a reference to the FTPDownloader by right-clicking the ADFCustomActivityTest References tab.
After this is done, the code for the Program.cs is as follows:
|
1 2 3 4 5 6 7 8 9 10 11 12 13 14 15 16 17 18 19 20 21 22 23 24 25 26 27 28 29 30 31 32 33 34 35 |
using System; using System.Collections.Generic; using System.Linq; using System.Text; using System.Threading.Tasks; using System.Net; using FTPDownloader; using Microsoft.Azure.Management.DataFactories.Models; using Microsoft.Azure.Management.DataFactories.Runtime; namespace ADFCustomActivityTest { class Program { static void Main(string[] args) { var ftpActivity = new FTPActivity(); string ftpFileUrl = "ftp://speedtest.tele2.net/20MB.zip"; string ftpUserName = string.Empty; string ftpPassword = string.Empty; string blobConnectionString = "[Your Storage Connectionstring]"; string blobFolderPath = "ftpdata"; ftpActivity.UploadFileToBlob(ftpFileUrl, ftpUserName, ftpPassword, blobConnectionString, blobFolderPath, new ConsoleActivityLogger()); Console.WriteLine("Press Any Key to Exit..."); Console.ReadKey(); } } public class ConsoleActivityLogger : IActivityLogger { public void Write(string format, params object[] args) { Console.WriteLine(format, args); } } } |
Make sure to paste the correct Connection String for the Blob storage connection in the code above.
The next step would be to set the ADFCustomActivityTest console app as a startup project, put breakpoints in the Program.cs and run the console app.
After you run the app, the breakpoint will be hit and the local variables will be displayed:
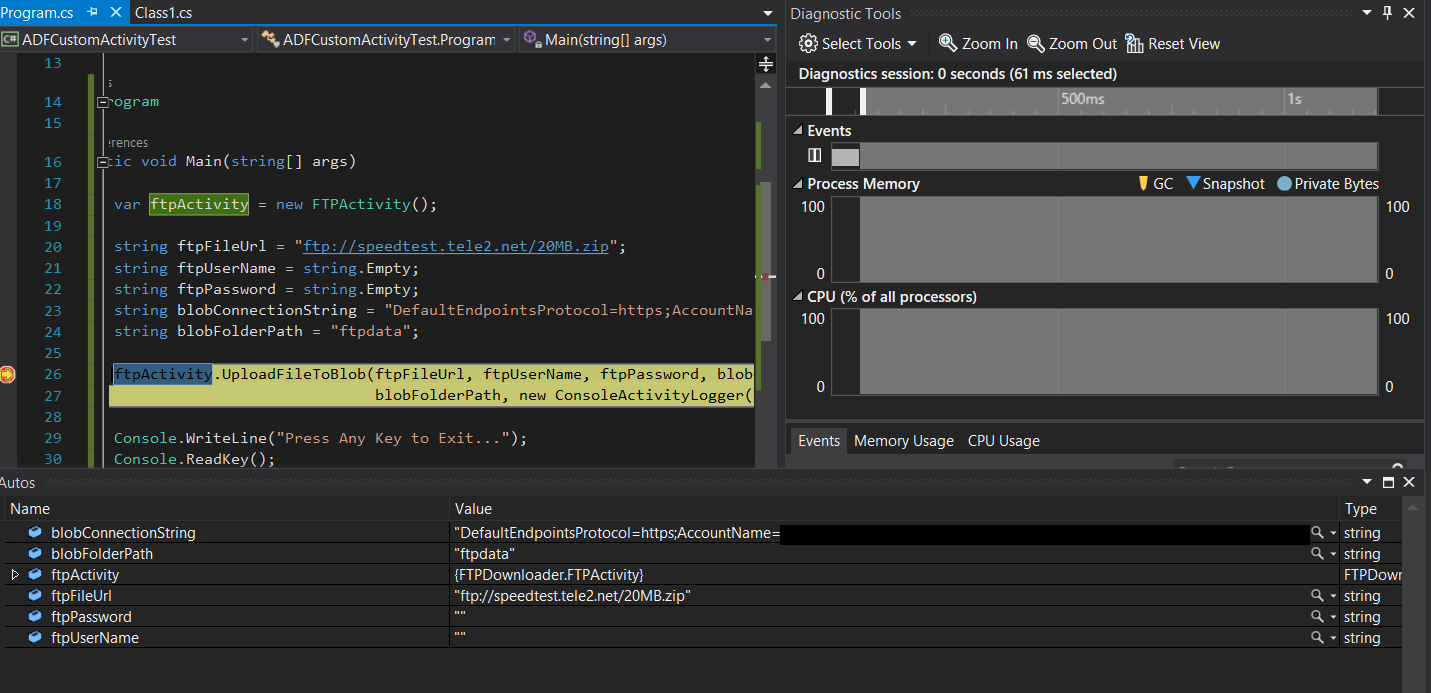
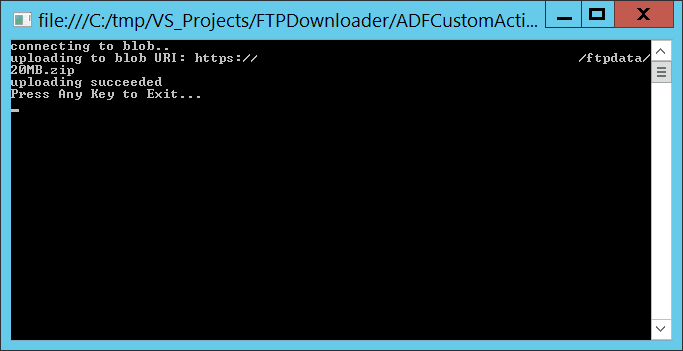
When you click ‘Continue’, the console app will print out the message that the file was uploaded to the blob.
Yet another way to go about it is to use Gerhard Brueckl’s debugger, which allows us to run our custom .NET activity locally in a debug mode. His work is on GitHub and he describes the process here. This is not in the scope of this article; however I can recommend this way of debugging the custom activities.
Now that we have tested our code, we can add a Data Factory App and deploy our code to Azure Data Factory. Make sure to set the FTPDownloader as a startup project.
About adding a Data Factory App to the project
First we need to install the Data Factory tools for Visual Studio by going to ‘Tools’ ‘Extensions and Updates’, then ‘Online’ / ‘Visual Studio Gallery’ and look for Microsoft Azure DataFactory Tools for Visual Studio.
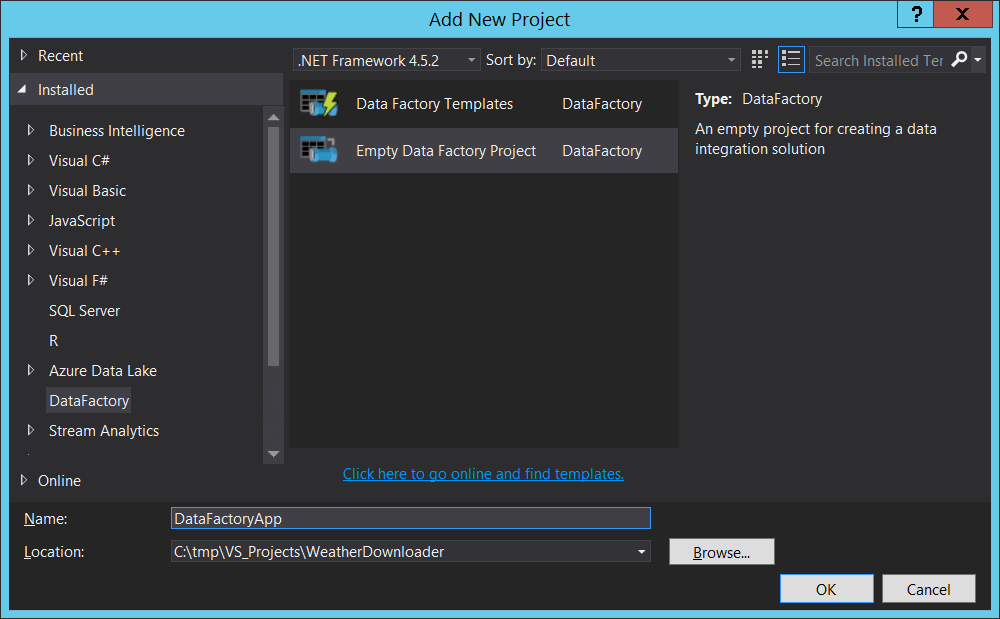
After we have installed the DataFactory Tools, we should add the Data Factory App to the project by clicking on ‘File’’Add’ ‘New Project…’ in Visual Studio. From the dialog, we select ‘DataFactory’ ‘Empty Data Factory Project’ and we give it a name DataFactoryApp.
When this is done, we see that our Solution Explorer looks like this:
The next steps will be to create
- a linked service for the batch activity and for the blob storage
- output table (we need this for the output results from the pipeline)
- the pipeline itself with all extended properties
Creating the linked Services
To create the linked service, we need to right-click on the LinkedServices folder in the Solution Explorer and select Azure Batch Linked Service type and give it a name as AzureBatchLinkedService_FTPData.json:
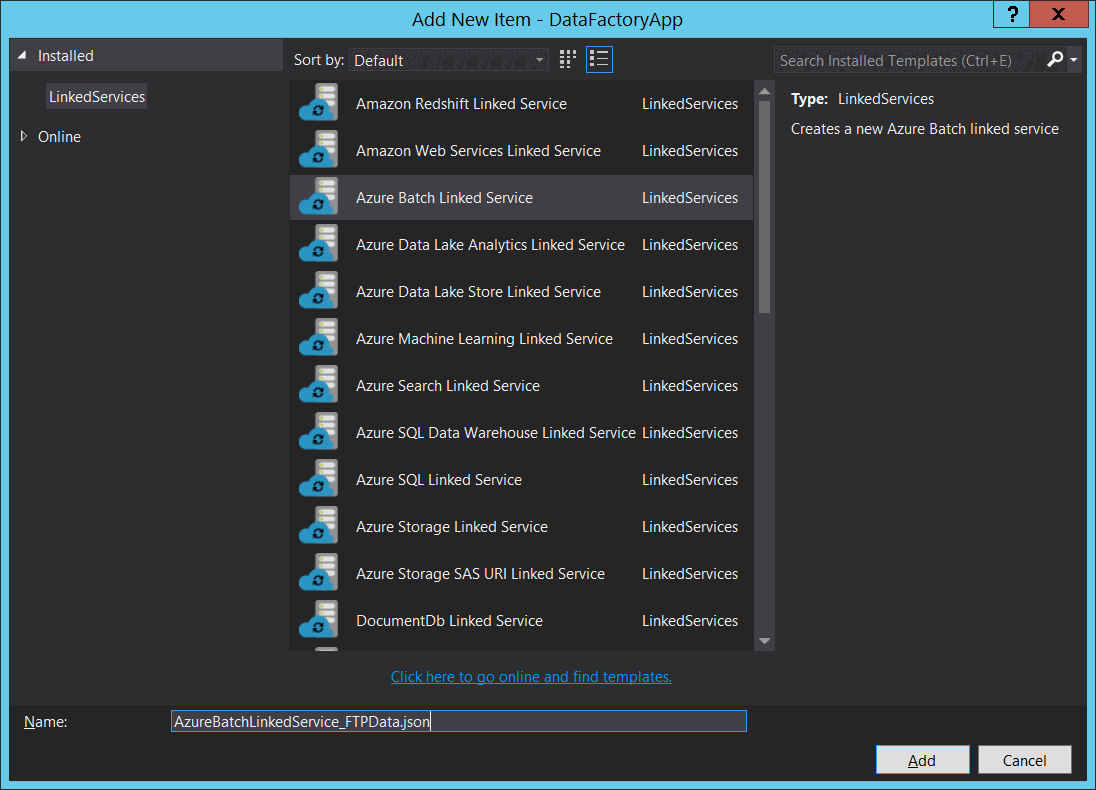
After we click ‘Add’, the JSON code for the service will be presented to us and we need to fill in the proper values for the Batch Service that we want to use.
In a similar manner, we create a Storage linked Service which points to the blob storage that we will be using.
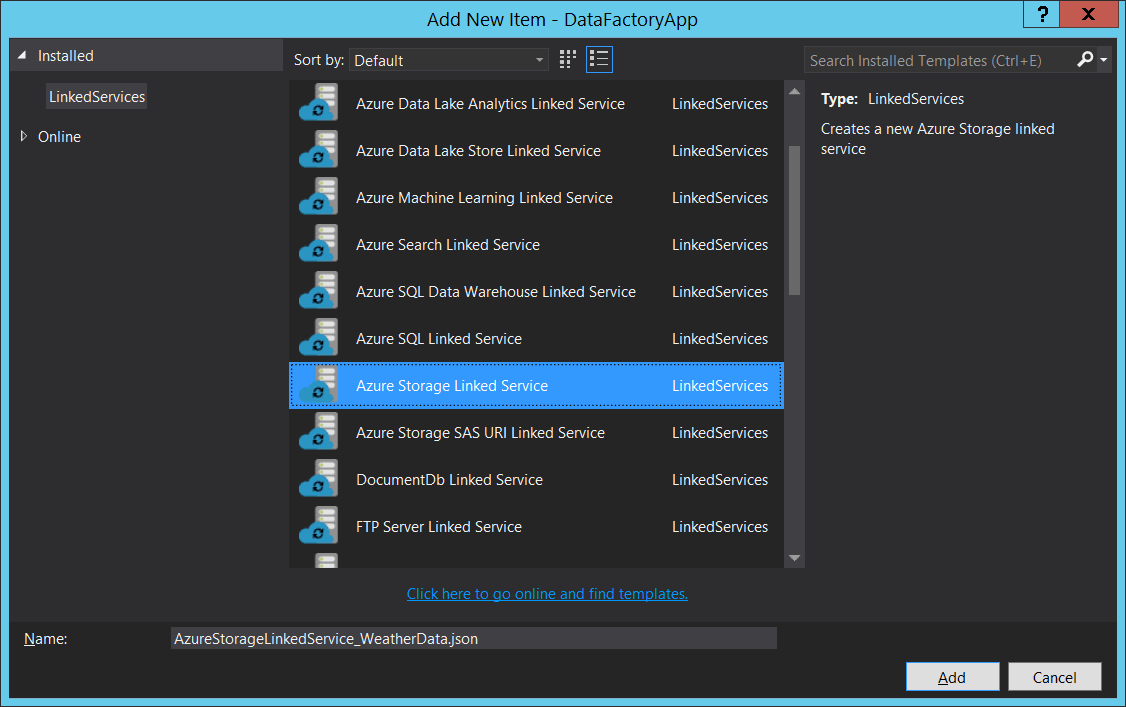
In the next step we need to edit the JSON to point to the correct connection string to our blob storage.
Creating the output table
We need to right-click on the Tables folder and create and output with the Azure Blob type and give it a proper name:
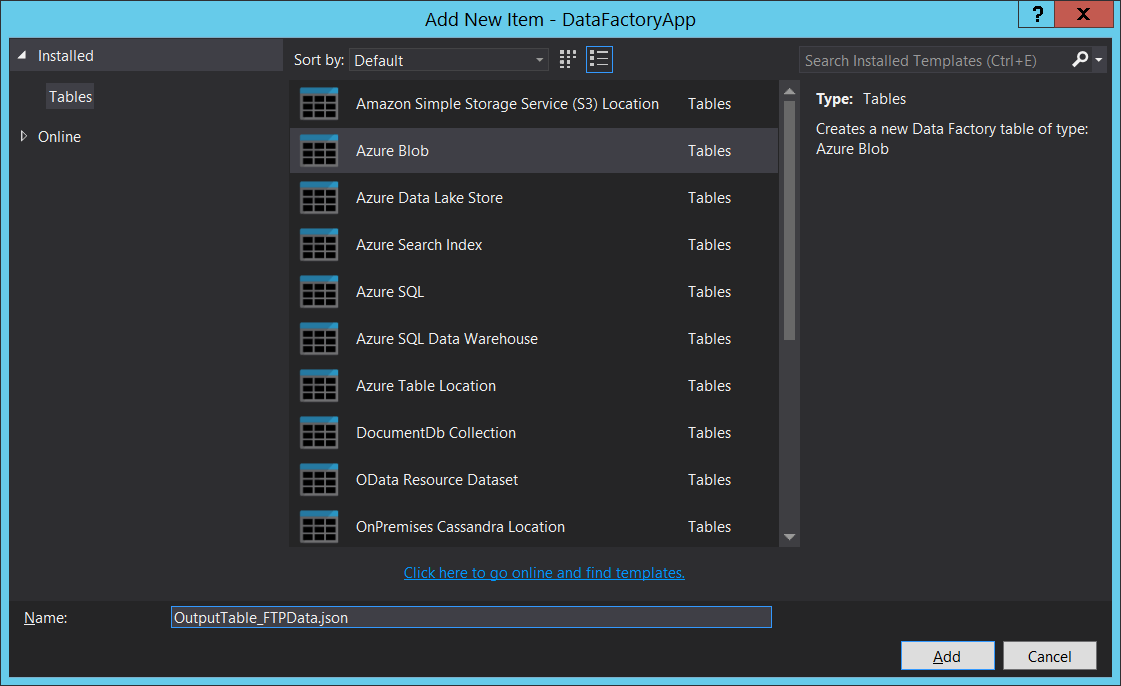
In the next screen, we need to edit the JSON to point to the blob linked service we created earlier and to the correct folder in our blob container.
Composing the Pipeline
As we saw above in our custom .NET class, we have some references to extended properties, such as:
|
1 |
FTPFileUrl |
These extended properties are supplied to the .NET class at runtime from the ADF pipeline, and in our case the code for creating the pipeline is as follows (we need to right-click on the Pipeline folder in the Visual Studio and add a Custom Pipeline):
|
1 2 3 4 5 6 7 8 9 10 11 12 13 14 15 16 17 18 19 20 21 22 23 24 25 26 27 28 29 30 31 32 33 34 35 36 37 38 39 40 |
{ "$schema": "http://datafactories.schema.management.azure.com/schemas/2015-09-01/Microsoft.DataFactory.Pipeline.json", "name": "FTPDownloaderPipeline", "properties": { "description": "Download FTP Data and Upload to Blob", "activities": [ { "name": "DotNetActivityTemplate", "type": "DotNetActivity", "outputs": [ { "name": "FTPBlobOutput" } ], "typeProperties": { "assemblyName": "FTPDownloader", "entryPoint": "FTPDownloader.FTPActivity", "packageLinkedService": "AzureStorageLinkedService_FTPData", "packageFile": "customactivitycontainer/FTPDownloader.zip", "extendedProperties": { "FTPFileUrl": "ftp://speedtest.tele2.net/20MB.zip" } }, "linkedServiceName": "AzureBatchLinkedService_FTPData", "policy": { "concurrency": 1, "executionPriorityOrder": "OldestFirst", "retry": 3, "timeout": "00:05:00" }, "scheduler": { "frequency": "Day", "interval": 1 } } ], "start": "2017-07-01T00:00:00Z", "end": "2017-07-01T00:00:00Z" } } |
In the above script, we need to enter the proper values for the storage account and folder. Also, make sure to add a reference to the FTPDownloader in the DataFactoryApp, otherwise we will get an error that the reference is missing.
Keep in mind that the pipeline can be extended with the partionedBy functionality to dynamically assign variables for DateTime and Text, which can be used to traverse subfolders, concatenate file names etc. For more details, visit the ADF pipeline documentation: https://docs.microsoft.com/en-us/azure/data-factory/data-factory-functions-variables
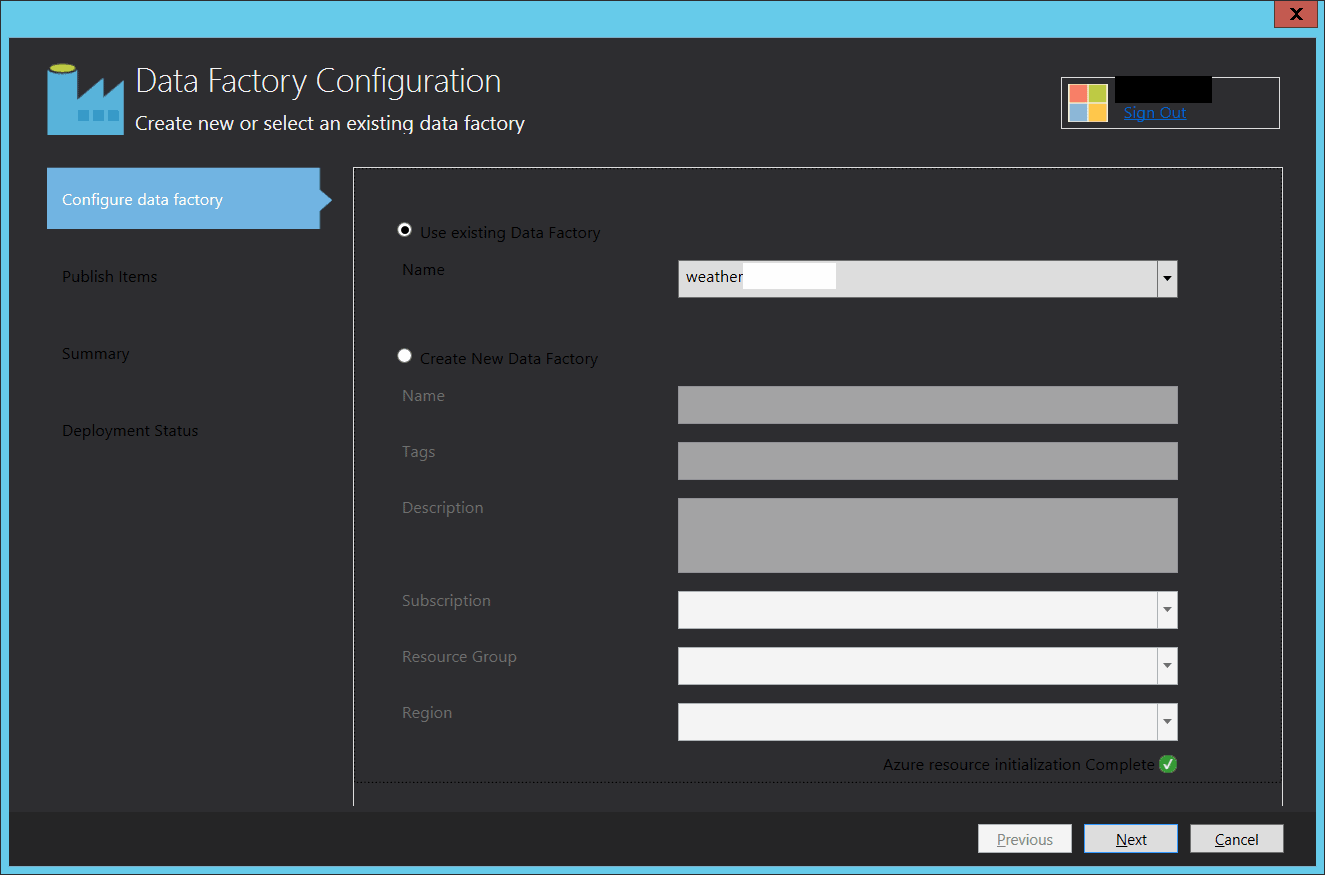
About deploying the pipeline
To deploy the Data Factory items created in the steps above, we need to right-click on the DataFactoryApp and click ‘Publish…’, which will bring us to the publish wizard. In the wizard, we need to specify the Data Factory we want to use and what files we want to copy.
After we go through the wizard, and assuming that we have configured everything properly, we will get the published ADF pipeline in Azure. Then we can go to the portal and monitor its execution. See the next article in the series: creating an on-demand HDInsight cluster.
Conclusion
In this article, we covered the topic of setting up the Azure environment and running a custom .NET activity to download file from a FTP to a blob storage in our Azure environment. We learned how to debug our code locally and we also learned how to create and deploy the ADF pipeline from the Visual Studio environment. This is a very flexible way to extend the functionality of ADF and it gives us the ability to write custom logic.
In the above example, the code is just a glimpse into the possibilities presented by the custom .NET activities and not really a production-ready code which performs magic.
It is much more important to focus on the building blocks of the process of composing the data integration: from deciding what batch pool to use, how to scale it, what inputs and outputs to use, how to slice the extended properties dynamically, and finally to automatically deploying the pipeline with a single-click from Visual Studio.
FAQs: Creating a Custom .NET Activity Pipeline for Azure Data Factory
1. What is a custom .NET activity in Azure Data Factory?
A custom .NET activity runs your own C# code as a step in an ADF pipeline. Create a class library implementing IDotNetActivity, package it, deploy to an Azure Batch pool. Extends ADF beyond built-in activities for custom logic like FTP downloads, API calls, or complex data processing.
2. How do you debug a custom .NET activity locally?
Write a console app that creates the same linked services, datasets, and activity objects in code, then calls your Execute method directly. Replicates the ADF pipeline context locally with logging output.
This document contains proprietary information and is protected by copyright law.
Copyright © 2026 Red Gate Software Limited. All rights reserved
Load comments