
The series so far:
- Creating a Custom .NET Activity Pipeline for Azure Data Factory
- Using the Copy Wizard for the Azure Data Factory
- The Quick and the Dead Slow: Importing CSV Files into Azure Data Warehouse
In my previous article, I described a way to get data from an endpoint into an Azure Data Warehouse (called ADW from now on in this article). On a conceptual level, that worked well, however there are a few things to consider for the sake of performance and cost, especially important when you are regularly importing large amounts of data.
The final architecture of the data load in my previous article looked like this:
As we can see, the files are taken from an FTP server, copied to a blob storage and then imported to the Azure Data Warehouse from there. This means that we will not achieve great levels of performance, especially when you load larger amounts of data, because of the intermediate step of copying data through blob storage .
The fastest way to import data into an Azure Data Warehouse is to use Polybase, and there are some requirements to be met before Polybase can step in.
Just to give an example of what happens if Polybase can be used: I was recently working on an import of a dataset of CSV files with an approximate size of 1Tb. I started by choosing an ‘intermediate storage’ approach (as in the picture above), and it was about to take 9 days to complete, and this with an Azure Data Warehouse scaled to 600DWUs. For more information about ADW scalability and DWUs, have a look at https://docs.microsoft.com/en-us/azure/sql-data-warehouse/sql-data-warehouse-manage-compute-overview ). Given that an ADW with 600DWU costs 7.02 EUR/hour, I was pretty confident that my project accountant would have been unhappy with the cost, which would have been about 1,500 EUR for this load! Instead, by making sure of meeting the criteria for Polybase, I managed to import the entire 1Tb data into my Azure Data Warehouse in the means of 3 hours, i.e. at the cost of about 21 EUR.
In this article we will base our work on the idea of my previous article, however we will change the architecture in order to save time and resources. In this case we will do the following:
- Download the files from the FTP (ftp://neoftp.sci.gsfc.nasa.gov/csv/) to our Azure storage
- Decompress the files
- Look into Polybase requirements and import the data reasonably fast into our ADW
Download the files from FTP
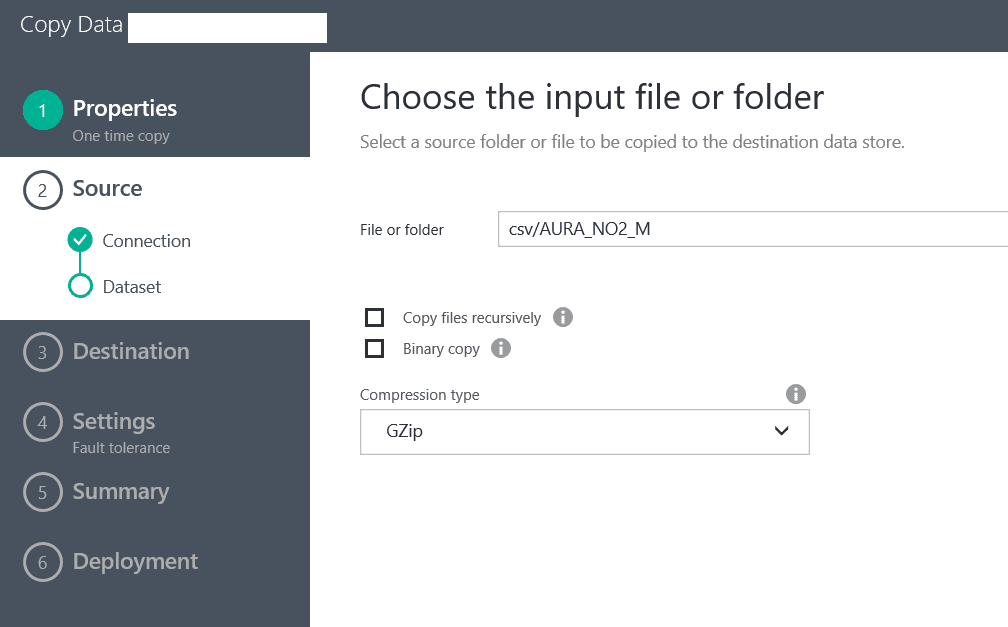
In this section we will not spend too much time on describing how to get the files from the FTP site, because the method is very similar to the one described in my previous article. For downloading the files from the FTP, we will be using the Copy Data wizard. The only difference is that in this case, because the files on the FTP server are compressed, we will need to use Blob storage as a destination. In the download process, we will instruct the ADF to decompress the files as they are being downloaded.
The reason for this is that Polybase does not yet support direct import from compressed files.
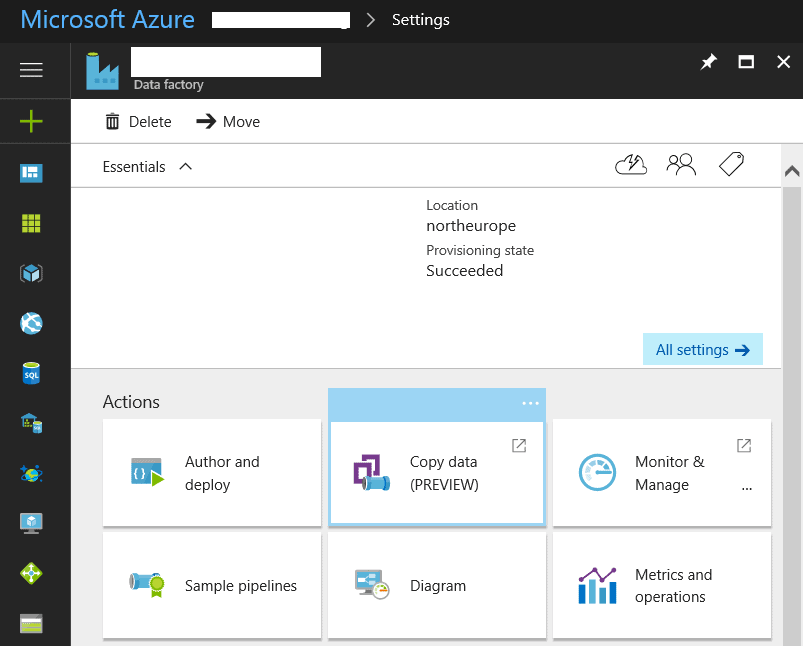
To get the files, we need to start the Copy Data wizard from our Data Factory:
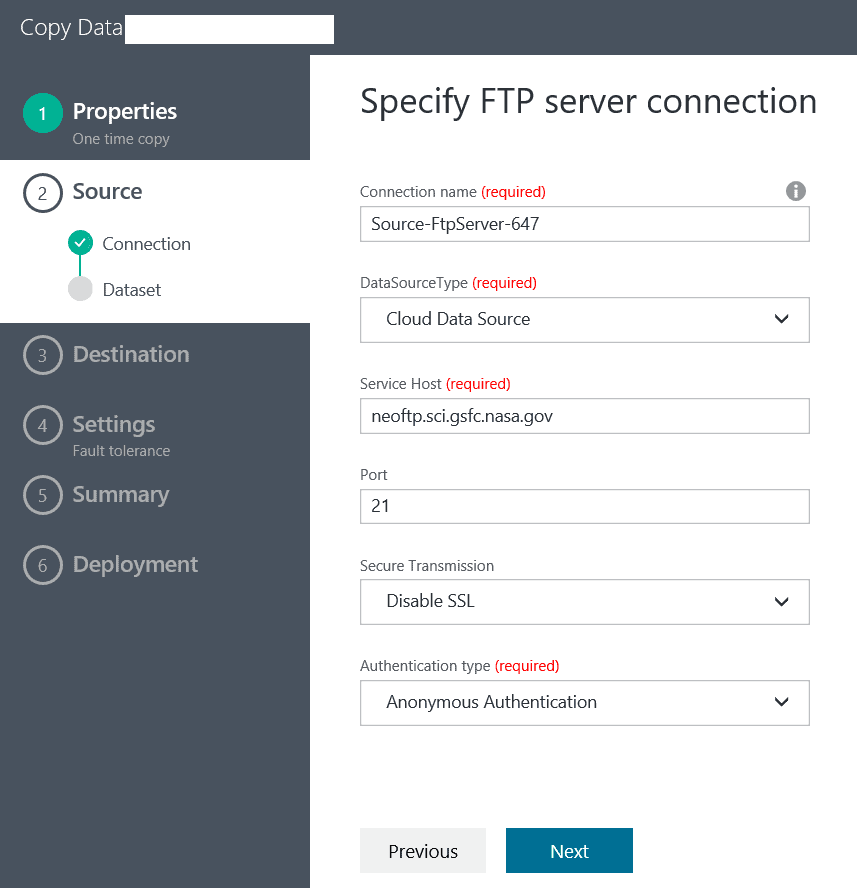
then configure the FTP server properties:
Then we need to select the folder we want to process recursively:
Now choose ‘Azure Data Lake store’ (ADL) as a destination. Of course, there are many ways to go about it, but in this case I choose to use ADL because I want to demonstrate the power of U-SQL scripting for preparing the data for Polybase import.
For the ADL destination, I will be using Service-to-Service authentication. This is also a requirement for Polybase loads, so now is a great time to create an Active Directory App which will carry out the task of authenticating our data operations.
Creating a Service-to-Service authentication
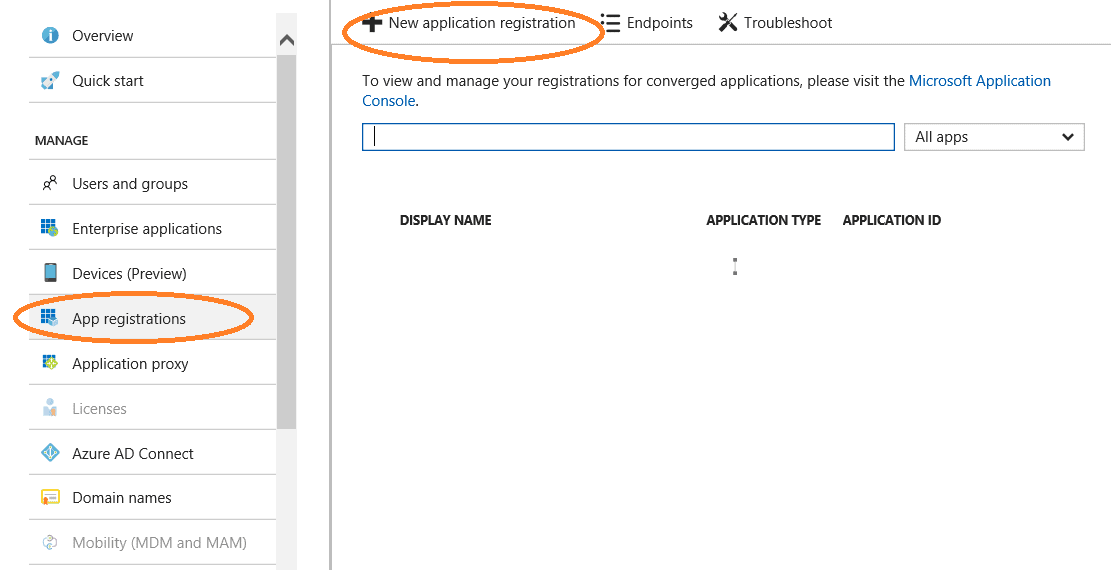
In the Azure portal we need to go to Azure Active Directory blade and from there to ‘App registrations’, and click on ‘New App Registration’.
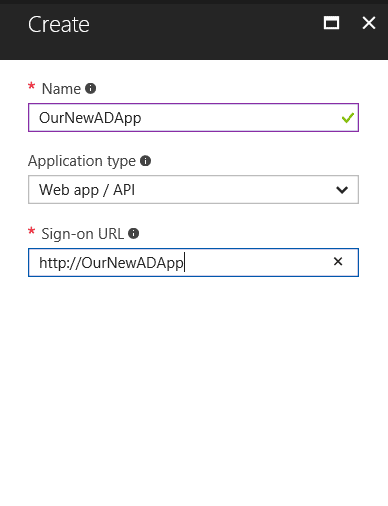
In the next screen we give a name to our app and we create it:
Now that we have created our application, we need to gather its properties for later use, and also we need to create a key for it.
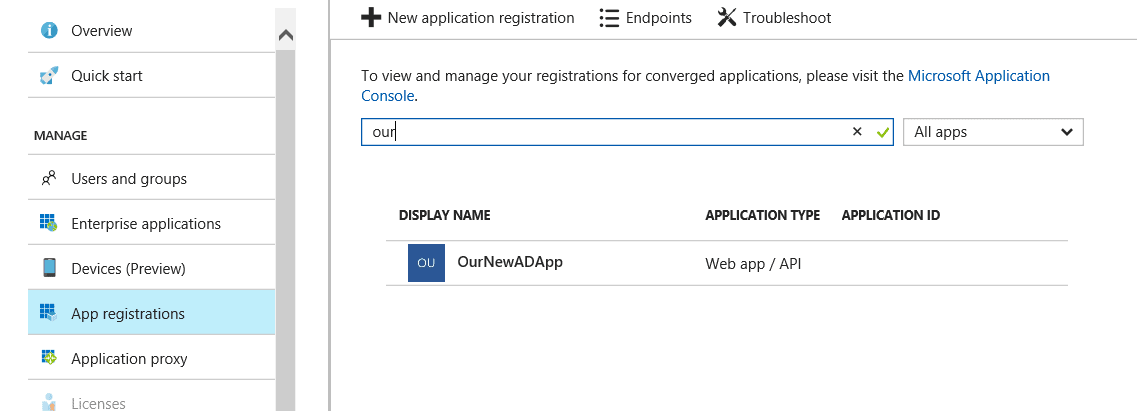
After creating the application we search for it in the ‘New application registration’ tab, and we click on the application we just created:
We need to note the Application ID in the next screen:
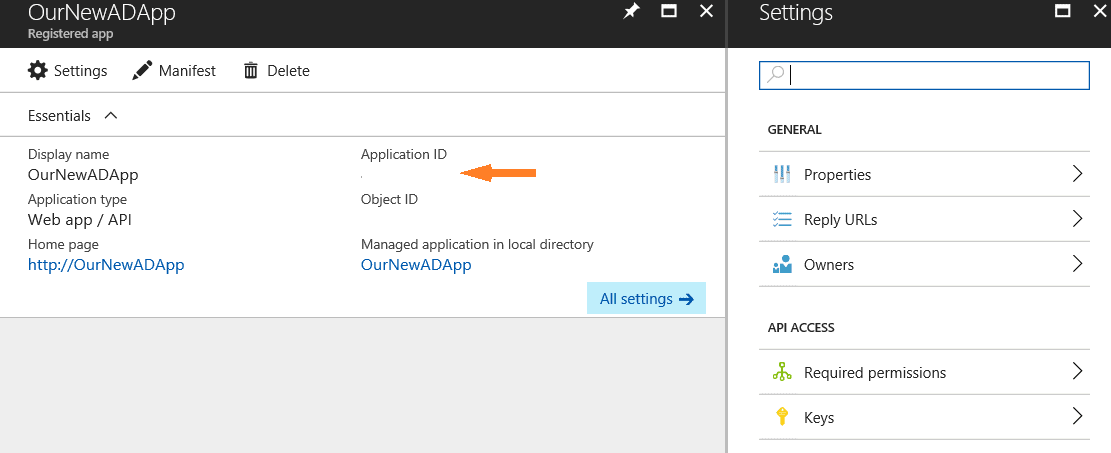
And next we need to create a key for the app by clicking on the Keys link to the right
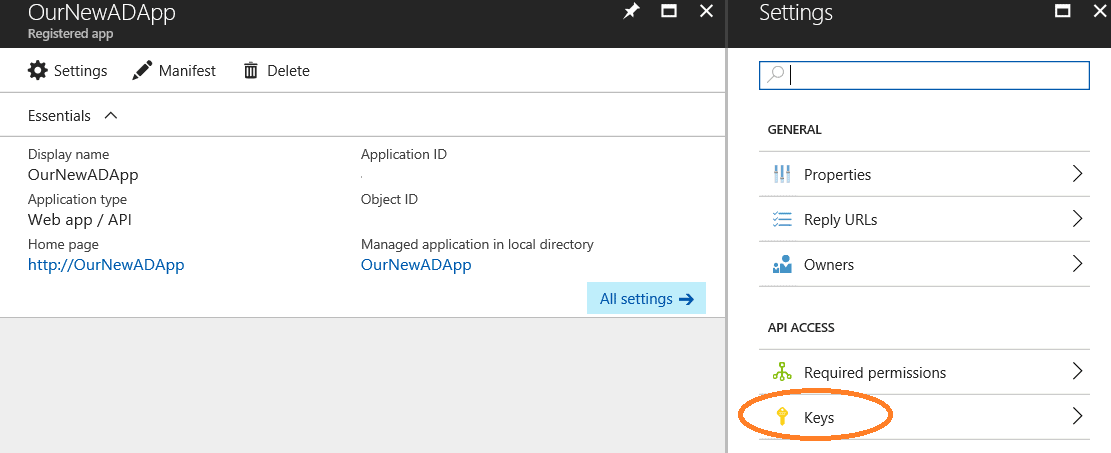
Make sure to write down the key, since it is impossible to retrieve it at a later time.
Back to the ADL destination in the ADF pipeline
Now that we have created the Azure Active Directory App, we are ready to use Service-to-Service authentication for the FTP files to be downloaded and extracted to our data lake.
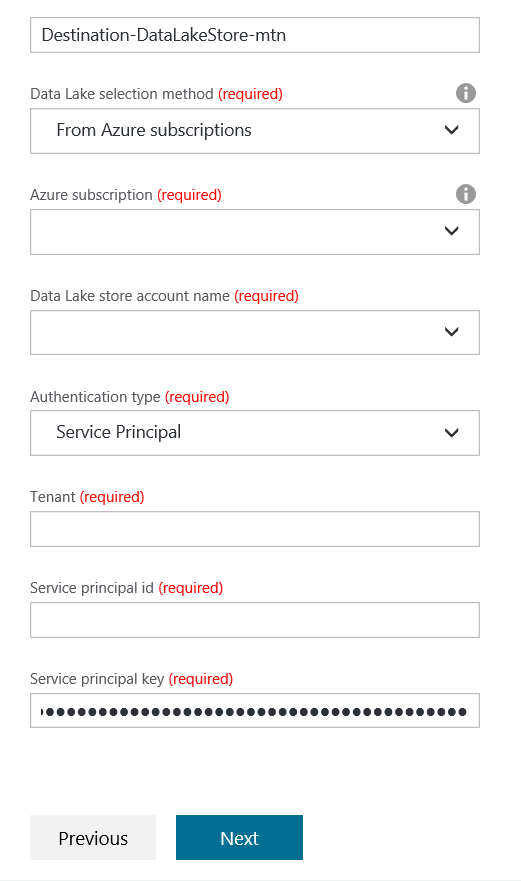
In the above case, we need to specify the Subscription, the Data Lake account and the Tenant ID.
The Service principal id term is a bit inconsistent, but in this field we need to paste the Application Id we gathered from the Properties tab of our Azure AD App. And then the Service principal key is the key we created for the app.
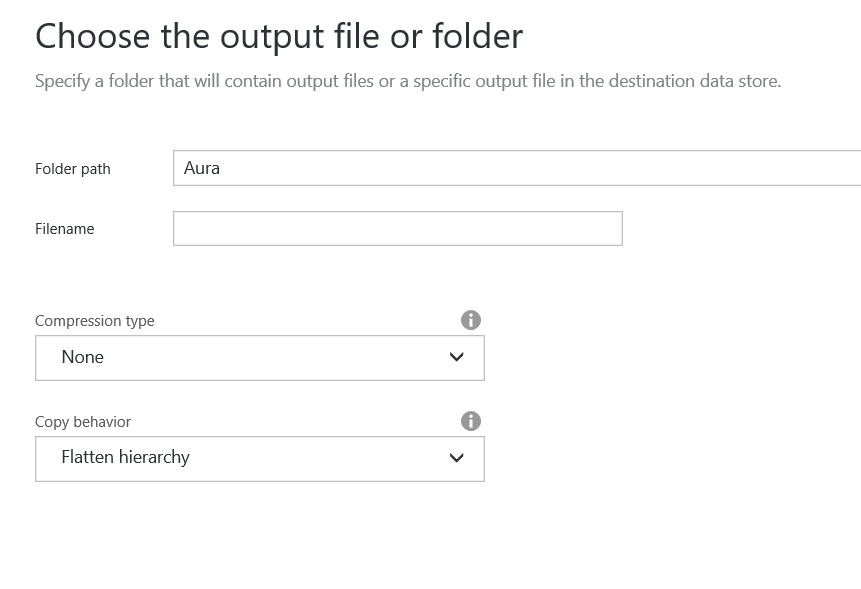
After we click ‘Next’ in the screen above, we will be asked where to store the files on our ADL. For the purpose I have created a folder called Aura. For the copy behaviour, I have chosen ‘Flatten hierarchy’. This means that I will get as many files as there are in the FTP, but in a single folder.
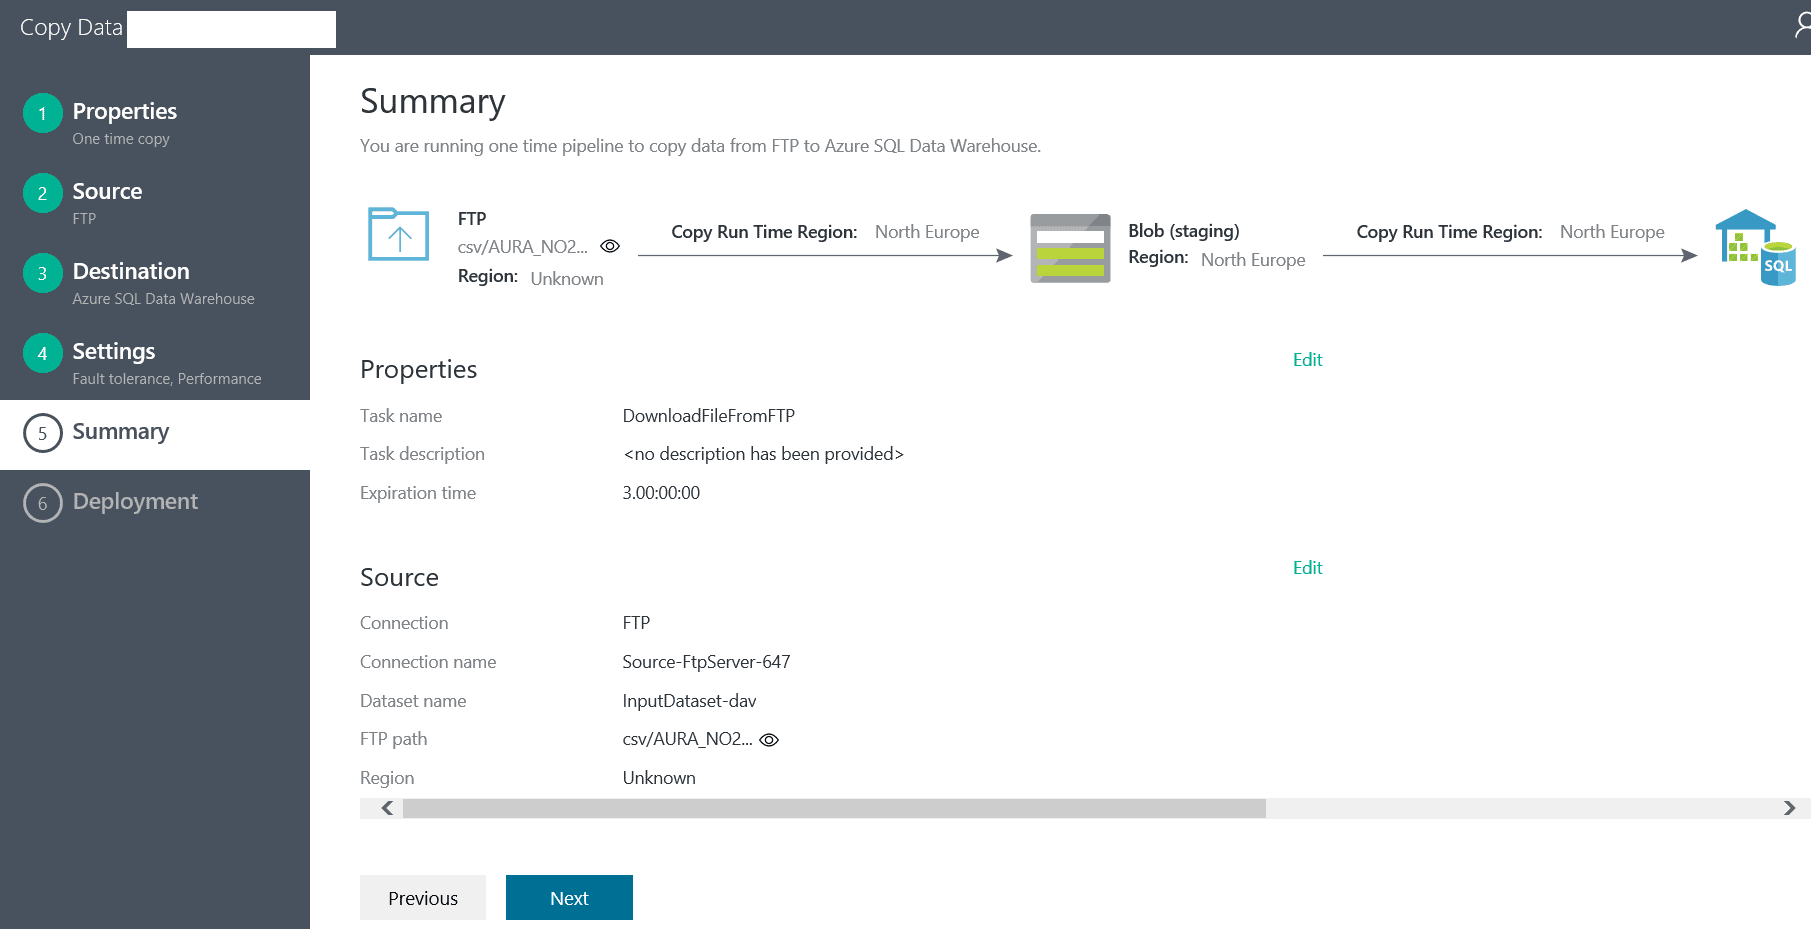
In the next screen we are asked to specify the properties of the destination flat file. This is a very important step, since Polybase has a very specific set of expectations for the format of the file, and if these requirements are not met, then we will need to use an intermediary storage to process the files and prepare them for import (and this, as we discussed above, is extremely slow and costly).
Here are the requirements for using Polybase:
The input dataset is of type AzureBlob or AzureDataLakeStore, and the format type under type properties is OrcFormat, or TextFormat with the following configurations:
- rowDelimiter must be \n.
- nullValue is set to empty string (“”), or treatEmptyAsNull is set to true.
- encodingName is set to utf-8, which is default value.
- escapeChar, quoteChar, firstRowAsHeader, and skipLineCount are not specified.
- There is no skipHeaderLineCount setting under BlobSource or AzureDataLakeStore for the Copy activity in the pipeline.
- There is no sliceIdentifierColumnName setting under SqlDWSink for the Copy activity in the pipeline.
- There is no columnMapping being used in the associated in Copy activity.
The following screen looks like this by default:
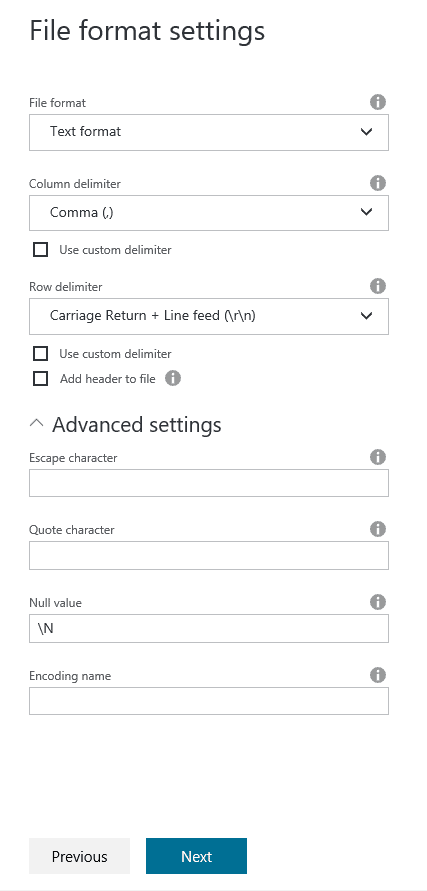
Usually, we would set up the above screen properly so that we can get the files ready for Polybase directly. For this article, however, I will leave the settings as they are because I would like to demonstrate a data preparation step by using U-SQL.
U-SQL is a language used together with Data Lake and it is a hybrid between T-SQL (the select statement) and C# (used for the WHERE clause). The U-SQL language is extremely flexible and scalable. For more information on U-SQL, check the online documentation here.
Another reason to U-SQL in this case is because Polybase does not support column mapping, and in this case my data has over 3000 variables. This poses a few challenges: in SQL Server and in ADW there is a limitation of 1024 columns per table, which means that in this particular case I need to resort to U-SQL to make sure the data is managed correctly.
So, I click ‘Next’ and end up at the final screen, ready to run the pipeline.
Creating a ADW login and user to load the data
When the Azure Data Warehouse was created, we had to specify a user with a password to connect to it. The permissions on that login are not very restricted, and because of this we will now create a login and a database user to do our data import.
The following T-SQL code will create this:
|
1 2 3 4 5 6 7 8 9 10 11 12 13 14 |
CREATE LOGIN DataImporter WITH PASSWORD = 'fsklj2#%3245%#&skjhgdfk236' GO CREATE USER DataImporter FOR LOGIN DataImporter WITH DEFAULT_SCHEMA = dbo GO USE [myDB] GO CREATE USER [DataImporter] FOR LOGIN [DataImporter] WITH DEFAULT_SCHEMA=[dbo] GO -- Add user to the database owner role EXEC sp_addrolemember N'db_owner', N'DataImporter' GO |
Creating the ADW table
For this article, we will create a small table called NEOData with only a few columns. Here is the T-SQL:
|
1 2 3 4 5 6 7 8 9 10 11 12 13 14 15 16 17 18 19 |
CREATE TABLE [dbo].[NeoData] ( [Column0] [varchar](200) NULL, [Column1] [varchar](200) NULL, [Column2] [varchar](200) NULL, [Column3] [varchar](200) NULL, [Column4] [varchar](200) NULL, [Column5] [varchar](200) NULL, [Column6] [varchar](200) NULL, [Column7] [varchar](200) NULL, [Column8] [varchar](200) NULL, [Column9] [varchar](200) NULL, [Column10] [varchar](200) NULL ) WITH ( DISTRIBUTION = ROUND_ROBIN, HEAP ) |
Note: it is still valid even in Azure Data Warehouse that heaps are the fastest way to import data into SQL Server.
Selecting columns to work with
So far we have a Data Lake with the downloaded files from the FTP server, which were extracted from the GZip. In other words, we have our CSV files in the Data Lake.
There is a challenge in this case because the CSV files we have downloaded have 3600 columns. As mentioned, ADW has a limit of 1024 columns per table, and in our case our data science team is only interested in the first 11 columns anyway.
In a case like this, we can use the flexibility of U-SQL, combined with Azure Data Lake analytics views (you can read more about U-SQL views here https://msdn.microsoft.com/en-us/library/azure/mt771901.aspx ).
To do this, we need to construct a view which uses an Extractor in U-SQL which contains all 3600 columns and specifies their data type. In our case all columns are of the float datatype.
Then we need to create a second view, which uses the first view to select only the first 11 columns from it.
And finally, we can output the file from the result of the second view.
Conceptually the code will look like:
|
1 2 3 4 5 6 7 8 9 10 11 12 13 14 15 16 17 18 |
CREATE VIEW IF NOT EXISTS dbo.view1 AS EXTRACT col1 float, col2 float, col3 float FROM "someFile.txt" USING Extractors.Csv(); CREATE VIEW IF NOT EXISTS dbo.view2 AS SELECT col1, col2 FROM dbo.view1; @input = SELECT * FROM dbo.view2; OUTPUT @input TO "adl://somethingHere.azuredatalakestore.net/Aura/ReadyForImport/Aura.txt" USING Outputters.Csv(rowDelimiter: "\n", encoding: Encoding.UTF8,quoting: false); |
There are several ways to prepare the actual U-SQL script which we will run, and usually it is a great help to use Visual Studio and the Azure Data Lake Explorer add-in. The Add-in allows us to browse the files in our Data Lake and right-click on one of the files and then click on the “Create EXTRACT Script” from the context menu. In this case, however, it will take a very long time, since the file is so wide.
Another way to do it is to just to use Excel to write out the column1 to column 3600 and append the data type.
Either way, our final U-SQL script will look similar to this:
|
1 2 3 4 5 6 7 8 9 10 11 12 13 14 15 16 17 18 19 20 21 22 23 24 25 26 27 28 29 |
CREATE VIEW IF NOT EXISTS dbo.view1 AS EXTRACT [Column1] float?, [Column2] float?, [Column3] float?, ... [Column3600] float? FROM "someFile.txt" USING Extractors.Csv(); CREATE VIEW IF NOT EXISTS dbo.view2 AS SELECT [Column1], [Column2], [Column3], [Column4], [Column5], [Column6], [Column7], [Column8], [Column9], [Column10], [Column11] FROM dbo.view1; @input = SELECT * FROM dbo.view2; OUTPUT @input TO "adl://somethingHere.azuredatalakestore.net/Aura/ReadyForImport/Aura.txt" USING Outputters.Csv(rowDelimiter: "\n", encoding: Encoding.UTF8,quoting: false); |
As mentioned above, the View1 is used to extract the data from the CSV files, view2 is used to sub-set the data from the view1. Finally the view2 is used to write the final result to our Data Lake. The parameters in the outputter are very important, since these are the requirements for using Polybase to push the data in the fastest way to the Data Warehouse in the next step.
And finally, it is important to boost up the parallelism of the U-SQL processing before submitting the job, since it might take a while if we use the default setting. In my case I am using parallelism of 120.
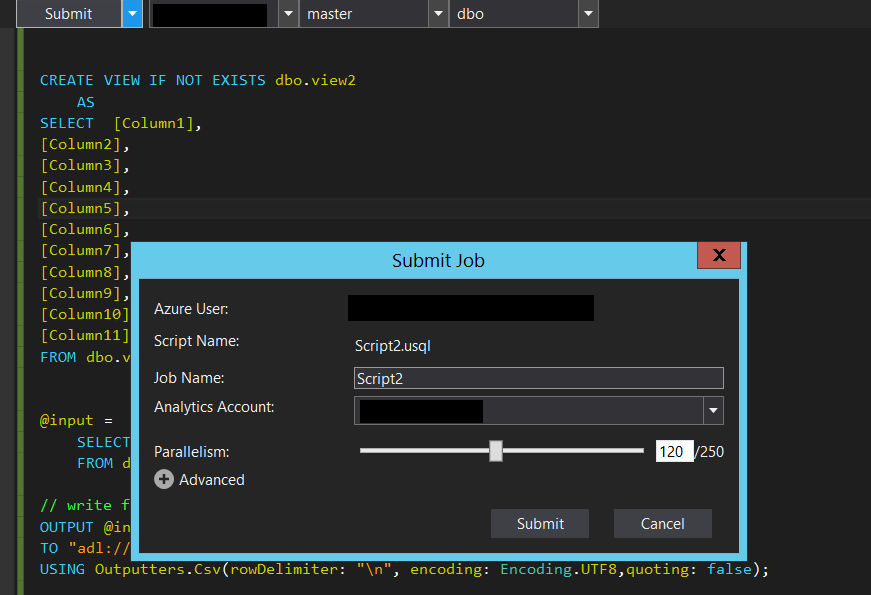
U-SQL scales very well. In my case of about 500Mb of CSV files, it took about 2 minutes for the above script to produce a CSV file of 22Mb, by reducing the width from 3600 to 11 columns.
Importing the file to the Data Warehouse with Polybase
When the U-SQL script above is ready, we can finally import the file that we produced to our Data Warehouse.
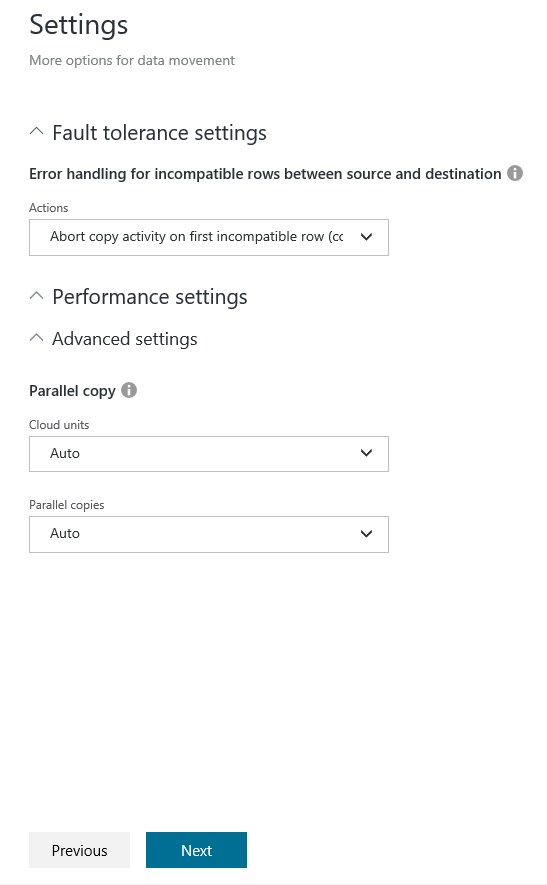
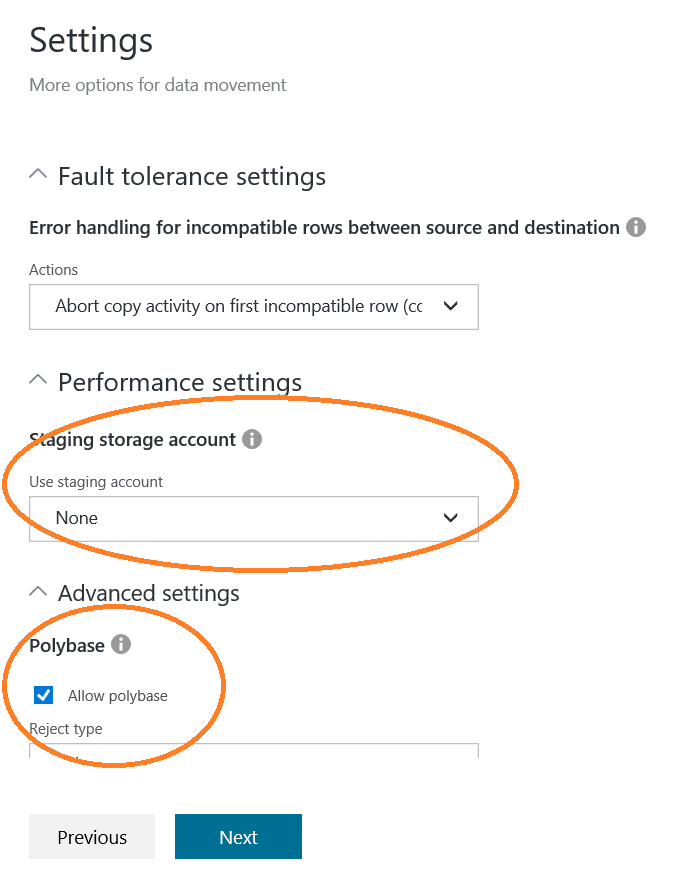
To import the data, we are going to use the Copy Data wizard, with which we are already familiar, to create an ADF pipeline. It is just a matter of setting up the ADL as a source, ADW as a destination and setting up the Service-to-Service authentication for ADL and the DataImporter credential for the ADW. After setting up all of this, it is very important to verify that in the last screen there is NO staging storage account used and that Polybase is allowed:
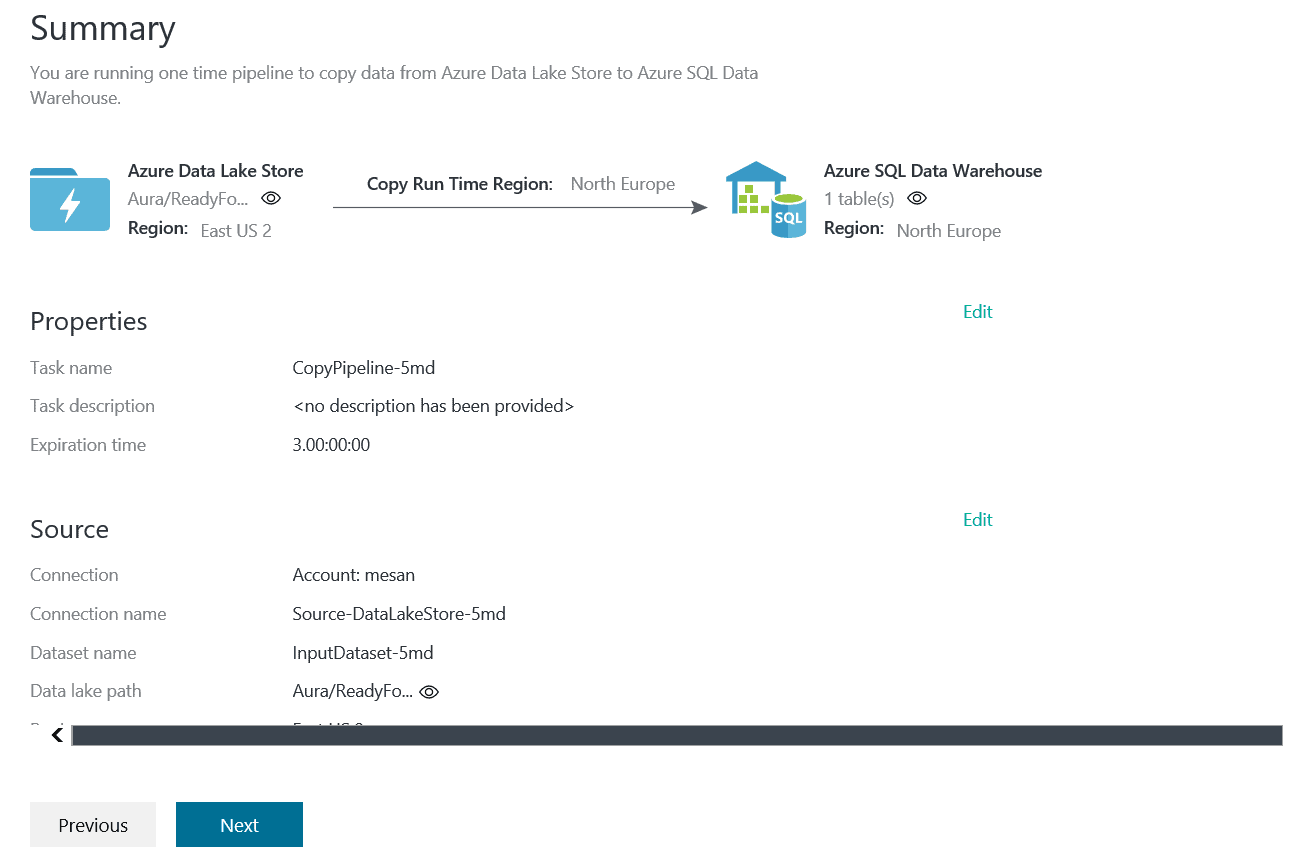
Finally, the architecture looks like this, with a direct import from ADL to ADW:
Monitoring and performance of the pipeline
After a couple minutes, the pipeline is finished, and we get the following information:
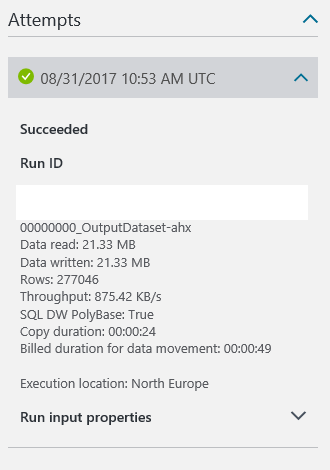
Notice that it took about a minute to import 21 MB of data and 277K rows. This is with a 100 DWUs for the Data Warehouse, which is 1.17 EUR per hour.
If we wanted the import to be faster, then we would Scale up the Data Warehouse to 600 DWUs, for example.
Having the feature of a scalable Data Warehouse is great because the user gets to scale up when the resource is used (for imports and for busy read times). However, the downside is that connections get terminated when scaling is in process, and this means down time.
On a final note, all good-old-rules from data warehousing are still valid when it comes to speedy data imports. For example, it is still faster to insert into a heap than to anything else. And let’s not forget to create and rebuild those statistics after the import!
Conclusion:
When you are paying for a resource by the hour, you soon get increasingly interested in the time a data import takes. In this article we explored the options and considerations it takes to import data into an Azure Data Warehouse in a fast and economic way. We saw that the old data warehousing rules are still valid, and that Polybase is a great tool for speedy imports of large volumes of data.
This document contains proprietary information and is protected by copyright law.
Copyright © 2026 Red Gate Software Limited. All rights reserved
Load comments