Contents
This is the sixth installment of the TortoiseSVN and Subversion Cookbook series, a collection of practical recipes to help you navigate through the occasionally subtle complexities of source control with Subversion and its ubiquitous GUI front-end, TortoiseSVN. So far this series has covered:
- Part 1: Checkouts and commits in a multiple-user environment.
- Part 2: Adding, deleting, moving, and renaming files, plus filtering what you add.
- Part 3: Putting things in and taking things out of source control.
- Part 4: Sharing source-controlled libraries in other source-controlled projects.
- Part 5: Embedding revision details within your source files.
This installment explains how to work with revisions and releases using tags.
Reminder: Refer to the Subversion book and the TortoiseSVN book for further reading as needed, and as directed in the recipes below.
Once you have done your testing and tweaking and are ready to deliver your code to production, perhaps the most important thing you need to do (besides actually delivering the code) is to know what you are delivering. You must be able to come back in an hour, a month, or a year and be able to examine, diagnose, tweak, compile, or recreate the exact same release you just delivered. Taking such a snapshot in source control lingo is called tagging in some systems (including Subversion) and labeling in others. Regardless of the name, the concept of a snapshot is a central tenet – indeed, possibly the central tenet – of source control: a snapshot allows you to shift your world view to restore an arbitrary build or environment.

“Because there is only a single, global current revision number in Subversion, every commit creates a snapshot …by definition.”
In Subversion, taking snapshots is easy. In fact, because there is only a single, global current revision number in Subversion, every commit creates a snapshot of the filesystem by definition. Assuming you write on a post-it that revision 58329 in your Subversion repository corresponds to your latest release of WhizBang version 5.1, you could come back anytime in the future and use the TortoiseSVN >> Update to Revision command to recreate the world as it existed in revision 58329. But that is rather unpalatable; a much more savory approach is to associate a tag (e.g. “WhizBang 5.1”) with a revision (58329 in this example) within Subversion itself. Then, instead of having to remember the association, you use the TortoiseSVN >> Switch command to switch to the tag name. As an example, consider the revision graph of a portion of my open-source libraries in Figure 6-1. Starting from the bottom you can observe that revision 847 has been tagged with Release 0_9_31. If you move upward looking for similar tags (i.e. /tags/Release_x_x_x) you will find 0_9_32 and 0_9_33 consecutively, then jump up and over to the right a bit to find 1_0_0 when I did a major release. Finally at the top is 1_00_01, a minor release. Also notice that I have a different product, SqlDiffFramework, first appearing at revision 1021, which goes through a couple minor revisions as well. Finally, second from the top (at revision 970) I have a tag that is not for a product but rather just for a notable milestone, my last revision using Visual Studio 2008 before switching to Visual Studio 2010. So you can add tags for whatever is of use to you, be it releases, milestones, builds, etc.
The leftmost column in the graph-the grey rectangles-represent the mainline of code. The rectangles with rounded corners represent tags. Each tag, being a snapshot of the mainline, is tied back to a specific revision in the mainline. So, for example, Release 0_9_32 ties to revision 887. But curiously the tag itself has its own revision (891 in this example)! The reason is that tags are committed just like any other file; since every commit is associated with a new global revision number, each tag must then have its own unique revision. You can add multiple tags to a mainline revision-you can find a couple examples of this in the illustration. Each tag will have its own unique revision number though each is associated to the same mainline revision number.
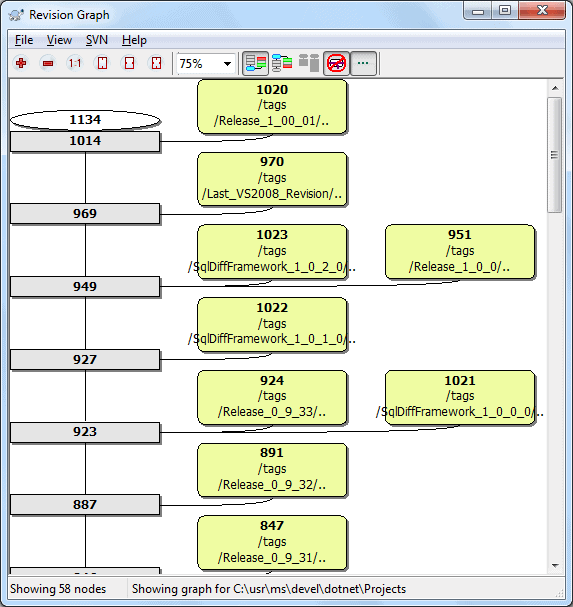
Figure 6-1 A revision graph showing labeled snapshots over time.
Managing Labels
Labeling the latest revision as a release
To create a tag, invoke the TortoiseSVN >> Branch/Tag command. Branches and tags are equivalent in Subversion. They are only different by convention. According to Chapter 4 (Branching and Merging) of the Subversion book:
“In Subversion, there’s no difference between a tag and a branch. Both are just ordinary directories that are created by copying. Just as with branches, the only reason a copied directory is a “tag” is because humans have decided to treat it that way: as long as nobody ever commits to the directory, it forever remains a snapshot. If people start committing to it, it becomes a branch.”
Use the browse button on the URL field to find the correct URL to your tags directory, then type the tag name as the final component, as in Figure 6-2. Select the head revision as indicated to label your latest committed set of files.
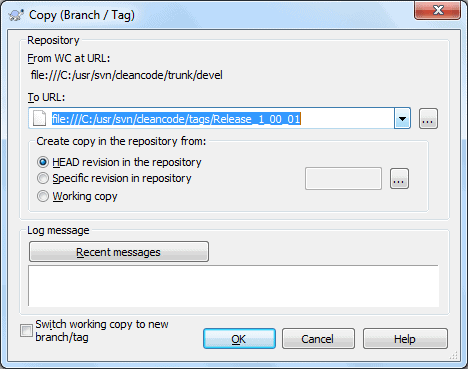
Figure 6-2 Dialog to create a tag.
Labeling an earlier revision as a release
Depending on your methodology you might tag your release immediately (in which case you need only tag the head revision as detailed in the Labeling the latest revision as a release recipe) or you might wait until you are sure the release is stable before tagging it. In the interim, however, your colleagues may have made other, unrelated, commits to your repository; so tagging the head revision is no longer an option. But you can just as easily tag some previous revision.
To create a tag, invoke the Branch/Tag command. (Branches and tags are equivalent in Subversion. See Labeling the latest revision as a release for more.) Use the browse button on the URL field to find the correct URL to your tags directory, then type the tag name as the final component, as in Figure 6-2. Select a specific revision number to label. If you know it, just type it in. If you do not, press the browse button to open the log viewer, letting you browse for what you need. Select the appropriate version in the log viewer; TortoiseSVN shows a check mark on the one you select. When you close out the dialog by pressing OK, it copies the selected version number into the original dialog.
Labeling by bits and pieces
The previous two recipes explained the process of applying a simple tag, where all files were at the same revision. But Subversion has the flexibility to apply a complex tag where different files or folders are at different revisions or even if they have local modifications. The procedure to do this is virtually the same as the last two recipes, with one prerequisite. Before invoking the Branch/Tag command, configure your environment with the various revisions and local modifications that you want to snapshot. Open the Branch/Tag dialog as before and select your tag name but, this time, select the Working Copy option in the dialog.
Moving a Tag
Consider this scenario: you finish your code, test thoroughly, and release to production. Your final flourish is to create a snapshot/label the release as “version_2.0.0” in the repository so that you can quickly and easily restore your environment to this release at any time in the future. Invoke the TortoiseSVN >> Branch/Tag command to create the tag. Great; it’s a wrap. But then a day passes and a customer reports a minor problem that, you determine, requires only the slightest tweak of a configuration file. You update the file, commit it to Subversion, and release to production. You still consider this version 2.0.0 but now your label is stale: if you restore your working copy to the “version_2.0.0” tag it will be wrong because it will not include this configuration file tweak. Realizing this, you just want to move the label so it also includes this configuration file change. There is no command to move a tag but it is almost that simple: in the repository browser delete the tag, which is simply a folder. Then back in Windows Explorer, recreate the tag with the standard TortoiseSVN >> Branch/Tag command. Before you invoke the command, however, you need to consider whether you are tagging a single revision or a mix of revisions-see the earlier recipes in this section once you make this determination.
“Before you blithely move a tag… consider whether you should.”
Before you blithely move a tag in this fashion, however, consider whether you should. To borrow the argument presented by Gabor Szabo in this forum post, how will QA report bugs after you move a tag? “Well, we found a bug in version_2.0.0,” they might report. But which “version_2.0.0”? Was that before or after you moved the tag? Some organizations make the whole question moot by requiring a version increment for any change, no matter how small. So you would never have moved the original “version_2.0.0” tag; instead you would have created a new “version_2.0.1” tag-no ambiguity. But even if you do not bump the version, you can still bump the tag, e.g. use something like “version_2.0.0_A” where you always look for the highest suffix to find the variation of version 2.0.0 that is actually in production.
Adjusting your World View with Labels and Revisions
Restoring your environment to a labeled revision
To recreate your world as it existed in a particular, tagged release, use the TortoiseSVN >> Switch command (Figure 6-3). Use the browse button on the URL field to find the tag of interest. Regardless of whether your tag is on the trunk or on a branch, the Switch command retargets your working copy to the revision associated with that tag. Switch operates as a branch-agnostic Update command.
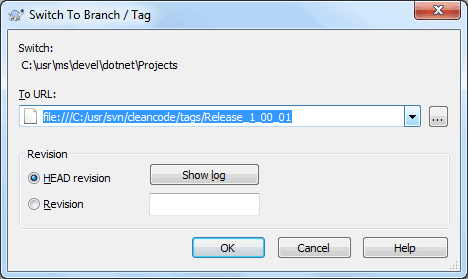
Figure 6-3 Dialog to switch to a tag / snapshot.
By convention, tags represent a single point; so you should always use the default HEAD revision selection in the dialog. The same dialog box, as its title implies, is used for switching to branches as well. (Branching will be covered in a later installment.) A branch is a continuum rather than a point, so it makes sense to be able to select which revision on the branch you wish to target.
When you press OK in the Switch dialog, TortoiseSVN will show a progress dialog indicating it is deleting and adding files and folders, and this list could vary enormously, depending on how far you are diverging from your previous revision and on how extensive your code-base changes from any one revision to another. If this is the first time you have used Switch — remain calm! The files being deleted are not lost; they are completely recoverable by simply switching back to where you came from. Remember that your working copy is a projection of the repository at a single revision. When you switch to a different revision, TortoiseSVN makes all the necessary changes to your working copy to make it now reflect the new revision.
Restoring your environment to an unlabeled revision
Tags make it particularly convenient to return to particular snapshots of your code base, detailed in the previous recipe but, even without tags, it is almost as simple to jump to anywhere in your code base history. As in the previous recipe, you could also use the TortoiseSVN >> Switch command. You would then specify the branch URL and the revision number on that branch. (Note that the trunk is just a special case of a branch, so is also covered by the term “branch”.) If, however, you are already on the branch where your target lies, you can more simply use the TortoiseSVN >> Update to Revision command (Figure 6-4). Here, you need only enter your target revision number.
TortoiseSVN often provides more than one way to perform the same action. An equivalent way to accomplish the same task is to open the log viewer (TortoiseSVN >> Show log) where you can see all the revisions with comments and scroll to the one you are interested in. Open the context menu on that revision and then select Update item to revision.

Figure 6-4 Dialog to update to a specific revision.
Understanding the difference between switch and update
Update to revision and Switch are very similar operations. In fact, Switch is a superset of Update to revision. An Update to revision adjusts your working copy to a different revision on the same branch. A Switch adjusts your working copy to a different revision on any branch. (Branching will be covered in a later installment.) Refer to the Switches and Updates section of Traversing Branches in the Subversion book for more.
Understanding the difference between revert and update
“Update to revision actually takes you back in time to a previous revision. Revert modifies your current working copy to make it look exactly like a previous revision.”
As several recipes above have shown, an Update to revision operation changes your world view. If your head revision is 29322 and you update it to 11043 then you have essentially traveled back in time. As far as your working copy, everything is as it was the instant after revision 11043 was committed, whether that was a month ago or five years ago. And just as all the movies warn, do not tamper with the past! When you update to a previous revision or tag, you must think of yourself as just an observer visiting the past-do not edit any files or attempt to commit them. But what if that is just what you need to do? That is, you want to back up to a previous release and start off a new branch of development from that point. This is where the Revert command comes in. Update to revision actually takes you back in time to a previous revision. Revert modifies your current working copy to make it look exactly like a previous revision. With Revert, you are free to edit the files in your working copy, create a branch, or whatever else you like. And just like any other modification to your working copy, commit the changes if you wish to make them permanent.
Study the difference between Revert and Update to revision until it becomes second nature. Knowing which one you need when you want to get something accomplished will end up saving you time in the long run. It is, in that sense, just like learning the alphabet. There is nothing magical about “A” and “B” and “C”; you just needed to learn their ordering, pronunciation, and use. Same thing here. Why is one called Update and the other Revert? The definition of either word could be stretched to encompass either purpose; they are what they are so learn them. One thing that may help appreciate the difference: first, start with an up-to-date working copy (Check for modifications should show no files modified.) After you do an Update to revision, invoke Check for modifications again and it should still show no files modified. But after a Revert then Check for modifications should list some files that need to be committed.
Returning to the present from a previous revision
The previous two recipes have explained how to move back in time to an arbitrary point. Once you have traveled back in time, however, it is important to be able to return to the present! But this is something you already know and use every day – the simple SVN Update command. SVN Update, as you may have surmised, is just the degenerate case of SVN Update to revision where the target revision is the head revision.
Load comments