
You can build a custom level editor in Unity using five C# scripts that handle object data (EditorObject), level state management (LevelEditor), camera movement (CameraMove), mouse-based object placement and deletion (MouseScript), and UI/save-load coordination (ManagerScript). The editor lets users place objects on a grid, move the camera, and save/load level data – all through Unity’s built-in UI system. This tutorial provides the complete code for each script with a downloadable pre-configured Unity project so you can focus on the editor logic rather than scene setup.
Read also: C++/CLI wrapper for native game engine code
How are video game levels created?
There are several important parts of a video game, ranging from sound to the player character itself. Arguably the most important aspect is the level, which is essentially the world the player inhabits. Without levels, all the other components of a game won’t be put to any use and only serve as fun coding projects rather than a piece of a game. Levels come in all shapes, sizes, and formats with some games having multiple smaller levels and others taking place in one giant level. A level can serve a wide variety of purposes, such as teaching a new game mechanic or presenting an important plot point in your story.
How do these levels get created? After designing the world your user will interact with, it becomes time to open up the level editor. Here you’ll edit the terrain of the world, place enemies, and scatter items. Of course, many game engines come with a level editor out of the box. So why would you want to make your own? One of the biggest reasons is to allow the user to create their own levels, allowing them to get creative with your game as well as have near endless amounts of content to enjoy in your game. Some games, such as Super Mario Maker, base their entire existence around this idea.
As a developer, you may find that the level editor that comes with a game engine doesn’t quite give what you want, or perhaps it gives you too much. You might also be a part of a larger team, and your teammates could use a level editor that makes their jobs easier. It’s also possible that just you and a friend are working on this project, but you still need something to lighten the workload or at least make development easier. From the perspective of the developer, there can be any number of reasons to have a custom level editor for your project. After all, why not have better tools in the proverbial tool shed?
How to build a level editor in Unity
Level editors are not easy to make. There are several pieces to a level editor and, as you can imagine, plenty of code to write. It will already take lots of time to put together; thus, the setup portion will be skipped in favour of jumping straight to the code. However, there’s no reason to leave you with nothing to start with. A link will be provided to download the project with all assets (other than the scripts) and with the primary Unity scene prepared ahead of time. Also, another link will take you to the complete project source.
Normally these articles start the project from scratch, but in this case, you’ll use a pre-existing project. To open this project, first open Unity as usual and click Open in the upper right. After this, navigate to the folder containing the project. If the folder is associated with a Unity project, the Select Folder button will appear. Click this button, and the project will begin loading. Keep in mind that you may have to enter into another folder before finding the correct directory that Unity can open.
If downloading the project without the code, you’ll need to create five scripts inside the Unity Project. The names of these scripts are listed in the figure below:
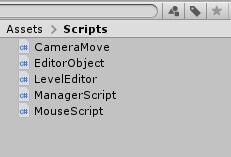
Figure 1: List of scripts
Level Editor – no code:
Level Editor – complete:
The Code
First, here’s a breakdown of what all these scripts do. EditorObject and LevelEditor will be handling the level data. The EditorObject script will contain data for an individual object while the LevelEditor will hold the data for the entire level. When saving a level, any object with EditorObject attached will be noted in LevelEditor, and its data will be saved to a json file. ManagerScript will be the central hub of the editor, handling tasks like UI functions, level saving, and checking for certain objects. CameraMove and MouseScript are for user input, specifically placing or destroying objects and changing the camera view.
The EditorObject
Starting with EditorObject, this script will contain the data of the various objects the user places within the level. It is still a component though, and thus will need using UnityEngine to inherit from MonoBehaviour so it can be attached to objects. As a result, you won’t be able to serialize the class entirely. Instead, you can create a public struct within the class called Data and serialize that (make sure you have using System at the top). Before creating the struct, remove the Start and Update functions, then make an enum called ObjectType and list Cylinder, Cube, Sphere, and Player within the enum. Inside the struct are three public variables: a Vector3 named pos, Quaternion called rot, and an ObjectType specified as objectType. The first two variables will store the position and rotation of an object, while objectType will hold what kind of object this is attached to whether it be a cube or the player. Finally, a new public Data object is declared that you simply call data.
|
1 2 3 4 5 6 7 8 9 10 11 12 13 14 |
using System; using UnityEngine; public class EditorObject : MonoBehaviour { public enum ObjectType { Cylinder, Cube, Sphere, Player}; [Serializable] public struct Data { public Vector3 pos; public Quaternion rot; public ObjectType objectType; } public Data data; } |
The code will look like Figure 2:
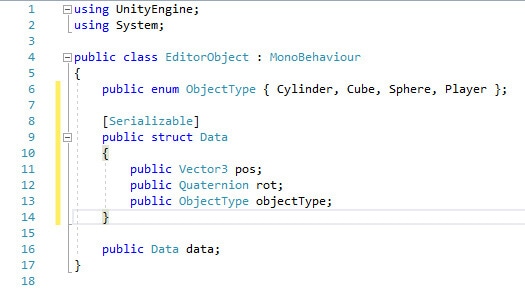
Figure 2: EditorObject complete script
The LevelEditor
LevelEditor has one job – to hold all the data gathered from objects with EditorObject attached. This script will not be attached to any object and therefore does not need to inherit from MonoBehaviour. This also means the only two using statements you’ll need are System.Collections.Generic and System. Serialize the class, then define a public list with the type of EditorObject.Data. Name this list editorObjects, and the LevelEditor script will be finished.
|
1 2 3 4 5 6 7 |
using System.Collections.Generic; using System; [Serializable] public class LevelEditor { public List<EditorObject.Data> editorObjects; } |
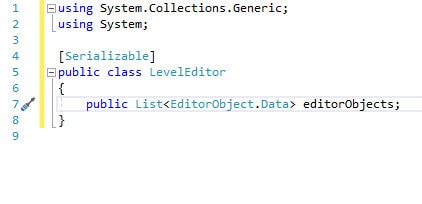
Figure 3: LevelEditor complete script
CameraMove
The two scripts responsible for handling level data are finished, which leaves the rest of the level editor to program. CameraMove is a good place to begin as it has the least happening within it. You’ll need to have using UnityEngine and using UnityEngine.UI at the top to do everything required in this script. Next comes the variable declaration inside the class as follows:
|
1 2 3 4 5 6 |
public Slider cameraSpeedSlide; public ManagerScript ms; private float xAxis; private float yAxis; private float zoom; private Camera cam; |
At the start, you have a variable with the Slider type called cameraSpeedSlide. When looking at the editor, you should notice a UI object with the text ‘Camera Speed’ above it. This is the slider that CameraMove will be using. Most level editors have functionality that allows the user to adjust the speed of the camera, and this level editor will be no exception. By moving the slider, you can adjust how fast or slow the camera moves when pressing the movement keys or zooming the camera in and out. Next comes ms, which simply contains a reference to ManagerScript. This is only needed to check if certain menus are open and the ManagerScript is the one that will know this information.
Three of the four private variables are all created for input, as you’ll see later on. The last variable, cam, will store the object’s Camera component and manipulate certain values from there. Speaking of cam, that brings you to the next step in the code. In the Start function, you’ll want to have cam get the aforementioned Camera component.
|
1 |
cam = GetComponent<Camera>(); |
So far, the script will look like what’s shown in figure 4.
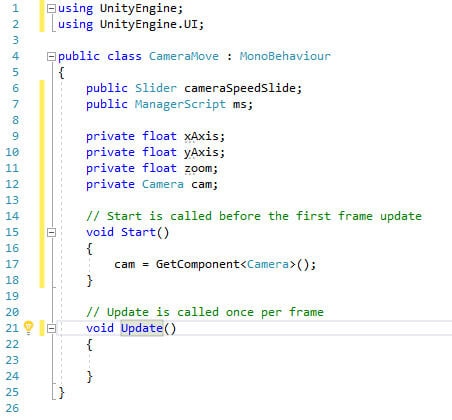
Figure 4: Variables and Start function for CameraMove.
The Update function is all that remains for this script to be completed. First, it will check with the ManagerScript if a save or load menu has been opened.
|
1 2 3 |
if (ms.saveLoadMenuOpen == false) { } |
Assuming they aren’t, the camera will move according to the player’s input. This will be where xAxis, yAxis, and zoom come in.
|
1 2 3 |
xAxis = Input.GetAxis("Horizontal"); yAxis = Input.GetAxis("Vertical"); zoom = Input.GetAxis("Mouse ScrollWheel") * 10; |
These variables will change as the player presses the keys bound to Horizontal, Vertical, and Mouse ScrollWheel. In this case that would mean whenever the player presses any of the arrow keys or, you guessed it, scrolls the mouse wheel.
|
1 2 3 4 5 6 7 8 9 10 |
transform.Translate(new Vector3(xAxis * -cameraSpeedSlide.value, yAxis * -cameraSpeedSlide.value, 0.0f)); transform.position = new Vector3( Mathf.Clamp(transform.position.x, -20, 20), Mathf.Clamp(transform.position.y, 20, 20), Mathf.Clamp(transform.position.z, -20, 20)); if (zoom < 0 && cam.orthographicSize >= -25) cam.orthographicSize -= zoom * -cameraSpeedSlide.value; if (zoom > 0 && cam.orthographicSize <= -5) cam.orthographicSize += zoom * cameraSpeedSlide.value; |
You’ll notice that cameraSpeedSlide is starting to see some use here. By pressing any of the movement keys, the camera will move based on which key is pressed multiplied by the value in the slider. The same thing is done when zooming the camera in or out later on. In addition, Clamp is being used to limit how far the camera can go. This is done to prevent said camera moving away from the area where the level editing happens. Similarly, the camera will only be zoomed in or out based on cam's orthographicSize variable.
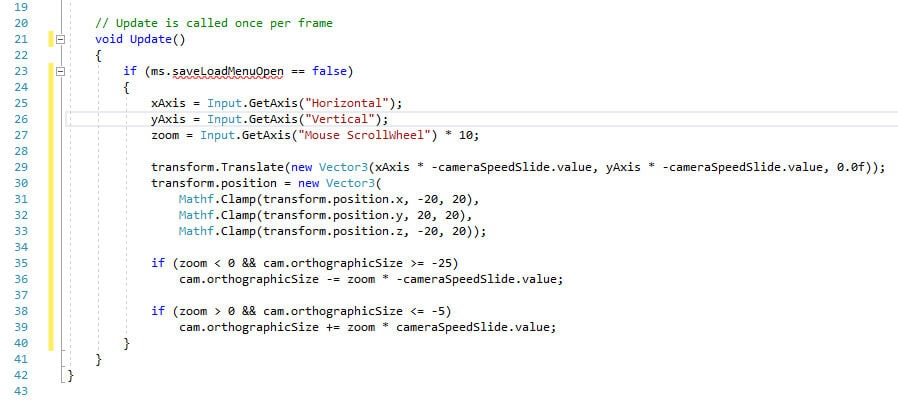
Figure 5: Update function in CameraMove.
This concludes the CameraMove script, but you’ll notice that the first if statement has an error. Of course, without doing anything with ManagerScript Visual Studio would naturally not know what the saveLoadMenuOpen boolean is. You can ignore this for the time being. For now, it’s time to focus attention on the MouseScript.
MouseScript
Much like how CameraMove controls what the user does with the camera, MouseScript will dictate the functionality of the user’s mouse input. In particular, MouseScript will allow the creation of objects, have an image of your current object to follow the mouse, and selecting which object to rotate.
To start, using UnityEngine.EventSystems will need to be declared at the top. This script will be checking if the mouse is currently over any UI elements and will use EventSystem to do this. Checking this is important as you wouldn’t want users to accidentally place an object when they were trying to select a menu item instead. Once added, the next step is to declare variables inside the class.
|
1 2 3 4 5 6 7 8 9 10 11 12 13 14 15 16 17 18 |
public enum LevelManipulation { Create, Rotate, Destroy }; public enum ItemList { Cylinder, Cube, Sphere, Player }; [HideInInspector] public ItemList itemOption = ItemList.Cylinder; [HideInInspector] public LevelManipulation manipulateOption = LevelManipulation.Create; [HideInInspector] public MeshRenderer mr; [HideInInspector] public GameObject rotObject; public Material goodPlace; public Material badPlace; public GameObject Player; public ManagerScript ms; private Vector3 mousePos; private bool colliding; private Ray ray; private RaycastHit hit; |
From the beginning, two enums are created called LevelManipulation and ItemList. Within these two enums are the list of ways to manipulate objects and the possible objects to create respectively. A handful of variables are then declared that are public but have HideInInspector above them. These variables will be used by another script, but they don’t need to be seen in the Unity editor. Variable declaration continues as normal from there with some public variables that will be given values in the editor and private variables that pertain to this script only. Finally, in the Start function, you add the following:
|
1 |
mr = GetComponent<MeshRenderer>(); |
Anyone using your level editor will need a way to know what object they’re about to place. By manipulating this object’s MeshRenderer, you can change the current mesh that is following your mouse, thus letting you know which object is currently set to be placed.
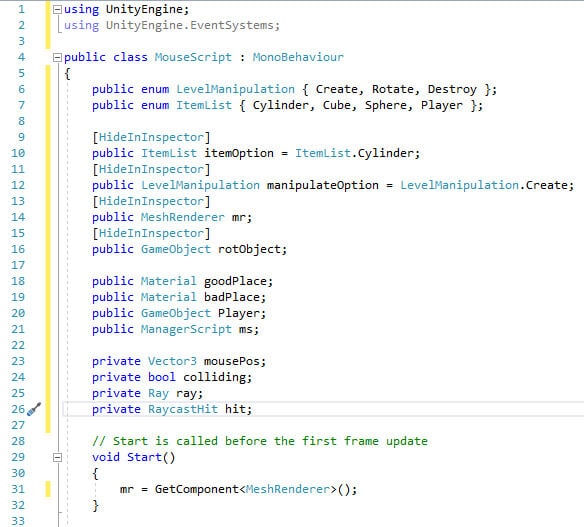
Figure 6: MouseScript variables and Start function.
Moving along to the Update function, the first thing to do is allow this object to follow the mouse cursor. First, the current mouse coordinates will be set to mousePos followed by converting those screen coordinates to a position in the game world. Like with CameraMove, Clamp will also be used to limit where this object can go.
|
1 2 3 4 5 6 |
mousePos = Input.mousePosition; mousePos = Camera.main.ScreenToWorldPoint(mousePos); transform.position = new Vector3( Mathf.Clamp(mousePos.x, -20, 20), 0.75f, Mathf.Clamp(mousePos.z, -20, 20)); |
You’ll also need a way to change the look of the mouse object based on whether you can place an item in your level or not. Unity’s Materials will be utilized here to give a visual indication that an object can be placed. To accomplish this, a raycast will be sent out checking for collision with any objects on the ninth layer. Why the ninth layer specifically? It’s because when creating objects in a level editor you want to distinguish the player created objects from any objects that might already be present in the current level such as the floor or walls. This is being done by creating a new layer in Unity called SpawnedObjects and assigning player created objects to this layer. Much like how you’d look for something in an array, you specify which layer you wish to check by index.
|
1 2 3 4 5 6 7 8 9 10 11 12 13 14 |
ray = Camera.main.ScreenPointToRay(Input.mousePosition); if (Physics.Raycast(ray, out hit)) { if (hit.collider.gameObject.layer == 9) { colliding = true; mr.material = badPlace; } else { colliding = false; mr.material = goodPlace; } } |
Should the raycast detect an object in this layer, the material of the mouse object will be set to the material called badPlace. In other words, the colour of the object will change to red. Once the mouse leaves the colliding object, it will set the material to goodPlace, back to green, to let the user know that they can create an item in that space.
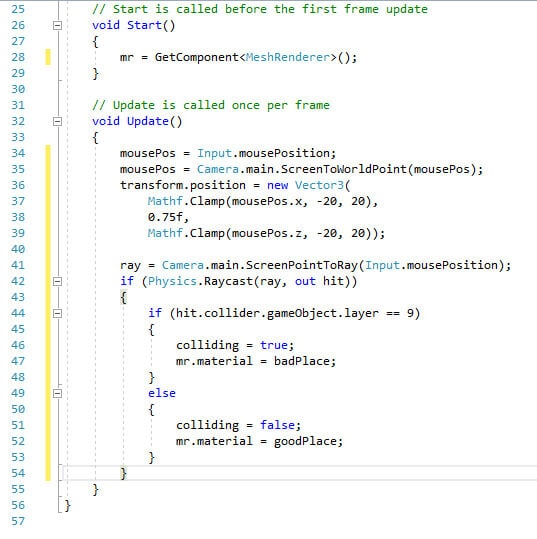
Figure 7: Beginning of MouseScript’s Update function.
The next step involves object manipulation. Unity will need to know what to do when the user clicks the mouse button. In addition, it will need to know what conditions are required to create, rotate, or destroy an object.
|
1 2 3 4 5 6 7 8 9 10 11 12 13 14 15 16 17 18 19 20 |
if (Input.GetMouseButtonDown(0)) { if (!EventSystem.current.IsPointerOverGameObject()) { if (colliding == false && manipulateOption == LevelManipulation.Create) CreateObject(); else if (colliding == true && manipulateOption == LevelManipulation.Rotate) SetRotateObject(); else if (colliding == true && manipulateOption == LevelManipulation.Destroy) { if (hit.collider.gameObject.name.Contains( "PlayerModel")) ms.playerPlaced = false; Destroy(hit.collider.gameObject); } } } |
Once the user presses the left mouse button, a series of checks begin. Unity’s EventSystem comes in to play first by confirming that the mouse cursor is not over any UI elements. Assuming this is true then you first check if the there is any collision. If there isn’t, be sure also to check that the user is looking to create an object. Should there be a collision, you will want to be sure the player isn’t selecting an object to rotate or destroy. When it comes to destroying an object, you’ll want to see if the user is destroying an object that has ‘PlayerModel’ in its name. The rules of this level editor dictate that the user cannot place more than one player object. If that player object is destroyed, Unity will need to know that the user is permitted to place a player object the next time they desire to.
At this point, the Start and Update functions are finished, and all that remains are the user defined functions, namely CreateObject and RotateObject. The average user will spend more time placing objects than changing their rotation, so CreateObject would be a good place to begin. As the name implies, it will create an object at the mouse cursor’s location. Which object it places is dependent on which item is currently selected from ItemList. This is also where the EditorObject script will start to see some use. Once an object is placed, EditorObject will be attached to the newly created object as a script component and assigned some data.
|
1 2 3 4 5 6 7 8 9 10 11 12 13 14 15 16 17 18 19 20 21 22 23 24 25 26 27 28 29 30 31 32 33 34 35 36 37 38 39 40 41 42 43 44 45 46 47 48 49 50 51 52 |
void CreateObject() { GameObject newObj; if (itemOption == ItemList.Cylinder) { newObj = GameObject.CreatePrimitive(PrimitiveType.Cylinder); newObj.transform.position = transform.position; newObj.layer = 9; EditorObject eo = newObj.AddComponent<EditorObject>(); eo.data.pos = newObj.transform.position; eo.data.rot = newObj.transform.rotation; eo.data.objectType = EditorObject.ObjectType.Cylinder; } else if (itemOption == ItemList.Cube) { newObj = GameObject.CreatePrimitive(PrimitiveType.Cube); newObj.transform.position = transform.position; newObj.layer = 9; EditorObject eo = newObj.AddComponent<EditorObject>(); eo.data.pos = newObj.transform.position; eo.data.rot = newObj.transform.rotation; eo.data.objectType = EditorObject.ObjectType.Cube; } else if (itemOption == ItemList.Sphere) { newObj = GameObject.CreatePrimitive(PrimitiveType.Sphere); newObj.transform.position = transform.position; newObj.layer = 9; EditorObject eo = newObj.AddComponent<EditorObject>(); eo.data.pos = newObj.transform.position; eo.data.rot = newObj.transform.rotation; eo.data.objectType = EditorObject.ObjectType.Sphere; } else if (itemOption == ItemList.Player) { if (ms.playerPlaced == false) { newObj = Instantiate(Player, transform.position, Quaternion.identity); newObj.layer = 9; newObj.AddComponent<CapsuleCollider>(); newObj.GetComponent<CapsuleCollider>().center = new Vector3(0, 1, 0); newObj.GetComponent<CapsuleCollider>().height = 2; ms.playerPlaced = true; EditorObject eo = newObj.AddComponent<EditorObject>(); eo.data.pos = newObj.transform.position; eo.data.rot = newObj.transform.rotation; eo.data.objectType = EditorObject.ObjectType.Player; } } } |
The one editor object that changes things up during creation is the player object. In this case, the only other step that’s being added is a CapsuleCollider component will be attached along with an EditorObject component. In addition, since a prefab is being created for the player Instantiate is used as opposed to CreatePrimitive. It also makes sure to check if a player object has already been placed. Assuming it hasn’t, the object is created normally.
One last function remains before the completion of MouseScript, and it’s a short one. This function will set the object that is selected to be rotated. It uses information gathered from a raycast to set rotObject to the current object the mouse is over.
|
1 2 3 4 5 |
void SetRotateObject() { rotObject = hit.collider.gameObject; ms.rotSlider.value = rotObject.transform.rotation.y; } |
This completes MouseScript, which means only one script remains for the level editor to have all the code needed. All those error messages wondering what those variables within ManagerScript are about to be resolved.
The ManagerScript
As this is the script that will read and write your level data to and from a json file, you’ll need to start by adding using System.IO. You’ll also want using UnityEngine.UI in there as well since various UI elements will be needed here. Then you will need to declare several variables:
|
1 2 3 4 5 6 7 8 9 10 11 12 13 14 15 16 17 18 19 20 21 |
[HideInInspector] public bool playerPlaced = false; [HideInInspector] public bool saveLoadMenuOpen = false; public Animator itemUIAnimation; public Animator optionUIAnimation; public Animator saveUIAnimation; public Animator loadUIAnimation; public MeshFilter mouseObject; public MouseScript user; public Mesh playerMarker; public Slider rotSlider; public GameObject rotUI; public InputField levelNameSave; public InputField levelNameLoad; public Text levelMessage; public Animator messageAnim; private bool itemPositionIn = true; private bool optionPositionIn = true; private bool saveLoadPositionIn = false; private LevelEditor level; |
Once again certain variables are made public but kept hidden in the Unity editor itself. Then several public variables are declared, all of which will be filled from the Unity Editor. In the end, a few booleans are declared that will let Unity know when certain menus are in view. The last variable, level, is essentially our level data. When it comes time to save the level, this will be used to gather a list of player created objects and serialize their information into a json file.
Here you may go ahead and either comment out or delete Update as it will not be used in this script. After this, go ahead and enter the following code for Start:
|
1 2 3 |
rotSlider.onValueChanged.AddListener(delegate { RotationValueChange(); }); CreateEditor(); |
First, a listener will be made and applied to the event onValueChanged from rotSlider. This means that whenever the value of rotSlider has changed, the function RotationValueChange will be called, rotating the object selected. After this CreateEditor is called which creates a new LevelEditor and declares a new list of EditorObject.Data before returning level.
|
1 2 3 4 5 6 7 8 9 10 11 12 13 |
LevelEditor CreateEditor() { level = new LevelEditor(); level.editorObjects = new List<EditorObject.Data>(); return level; } void RotationValueChange() { user.rotObject.transform.localEulerAngles = new Vector3(0, rotSlider.value, 0); user.rotObject.GetComponent<EditorObject>().data.rot = user.rotObject.transform.rotation; } |
All of the preparations for ManagerScript are finished now. From the Start function down, the script should look similar to figure 8.
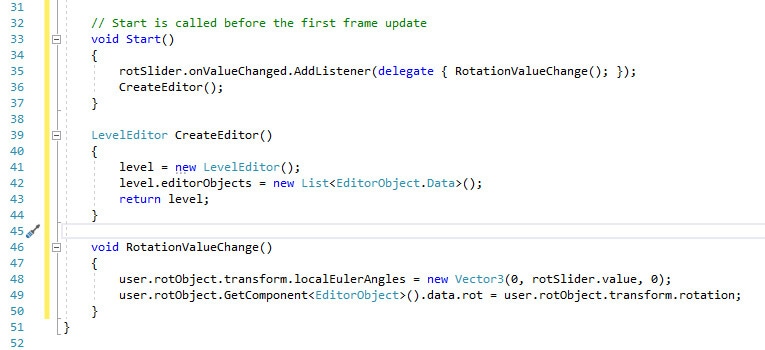
Figure 8: Start, CreateEditor, and RotationValueChanged methods.
Menus are the bread and butter of any level editor, so it only makes sense to get the code for menus ready early on. A good place to start is with the menus appearing on screen. You’ll want a way to open and close menus for the user to make the desired room on their screen. The following functions will first check if the menu is currently positioned within the user’s screen or not. Depending on the answer, it will ‘slide’ the menu into the screen or out of the screen by setting a trigger in the respective menu’s Animation component.
|
1 2 3 4 5 6 7 8 9 10 11 12 13 14 15 16 17 18 19 20 21 22 23 24 25 26 |
public void SlideItemMenu() { if (itemPositionIn == false) { itemUIAnimation.SetTrigger("ItemMenuIn"); itemPositionIn = true; } else { itemUIAnimation.SetTrigger("ItemMenuOut"); itemPositionIn = false; } } public void SlideOptionMenu() { if (optionPositionIn == false) { optionUIAnimation.SetTrigger("OptionMenuIn"); optionPositionIn = true; } else { optionUIAnimation.SetTrigger("OptionMenuOut"); optionPositionIn = false; } } |
Note also that these functions are made public. This is done in order to set the OnClicked event to the function from within the Unity Editor. Next comes the save and load menus which operate very similarly to the previous menu functions but with an extra command.
|
1 2 3 4 5 6 7 8 9 10 11 12 13 14 15 16 17 18 19 20 21 22 23 24 25 26 27 28 29 30 |
public void ChooseSave() { if (saveLoadPositionIn == false) { saveUIAnimation.SetTrigger("SaveLoadIn"); saveLoadPositionIn = true; saveLoadMenuOpen = true; } else { saveUIAnimation.SetTrigger("SaveLoadOut"); saveLoadPositionIn = false; saveLoadMenuOpen = false; } } public void ChooseLoad() { if (saveLoadPositionIn == false) { loadUIAnimation.SetTrigger("SaveLoadIn"); saveLoadPositionIn = true; saveLoadMenuOpen = true; } else { loadUIAnimation.SetTrigger("SaveLoadOut"); saveLoadPositionIn = false; saveLoadMenuOpen = false; } } |
This extra line is simply setting saveLoadMenuOpen to true or false, depending on the circumstances. Recall from the CameraMove script the boolean that checks if the save or load menu is open. In that script, the check is performed to avoid camera movement while the menu is open.
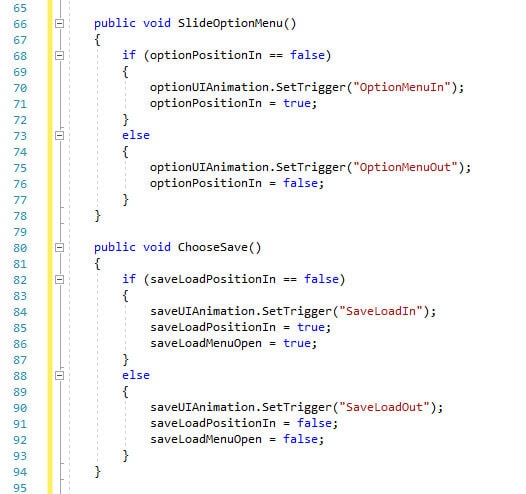
Figure 9: SlideOptionMenu and ChooseSave, two of the four menu functions.
Next up is the object selection functions. On the left side of the level editor is a menu with four buttons. Selecting any of these buttons sets the object to be placed as whichever object corresponds with that button. For example, clicking on the button with the cube in it sets the object to place as a cube object.
|
1 2 3 4 5 6 7 8 9 10 11 12 13 14 15 16 17 18 19 20 21 22 23 24 25 26 27 28 29 30 31 |
public void ChooseCylinder() { user.itemOption = MouseScript.ItemList.Cylinder; GameObject cylinder = GameObject.CreatePrimitive(PrimitiveType.Cylinder); mouseObject.mesh = cylinder.GetComponent<MeshFilter>().mesh; Destroy(cylinder); } public void ChooseCube() { user.itemOption = MouseScript.ItemList.Cube; GameObject cube = GameObject.CreatePrimitive(PrimitiveType.Cube); mouseObject.mesh = cube.GetComponent<MeshFilter>().mesh; Destroy(cube); } public void ChooseSphere() { user.itemOption = MouseScript.ItemList.Sphere; GameObject sphere = GameObject.CreatePrimitive(PrimitiveType.Sphere); mouseObject.mesh = sphere.GetComponent<MeshFilter>().mesh; Destroy(sphere); } public void ChoosePlayerStart() { user.itemOption = MouseScript.ItemList.Player; mouseObject.mesh = playerMarker; } |
In each function, you begin by setting user.itemOption (the itemOption variable in MouseScript) to the corresponding object. From there, you change the mesh of the mouse object by quickly creating an object in the world and setting mouseObject.mesh to the mesh of the created object. Once this is done, the newly created object is immediately destroyed. ChoosePlayerStart mixes things up by instead taking the mesh from playerMarker, a variable created early on that stores the player mesh.
Why the distinction? Ordinarily, your object selection methods might look like ChoosePlayerStart, but in this example, the user created objects are all basic geometric shapes like cubes. To save on variable declarations, the script instead uses CreatePrimitive to make the mesh needed for the mouse. You can, of course, make variables holding these different meshes if you so desire. From there you can make all methods functionally identical or perhaps use a different method altogether. CreatePrimitive was used to keep the code simple and easier to follow.
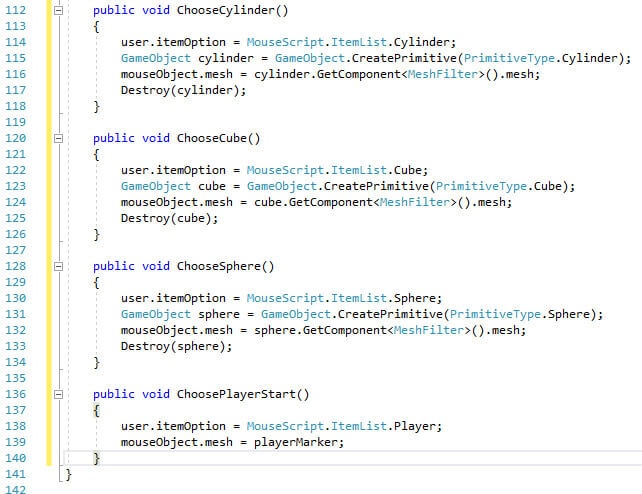
Figure 10: All object selection functions.
That’s one major menu done, but there’s still the other part of what is being referred to as the ‘options’ menu. The save and load buttons are complete, but the remaining buttons currently do nothing. Once again, three separate functions will be used, each doing similar tasks with some slight differences.
|
1 2 3 4 5 6 7 8 9 10 11 12 13 14 15 16 17 18 |
public void ChooseCreate() { user.manipulateOption = MouseScript.LevelManipulation.Create; user.mr.enabled = true; rotUI.SetActive(false); } public void ChooseRotate() { user.manipulateOption = MouseScript.LevelManipulation.Rotate; user.mr.enabled = false; rotUI.SetActive(true); } public void ChooseDestroy() { user.manipulateOption = MouseScript.LevelManipulation.Destroy; user.mr.enabled = false; rotUI.SetActive(false); } |
With each function, you first set what manipulation option the player is using. From there you enable or disable the mouse object’s mesh renderer followed by activating or deactivating the rotation slider. This concludes the main menu functionality of the level editor, leaving only the save and load methods. Now the fun begins as you write code to save your level data to a json file stored within a folder that you request Unity to make. To start, you’ll need to gather up all objects with the EditorObject component, which of course signifies objects that were user-generated. Once you have your array of objects, you’ll need to add the data from these objects to the list created in level.
|
1 2 3 4 5 6 |
public void SaveLevel() { EditorObject[] foundObjects = FindObjectsOfType<EditorObject>(); foreach (EditorObject obj in foundObjects) level.editorObjects.Add(obj.data); } |
Next, comes the directory and file creation. Unity has built-in json functionality that makes reading and writing a json file considerably easier on you as the developer. This function, called JsonUtility.ToJson, will be used to create the json file. Next, a folder is specified by getting the data path of the project, followed by adding the directory LevelData. A default filename is created followed by checking to see if the user entered anything in the level name field in the editor. Assuming they have, the json file is given that name. The existence of the LevelData directory is confirmed, and finally, the file path is set by using Path.Combine which completes all the prep work before saving the file.
|
1 2 3 4 5 6 7 8 9 10 |
string json = JsonUtility.ToJson(level); string folder = Application.dataPath + "/LevelData/"; string levelFile = ""; if (levelNameSave.text == "") levelFile = "new_level.json"; else levelFile = levelNameSave.text + ".json"; if (!Directory.Exists(folder)) Directory.CreateDirectory(folder); string path = Path.Combine(folder, levelFile); |
A quick check is performed to make sure a file of the same name already exists. If it does, then it is deleted and simply replaced with the new file. You use File.WriteAllText to save the file to the path specified, and the level file is created. Remove the save menu from there, clear out the input field and remove the focus from it, and send a message to the user letting them know their level was saved successfully.
|
1 2 3 4 5 6 7 8 9 10 |
if (File.Exists(path)) File.Delete(path); File.WriteAllText(path, json); saveUIAnimation.SetTrigger("SaveLoadOut"); saveLoadPositionIn = false; saveLoadMenuOpen = false; levelNameSave.text = ""; levelNameSave.DeactivateInputField(); levelMessage.text = levelFile + " saved to LevelData folder."; messageAnim.Play("MessageFade", 0, 0); |
Saving your data is now possible in your level editor. The complete function is shown in the figure below if you wish to check your code.
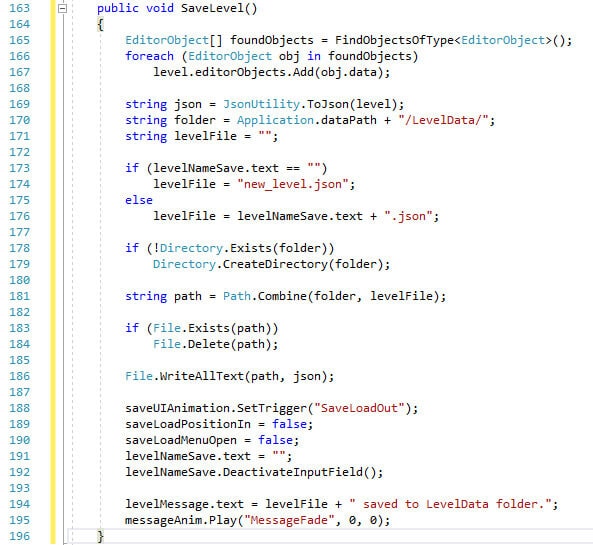
Figure 11: The complete SaveLevel function.
Naturally, someone may wish to make adjustments to their created level later on. A similar menu to the save menu is created for that purpose. The actual functionality of loading a level is effectively doing SaveLevel in reverse. You’ll still begin by specifying the file path to be used when searching for a level to load.
|
1 2 3 4 5 6 7 8 9 10 11 |
public void LoadLevel() { string folder = Application.dataPath + "/LevelData/"; string levelFile = ""; if (levelNameLoad.text == "") levelFile = "new_level.json"; else levelFile = levelNameLoad.text + ".json"; string path = Path.Combine(folder, levelFile); } |
From here you first check to see if the file exists. If not, you’ll display a message stating that the file could not be found. Otherwise, you’ll once again gather all the current objects with EditorObject attached but this time delete them. This is done simply to make room for the objects about to be loaded from the json file. You also go ahead and set playerPlaced to false as the original player object will be destroyed, and you can’t confirm if the json file will have data for a player object. After that, you read all the text from the file and enter that data into level.
|
1 2 3 4 5 6 7 8 9 10 11 12 13 14 15 16 17 18 19 20 21 |
if (File.Exists(path)) { EditorObject[] foundObjects = FindObjectsOfType<EditorObject>(); foreach (EditorObject obj in foundObjects) Destroy(obj.gameObject); playerPlaced = false; string json = File.ReadAllText(path); level = JsonUtility.FromJson<LevelEditor>(json); CreateFromFile(); } else { loadUIAnimation.SetTrigger("SaveLoadOut"); saveLoadPositionIn = false; saveLoadMenuOpen = false; levelMessage.text = levelFile + " could not be found!"; messageAnim.Play("MessageFade", 0, 0); levelNameLoad.DeactivateInputField(); } |
In case you wish to compare, figure 12 shows the completed LoadLevel function.
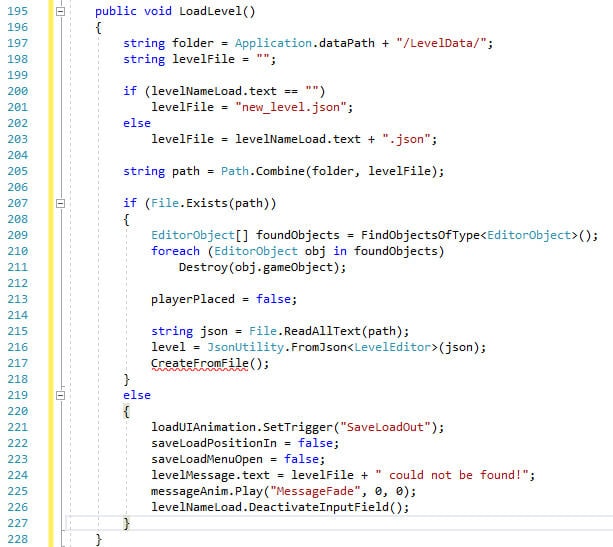
Figure 12: The complete LoadLevel function.
You’re not finished yet! While level has been given some data, it doesn’t actually do anything with it. Its only job is to hold that data for saving and loading levels. How would you populate the world with the objects listed in the json file? You’ll notice an undefined method, CreateFromFile, in the code near the end there. This method acts almost exactly like the code from MouseScript that creates objects when the left mouse button is clicked. It goes through the now populated editorObjects list in level and creates objects based on the information in that list. The only major difference is that it will also send a message when it’s complete letting the user know that the level has finished loading.
|
1 2 3 4 5 6 7 8 9 10 11 12 13 14 15 16 17 18 19 20 21 22 23 24 25 26 27 28 29 30 31 32 33 34 35 36 37 38 39 40 41 42 43 44 45 46 47 48 49 50 51 52 53 54 55 56 57 58 59 60 61 62 63 64 65 66 67 68 69 70 71 72 |
void CreateFromFile() { GameObject newObj; for (int i = 0; i < level.editorObjects.Count; i++) { if (level.editorObjects[i].objectType == EditorObject.ObjectType.Cylinder) { newObj = GameObject.CreatePrimitive(PrimitiveType.Cylinder); newObj.transform.position = level.editorObjects[i].pos; newObj.transform.rotation = level.editorObjects[i].rot; newObj.layer = 9; EditorObject eo = newObj.AddComponent<EditorObject>(); eo.data.pos = newObj.transform.position; eo.data.rot = newObj.transform.rotation; eo.data.objectType = EditorObject.ObjectType.Cylinder; } else if (level.editorObjects[i].objectType == EditorObject.ObjectType.Cube) { newObj = GameObject.CreatePrimitive(PrimitiveType.Cube); newObj.transform.position = level.editorObjects[i].pos; newObj.transform.rotation = level.editorObjects[i].rot; newObj.layer = 9; EditorObject eo = newObj.AddComponent<EditorObject>(); eo.data.pos = newObj.transform.position; eo.data.rot = newObj.transform.rotation; eo.data.objectType = EditorObject.ObjectType.Cube; } else if (level.editorObjects[i].objectType == EditorObject.ObjectType.Sphere) { newObj = GameObject.CreatePrimitive(PrimitiveType.Sphere); newObj.transform.position = level.editorObjects[i].pos; newObj.transform.rotation = level.editorObjects[i].rot; newObj.layer = 9; EditorObject eo = newObj.AddComponent<EditorObject>(); eo.data.pos = newObj.transform.position; eo.data.rot = newObj.transform.rotation; eo.data.objectType = EditorObject.ObjectType.Sphere; } else if (level.editorObjects[i].objectType == EditorObject.ObjectType.Player) { newObj = Instantiate(user.Player, transform.position, Quaternion.identity); newObj.layer = 9; newObj.AddComponent<CapsuleCollider>(); newObj.GetComponent<CapsuleCollider>().center = new Vector3(0, 1, 0); newObj.GetComponent<CapsuleCollider>().height = 2; newObj.transform.position = level.editorObjects[i].pos; newObj.transform.rotation = level.editorObjects[i].rot; playerPlaced = true; EditorObject eo = newObj.AddComponent<EditorObject>(); eo.data.pos = newObj.transform.position; eo.data.rot = newObj.transform.rotation; eo.data.objectType = EditorObject.ObjectType.Player; } } levelNameLoad.text = ""; levelNameLoad.DeactivateInputField(); loadUIAnimation.SetTrigger("SaveLoadOut"); saveLoadPositionIn = false; saveLoadMenuOpen = false; levelMessage.text = "Level loading...done."; messageAnim.Play("MessageFade", 0, 0); } |
Now the code is complete. All that remains is to assign the various buttons their respective functions and fill the various variables in the Unity editor. Save the VS project before closing it and returning to the Unity project.
Finishing the Project
First, the CameraMove, ManagerScript, and MouseScript will need to be attached to their respective objects. CameraMove will be attached to the Main Camera object, MouseScript attached to Mouse, and ManagerScript attached to Manager. You can add these by clicking on the object in the Hierarchy and dragging the script from the Assets window into the Inspector or clicking Add Component in the Inspector and searching the script from there. Once complete, you can then move on to filling in the fields for the various script components. Having the least number of variables to fill, it’s recommended to start with CameraMove.
You may wish to lock the Inspector to make this part easier. To do this click the lock icon in the upper right corner of the Inspector window. Doing so will make field assignment easier. In addition, if the fields don’t appear for any reason, double check the code as there may be a compile error. The debug log will let you know where the error is located.
Make sure the Canvas object is expanded, then expand CameraSpeed to reveal two more objects. Click and drag CameraSpeedSlider to the Camera Speed Slide field in the CameraMove component. As you may have guessed, CameraSpeed is the slider that will control how fast the camera moves. In addition, click and drag the Manager object to the ms field to give CameraMove its ManagerScript reference.
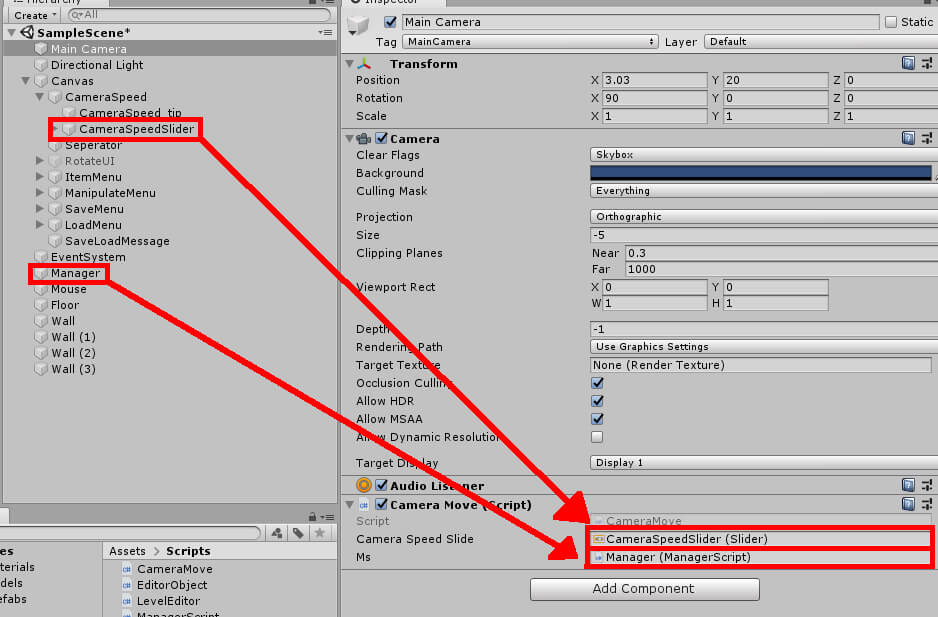
Figure 13: Setting the variables for CameraMove.
Moving along to the Mouse object, you’ll need to locate the materials for good and bad placement. They can be found in the Assets window by selecting the Materials folder.
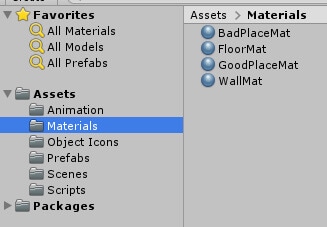
Figure 14: The Materials folder.
Drag BadPlaceMat to the Bad Place field and GoodPlaceMat to the Good Place field to cover the materials.
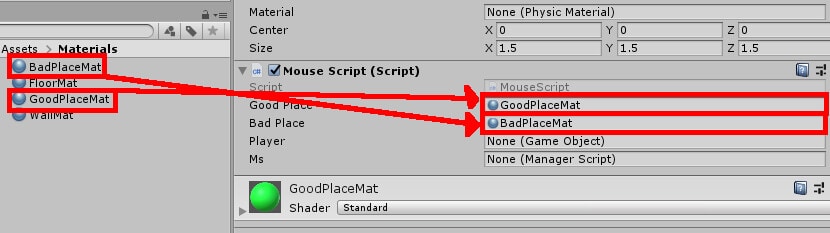
Figure 15: Setting material variables in MouseScript.
The Player object can be found under the Prefabs folder in the Assets window. Once there you will need to click and drag the PlayerModel prefab into the Player field. Afterwards, click and drag Manager from the Hierarchy to the ms field like you would with CameraMove.
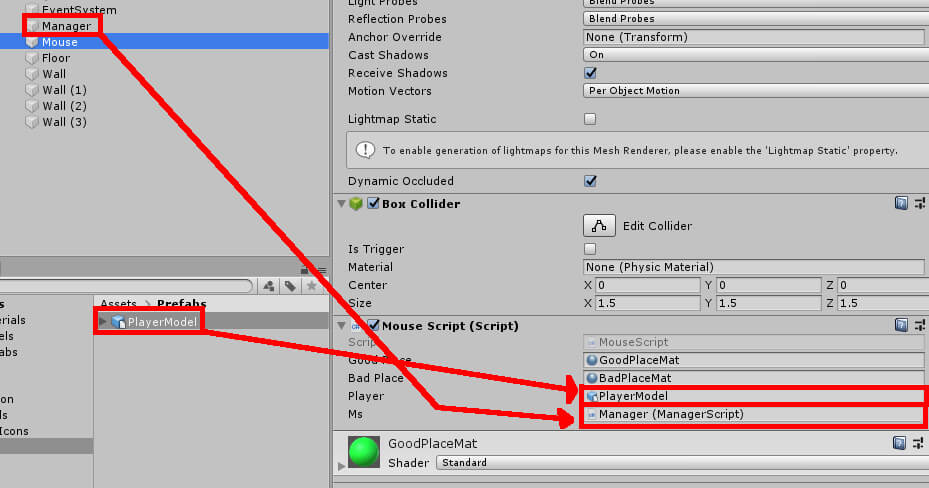
Figure 16: Finalizing MouseScript.
Now you’re at the big one. ManagerScript has quite a few fields that need filling, starting with the Animator fields. From the Hierarchy, ItemMenu will go to Item UI Animation, ManipulateMenu goes to Option UI Animation, SaveMenu goes to Save UI Animation, and LoadMenu goes towards Load UI Animation. From here, you can take Mouse and apply that to Mouse Object and User fields in the component.
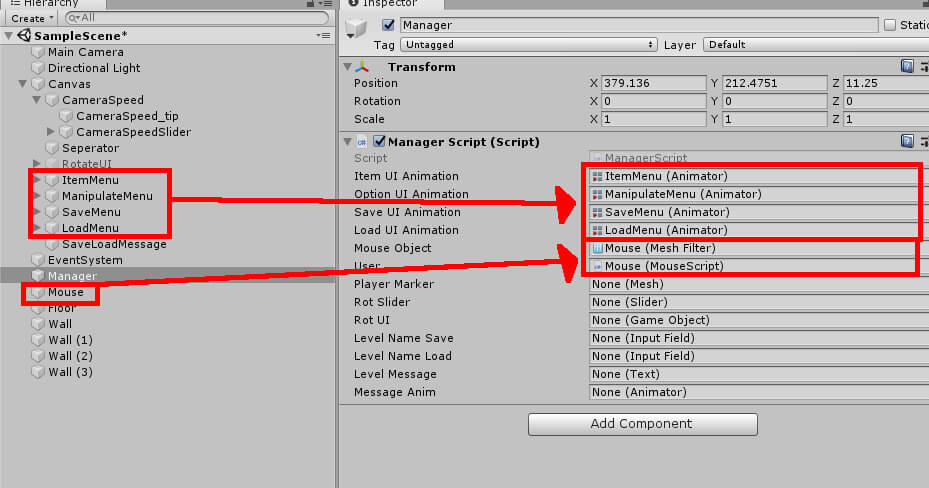
Figure 17: Setting animation and mouse fields.
PlayerMarker is the mesh that will be assigned to the Mouse object whenever the player icon is selected in the level editor. Once again you’ll go to Prefabs in the Assets window. Expand the PlayerModel prefab and locate Alpha_Surface. This is the mesh that Manager Script is looking for. Click and drag it to Player Marker to fill that field.
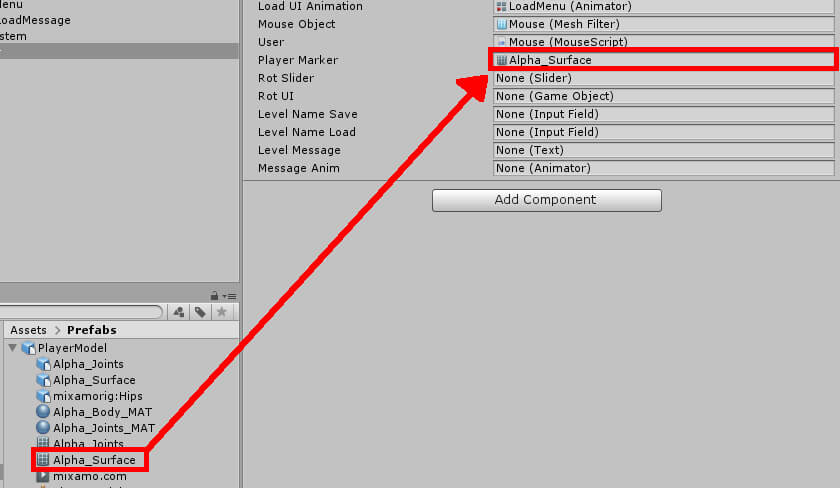
Figure 18: Defining the player mesh.
Back at the Hierarchy, find RotateUI and drag that to Rot UI. Expand RotateUI to reveal RotateSlider. Drag this to the Rot Slider field.
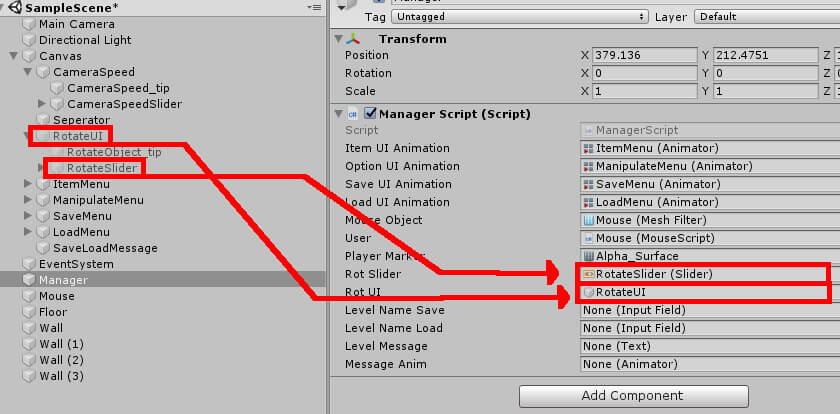
Figure 19: Filling rotation related fields.
Find the SaveMenu and LoadMenu objects and expand them to reveal three child objects each. The ManagerScript now needs the input fields that help it assign a name to a json file as well as search for one to load. As the names suggest, LevelNameSave will be applied to Level Name Save in the ManagerScript component while LevelNameLoad will fill Level Name Load.
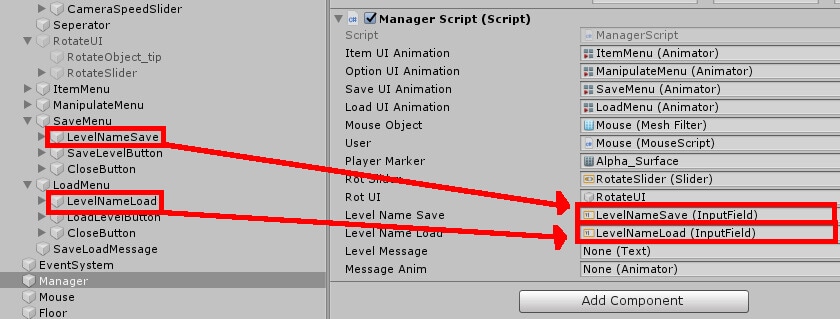
Figure 20: Filling Level Name Save and Load.
Finally, the SaveLoadMessage object in the Hierarchy will fill both the remaining fields in ManagerScript.
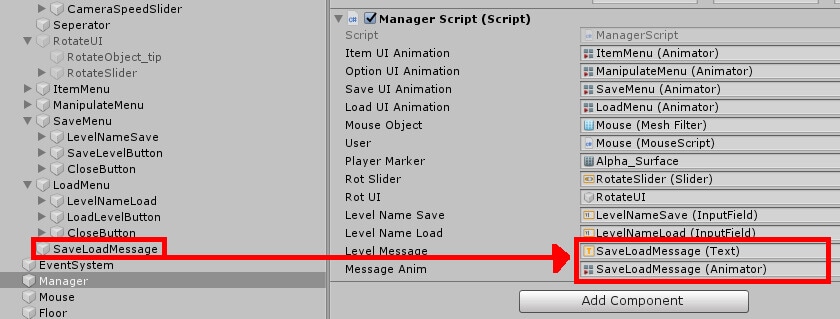
Figure 21: Setting the final fields in ManagerScript.
Every script variable has been given a value now. All that remains is to assign functions to the various buttons in the project. Assigning the function has been made easier as the only object the buttons will need to get the function from is Manager. To assign a function, you must select the button you wish to edit. The example below will use the OpenClose child object under ItemMenu. From there, drag Manager from the Hierarchy to the Object field in the button’s OnClick event.
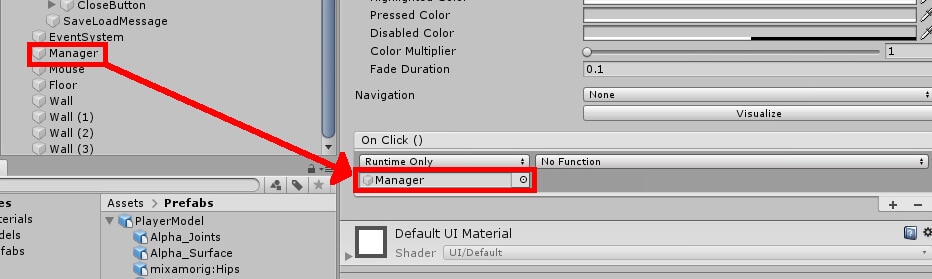
Figure 22: Letting OnClick know the function comes from the Manager object.
Select the No Function dropdown and navigate to ManagerScript->SlideItemMenu to assign the function.
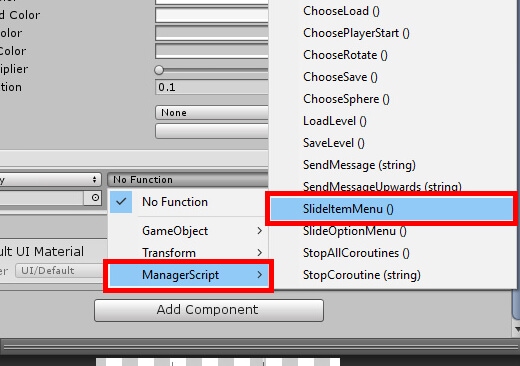
Figure 23: Selecting a function.
Each button will have to be assigned this way. The table below will help you know which function goes to which button. In addition, the Hierarchy path to each button will be shown for easier navigation through the project.
| Button | Function |
| Canvas->ItemMenu->OpenClose | SlideItemMenu() |
| Canvas->ItemMenu->CylinderSelect | ChooseCylinder() |
| Canvas->ItemMenu->BoxSelect | ChooseCube() |
| Canvas->ItemMenu->SphereSelect | ChooseSphere() |
| Canvas->ItemMenu->PlayerStart | ChoosePlayerStart() |
| Canvas->ManipulateMenu->OpenClose | SlideOptionMenu() |
| Canvas->ManipulateMenu->CreateOption | ChooseCreate() |
| Canvas->ManipulateMenu->RotateOption | ChooseRotate() |
| Canvas->ManipulateMenu->DestroyOption | ChooseDestroy() |
| Canvas->ManipulateMenu->SaveOption | ChooseSave() |
| Canvas->ManipulateMenu->LoadOption | ChooseLoad() |
| Canvas->SaveMenu->SaveLevelButton | SaveLevel() |
| Canvas->SaveMenu->CloseButton | ChooseSave() |
| Canvas->LoadMenu->LoadLevelButton | LoadLevel() |
| Canvas->LoadMenu->CloseButton | ChooseLoad() |
Table 1: All buttons and their corresponding functions
At last, the level editor is complete. Press the play button at the top of the editor and give it a try. Navigate to the project folder in Windows Explorer to check out the created LevelData folder and find your levels saved inside.
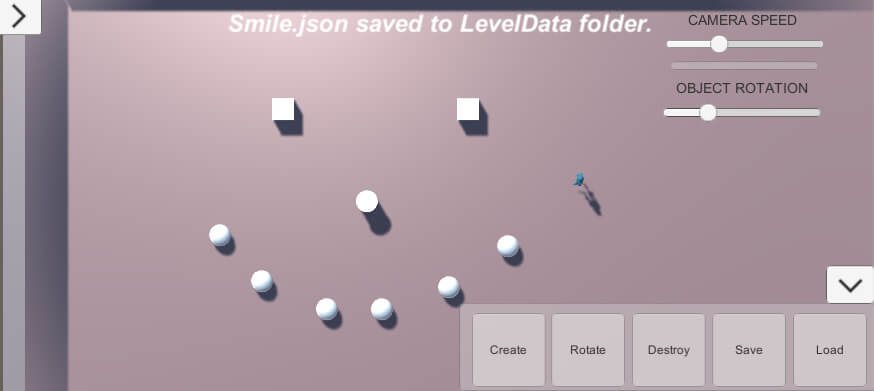
Figure 24: Completed level editor.
Conclusion
Though certainly not an easy task, creating a level editor can have several benefits to both development and the user experience. For the developer, it can be used to make large projects easier to manage in a team or streamline the level creation process. As for the players, they have a fun tool to express their creativity with. There are also long-term benefits to creating a level editor, with the biggest benefit being a longer and stronger interest in the game. Level editors are certainly a lot of work to put together, but it pays off in the end by allowing the project to have near limitless content created for it.
Read also: Test-driven development for game components
FAQs: Building a Level Editor in Unity
1. How do you create a custom level editor in Unity?
Create five C# scripts: an EditorObject MonoBehaviour to store per-object data (type, position), a static LevelEditor class to hold all placed objects, a CameraMove script for viewport navigation, a MouseScript for raycasting and object placement/deletion, and a ManagerScript to coordinate UI elements and handle save/load operations. Attach these scripts to appropriate GameObjects in your Unity scene and wire up the UI elements (buttons, sliders) in the Inspector.
2. How do you save and load level data in Unity?
Use Unity’s built-in serialization to convert your level data (object types, positions, rotations) to a savable format. The ManagerScript coordinates save operations by iterating through all EditorObjects tracked by the LevelEditor, serializing their data, and writing it to a file. Loading reverses the process: read the file, deserialize the data, and instantiate the corresponding prefabs at the saved positions.
Load comments