

A number of client tools are available for working with Azure Database for PostgreSQL flexible server. With these tools, you can connect to your ADP instance, manage the environment, and define your database structures. You can also query, update and delete data within those databases. Two of the most popular tools for working with PostgreSQL are the psql command-line utility and the pgAdmin GUI management tool, both of which are available for free on multiple platforms.
In this article, I introduce you to psql and show you how to connect to and work with your ADP instance. This article is the second in a series on ADP flexible server: in the first article, I introduced you to ADP and provided information to help you get started with your own ADP instance, and in part three l introduce you to pgAdmin, so you know how to use both that and psql.
Having a foundation in these two tools will make it easier to understand the different concepts I introduce in these articles, so you can immediately start using the tools to interface with your ADP instance. This foundation will also help you down the road when working with production PostgreSQL deployments, and if you need to carry out administrative tasks or access the data.
With all that in mind, let’s start diving into the psql utility. It provides a client interface for working with PostgreSQL from your local command shell environment. You can use psql in interactive mode, which enables you to run SQL statements or other commands interactively. You can also use psql without entering interactive mode to carry out one-off tasks such as running scripts or querying a database. You’ll get a better sense of how all this works as we work through the article.
Note: to follow along with the examples in this article, you need to have a running ADP instance and know the necessary connection information, including the full endpoint name, port number, user name, password, and target database. If you haven’t set up ADP yet, refer to the first article.
How to install psql on your system
Before you can use psql, it must be installed on your system. The utility is typically included with a PostgreSQL installation, so if you’ve set up PostgreSQL, you’re probably all set. You should be able to run psql in your system’s command-line interface (CLI), such as Terminal in macOS or Ubuntu. You can verify whether psql is installed by executing the following command at the CLI command prompt:
|
1 |
psql --version |
If psql is installed, the command will return the version number. If it is not installed, the command will return a message indicating so. The message might even suggest how to install it.
You can install psql on macOS, Linux and Windows computers. However, the installation process varies between platforms. A platform might also support multiple installation methods. You might have to do some digging to find information specific to your environment. We have this article here on Simple Talk, and I also recommend this article from Timescale.
I installed psql on macOS, Ubuntu and Windows systems. On my Mac, I installed the PostgreSQL libpq library, which includes the psql utility. The library is one of the components included in the PostgreSQL database platform. Because I did not need the entire platform, I installed only the libpq library by running the following Homebrew command:
|
1 |
brew install libpq |
After I installed the libpq library on my Mac, I ran the following brew command to create a symlink to the library’s binaries so I could easily run the psql utility:
|
1 |
brew link --force libpq |
I took a similar approach on Ubuntu, except that I used the apt package manager to install the postgresql-client client library, which contains psql and other tools. The following sudo command shows how I installed the library on Ubuntu:
|
1 |
sudo apt install postgresql-client |
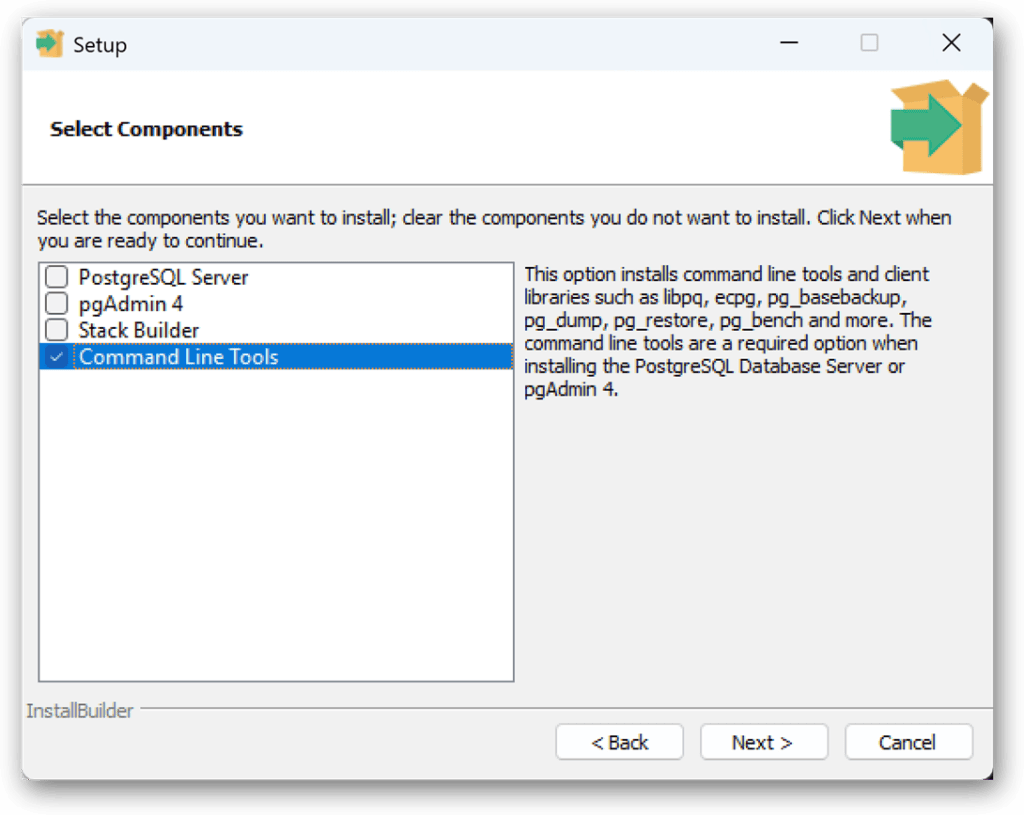
With Windows, I took a much different approach. First, I downloaded the PostgreSQL installer certified by EDB and then ran the installer’s Setup wizard. When I got to the wizard’s Select Components screen, I selected only the Command Line Tools option, as shown in the following figure. (I choose not to install any of the other components).
For the rest of the wizard, I stuck with the default settings. You can find more information about installing the Windows-based client tools in the PostgreSQL topic Windows installers.
Connecting to Azure Database for PostgreSQL with psql
After you install psql, you can start using it to work with your ADP instance. Before you do that, be sure that the instance is running and you’ve added your local IP address to the networking settings (as described in the first article). You can also use psql to connect to other PostgreSQL deployments, but for now, our concern is primarily with ADP.
When you connect to an ADP instance, you must provide the following connection information:
- Host server. The fully qualified endpoint name that Azure assigns to your instance when you create it. For my instance, Azure assigned the name adpserver.postgres.database.azure.com.
- Port. ADP flexible server uses TCP port 5432.
- User name. You can use either the PostgreSQL account that you set up when fist creating your ADP instance, or you can use your Microsoft Entra account. For the examples in this article, I used my PostgreSQL account, which is adpadmin.
- Password. The password associated with the specified user account.
- Database. The database that will be active when you first connect to your ADP instance. You can change to a different database at any time after you’ve connected to ADP. For now, we’ll stick with the postgres user database, which Azure creates automatically when you set up your ADP instance.
To help you connect to an ADP instance, the Azure portal page for that instance provides connection information for different platforms. In the left panel, expand Settings and click the Connect node. The main window will then display connection information.
You can run psql in a command shell such as Bash or Zsh. When you run the utility, you must provide the connection information either directly (as part of the command) or indirectly (through a configuration file). To provide the information directly, include the connection information as arguments in the psql command, as in the following example:
|
1 |
psql -h adpserver.postgres.database.azure.com -p 5432 -U adpadmin -d postgres |
This is the command that I ran in Zsh on my Mac. If you copy this command for your connection, be sure to replace the host name and user name with your specific information. Here’s a breakdown of the command’s arguments:
- -h. Host server instance
- -p. Port for the ADP service
- -U. User name
- -d. Target ADP database
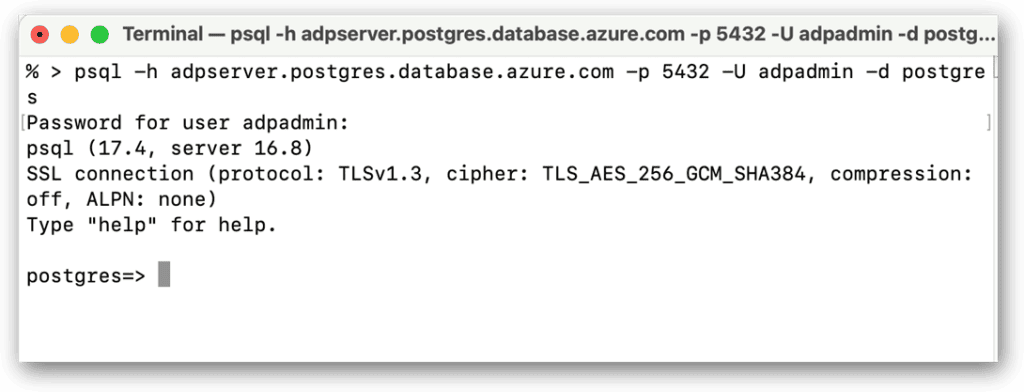
When you run the psql command, you’ll be prompted for the password associated with the specified user account. If everything checks out, you’ll be connected to your ADP instance. The command shell will display connection information that confirms your connection. The command prompt will also change to the name of the active database, in this case, postgres. The database command prompt indicates that you are now in interactive mode. The following figure shows the terminal after I connected to my ADP instance:
At the psql command prompt, you can enter both SQL statements and meta-commands that target the ADP instance. (I’ll be discussing both of these shortly).
For example, the following meta-command lists all the current databases on your ADP instance:
|
1 |
\l |
The command returns details about the existing databases, such as the owner, encoding, collation, and access privileges. You might recall from the first article that the Azure portal lists only three databases after you first create your instance: azure_maintenance, azure_sys, and postgres. However, the psql \l command also returns the template0 and template1 databases, which are used for creating new databases – more on that in a future article.
By running the \l command, you’re able to quickly confirm that psql can properly connect to the ADP instance and retrieve the requested information, which is all you need to do for now. We’ll be covering more commands later in the article. In the meantime, you should quit psql by running the following command:
|
1 |
/q |
When you quit psql, you’re returned to the regular command prompt. You can relaunch psql at any time. Before you do, however, let’s look at how you can simplify your connections going forward.
Adding connection settings to a configuration file
As I noted in the previous section, you must provide the connection information to your psql command either directly or indirectly when connecting to your ADP instance. You’ve already seen how to create a direct connection. Now let’s look at how to set up an indirect connection.
In psql, you can use any of the supported environment variables to define connection information. This way, you do not have to include this information in your psql commands – instead, you add the variables and their values to the startup configuration file specific to your command shell. For example, I use the Zsh command shell on my Mac, so I updated the .zshrc configuration file in my home directory. Zsh reads the file when first starting up.
To support my psql connections, I added the following settings to the file:
|
1 2 3 4 |
export PGHOST=adpserver.postgres.database.azure.com export PGPORT=5432 export PGUSER=adpadmin export PGDATABASE=postgres |
I did something similar in Ubuntu, which uses the Bash command shell by default. In this case, I updated the .bashrc file in my home directory.
Whenever you add or update environment variables for psql, you must quit your CLI if it’s still running and then restart it. After you restart the shell, you can verify the variable settings by running the following echo command:
|
1 |
echo $PGHOST, $PGPORT, $PGUSER, $PGDATABASE |
The command should return the four variable values. For more information about the environment variables available to psql, see the PostgreSQL topic Environment Variables. The topic also includes information about setting up the environment variables on Windows.
Note that psql also supports the PGPASSWORD environment variable, which you can add to your configuration file along with the others. However, PostgreSQL documentation recommends against including this variable for security reasons, which means that you’ll still be prompted for a password when you run your psql command.
If you want to avoid being prompted for a password but do not want to use the PGPASSWORD environment variable, you can instead add a password file to your system. In macOS or Linux, you would create the .pgpass file in your home directory and include your password in there. If working in Windows, you’ll need to create the %APPDATA%\postgresql\pgpass.conf file.
By using a separate password file, you can set stricter restrictions than you can with the command shell’s startup configuration file. In fact, psql will inform you if the file’s permissions are not considered restrictive enough when you try to connect to your ADP instance.
To set up the .pgpass or pgpass.conf file, create an empty text file and add the following connection string:
|
1 |
*:*:*:*:<password> |
The first four asterisk wildcards represent the hostname, port, database, username, and password. By using asterisks for these components, you can apply the password to any connection. However, you can be much more specific by including these components, which can be handy when working with multiple PostgreSQL deployments.
Note: including the other components in your connection string does not replace the need for providing the environment variables in the startup configuration file. Except for the password itself, the connection information in the .pgpass or pgpass.conf file is used only for matching purposes. For more information about the password file, refer to the PostgreSQL topic The Password File.
After you’ve added the connection string to the password file, be sure to restart your CLI again. If you’ve configured all the settings correctly, you should now be able to launch psql and connect to your ADP instance simply by running the following command:
|
1 |
psql |
That’s all there is to it. From here on in, you should be able to access your ADP instance with this simple psql command. Once you have psql running, you can run a wide range of SQL statements and meta-commands in interactive mode.
Running SQL commands in psql
PostgreSQL is a relational database management system. As such, it supports the type of SQL statements you’ve seen in systems such as MySQL or SQL Server, with the usual product-specific adaptations you might expect. You can run SQL statements at the psql command prompt, making it possible to define schema, create indexes, manipulate data, and carry out other actions.
To run a SQL statement, you simply type the statement and press enter. The command is sent to your ADP instance, which processes the statement and, if appropriate, returns data, a message, or both. If any information is returned, psql will display it beneath the original statement. For example, the following CREATE TABLE statement creates a table named tbl in the postgres database:
|
1 |
CREATE TABLE tbl (col1 smallint, col2 text); |
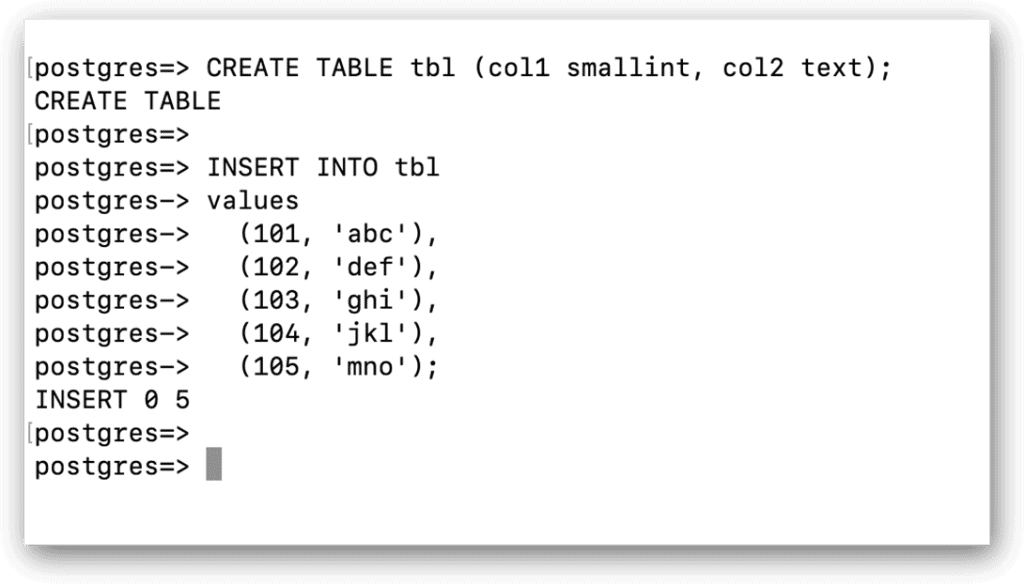
When you run this command, your ADP instance will add the table to the database and return a CREATE TABLE message. Notice that the statement ends with a semi-colon. You must include the semi-colon so the database engine knows when it has the complete SQL statement. This makes it possible to submit multi-line code as a single statement, as in the following example:
|
1 2 3 4 5 6 7 |
INSERT INTO tbl values (101, 'abc'), (102, 'def'), (103, 'ghi'), (104, 'jkl'), (105, 'mno'); |
The INSERT statement adds five rows to the tbl table and returns the message INSERT 0 5. The first number, which is always 0, is a carryover from when the database engine used to return an object ID (OID). The OID was related to the number of returned rows. However, this feature is no longer supported, although the 0 remains. The second number, 5, indicates the number of inserted rows.
When you enter a multi-line SQL statement in your shell, the command prompt itself changes slightly. The equal sign that follows the database name becomes a dash after the first line. This indicates that a multi-line statement is being submitted to the database engine and should be processed in its entirety, up to the final semi-colon. The following figure shows the statement across the multiple lines. As you can see, the command prompt is different for the lines after the first:
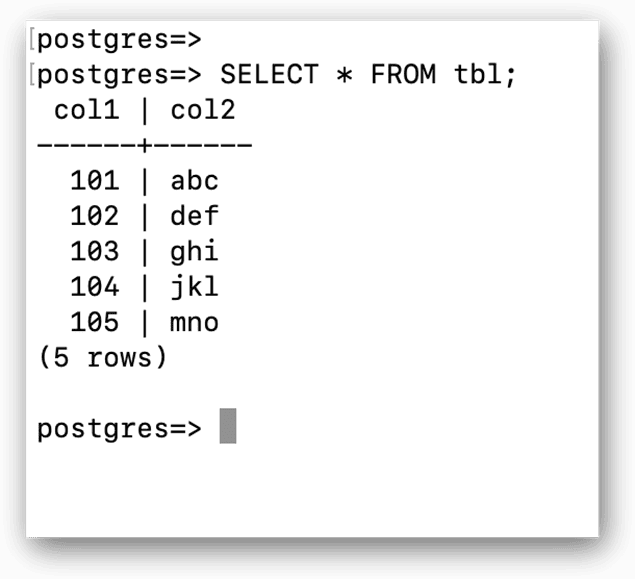
You can also run SQL statements that return data, just like you’d expect with any client that issues SQL statements. For example, the following SELECT statement returns all rows in the tbl table:
|
1 |
SELECT * FROM tbl; |
The data is returned in a tabular format, as shown in the following figure. Notice that the number of returned rows (in parentheses) is also included with the results:
Running SQL statements against your ADP instance is a fairly straightforward process. You can make those statements as simple or as complex as necessary. As you’ll see in the next section, you can also run meta-commands, which can help with administration and scripting.
Running meta-commands in psql
Meta-commands in psql enable you to retrieve information, configure settings, import data, set variables, and perform other operations. A meta-command always begins with a backslash, followed by the command name, which might be nothing but a single letter. Many meta-commands also take arguments, and some arguments take values.
You already saw a couple of meta-commands earlier in the article, when you first connected to your ADP instance. As you’ll recall, you used the \l command to list the current databases and the \q command to quit the psql program. In some cases, as with these two commands, a command might support two variations. For example, you can use the \list command instead of the \l command, and you can use the \quit command instead of the \q command.
Now let’s look at another way to use the \l command. In the following example, the command includes post* as an argument:
|
1 |
\l post* |
The asterisk is used as a wildcard, which means that psql will return information about any database whose name begins with post, followed by zero or more characters. In this case, only the postgres database matches the search pattern, but the results could have included databases with names such as post08, post_test, postprod, or even just post.
Another meta-command you might find useful is \dt. The command returns information about the tables defined in the current database, as shown in the following example:
|
1 |
\dt |
The root command in this case is \d, which takes many forms. For example, \d alone returns information about the database’s tables, indexes, views, materialized views, sequences, and other objects. If t is added, the returned information is limited to tables. Other examples include \di for indexes, \ds for sequences, and \dm for materialized views.
You can also use the \d command to limit the returned information to a specific object. For example, the following command returns information specific to the tbl table:
|
1 |
\d tbl |
Meta-commands are quite varied in the types of operations they support. You can even use a meta-command to control the borders that surround the result set returned by a query. For instance, the following command changes the border from its default (shown in the previous figure) to one that better distinguishes the results:
|
1 |
\pset border 2 |
The command starts with \pset, which lets you set options affecting the query output. This is followed the border argument and its value, 2. A value of 0 sets the output to no border, and a 1 creates internal dividing lines, which is the default. A value of 2 is used to create a complete table frame around the results.
You can see the effects of the \pset border setting by running the following SELECT statement, which returns all rows from the tbl table:
|
1 |
SELECT * FROM tbl; |
The following figure shows the statement and its returned values. Notice that the returned data is now completely surrounded by borders:

To set the border back to the default value, you can run the following \pset command:
|
1 |
\pset border 1 |
These are just a few examples of the many operations you can perform with meta-commands. I recommend that you review the psql documentation to better understand your options.
Outputting query results to a file
In some cases, you might want to output your query results to a file. You can do this by using the \o or \out command. When you want to control output, you must specifically tell psql to start outputting the data and then tell it to stop. For example, the following \o command tells psql to start outputting the results to the psql_out.txt file:
|
1 |
\o psql_out.txt |
When you run the command, psql creates an empty file named psql_out.txt. After that, any data returned by your statements is added to the file until you specifically stop the process. You can try this out by running the following SELECT statement:
|
1 2 |
SELECT col1, col2 FROM tbl WHERE col1 IN (102, 103, 104); |
When you run this statement, psql adds the query results to the psql_out.txt file. In addition, it does not display any data or message on the screen. You can confirm that the data has been added to the file by viewing the file’s contents. To stop outputting the data to the file, simply run the following \o command:
|
1 |
\o |
If you were to now rerun your SELECT statement, the results would again be returned to the screen, and nothing more would be added to the file.
With that in mind, let’s quit the psql program by running the \q command. This will return you to your regular command prompt, where we can work with psql in non-interactive mode.
Working with psql in non-interactive mode
You can use psql without entering interactive mode. For example, you might want to run a SQL script against your ADP instance but don’t need to interface with your ADP instance beyond that. In this case, all you have to do is call the file as part of your psql command. If the SQL returns any messages or data, psql displays them on the screen.
To demonstrate how this works, create a text file named psql_script.sql and save it to a specific folder. For this example, I used my home folder to keep things simple when calling the file. Next, add the following SELECT statement to the file:
|
1 2 |
SELECT col1, col2 FROM tbl WHERE col1 IN (102, 103, 104); |
Once you’ve set up your file, you can run the following psql command:
|
1 |
psql -f psql_script.sql |
The command takes the -f argument, followed by a value, which specifies the name of the target file. Because I saved the file to my home directory, I don’t need to include the full path name, although you might need to include it in your command. When you run this statement, psql will return the query results to your command shell.
You can also use psql to run SQL statements and meta-commands directly without entering interactive mode. In this case, you must use the -c option (instead of the -f option) and specify the statement or command in single quotes, as in the following example:
|
1 |
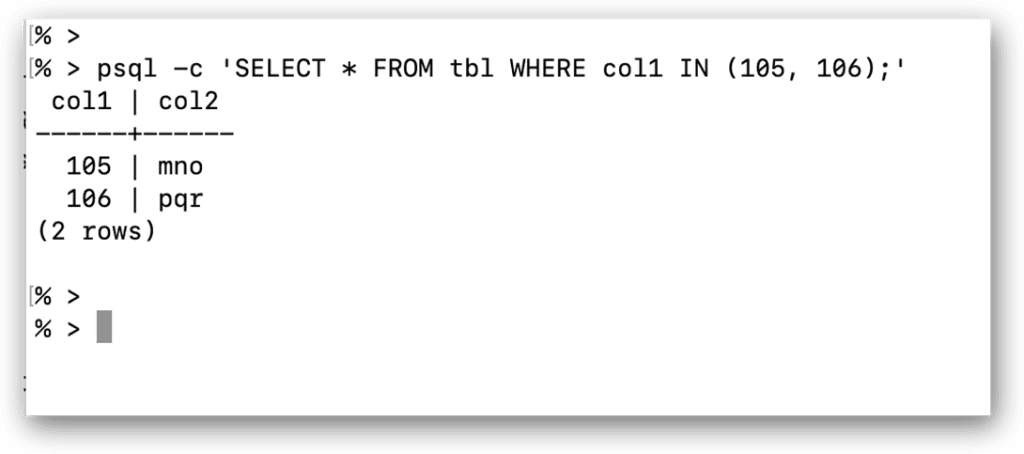
psql -c 'SELECT * FROM tbl WHERE col1 IN (105, 106);' |
When you run this command, psql submits the SELECT statement to your ADP instance and returns the results to the command prompt, as shown in the following figure:
You can also use this method to modify schema definitions. For instance, the following psql command runs a DROP TABLE statement that removes the tbl table from the postgres database:
|
1 |
psql -c 'DROP TABLE tbl;' |
This time, the statement returns only the message DROP TABLE. You can then verify that the table has been dropped by running the \dt meta-command, as in the following example:
|
1 |
psql -c '\dt' |
When you run this command, psql should return a message stating that it did not find any relations (tables), as expected. Being able to run psql commands non-interactively—whether to run scripts, SQL statements, or meta-commands—can be very useful when you need to perform quick one-offs or script your operations. The psql command also supports a number of other options for working with PostgreSQL without entering interactive mode.
Working with the psql command-line utility
The psql command-line utility is a versatile tool for working with PostgreSQL deployments, including ADP flexible server. You can run both SQL statements and meta-commands, choosing from a wide range of commands. You can also use psql interactively or non-interactively, as you’ve just seen. The better you understand how psql works and the different operations you can perform, the more you can take advantage of what the tool offers.
In this article, I touched upon a number of important aspects of psql to help you get started using the utility. However, there is a lot more to the tool than what I could cover in a single article. I’ve already pointed you to the main psql documentation, which provides a comprehensive reference for using psql. I recommend that you spend some time going over this and learning about the different options. In the next article, I introduce you to pgAdmin, a GUI management tool for PostgreSQL. It includes a built-in version of psql, giving you even more options for working with PostgreSQL and ADP.
This document contains proprietary information and is protected by copyright law.
Copyright © 2026 Red Gate Software Limited. All rights reserved


Load comments