
In my previous article, I showed you how to use PowerShell to create a script to dump out all the tables of your databases to files. One concept that was introduced at the time was that PowerShell treats everything as an object. In this article, you’ll get a chance to take a closer look at this.
Open the PowerShell ISE and execute the following commands
|
1 |
dir C:\ |
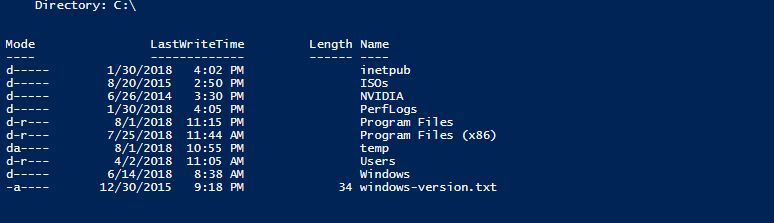
The results are about what you’d expect. Your output, of course, will vary a bit. The format is a little different from what you’d see in the CMD processor (it’s closer to a Unix style directory listing), but it’s recognizable as a directory listing.
Now try:
|
1 2 3 4 5 |
#this assumes you have a default instance on your local system, if you don't, change the word default to the name of your instance or change the server name $sqlserver = 'localhost\default' invoke-sqlcmd cd sqlserver:\sql\$sqlserver dir databases |
Now you’ll get back something very different from a filesystem listing, but it should be something that should be somewhat recognizable, a list of databases.

Back up a step and discover what else you can see. Enter the following command:
|
1 |
get-psdrive |
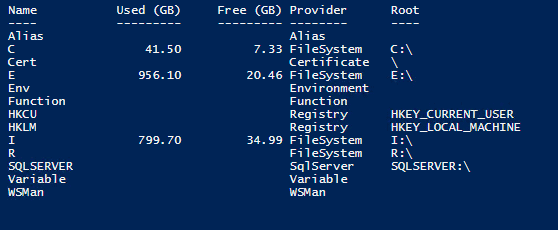
This output shows all the current locations that PowerShell can treat as a drive tree. Since this was run on a server as administrator, I could drill down and look at the Active Directory information. You probably will not see this on your machine. You will also see other objects that are specific to your machine. You can’t usually see SQLServer, but using the Invoke-SQLCmd forces the loading of the code necessary to make that happen. To access any of these objects, just type cd <objectname>.
I used the cmdlet Invoke-SQLCmd earlier in the article. What that did, however, was merely to force the loading of a PowerShell library. You can load the library directly with the following command when it’s not already loaded.
|
1 |
import-module sqlps |
You may get a warning message, about some verbs being unapproved. This warning doesn’t impact your ability to use them. You can ignore the warning message. If you’re curious about what cmdlets are being imported, try viewing both approved and unapproved by running the following command.
|
1 |
import-module sqlps -verbose |
If, for some reason, you want to remove all the SQL related cmdlets, use
|
1 |
Remove-Module sqlps |
I can’t think of a reason to do that, other than perhaps to free up memory.
PowerShell treats the objects in SQL Server like it treats files in a directory. By running dir databases, you get a list of your user databases. The system databases are not listed, but, you can treat them like hidden files and use the –force parameter.
|
1 |
ls databases -force |

I changed commands slightly here and used ls instead of dir. Dir is an alias for ls, which in turn is an alias for get-childitem. PowerShell uses a lot of aliases that map to cmdlets of the verb-noun form. Since it’s shorter and the syntax is closer to the Unix form, I will use ls from now on.
Just like in a Windows or Unix filesystem, you can navigate further. Run this to see the objects listed under the SQLServer directory.
|
1 |
ls . |
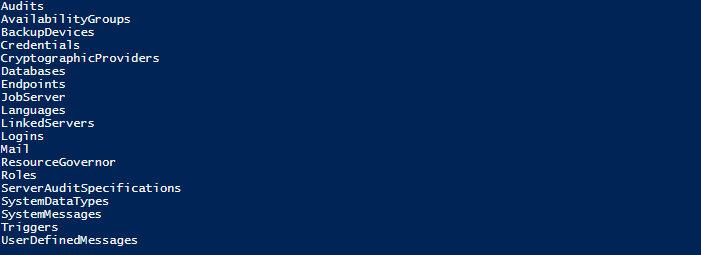
You should recognize these as objects and collections of objects that are found on SQL Server, for example, LinkedServers and Logins. You can explore any of those areas. To see the logins that exist on this server, run:
|
1 |
ls logins -force |
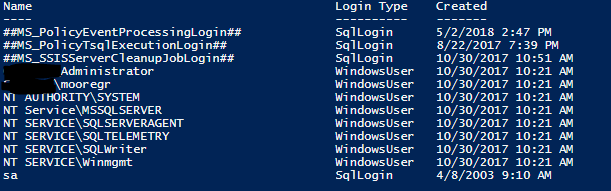
Notice that I used the –force parameter. Without that, some of the above logins, like sa, would not show up.
Looking at Objects
So far, the examples explore SQL Server like a filesystem. But again, PowerShell is about the objects.
|
1 2 |
$logins = ls logins -force $logins |
This will show you all the logins in the system after the collection has been saved in a variable. This command is useful, but what if you want just a list of the sqllogins?
|
1 |
ls logins -force | where {$_.logintype –eq 'sqllogin'} |
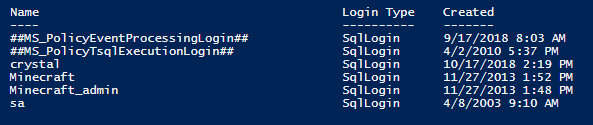
This takes the results of the ls logins command and pipes it to the where command. You have to tell where what to act on. $_ is a shorthand for referencing the most recently used object; in this case the output of the ls logins –force command. PowerShell uses -eq (and –gt and -lt and –ne) to test for equality. This command will show you all logins on the server that are of the type sqllogin. It does this by looking at the logins property of logintype.
This can also be done by using two commands, saving the collection in a variable first so that it can be reused:
|
1 2 |
$logins = ls logins -force $logins | where {$_.logintype –eq 'sqllogin'} |
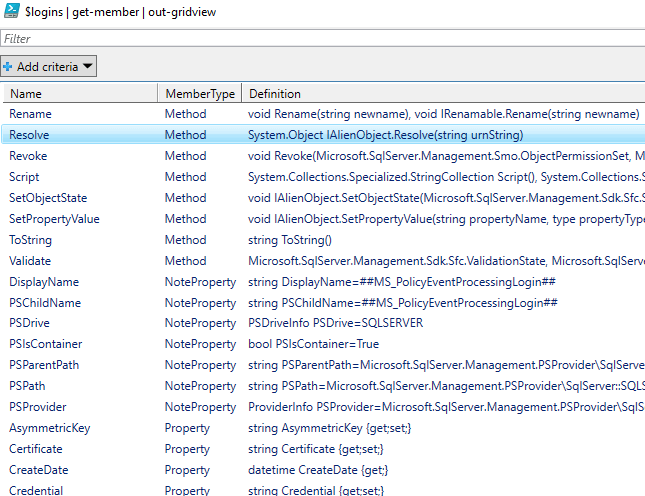
Every object has properties, some more than others. To see what properties and methods an object may have, pipe it to the get-member cmdlet.
|
1 |
$logins | get-member | out-gridview |
Or if you want to be very frugal in your typing, you can use aliases:
|
1 |
$logins | gm | ogv |
By piping the output to out-gridview, you can take advantage of the GUI and have an easy to read window that allows you to filter further.
And with a filter applied:
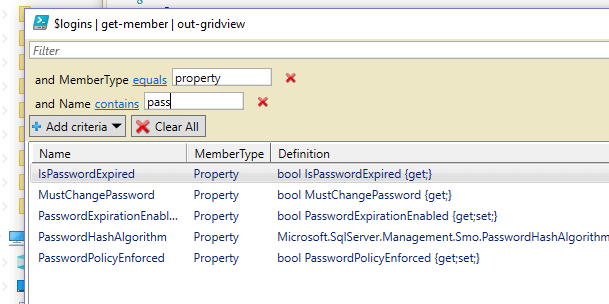
This is showing you all the login properties related to passwords.
Viewing Properties in Multiple Servers
Imagine the auditor has come to you and wants to know which logins exist on the SQL Server instance, which ones are enabled, and which ones have password expiration enabled. You could do this as a T-SQL query, but you need to execute this against 100 different servers.
Start with:
|
1 |
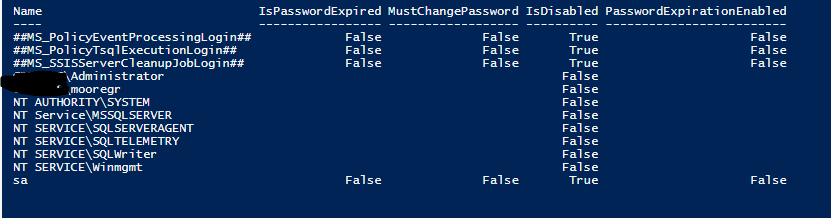
$logins | select-object name,ispasswordexpired, MustChangePassword, isdisabled, passwordexpirationenabled |
You most likely will get results like this:
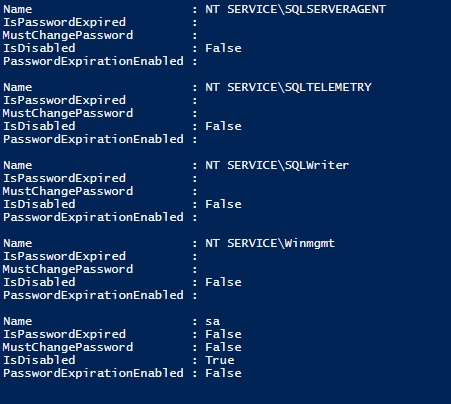
The select-object command permits selecting which properties you want from the logins object. However, you may want it in a more readable format. This is where the format-table cmdlet that was mentioned in the last article can be useful.
|
1 |
ls logins -force| select-object name,ispasswordexpired, MustChangePassword, isdisabled, passwordexpirationenabled | format-table |
You now have the results for one server, but you have 99 more to go. You can take advantage of the looping from the last article and the fact that you can use an array of strings:
|
1 2 3 4 5 6 7 |
#Update the array to reflect your instances $sqlservers = @('SQL01\default','SQLDB_02\sqlexpress','SalesSQL\default', 'SalesSQL\TEST_Instance') foreach ($sqlserver in $sqlservers) { cd sqlserver:\sql\$sqlserver ls logins -force| select-object name,ispasswordexpired, MustChangePassword, isdisabled, passwordexpirationenabled | format-table } |
Note that the array contains the name of the SQL Server and the instance on that server. That makes it easier to handle the servername and instances on that server. This code will loop through and display the name of the instance and the logins on it:
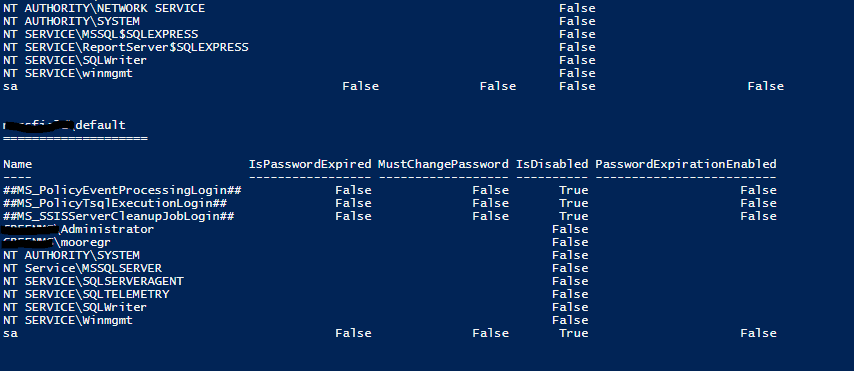
The auditor is happier, but this is still not the most useful format. You can take it one step further by updating your script a tad:
|
1 2 3 4 5 6 7 8 9 10 11 12 13 14 15 |
#Update the array to reflect your instances #Update the output path if necessary $sqlservers = @('SQL01\default','SQLDB_02\sqlexpress','SalesSQL\default', 'SalesSQL\TEST_Instance') $Filepath = 'C:\Users\administrator.YOURDOMAIN' foreach ($sqlserver in $sqlservers) { cd sqlserver:\sql\$sqlserver write-host $sqlserver write-host "====================" ls logins -force| select-object name,ispasswordexpired, MustChangePassword, isdisabled, passwordexpirationenabled | format-table $logins = ls logins -force| select-object name,ispasswordexpired, MustChangePassword, isdisabled, passwordexpirationenabled $logins | ConvertTo-Json | out-file -FilePath "$Filepath\$($sqlserver -replace '\\','_').json" $logins | ConvertTo-Csv | out-file -FilePath "$Filepath\$($sqlserver -replace '\\','_').csv" } |
The results are saved into a new object: $logins. Since you’re not sure if your auditor will want the results in a CSV file (which they can easily open in Excel, which it seems every auditor loves) or perhaps they want to be able to suck it into another program using JSON, you’ve nicely provided them with a choice of either. One of the things you’ll notice is that the script replaces the backslash (\) in the server name with an underscore (_). This is to prevent the OS from interpreting it as a subdirectory which would possibly give an error when writing to disk.
Speaking of errors, when you run the above script, you may get multiple warnings with the format:
WARNING: Could not obtain SQL Server Service information. An attempt to connect to WMI on ‘ SQL01’ failed with the following error: SQL Server WMI provider is not available on gage. –> Invalid namespace
This error appears to occur if the WMI agent is set up as a local login and not a domain login. You can suppress this using -WarningAction SilentlyContinue in the appropriate places, in this case after the –force and at the end of the select-object. Of course, suppress warnings at your own risk.
However, that only handles warnings. If you have errors, you could also silently continue, but that’s probably ill-advised. You should add in a little basic error handling. The most common error is that the server you’re trying to reach isn’t available when you run the scripts. It may be off-line, being rebooted or something else has happened. To solve that, you need to trap the error and handle it.
PowerShell, like most modern languages, supports try-catch-finally. There’s an important detail, however, to understand with error handling. Try-Catch only catches errors if you tell it to. Otherwise, the script continues to run. In other words, you will need to tell the CmdLet to STOP on an error. The default is to continue. In the example below, assume that FOO\BAR is currently offline. After attempting to connect to FOO\BAR, it will leave an error message in a file along with the CSV and JSON files.
|
1 2 3 4 5 6 7 8 9 10 11 12 13 14 15 16 17 18 19 20 21 22 23 24 |
#Update the array to reflect your instances #Update the output path if necessary $sqlservers = @('SQL01\default','SQLDB_02\sqlexpress','SalesSQL\default', 'SalesSQL\TEST_Instance', 'FOO\BAR') $Filepath = 'C:\Users\administrator.YOURDOMAIN' foreach ($sqlserver in $sqlservers) { write-host $sqlserver write-host "====================" try { cd sqlserver:\sql\$sqlserver -ErrorAction stop -WarningAction SilentlyContinue ls logins -force -WarningAction SilentlyContinue | select-object name,ispasswordexpired, MustChangePassword, isdisabled, passwordexpirationenabled | format-table $logins = ls logins -force| select-object name,ispasswordexpired, MustChangePassword, isdisabled, passwordexpirationenabled # | format-table $logins | ConvertTo-Json | out-file -FilePath "$Filepath\$($sqlserver -replace '\\','_').json" $logins | ConvertTo-Csv | out-file -FilePath "$Filepath\$($sqlserver -replace '\\','_').csv" } catch { $ErrorMessage = $_.Exception.Message "Error:Could not retrieve logins: $ErrorMessage." | ConvertTo-Json | out-file -FilePath "$Filepath\$($sqlserver -replace '\\','_').json" "Error:Could not retrieve logins: $ErrorMessage." | out-file -FilePath "$Filepath\$($sqlserver -replace '\\','_').txt" } } |
Notice that this is only catching errors if the CD CmdLet to switch instances fails. If any of the other CmdLets fails, the script will continue without being detected.
You now have a quick script that will give your mythical auditor the data they want on logins, broken down by instance. If there is an instance that isn’t responding, you’ll know about that as well. That means you can get out of the office without having to work overtime.
This sort of script could also be made a part of a scheduled task that could email you the results on a monthly (or more often) basis.
Updating Properties
But imagine that the auditor wants you to rename and then disable the sa account. This is a situation that came up with one of my clients. Again, you could go into each server manually, but this could take forever. Instead, take what you have learned and automate it using PowerShell.
Please note: The scrips above merely looked at your current server(s). The scripts below will make modifications to your server(s) and should only be run in a test environment until you’re comfortable running them.
Your first inclination may be to look for a cmdlet that can change login properties. To see what cmdlets are available within the sqlps module, you can invoke:
|
1 |
get-command -module sqlps |
Unfortunately, nothing here looks all that useful. You could use Invoke-SqlCMD, but that ignores the object focus of this article. But there is a better way. Instead of looking for types of logins as you did above, you are going to look for a specific login, in this case, the sa login.
Since you may have ended up on the wrong server from the loops above, make sure to get back to the server you want to work on before saving the logins.
|
1 2 3 |
$sqlserver = 'localhost\default' cd sqlserver:\sql\$sqlserver $login = ls logins -force | where {$_.name -eq 'sa'} |
Now you have an object, $login that contains the particulars of the sa login. If you recall from when you ran $logins | gm | ogv, there were a number of methods that were displayed. A quick search of $login | gm | ogv is quite useful. Once the GUI is displayed, enter disable as the filter.

You can make use of that and the closely related property IsDisabled and run the following lines:
|
1 2 3 |
$login.IsDisabled $login.disable() $login.IsDisabled |
If the account was originally enabled, you’d see that the sa login has changed from being enabled to disabled. If you want to enable it again, you would simply run
|
1 |
$login.Enable() |
But remember, your overanxious auditor also wants you to rename the login. Again, using the method associated with the login, you can do that simply as:
|
1 2 |
$login.Rename('foo_sa') $login |
And you’ll see your results show that the login is now named foo_sa. You can wrap the scripts to disable and rename your sa account into the code above to run it against multiple servers.
The primary focus of this article is using sqlps to access logins, but, as you will recall from one of the first scripts, ls ., you have access to almost any part of your SQL Server that you want. For example, you could get a list of all your databases with some essential information.
When I’m working in a new environment, I like to know what the recovery model of the databases are and what collations they are, and possibly more information.
Again, a simple ls unlocks this information:
|
1 2 |
$databases = ls .\databases $databases | Select-Object name, recoverymodel, collation, owner | format-table |
To see all the various properties you can access, execute:
|
1 |
$databases | gm | ogv |
You can get an amazing amount of information from running ls against your databases. For example, you can see all the stored procedures in a database, or synonyms and more. In addition to properties, you also have access to the various methods associated with the object.
If you run the following code, you will get different results for each resulting object.
|
1 2 3 4 5 |
cd .\databases $databases = ls . -Force #since we want the system databases also $singledb = ls master $databases | gm | ogv $singledb| gm | ogv |
The first is an object containing multiple databases; the second is an object that contains the sub-objects of master (think of them like subdirectories of a directory). It’s not actually a single database object. For that, you need to do what you did with logins above and filter $databases for a specific database.
|
1 2 |
$onedatabase = $databases |where { $_.name -eq 'master'} $onedatabase | gm | ogv |
If you want to see the different types of each object ($databases, $singledb, $onedatabase) execute the following, each separately. Otherwise it appears that PowerShell will show the results in an order of its choosing.
|
1 2 3 |
$databases.GetType() $singledb.GetType() $onedatabase.GetType() |
Now you can perform actual operations on the database. For example, if you had a database that was set to autoclose and you wanted to make sure that none of the databases were set that way, you could write a quick script to go through your server and disable autoclose on all your databases
For the following script, make sure you have run the cd .\databases command. You will also need to make sure that the AutoClose setting is set on a database before connecting. The prompt should look similar to PS SQL SERVER:\SQL\localhost\default\databases. If not, change directories before running the code.
|
1 2 3 4 5 6 7 8 |
$databases = ls . $autoclosed = $databases | where {$_.autoclose -eq 1} foreach ($db in $autoclosed) { $db.name $db.autoclose = 0 $db.alter() } |
You could wrap the above script in one of the scripts that loops through your servers, and you’d be able to execute this across all your servers if you wanted to. This means in a half-dozen or so lines; you can make updates across 1, 2, or 1000 servers in your organization with minimal effort. Of course, to quote Spiderman’s Uncle Ben, with great power comes great responsibility! So be careful of your newfound power.
Conclusion
Hopefully, this post has helped you to understand the power of treating SQL Server in an object-oriented fashion, and you can begin to use its features to manage across all the servers in your organization.
This document contains proprietary information and is protected by copyright law.
Copyright © 2026 Red Gate Software Limited. All rights reserved
Load comments