
The series so far:
- Automating Day-to-Day PowerShell Admin Tasks – Part 1: Jobs and Workflow
- PowerShell Day-to-Day Admin Tasks – Part 2: WMI, CIM and PSWA
- PowerShell Day-to-Day Admin Tasks – Part 3: Monitoring Performance
- PowerShell Day-to-Day Admin Tasks – Part 4: Securing Scripts
- PowerShell Day-to-Day Admin Tasks – Part 5: Events and Monitoring
- PowerShell Day-to-Day Admin Tasks - Part 6: Real Time IT Dashboard
This article is the second part of our series dedicated to daily system administrative tasks. In the first part, we saw how to use Jobs and Workflows. You now know that it is possible to launch them as a background, to plan them and also to execute several commands simultaneously. Here we are going to learn to interact with our systems (servers and workstations)
We shall see several access methods via PowerShell:
- WMI – Windows Management Instrumentation. It is the Microsoft implementation of Web-Based Enterprise Management (WBEM) allowing access to data. WMI uses the Common Information Model (CIM) to describe objects such as systems, applications, network equipments,…
- CIM – Common Information Model. It is a set of standards that describes how information is structured and represented at the heart of the system. It was created by the DMTF (Distributed Management Task Force), a working group to which Microsoft belongs.
- PSWA – PowerShell Web Access. This new function allows secure access to a Windows PowerShell console from a browser so as to interact with any system, even if it is outside the domain.
These technologies are too broad in scope to describe in full here, but you will find numerous sources of documentation on the internet to help you understand them. The objective of this guide is to give you a preview of what is possible to do, but most of all to explain how they will be useful in your daily routine, whatever the type of Windows system administration you are doing.
Windows Management Instrumentation
The reading of information
Let’s start with the oldest of these technologies – WMI. This is best envisaged as a database of all the information contained by the device, such as the discs, the services, or the BIOS. SQL Server, for example, is a WMI device. You will be able to gather a group of data and therefore recover the properties of a multitude of objects. You must understand that the operating system knows everything about your device (remaining disc space, IP address, means of consumer service most used …). So the first command that you will use to question your device is Get-WmiObject followed by WMI class.
|
1 |
PS > Get-WmiObject Win32_Processor | Format-List * |
The WMI classes are organized in the Namespace. Given that the auto-completion does not function with this command, I can recover the complete WMI classes available on my system in this manner:
|
1 |
PS> Get-WmiObject -List | ? {$_.name -Match "Win32"} |
Note: For the version number three of PowerShell, I recommend the CIM cmdlets for ease of use. (See the following section)
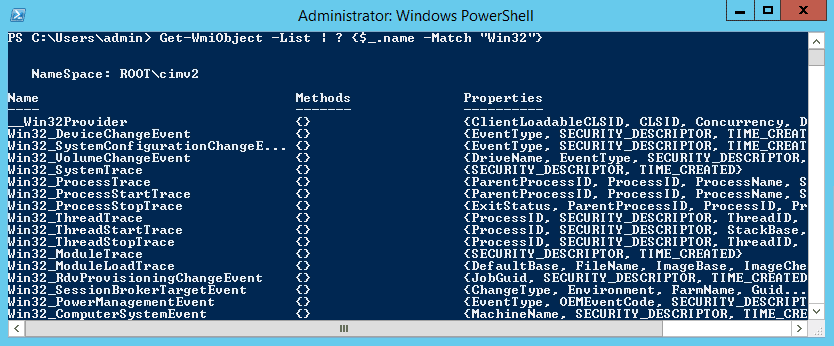
Figure1 – List of WMI classes
A lot of information is returned. On the left, we have the names of the classes, then the methods associated with each class of the namespace (by default: ROOT\cimv2).
|
1 |
PS> gwmi -Namespace "root" -class "__Namespace" | Select Name |
I can therefore change namespace to obtain information about the IIS role of my exchange server:
PS > Get-WmiObject -list -Namespace “root/MicrosoftIISv2”
Note: You must have IIS Server installed to run the above query in the Namespace “root/MicrosoftIISv2”. Depending on the device that you are questioning, certain specific roles may be installed or not.
By this means, I can now, for example, obtain the path of each IIS folder:
|
1 |
PS> Get-WMIObject -class "IIsSetting" -namespace "root\microsoftiisv2" | select Path, Name |
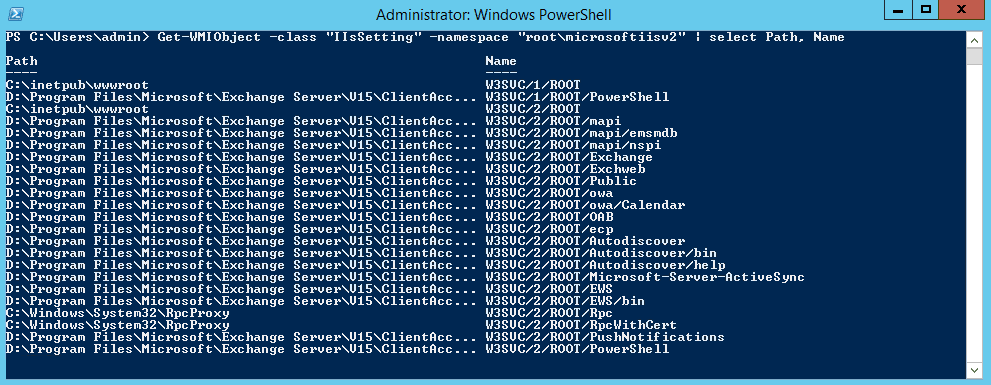
Figure2 – List of exchange folders
Data alteration
That’s great because I can obtain lots of valuable information, but are they only in “read-only” mode? No way! It is definitely possible to alter some information. Let’s imagine the following example: you have just migrated your DNS servers that have a new IP address. What happens? You are obliged to modify the network configuration of all your servers.
To do this, I shall search for the method to use in the class Win32_NetworkAdapterConfiguration:
|
1 |
PS> Get-WmiObject -Class "Win32_NetworkAdapterConfiguration" | Get-Member -MemberType method |
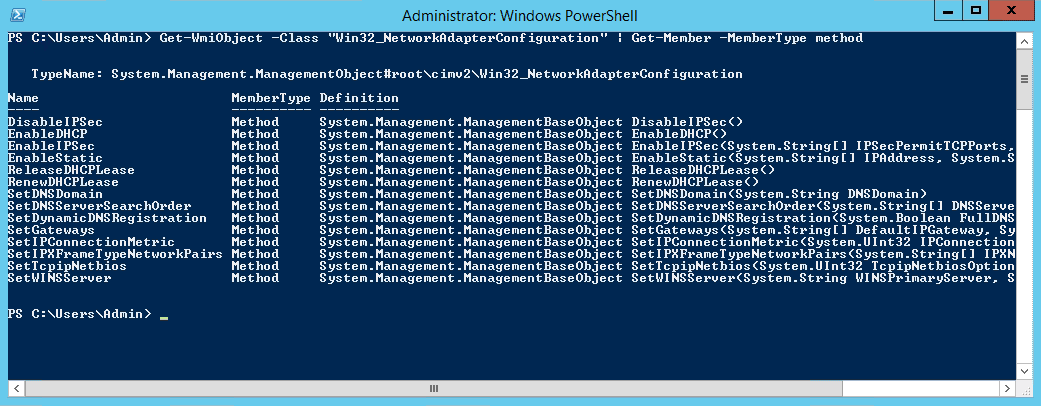
Figure3 – List of methods (class Win32_NetworkAdapterConfiguration)
We are going to make use of the SetDNSServerSearchOrder method. My variable $wmi contains the network card activated on my server.
|
1 2 |
PS> $wmi = Get-WmiObject win32_networkadapterconfiguration -filter "ipenabled = 'true'" PS> $wmi.SetDNSServerSearchOrder("172.26.10.10") |
This command may be executed on remote devices. We shall see this in the following section.
Scriptomatic
I can read and modify the WMI information as I wish, but I have to admit that it is still difficult to find it. Fortunately, there is a great tool created by Ed Wilson that is called Scriptomatic Powershell Version. You can download it here.

Figure4 – A glimpse of the Scriptomatic Powershell Version
Once the tool is launched, all you need to do is to choose the namespace and then select a WMI class. Then, magic! The PowerShell command sets itself up automatically with all the necessary arguments in use. The “Run” button lets you execute the task directly. You will appreciate that this tool will simplify your daily admin work and save you a lot of search time.
Note: remember to activate the ‘display class properties‘ option:
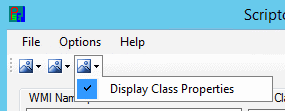
Figure5 – Display of the properties
Common Information Model
Since the third version of PowerShell, a new module has been introduced in Windows Server 2012 and Windows 8 that is called CIMCmdlets. It has been added so as to replace the legacy WMI cmdlets. If you regularly use WMI, then you will not be lost when moving to the new cmdlets as there are lots of similarities.
The first command to use is Get-CimInstance:
|
1 |
PS> Get-CimInstance -Class Win32_Process |
You will notice that it is possible to make requests on the WMI classes. To give a simple summary:
- Get-WmiObject is replaced by Get-CimInstance
- Get-WmiObject -list is replaced by Get-CimClass
Let’s see in detail the new functionality presented by CIM
The auto-completion
One of the major shortcomings of WMI is the difficulty of searching for information. With CIM, you may use the “TAB” button so as to finalise your command and to obtain the list of available namespace or classes. For example:
|
1 2 3 |
PS > Get-CimInstance -Namespace [press <TAB>] PS > Get-CimClass -ClassName *disk* [press <TAB>] |
Note: the “auto-completion” does not work with CIM session.
WS-Management
WS-Management is a protocol of communication for the management of servers, equipment, and applications. CIM communicates, by default, through this protocol but it is possible to “force” another protocol in order to remotely access a device. We shall see this now.
Remote WMI / CIM
You probably do not wish to connect each device in order to execute your PowerShell commands. In which case, there is an interesting key word –computername. The latter may be used with WMI and CIM so as to interrogate a remote device. Let’s imagine that I wish to recover the Hot Fix installed on a server:
|
1 |
PS> Get-WmiObject -ClassName "Win32_QuickFixEngineering" -ComputerName ADM11 | sort Description |
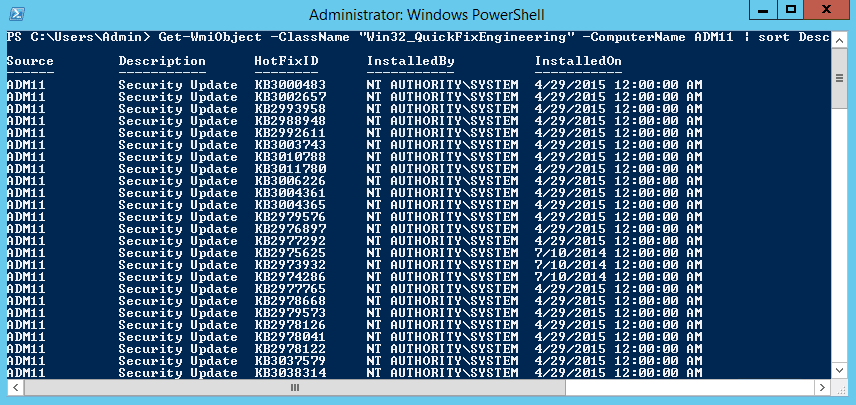
Figure6 – List of Hot Fix
Note: The DCOM protocol is used by WMI. DCOM, the Distributed Component Object Model, allows communication between components, in contrast to CIM which uses WS-Man.
If you execute the command using the key word –computername then a temporary session is created, and subsequently destroyed after the results have been sent:
|
1 |
PS> New-CimInstance -ClassName CIM_Service -Namespace root\cimv2 -ComputerName ADM11 |
If you perform several remote actions, you’d want to re-use the sessions so as to get the best performance on your device. You can do this by creating a permanent CIM session. The mechanism is similar to the PowerShell sessions:
PS > $session = New-CimSession -ComputerName ADM11
PS > $instance2 = Get-CimInstance -ClassName CIM_Service -Namespace root\cimv2 -CimSession $session
I can list the active sessions on the device:
|
1 |
PS> Get-CimSession |
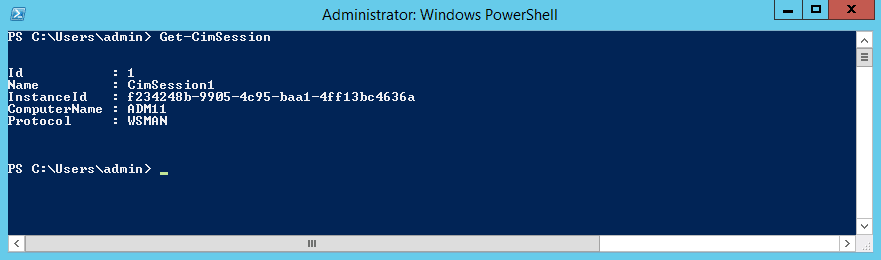
Figure7 – List of CIM sessions
It is important to understand which protocol to use, because this will affect the firewall rules. Here is a summary below:
And below are a few examples:
1/ WMI with –computername:
|
1 |
PS> Get-WmiObject -Class Win32_logicalDisk -ComputerName ADM11 |
2/ CIM without –computername:
|
1 |
PS> Get-CimInstance -ClassName Win32_logicalDisk |
3/ CIM with –computername:
|
1 |
PS > Get-CimInstance -ClassName Win32_logicalDisk -ComputerName ADM11 |
Let’s now imagine that I wish to interact with a device that has only the PowerShell version 2 installed, I have to force PowerShell to use the DCOM protocol:
|
1 2 3 4 5 |
PS> $Option = New-CimSessionOption -Protocol DCOM PS> $Session = New-CimSession -ComputerName ADM11 -SessionOption $Option -Name CimSessionWithDCOM PS> Get-CimInstance -ClassName CIM_OperatingSystem -CimSession $Session | Select-Object LocalDateTime, CSName, OSArchitecture, Status |

Figure8 – Utilisation of DCOM protocol
We notice that our CIM session has been created with the DCOM protocol, in contrast with the previous session that used WSMAN by default.
Note: For better visibility, the parameter –Name allows you to name your session.
Maximising the system’s performance
We are now going to focus on the concept of the ‘filter’ in PowerShell and WMI commands. This point seems to me to be important if you wish to optimize performance and really understand what happens in the background. Let’s take the following example:
|
1 |
PS> Get-WmiObject -Class Win32_Service | where {$_.StartMode -eq "Auto"} |
The previous command executes a filter on the type of service with the help of the condition WHERE then displays the result. At first glance, there is no difference with the following command and the argument -filter:
|
1 |
PS > Get-WmiObject -Class Win32_Service -filter "StartMode = 'Auto'" |
As a system administrator, the main concern will be the availability of the devices. Then, let’s analyze what happens with the performances during the execution of these commands:
|
1 2 3 |
PS> measure-command {Get-WmiObject -Class Win32_Service | where {$_.StartMode -eq "Auto"}} PS> measure-command {Get-WmiObject -Class Win32_Service -filter "StartMode = 'Auto'"} |
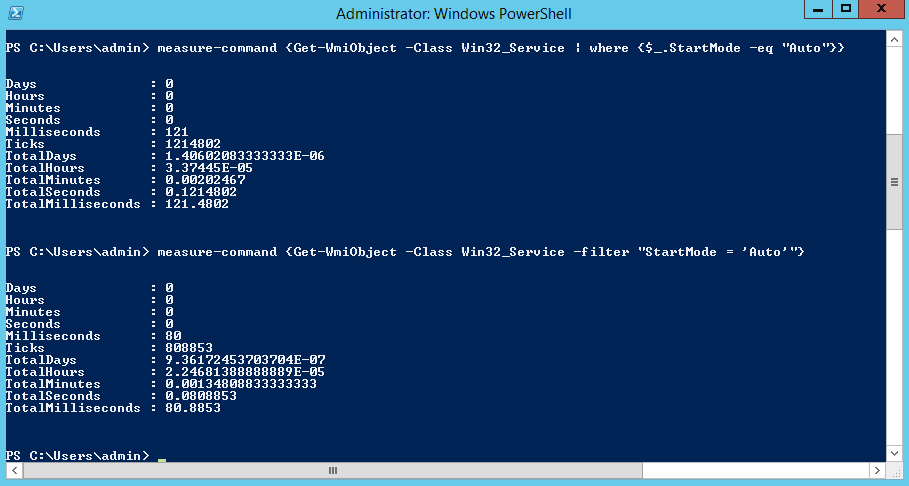
Figure9 – Performance analysis
When the parameter -filter is used, there is less demand place on your WMI repository and it therefore sends back the results more quickly because -Filter uses the WMI Query Language (WQL), which is a subset of SQL.With the “where” condition, results are filtered when retrieving the objects. In our example, the execution goes from 121 to 80 milliseconds. So, when you question a remote device with –filter parameter, your data passes through network in a shorter time-period. The network administrators will be happy to hear that.
PowerShell Web Access
PowerShell Web Access allows a PowerShell console to be reached on a remote server from any browser that supports JavaScript. To do this, one just needs to install an IIS application on a server that will be used as a gateway to access PowerShell on any system on which WinRM is activated.
Requirements are:
- Active Directory (AD DS)
- Certificate Authority (AD CS) will give you a certificate for the hosting server PowerShell Web Access.
To summarize, I have described in the following diagram an example of the implementation of a structure with PSWA. It is possible not to open your Web Access Gateway on the outside:
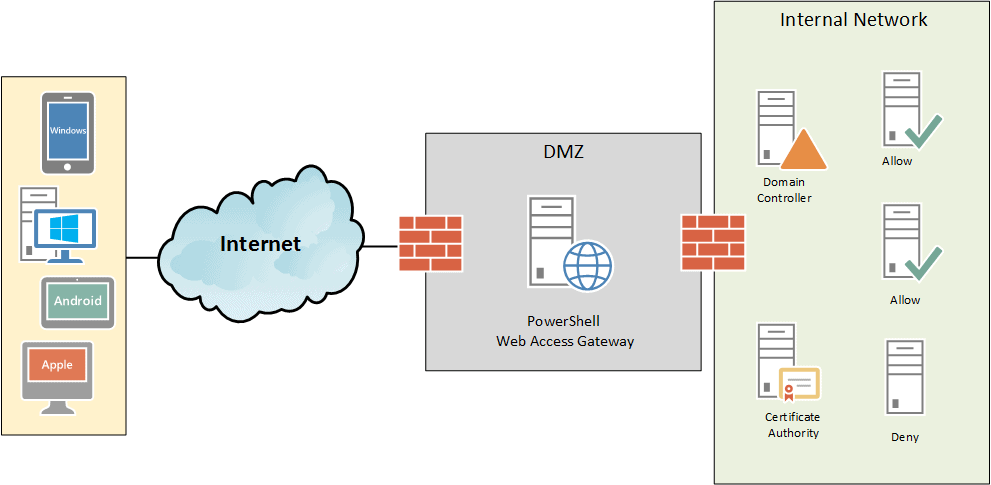
Figure10 – Implementation diagram ofPSWA
Installation
Firstly, you need to install thePSWA feature on your gateway server:
|
1 |
PS> Install-WindowsFeature -Name WindowsPowerShellWebAccess -IncludeAllManagementTools |
Or in GUI mode:
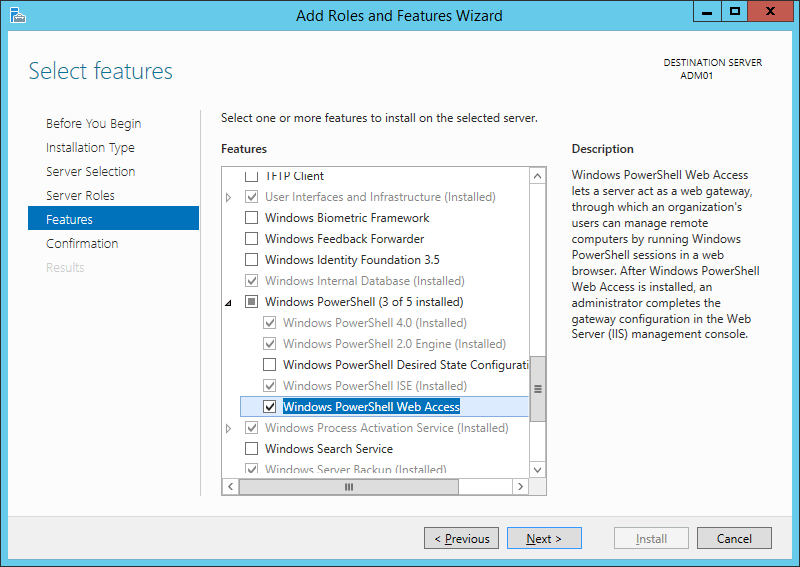
Figure11 – Addition of thePSWA feature
Then you must install the web application in IIS:
|
1 |
PS > Install-PswaWebApplication |
Note: I strongly advise against the option –UseTestCertificate. This automatically places a test certificate on the site. I highly recommend the use of a certificate signed by the certificate authority. Then you will need to add it in the “binding” section for the HTTPS protocol of your IIS site.
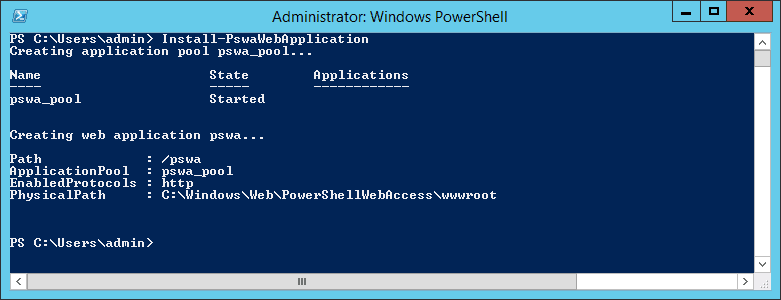
Figure12 – Installation of the IIS application
You may access the web interface at this address: https://adm01.demo.local/pswa
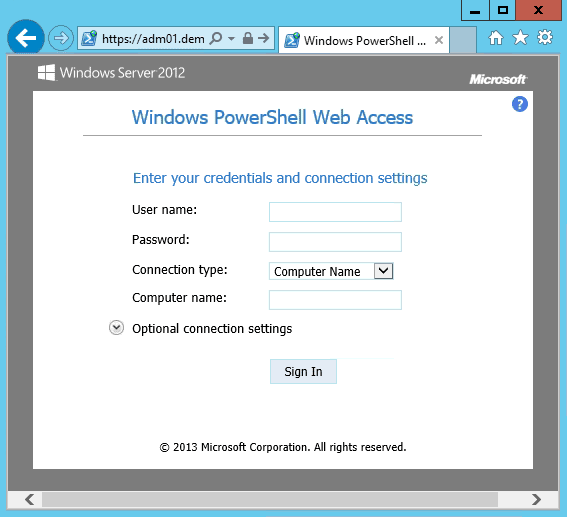
Figure13 – Access to the web interface ofPSWA
You may indicate the communication protocol of your choice (DCOM or WSMAN) in the << Optional connection settings >>
The last stage consists of establishing authorisation rules. One must thereby define just one rule per server and per user. My advice is to use Active Directory groups to reduce the number of rules.
The following example gives access to the server ADM11.demo.local for the group << PSWAdmins >>:
|
1 |
PS> Add-PswaAuthorizationRule -ComputerName ADM11.demo.local -UserGroupName "demo.local\PSWAdmins" -ConfigurationName Microsoft.PowerShell |
The last parameter (–ConfigurationName) indicates the Endpoint PowerShell on the targeted system. By default, the Endpoint is “Microsoft.PowerShell”, but it is possible to create other specific Endpoint to limit modules or commands accessible by one user.
Below is the PowerShell console that you will get. By sending a WMI command, I notice that I am connected to the PowerShell console of the server ADM11 from my gateway server ADM01.
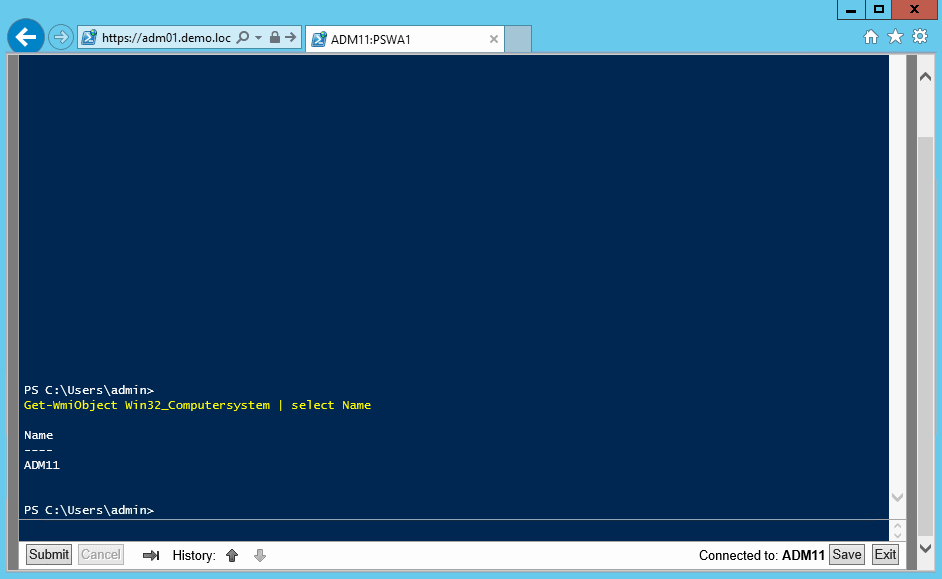
Figure14 – Glimpse of the PowerShell console in the web browser
You may use this console from your smartphone or any other device that has a compatible browser. I shall let you imagine all the possibilities of this function for automating routine admin work in your daily life.
Conclusion
We are coming to the end of this article which I hope will help you to automate some of the routine in your daily admin tasks. I’ve only been able to give an overview of some complex technologies and so there are numerous things to explore. To make sure you get a good start, I advise you to duplicate the examples of the article and adapt them to your daily routine. Then you will be able to improve and create them with some of the more complex functionality that you’ll find in the references I’ve given.
In my experience, it is much quicker to use Get-CimInstance rather than Get-WmiObject to display results. To know when to use WMI or CIM, my simple rule is:
- If the version of Powershell is v1 or v2 then use WMI.
- If the version of Powershell is v3 or above then use CIM.
Lastly, you will quickly see certain classes are used more frequently than others, notably:
- Win32_BIOS
- Win32_ComputerSystem
- Win32_OperatingSystem
- Win32_Service
To go further and to link with what I demonstrated in the first part of this series, you may automate your WMI/CIM requests inside jobs and workflows. Do not hesitate to use Powershell resources to simplify your working life to the maximum.
References
- Powershell 3 Advanced Administration Handbook – Sherif Talaat & Haijun Fu
- WMI Query Language via PowerShell – Ravikanth Chaganti
Load comments