
The series so far:
- Automating Day-to-Day PowerShell Admin Tasks – Part 1: Jobs and Workflow
- PowerShell Day-to-Day Admin Tasks – Part 2: WMI, CIM and PSWA
- PowerShell Day-to-Day Admin Tasks – Part 3: Monitoring Performance
- PowerShell Day-to-Day Admin Tasks – Part 4: Securing Scripts
- PowerShell Day-to-Day Admin Tasks – Part 5: Events and Monitoring
- PowerShell Day-to-Day Admin Tasks - Part 6: Real Time IT Dashboard
Overview
Scripting shells can be one of the most effective attack points of an operating system. They offer an advantage to an attacker by providing a layer of abstraction that anti-virus applications have no idea how to interpret. PowerShell is a scripting shell, but it uses ‘defense in depth’ meaning that it takes a number of approaches to preventing malicious use of PowerShell or your scripts. One of the most effective measures is to use Digital Signatures to determine whether a script is to be ‘trusted’.
PowerShell, by default, has an execution policy that prevents scripts being run at all and only allows interactive use of PowerShell. Many admins switch to an unrestricted policy, which is leaves the possibility of malicious attack wide-open, thereby risking harm for them and the firm for which they work. In this article, I will argue that using signed scripts a via digital Signatures (allsigned) is the best execution policy.
PowerShell is unique amongst shells in that it executes scripts on start-up. There are user or system scripts that are run unnoticed when you start up PowerShell in order to provide the PowerShell ‘environment’, and to maintain profiles for users. An attacker needs only add code to a profile is then executed using the ID of the user, along with all its permissions. It could then execute an external binary, or more covertly, load shellcode or a malicious DLL. When the user executes the script, he inadvertently executes the added code. The attacker has avoided having to load an external malicious script and the modification could easily remain unnoticed. Obviously, the PowerShell profile scripts are stored within a windows users’ directory so they may not seem to be easy for an intruder to alter, but any malware is likely to run under the users ID anyway so this, by itself, offers little protection. Digital signatures provide a measure of security wherever the PowerShell scripts are stored, and allow admins to safely share common libraries of scripts.
In case you are unfamiliar with profiles, I’ll show how you can obtain PowerShell’s environment when personalising your profile. Then I shall build on this to show how PowerShell handles this security aspect. Most important, I’d like to demonstrate that ease-of-use does not mean lack of security.
The customisation of your work environment
The PowerShell is capable of saving time with your tasks and assisting with your work. A profile can, among other things, help with the administrator’s task. Anyone, for example, who does administrative tasks will find that many actions are performed several times per day, or each time they connect to their machine. Let’s take a simple example: you launch a remote connection on a server to update a component. How many times will you ask yourself the following question: ‘Am I really connected to server “SRV01”?’ To reassure ourselves, we open a PowerShell console and type ‘$env:COMPUTERNAME’.It is certainly wise to double-check but, in doing so, you have just lost a few seconds. You’d probably have other information you’d want to check, such as the User_AD you are logged-in as, and the up-time of the machine you’re logged into. There are, of course, tools available to provide this sort of information such as BGInfo (download: https://technet.microsoft.com/en-us/sysinternals/bginfo.aspx). Sadly it is not always possible to execute this type of tool on critical servers. It is here that PowerShell can help you if we create a profile.
To determine if you already possess a PowerShell profile, type in the following on your machine:
|
1 |
PS> Test-path $profile |
If the result is TRUE, then a profile has already been created. Otherwise we would need to type in the following to create the path.
|
1 |
PS> New-item -type file -force $profile |
A file ‘Microsoft.PowerShell_profile.ps1’ will have been created in the following list:
C:\Users\<username>\Documents\WindowsPowerShell\
This file is called a ‘PowerShell profile’, and will automatically execute its contents each time a console is opened. This file may contain personalised aliases, PSDrives, snap-ins or any other command that you judge to be useful. Database Administrators, for example, use SQLPS so much they’d want to include this in their profile, and Exchange/Office Administrators might want the Exchange Management Shell snap-in or Azure Active Directory Module.
There are four different profiles:
|
1 |
PS> $PROFILE | Get-Member -MemberType noteproperty | format-list |
Figure 1 – List $Profile properties
Note: The term ‘User’ refers to the actual user connected to the machine.
The term ‘Host’ refers to the host application that interfaces with the PowerShell engine. (A few examples of ‘Host’: the PowerShell console, PowerShell ISE, PowerGUI).
This means that it is possible to have four different profiles for a single ‘Host’:
- CurrentUserCurrentHost This applies only to the connected user and for a supported ‘host’.
- CurrentUserAllHosts This applies only to the connected user and all the ‘hosts’ of the machine.
- AllUsersCurrentHosts This applies to all users and for a supported ‘host’.
- AllUsersAllHosts This applies to all users and for all supported ‘hosts’ of the machine.
For each profile, there is an associated file in a particular location. For ease of maintenance, I prefer to use just one file to manage several profiles: I just add conditions to a single file so as to prevent a ‘host’ from executing a non-supported command (We’ll see this in the next section). Certain people will prefer to separate the profiles into separate files so as to avoid having a PS1 file that becomes far too complex to maintain.
Let’s see in more detail what this file looks like. I take as an example the file that I use every day while I work so as to obtain useful overall information rapidly:
|
1 2 3 4 5 6 7 8 9 10 11 12 13 14 15 16 17 18 19 20 21 22 23 24 25 26 27 28 29 30 31 32 33 34 35 36 37 38 39 40 41 42 43 44 45 46 47 48 49 50 51 52 53 54 55 56 57 58 59 60 61 62 63 64 65 66 67 68 69 70 71 72 73 74 75 76 |
<# .SYNOPSIS Microsoft.PowerShell_profile.ps1 - My Custom PowerShell profile .DESCRIPTION Customizes the PowerShell console .NOTES Author : Nicolas PRIGENT #> #PART 1 if ($host.name -eq 'ConsoleHost') { $Shell=$Host.UI.RawUI $size=$Shell.BufferSize $size.width=120 $size.height=3000 $Shell.BufferSize=$size $size=$Shell.WindowSize $size.width=120 $size.height=30 $Shell.WindowSize=$size $Shell.BackgroundColor="Black" $Shell.ForegroundColor="White" $Shell.CursorSize=10 $Shell.WindowTitle="Console PowerShell - By Nicolas" } #PART 2 function Get-Uptime { $os = Get-WmiObject win32_operatingsystem $uptime = (Get-Date) - ($os.ConvertToDateTime($os.lastbootuptime)) $Display = "" + $Uptime.Days + "days / " + $Uptime.Hours + "hours / " + $Uptime.Minutes + "minutes" Write-Output $Display } function Get-Time {return $(Get-Date | ForEach {$_.ToLongTimeString()})} function prompt { Write-Host "[" -noNewLine Write-Host $(Get-Time) -ForegroundColor DarkYellow -noNewLine Write-Host "] " -noNewLine Write-Host $($(Get-Location).Path.replace($home,"~")) -ForegroundColor DarkGreen -noNewLine Write-Host $(if ($nestedpromptlevel -ge 1) { '>>' }) -noNewLine return "> " } function rdp ($IPAddr) { Start-Process -FilePath mstsc -ArgumentList "/admin /w:1024 /h:768 /v:$IPAddr" } #PART 3 Set-Location C:\ $MaximumHistoryCount=1024 $IPAddress=@(Get-WmiObject Win32_NetworkAdapterConfiguration | Where-Object {$_.DefaultIpGateway})[0].IPAddress[0] $IPGateway=@(Get-WmiObject Win32_NetworkAdapterConfiguration | Where-Object {$_.DefaultIpGateway})[0].DefaultIPGateway[0] $PSExecPolicy=Get-ExecutionPolicy $PSVersion=$PSVersionTable.PSVersion.Major #PART 4 Clear-Host Write-Host " -------------------------------------------------------------------------------------------------------" -ForegroundColor Green Write-Host " ¦`tComputerName:`t`t" -nonewline -ForegroundColor Green;Write-Host $($env:COMPUTERNAME)"`t`t`t`t" -nonewline -ForegroundColor Cyan;Write-Host "UserName:`t" -nonewline -ForegroundColor Green;Write-Host $env:UserDomain\$env:UserName"`t`t" -nonewline -ForegroundColor Cyan;Write-Host " ¦" -ForegroundColor Green Write-Host " ¦`tLogon Server:`t`t" -nonewline -ForegroundColor Green;Write-Host $($env:LOGONSERVER)"`t`t`t`t" -nonewline -ForegroundColor Cyan;Write-Host "IP Address:`t" -nonewline -ForegroundColor Green;Write-Host $IPAddress"`t`t" -nonewline -ForegroundColor Cyan;Write-Host " ¦" -ForegroundColor Green Write-Host " ¦`tPS Execution Policy:`t" -nonewline -ForegroundColor Green;Write-Host $($PSExecPolicy)"`t`t`t" -nonewline -ForegroundColor Cyan;Write-Host "PS Version:`t" -nonewline -ForegroundColor Green;Write-Host $PSVersion"`t`t`t" -nonewline -ForegroundColor Cyan;Write-Host " ¦" -ForegroundColor Green Write-Host " ¦`tUptime:`t`t`t" -nonewline -ForegroundColor Green;Write-Host $(Get-Uptime)"`t`t`t`t`t`t" -nonewline -ForegroundColor Cyan;Write-Host " ¦" -ForegroundColor Green Write-Host " -------------------------------------------------------------------------------------------------------`n" -ForegroundColor Green Write-Host "Customs functions : Get-Uptime / Get-Time / RDP <IPAddr>`n" -ForegroundColor Yellow; |
The file is segmented into four parts:
- #PART1 I add a condition on the ‘Host’ that can execute those commands because they can only be interpreted by the PowerShell console.
- #PART2 This section contains the overall personalised PowerShell functions so as to facilitate administration tasks.
- #PART3 This bloc defines the PowerShell variables that will be used in the following section of this file.
- #PART4 Lastly, this section allows to visually see the profile. Let your imagination run wild.
Figure 2 – Custom profile
It is also possible to load modules or snap-ins:
|
1 |
add-PSSnapIn Microsoft.Exchange, Microsoft.Windows.AD |
Note: A profile that loads several snap-ins may result in a slower start-up of your PowerShell console.
At this point, things get interesting from a security angle. Although PowerShell profiles can help with administration, it is easy for someone to alter your profile to execute malicious code under your administrative user account. After all, it is only a PS1 file. Even if it is, by default, in a user’s directory and therefore protected from access by other users, it could be altered to execute malicious commands silently with your windows identity, unbeknown to you. In order to avoid this, there are two things you can do. Firstly use the NTFS permissions to limit modify permission to these files to the administrator account. Secondly, sign it digitally and configure PowerShell so that it uses a more restrictive execution strategy. I shall explain the second option in detail.
The securing of your PowerShell scripts at the heart of your systems
This section focuses mainly around a command Set-ExecutionPolicy. The execution policy indicates to PowerShell what can and what cannot be executed on your system. Thus it is possible to block the execution of a script. I see too often Execution Policy deactivated entirely to make it simpler to maintain and less restrictive. In a test or development environment, it may indeed be important not to be too restrictive. However, in a production environment, you have to secure the execution of PowerShell scripts as necessary. The command Set-ExecutionPolicy accepts six values:
- Restricted/Default: This is the default policy. You may not launch any script. The only possibility is to use PowerShell in ‘interactive mode’.
- Allsigned: All the scripts that should be executed on the machine must be signed by a ‘Trusted Publisher’.
- RemoteSigned: This concerns only the scripts that have been downloaded from the internet. These scripts must be signed by a ‘Trusted Publisher’.
- Unrestricted: No constraints on the execution of scripts. All the scripts will be executed if you accept a warning message. I do not recommend it in a production environment.
- Bypass: No blockage, no warning message. Everything is executed without control.
- Undefined: Removes the currently assigned execution policy from the current scope. This parameter will not remove an execution policy that is set in a Group Policy scope.
The latest versions of PowerShell bring an extra granularity to the security level so as to assist the users to put a strategic security in place. For this, it is possible to apply these values to a ‘scope’:
- Process Affect only PowerShell process.
- CurrentUser Affect only the current user.
- LocalMachine Affect all users of the computer.
- MachinePolicy Must be set through Group Policy.
- UserPolicy Must be set through Group Policy.
|
1 |
PS > Get-ExecutionPolicy -List |
Figure 3 – Get-ExecutionPolicy -List
Note: The value is stocked in the registry base:
HKLM\SOFTWARE\Microsoft\PowerShell\1\ShellIds\Microsoft.PowerShell except for ‘Process’ that is temporarily stocked in ($env:PSExecutionPolicyPreference) then it is destroyed at the end of the session.
A few examples of use:
This affects the policy ‘unrestricted‘ only for the current user.
|
1 |
PS> Set-ExecutionPolicy -Scope:CurrentUser -ExecutionPolicy:Unrestricted |
This affects the policy ‘RemoteSigned‘ of the machine (and therefore to all users).
|
1 |
PS> Set-ExecutionPolicy -Scope:LocalMachine -ExecutionPolicy:RemoteSigned |
Let’s take a simple concrete example. A PowerShell profile is nothing more than a PowerShell script, so you must authorise the script’s execution in your environment. For this, I recommend the policy ‘AllSigned‘ that allows you to ‘freeze’ the changes of your profile and so avoid all malicious modifications. This will allow you to control the level of trust with the author/editor of the script and to warn the user about code injections.
Self-signed certificate
As Code-signing certificated are expensive, a self-signed certificate is worth using for testing although it will be trusted only on your own PC and any PCs to which you have exported the certificate. Instructions on doing this are here. You can get help on the signing process by typing:
|
1 |
PS> Get-help about_Signing |
Active Directory-based public key infrastructure
It is relatively simple to put an AllSigned policy in place in an Active Directory environment. For this, you will need a certification authority to generate a certificate so as to sign your scripts.
Begin by creating a template of type ‘Code Signing’. To sign the code digitally, we use a normalised certificate X509.
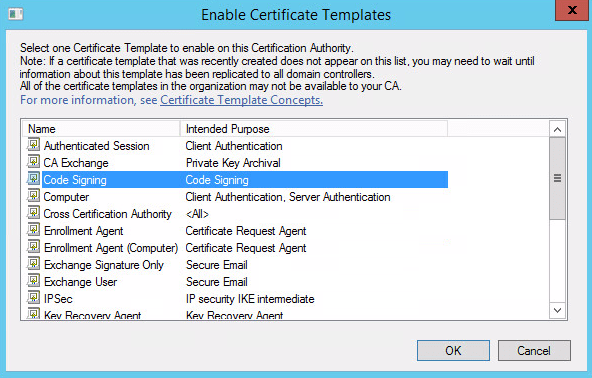
Figure 4 – Enable certificate template
Then generate a certificate request from this template and think about selecting option ‘Mark key as exportable’. You must export the private key along with your certificate for it to be valid on your target machines. When you export the private key you will need to use a strong password. This password protects access to your private key.
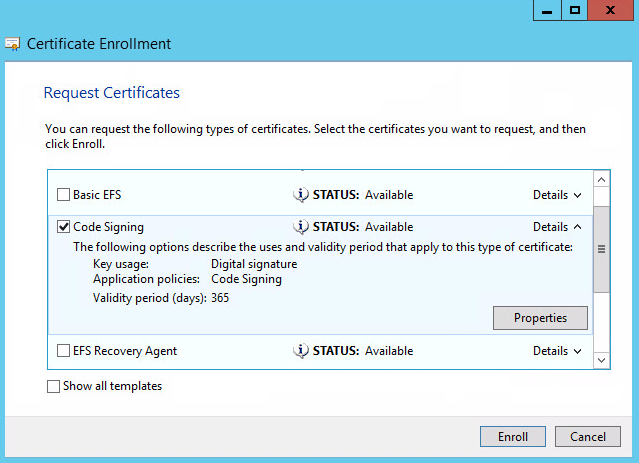
Figure 5 – Request a certificate
This certificate must then be imported into the folder ‘Trusted Publishers’ from the certificate store of each machine using your scripts. You can deploy it easily via Group Policy Object (GPO) or with a logon script or you can just copy manually. The goal is to import the certificate on every machine in the Active Directory domain that will run your signed scripts.
To do this, you will need a Group Policy Object (GPO) to define the overall parameters of your units
The following parameter must be configured: Computer Configuration | Administrative Templates | Windows Components | Windows PowerShell
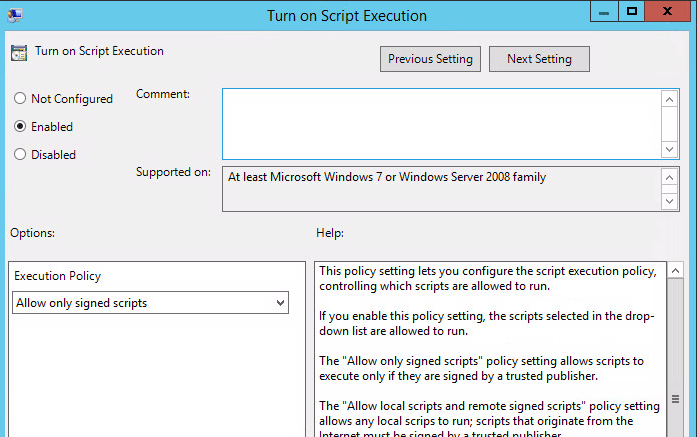
Figure 6 – Configure Group Policy Object
With all this done, all you then need to do is to sign your profile with this certificate. The command used is Set-AuthenticodeSignature.
Note: Authenticode is a digital signature format used to embed a signature into a file. This means that the signature bloc is directly visible in your script.
The certificate store is directly accessible as PSDrive. We therefore verify if a certificate is available then we add it to the variable $MyCert.Then, this certificate must be passed as an object to the command Set-AuthenticodeSignature.
|
1 2 |
PS> $MyCert =(dir Cert:\CurrentUser\My -CodeSigningCert)[0] PS> Set-AuthenticodeSignature .\Microsoft.PowerShell_profile.ps1 -Certificate $MyCert |
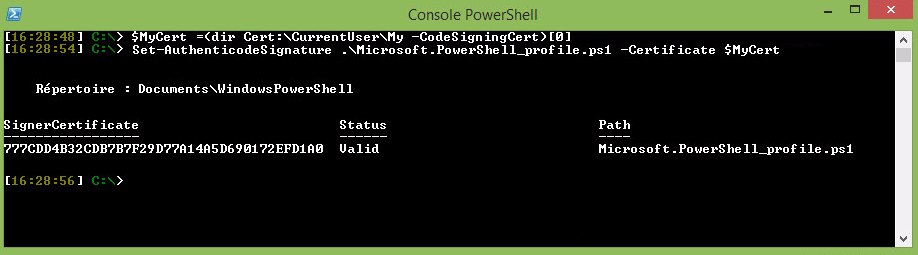
Figure 7 – Sign powershell script
Note: If the variable $MyCert is empty, then it means that your certificate is not a ‘Code Signing’ type. You have to generate a new certificate.
If you open your script, you will note that it now has a signature at the end of the script:
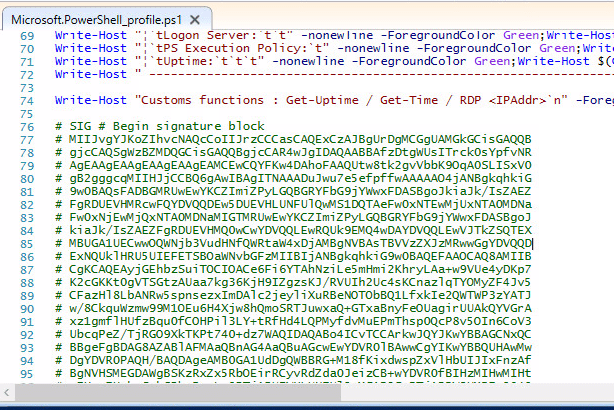
Figure 8 – Signature block
Let’s imagine that an ill-intentioned person modifies your profile. You launch your PowerShell console and you obtain this error:
|
1 |
The file .\profile.ps1 cannot be loaded. The file .\profile.ps1 is not digitally signed. The script will not execute on the system. Please see "get-help about_signing" for more details.. |
This means that after modification, the file has not been signed again. The policy ‘AllSigned’ has just blocked the execution of your profile.
But you may also get this error after updating your profile. Therefore, in order to simplify the signature of your scripts, you may add the following function to your profile:
|
1 2 3 4 |
function Sign ($filename) { $MyCert =(dir Cert:\CurrentUser\My -CodeSigningCert)[0] Set-AuthenticodeSignature $filename -Certificate $MyCert } |
Then it will be very simple to sign subsequent scripts with the following command:
|
1 |
PS> Sign .\profile.ps1 |
Note: Some PowerShell IDEs will sign your scripts automatically for you when you save the script.
Once your script is signed, you will then notice a new tab in the properties of the file named ‘Digital Signatures’ that will allow you to view the certificate.
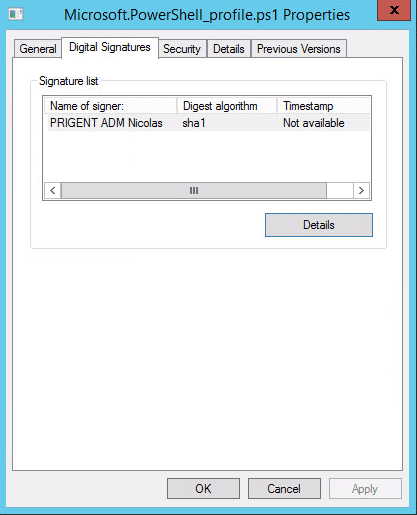
Figure 9 – Digital Signatures Tab
Here I do not use TimeStamp. You may, if you wish, use the parameter -TimeStampServer that lets you verify that the script was signed at some given time. Indeed, most of the certificates are valid for one year. When the date of expiration of the certificate arrives at its due date, the usage of this parameter does not let the code itself expire. It will be possible to carry on using it as long as it has not been modified. In case of modification, then it will have to be signed again with a valid certificate.
|
1 |
PS> Set-AuthenticodeSignature $filename -Certificate $MyCert -IncludeChain All -TimeStampServer "http://timestamp.verisign.com/scripts/timstamp.dll" |
To go further
It is possible to use the previously created certificate to sign all your Windows files, or even executables files. Indeed, how to make sure that the PowerShell executable has not been modified? By also signing powershell.exe, you will be assured that it is not an infected copy.
A folder may be signed in two manners:
With an embedded signature
This method protects a file by integrating the signature bloc directly into the script. It offers an ease of use of the files because the signature is situated in the file itself. The drawback of this method is that it does not support many file formats and does not detect if a file has been signed from a signed catalog file (the following method). The result of the command PowerShell Get-AuthenticodeSignature returns ‘Valid’ if the file is signed with an embedded signature.
Let’s take the example of the executable PowerShell.exe:
|
1 2 3 4 5 6 7 |
PS> Get-AuthenticodeSignature C:\Windows\System32\WindowsPowerShell\v1.0\powershell.exe Directory: C:\Windows\System32\WindowsPowerShell\v1.0 SignerCertificate Status Path ----------------- ------ ---- NotSigned |
It is indicated as ‘not signed’. To correct this:
|
1 2 3 |
PS> $MyCert =(dir Cert:\CurrentUser\My -CodeSigningCert)[0] PS> Set-AuthenticodeSignature -FilePath C:\Windows\System32\WindowsPowerShell\v1.0\powershell.exe -Certificate $MyCert |
The result of the command now returns ‘Valid’:
|
1 2 3 4 5 6 7 8 9 |
PS> Get-AuthenticodeSignature C:\Windows\System32\WindowsPowerShell\v1.0\powershell.exe Directory: C:\Windows\System32\WindowsPowerShell\v1.0 SignerCertificate Status Path ----------------- ------ ---- DF3B9B7E5AEA1AA0B82EA25F542A6A00963AB890 Valid powershell.exe |
With a signed catalog file
It is a list containing several ‘Hash’ and acting as a signature for several files. This is different from the previous method in that the signature is ‘detached’ from the signed file. The main advantage of this method is that it supports all types of folders. The tool SigCheck allows us to verify that a file is signed via a signed catalog file. SigCheck allows us to verify that a file is signed via a signed catalog file.
Conclusion
By using a digital certificate to sign your PowerShell scripts, you can be alerted to malicious actions. A digital signature in a script is an insurance against a very effective way of attacking your network. Unfortunately, a signature is valid only until the expiration date of the certificate. However, as long as the script was signed while the signing certificate was valid, and there is a time stamp server, users can carry on using script indefinitely.
The securing is very important in a production environment, but it must not become a restriction. So, before deploying your policy, you should go through a test plan to make sure that the use of signed scripts is not going to cause problems to any of the units affected.
Load comments