
One of my clients wanted to be able to restrict any given control, on any form, so that it is either invisible or disabled based on who is using the form. We decided to make the restrictions “roles-based” – that is “managers can click this button, users can see it, but to guests it is invisible.”
We wanted to build an architecture that would allow us to add forms and controls to the application without deciding in advance which roles we would use, and without having to modify the forms or controls to meet the needs of the security architecture any more than absolutely necessary. The ideal security architecture would be independent of the participating forms and controls.
In this article, I will review the approach I took, focusing on the nitty-gritty code used to make this work, and the challenges faced in creating such an application quickly (their budget for this was 4 days). This article takes you as far as saving the users, roles and the permissions those roles have for the various controls. It does not implement login and so it does not implement any of the checks to see if the logged in user should be restricted in access to the controls on any given page. All of that is left as a (dare I say?) fairly straight-forward exercise for the reader.
The full source code for this article is available for download. Simply click on the CODE DOWNLOAD link in the box to the right of the article title. It is also available on the author’s website.
NOTE:
This article is targeted at .NET 2 programmers already familiar with C# and .NET Windows Forms. I do not explain how to create forms, or how event handling works, nor do I explain how to interact with a SQL database.
Users and roles
There are many security schemes that have evolved over time, but the one which has proven most successful, at least in the Windows world, is that of Access Control Lists (ACLs) now most commonly referred to as Users and Roles. We see this most cleanly and starkly implemented in ASP.NET, though it presents a bit more of a challenge with Windows Forms applications that will be used by a very large number of users. (One approach is to use the ASP.NET authentication support, accessing it through a web service.)
NOTE:
See, for example, my articles on creating users and roles on O’Reilly Windows DevCenter (though today I would re-write these articles to use the Web Site Administration Tool accessed from Visual Studio under Website-> ASP.NET -> Configuration.
My client had their own authentication system (as part of their larger in-house system) and to keep this article simple I’ll follow their lead and simply create a Users table and a Roles table and finesse the authentication.
Roles and controls
To decide if a user has “access” to a control (which will be defined as meaning the right to see a control or to invoke the control) we’ll create two additional objects:
-
ControlPermission which will represent a given control on a given form, and
-
PermissionToRole which encapsulates the relationship between a given ControlPermsision and a given Role (the one to many relationship) and the permissions for that control by users in that role.
NOTE:
In a “real” application, I’d add a middle tier of business objects to represent the user, role, control and the relationships, but again, to keep this paper stripped down to the essence, the sample application will have the presentation layer talk directly to the persistence layer (a practice I generally recommend against! Please see this article for more on this topic).
The database
The database (for this part of the application) is very straight forward. We’ll create five tables, as shown in the figure 1:
NOTE:
To make this article as accessible as possible, I created the database using SQLExpress, though I accessed and manipulated the database using the SQL Server Management Studio from SQL Server 2005.
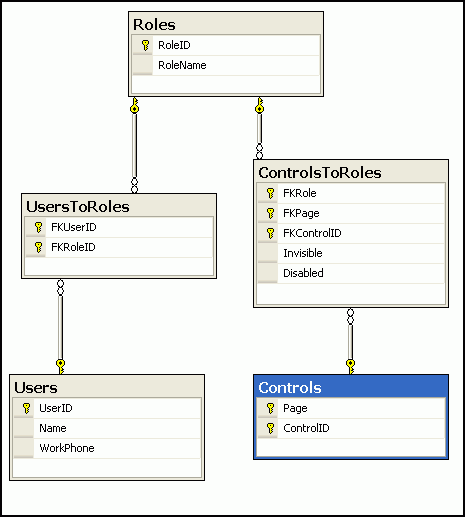
Figure 1 Database diagram
There are three data tables (Users, Roles and Controls) and two tables that create many-to-many relationships: UsersToRoles and ControlsToRoles. Users and Roles are more or less self-explanatory. The Controls table represents a control on a form, and ControlsToRoles is the heart of the control-based security approach; it represents the permissions of a given role for a given control on a given form, as is explained in detail below.
Application and control-security forms
The application may consist of any number of forms. To keep the explanation clear, we’ll draw a distinction between the two forms used for control-security, and all the other forms used for the application (which we’ll call “application forms.”).
There are only two requirements for an application form to participate in control-based security:
- Each application form must include two toolTip controls (explained in detail below) which must be named toolTip1 and toolTip2.
- Each application form must provide some means (typically a menu choice) of invoking the two control-security forms: ManageRoles.cs and ManagePermissions.cs
The application forms are free to use toolTip1 in any way they choose (including ignoring it), but they must not use toolTip2 at all, as its contents will be controlled by the Control-security forms.
That’s it, otherwise all application forms and their controls (including user controls and custom controls) remain unchanged.
Creating the application
Begin by creating a new Windows Forms application in Visual Studio 2005 (or your favorite alternative tool).
Let’s assume, for the sake of this article, that the application you are building will be used by a Sales Representative to enter data about a request to Liberty Associates, Inc. for contract programming, training or writing. For illustration purposes I’ll create two application forms (PotentialClient and NewContract), but you can imagine an application with 20 (or 200) application forms. I’ll also create the two security forms: ManageRoles and ManagePermissions.
PotentialClient asks for basic demographic information as shown in figure 2:
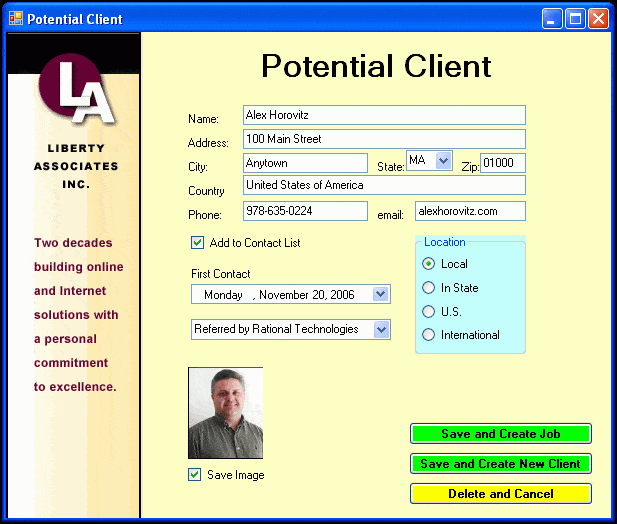
Figure 2 Potential Client Form
And NewContract asks for details about the work requested, as shown in figure 3.
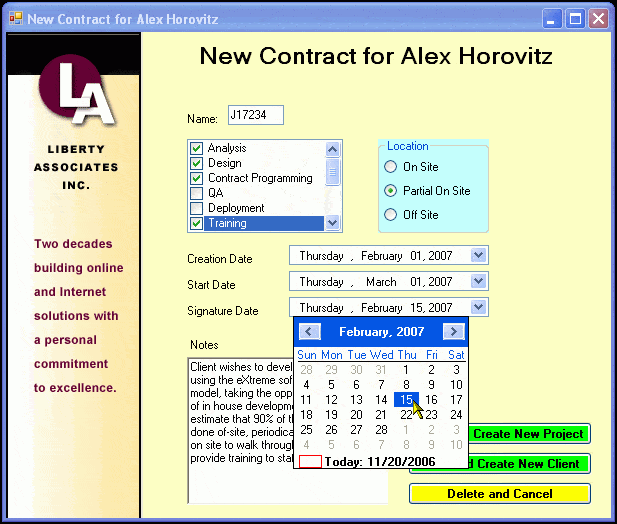
Figure 3 Second form: New Contract
I’ve intentionally made these application forms crude and simple to allow us to focus on the control-based security rather than on the form design. In any case, none of the data retrieved in these forms will be persisted, and I encourage you to create your own forms that more closely represent your own business needs.
Creating users and roles
As noted earlier, there are numerous ways to approach creating users and roles in a Windows application. The three that I personally find most appealing are:
- Use the Windows built in users and roles if the application needs and network needs are 100% isomorphic (a rare but not impossible scenario)
- Use a Web Service to leverage the ASP.NET forms-based security infrastructure created by Microsoft.
- Create your own simple database, and use a proprietary (existing) authenticating system.
Again, to keep this paper focused, we’ll assume situation #3. Thus, we need only create a Windows form for adding users, adding roles and adding users to roles, and saving all of that to the database. This is easily accomplished by creating the form shown in Figure 4:
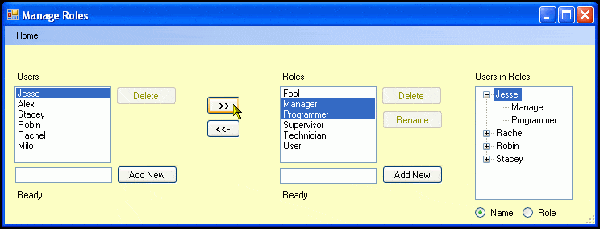
Figure 4 Manage Roles Form
You will want to bind the list boxes to data sources tied to your data tables. When the user clicks on AddNew you’ll get the name from the text box and create the new record for the database and for the list box:
|
1 2 3 4 5 6 7 8 9 10 11 12 13 14 15 16 17 18 19 20 21 22 23 24 25 26 27 28 29 |
private void AddNewRole_Click( object sender, EventArgse ) { string newName = string.Empty; newName = NewRoleName.Text; NewRoleName.Text = string.Empty; // clear the control ControlSecurityDataSet.RolesRownewRolesRow; newRolesRow = controlSecurityDataSet.Roles.NewRolesRow(); newRolesRow.RoleName = newName; this.controlSecurityDataSet.Roles.Rows.Add( newRolesRow ); try { this.rolesTableAdapter.Update ( this.controlSecurityDataSet.Roles ); } catch ( Exceptionex ) { this.controlSecurityDataSet.Roles.Rows. Remove( newRolesRow ); MessageBox.Show( "Unable to add role "+ newName + ex.Message, "Unable to add role!", MessageBoxButtons.OK, MessageBoxIcon.Error ); } RolesListBox.SelectedIndex = -1; } |
When you add a user to a role (by clicking on the arrow key), you’ll make an entry in the UsersToRoles table (adding the UserID and RoleID and then updating the TreeView (far right)). To update the TreeView, you’ll retrieve the entries fro the database and iterate through the rows of the table crating a new parent node each time you come across a new user name (if the “Name” radio button is selected) or a new RoleName (if the Role radio button is pressed):
|
1 2 3 4 5 6 7 8 9 10 11 12 |
foreach ( DataRow row indt.Rows ) { if( rbName.Checked ) { subNode = new TreeNode( row["roleName"].ToString() ); if ( currentName != row["Name"].ToString() ) { ParentNode = new TreeNode( row["Name"].ToString() ); currentName = row["Name"].ToString(); UsersInRoles.Nodes.Add( ParentNode ); } } |
Since our focus is on the controls-based security, I won’t go into more detail here, though as mentioned earlier, the complete source is available for you to download and try out.
The Manage Permissions page
The second, and perhaps more important, page involved in managing the control-based security will display all the controls for a given page, and will display all the roles known to the application. Since the default is full access, the administrator need only indicate the restrictions to apply for any given control for any given role. The page will have two multi-select list boxes: one displaying all the controls from the page and one displaying all the roles. In addition, much as in the ManageRoles form, there will be a Tree control displaying the saved restrictions, either by role or by control, as shown in Figure 5:
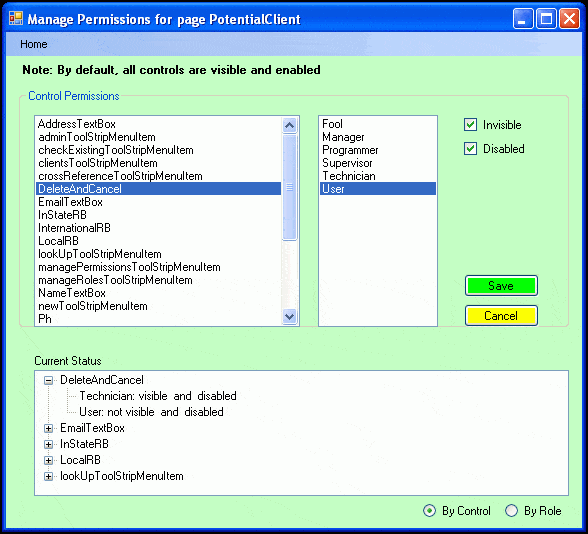
Figure 5 Manage Permissions
To accomplish this, you’ll want to extend your data source to include the Controls and ControlsToRoles tables as shown in Figure 6:
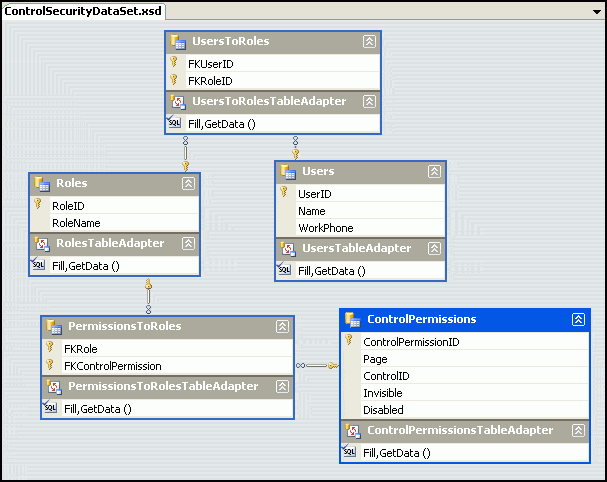
Figure 6: Control Security Data Set
Once again you’ll populate the Roles list box by dragging the Roles table from the data sources view onto the list box, thus creating both a BindingSource and a TableAdapter
Populating the Controls permission list box is a bit trickier. To do this you need access to the list of controls for the form.
The ManagePermissions constructor will take three arguments: a reference to a Form, and two references to ToolTip objects.). The constructor will stash these away in private member variables.
|
1 2 3 4 5 6 7 8 9 10 11 12 13 14 15 16 17 18 19 20 21 22 |
public partial class ManagePermissions : Form { private FormworkingForm; private ToolTip formToolTip1 = null; private ToolTip formToolTip2 = null; public ManagePermissions( Form f, ToolTip toolTip1, ToolTiptoolTip2 ) { InitializeComponent(); workingForm = f; formToolTip1 = toolTip1; formToolTip2 = toolTip2; formToolTip1.Active = false; formToolTip2.Active = true; this.Text += " for page " + f.Name; ShowControls( f.Controls ); PopulatePermissionTree(); } |
Note that after it stashes away the references it sets the title to indicate which form (page) it is setting permissions for. The reason we pass in the two tool tips is to change the tooltips from whatever the programmer was using the tooltips for to now using the tooltips to indicate the name of every control on the page. This allows the administrator to identify the exact control to be restricted, as shown in figure 7:
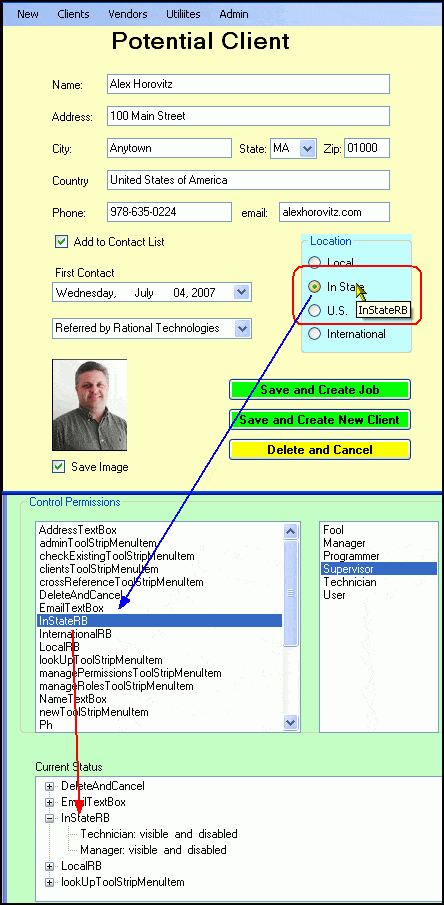
Figure 7 – Tool Tips used to name Controls
In Figure 7 you can see that when the permissions dialog is open if the user hovers over any control on the page for which permissions are being set, the tool tip has been changed to indicate the name of the control. This corresponds directly to the name listed in the Control Permissions list box (which is sorted alphabetically).
Setting permissions
The administrator selects (or multi-selects) one or more controls in the Controls Permission list box, then selects (or multi-selects) one or more roles in the roles list box and then checks either or both of invisible and disabled. The handler for the Save button loops through each indicated control and each indicated role and calls a stored procedure to make a record in ControlToRoles (first ensuring there is a record for that control in Controls). All of this is done under transaction support, as explained in detail below).
Cleaning up
When the Control Permissions page closes, we reset the original tool tips (which we stashed away).
The nitty gritty
There are a number of juicy technical details, and the best way to see them is to walk through them step by step.
Implementing permissions – step-by-step
The following is an annotated walk through of adding restrictions to a control for a given role, as you might see it stepping through the debugger.
<Rant>
Programmers do not spend nearly enough time becoming proficient with their editor nor with their debugger. This seems crazy to me; on a par with race car drivers who do not know how the engine to their car works, or infantry who can’t break down their weapons. They put others at risk.
Code should be self-commenting. Excessive comments (more than a few per page) are an admission of failure and each comment you add to your code greatly decreases the life expectancy of your code (comments rust). This second point is highly controversial and worth an opinion piece all its own (forthcoming).
The best way to learn how to program is (a) to buy a really good book with lots of exercises, (b) to expand those exercises and (c) [most important] to step through your exercises in the debugger to see what is really happening. The best way to learn new techniques is to step through code. Visual Studio has a great debugger, pay special attention to the watch and quick watch features.
</Rant>
We’ll pick up the program where the user clicks on ManagePermissions from the PotentialClient Application Form, as shown in figure 8:
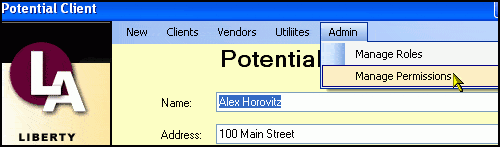
Figure 8 Manage Permissions
The code handler follows:
|
1 2 3 4 5 6 7 8 9 |
private void managePermissionsToolStripMenuItem_Click ( object sender, EventArgse ) { ManagePermissions dlg = new ManagePermissions( this, this.toolTip1, this.toolTip2 ); dlg.Show(); } |
There are two things to note about this handler:
- As required, it passes in a reference to itself (the form) and to its two ToolTip objects to the constructor for the ManagePermissions form.
- Equally important, it calls Show, and not ShowModal, when invoking the dialog – this allows the user to return to the invoking form to give the form focus and hover over controls to see the name of the control in the tooltips.
ManagePermisssions constructor
Control now switches to the constructor of the ManagePermissions form, which was shown, slightly-excerpted, before. The ommission was that I hid the Dictionary named oldMenuToolTips that I was forced to create despite the fact that I hold on to ToolTips1. This dictionary is needed because tool tips work differently for menus than they do for other controls. This is a detail we’ll come to in a bit.
Stepping into the ManagePermissions constructor, the class members are initialized and then the body of the constructor itself is called:
|
1 2 3 4 5 6 7 8 9 10 11 12 13 14 15 16 17 18 19 20 21 22 23 24 |
public partial class ManagePermissions : Form { private Dictionary<string, string> oldMenuToolTips = new Dictionary<string, string>(); private FormworkingForm; private ToolTip formToolTip1 = null; private ToolTip formToolTip2 = null; public ManagePermissions( Form f, ToolTip toolTip1, ToolTiptoolTip2 ) { InitializeComponent(); workingForm = f; formToolTip1 = toolTip1; formToolTip2 = toolTip2; formToolTip1.Active = false; formToolTip2.Active = true; this.Text += " for page " + f.Name; ShowControls( f.Controls ); PopulatePermissionTree(); } |
NOTE:
If you are stepping through, you’ll find yourself in the designer. Put a breakpoint on ShowControls in the constructor and hit F5 to jump there, as it is the next interesting piece to examine.
ShowControls
After setting the title bar ShowControls is called, passing in the controls collection of the form. Stepping in you see the controls collection defined as a Control.ControlCollection. The trick with this method is that Controls themselves can contain other controls (e.g., a panel can contain controls) and so the method must be made recursive:
|
1 2 3 4 5 6 7 |
foreach ( Control c incontrolCollection ) { string displayName = string.Empty; if ( c.Controls.Count > 0 ) { ShowControls( c.Controls ); } |
A bit nastier, menu strips handle their members differently, so if the control is a menu strip, you’ll need to call a different method:
|
1 2 3 4 5 |
if ( c is MenuStrip) { MenuStrip menuStrip = c as MenuStrip; ShowToolStipItems( menuStrip.Items ); } |
The ShowtoolStipItems method itself must be recursive as well:
|
1 2 3 4 5 6 7 8 9 10 11 12 13 14 15 |
private void ShowToolStipItems(ToolStripItemCollectiontoolStripItems) { foreach ( ToolStripMenuItem mi intoolStripItems ) { oldMenuToolTips.Add( mi.Name, mi.ToolTipText ); mi.ToolTipText = mi.Name; if ( mi.DropDownItems.Count > 0 ) { ShowToolStipItems( mi.DropDownItems ); } PageControls.Items.Add( mi.Name ); } } |
Notice the last line; it is here that we add the menu items to the list of controls that might be restricted – that is we treat the menu items just like any other control for purposes of control-based security.
Returning to the ShowControls method, we are now ready to see if the control is of a type that we might want to restrict (you are free to expand the list of types). If so, we’ll set its second tool tip to its name and we’ll add it to the list box of controls:
|
1 2 3 4 5 6 7 8 9 |
if ( c is Button || c is ComboBox || c is TextBox|| c is ListBox || c is DataGridView || c is RadioButton| c is RichTextBox || c is TabPage ) { formToolTip2.SetToolTip( c, c.Name ); PageControls.Items.Add( c.Name ); } |
Populate Permission Tree
Having populated the controls, and remembering that we bound the roles control box to the roles table (by dragging the roles table from the data source to the control in design view, thus setting up a rolesBindingSource and a rolesTableAdapter and letting them do the work), we are up to the last line in the constructor in which we invoke PopulatePermissionTree.
This method is factored out because it is invoked from a number of places (which the debugger is happy to point out to you, just go to the method, right click and then click on “Find all references.”
NOTE:
Here, as in many places in the code, I would normally remove all calls to the database to a business object (or at least to a helper object with static member methods). Once again, to focus on the task at hand, and to keep the code straight forward, I’ve put the data access code directly into the presentation layer code, whch gives me the willies but does make for an easier to follow example.
The method begins by retrieving the connection string from the AppSettings.cs file, using the ConfigurationManager object (the new and preferred way to do so in 2.0 applications). Once this is obtained, a SQL connection is created and opened:
|
1 2 3 4 5 6 7 8 9 10 |
ConnectionStringSettingsCollectionconnectionStrings = ConfigurationManager.ConnectionStrings; stringconnString = connectionStrings[ "ControlBasedSecurity.Properties.Settings. ControlSecurityConnectionString"]. ToString(); SqlConnection conn = new SqlConnection( connString ); conn.Open(); |
The queryString to obtain the controls we want is hard wired into the code (typically, we’d use a stored procedure) and the order clause is set by which radio button is chosen by the user. A hack, but an effective one:
|
1 2 3 4 5 6 7 8 9 10 11 12 13 14 15 |
string queryString = "select controlID, Invisible, Disabled, RoleName "+ "from ControlsToRoles ctr "+ " join controls c on c.ControlID = ctr.FKControlID and c.Page = ctr.FKPage "+ " join roles r on r.RoleID = ctr.FKRole "; if( ByControlRB.Checked ) { queryString += " order by ControlID"; } else { queryString += " order by RoleName"; } |
In the parallel method, in ManageRoles, I had an if statement to check which radio button was checked (by user or by role) and set the varaibles subNode and parentNode accordingly:
|
1 2 3 4 5 6 7 8 9 10 11 12 13 14 15 16 17 18 19 |
if( rbName.Checked ) { subNode = new TreeNode( row["roleName"].ToString() ); if ( currentName != row["Name"].ToString() ) { parentNode = new TreeNode( row["Name"].ToString() ); currentName = row["Name"].ToString(); UsersInRoles.Nodes.Add( parentNode ); } } else { subNode = new TreeNode( row["Name"].ToString() ); if ( currentName != row["RoleName"].ToString() ) { parentNode = new TreeNode( row["RoleName"].ToString() ); currentName = row["RoleName"].ToString(); UsersInRoles.Nodes.Add( parentNode ); } |
In this method, I’ll use the C# ternary operator to consolidate this code:
|
1 2 3 4 5 6 7 8 9 10 11 |
subNode = new TreeNode( subNodeText ); stringdataName = ByControlRB.Checked ? row["ControlID"].ToString() : row["RoleName"].ToString(); if( currentName != dataName ) { parentNode = new TreeNode( dataName ); currentName = dataName; PermissionTree.Nodes.Add( parentNode ); } |
NOTE:
You read the ternary operator statement as follows “Is the radio button ControlRB checked? If so, assign what is in the column ControlID to the string DataName, otherwise assign what is in the column RoleName to that string.
This avoids duplicating the code in an else statement, and thus makes the code more robust.
NOTE:
The opportunity to factor the two PopulateTree methods (from ManagePermissions and ManageRoles, into a single helper method is left as an exercise for the reader.
With the query string created, we can retrieve the permissions from the database into a dataset, and from that extract the DataTable whose Rows collection we’ll iterate through to get all the existing controlsToRows relations.
|
1 |
DataSet ds = new DataSet();SqlDataAdapter dataAdapter = null;DataTable dt = null;try{ dataAdapter = new SqlDataAdapter( queryString, conn ); dataAdapter.Fill( ds, "controlsToRoles" ); dt = ds.Tables[0];}catch (Exception e){ MessageBox.Show( "Unable to retrieve permissions: " + e.Message, "Error retrieving permissions", MessageBoxButtons.OK, MessageBoxIcon.Error );}finally{ conn.Close(); |
With the DataTable in hand, the next step is to prep the TreeView by calling BeginUpdate (which stops it from updating until we call EndUpdate) and by clearing all its existing nodes, so that we can add all the nodes from the database and not worry about duplication. We then iterate through each row, creating sub-nodes for each parent, and adding the parents to the TreeView as we find new parents. The parents are defined as a new control (when sorting by controls) or a new role (when sorting by roles).
|
1 2 3 4 5 6 7 8 9 10 11 12 13 14 15 16 17 18 19 20 21 22 23 24 25 26 27 28 29 30 31 32 33 |
PermissionTree.BeginUpdate(); PermissionTree.Nodes.Clear(); TreeNode parentNode = null; TreeNode subNode = null; string currentName = string.Empty; foreach ( DataRow row indt.Rows ) { stringsubNodeText = ByControlRB.Checked ? row["RoleName"].ToString() : row["ControlID"].ToString(); subNodeText += ":"; subNodeText += Convert.ToInt32( row["Invisible"] ) == 0 ? " visible " : " not visible "; subNodeText += " and "; subNodeText += Convert.ToInt32( row["Disabled"] ) == 0 ? " enabled " : " disabled "; subNode = new TreeNode( subNodeText ); stringdataName = ByControlRB.Checked ? row["ControlID"].ToString() : row["RoleName"].ToString(); if( currentName != dataName ) { parentNode = new TreeNode( dataName ); currentName = dataName; PermissionTree.Nodes.Add( parentNode ); } if ( parentNode != null ) { parentNode.Nodes.Add( subNode ); } } PermissionTree.EndUpdate(); |
We’ve chosen to have the sub-nodes tell whether the control is invisible or disabled no matter what the view, allowing for displays as shown in figures 9 and 10:
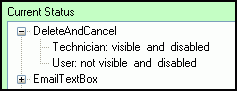
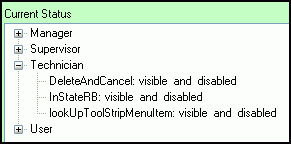
Figure 9 Current Status by Control Figure 10 Current Status By Role
Adding a new restriction to a control
At this point, all we’ve done (hard to believe!) is finish the constructor. The dialog is displayed with the name of the page we’re setting permissions for, the controls for that page are displayed, the roles are displayed, and any previously recorded restrictions are displayed. In addition, the application page’s ToolTip’s have been adjusted to display the name of each control when you hover over the control (all of this was shown in figure 7).
Assume the administrator selects a control (e.g., InternationalRB) and then selects two roles (e.g., User and Technician) and checks Disable and Save. The user’s intent is to restrict all members in the User role and the Technician role from having the International radio button being enabled when they view the Potential Client application page.
When the administrator clicks Save, control will jump to the Save_Click event handler. Once again we’ll retrieve the connection settings and open a connection. The code then iterates through each of the selected items in the PageControls list box extracting the string representing the controlID of the control that was selected (InternatioanlRB) and then within that loop iterates through each of the selected items in the PermissionRoles list box, retrieving the DataRowViews corresponding to the selected items (remember that the PermissionRoles list box was populated through data binding).
With these in hand, you are ready to create records in ControlsToRoles which you will do by calling the stored procedure spInsertNewControlToRole, shown here:
|
1 2 3 4 5 6 7 8 9 10 11 12 13 14 15 16 17 18 19 20 21 22 23 24 25 26 27 28 29 30 31 |
PROCEDUREspInsertNewControlToRole @RoleID int, @PageName varchar(50), @ControlID varchar(50), @invisible int, @disabled int AS BEGIN Begin Transaction if not exists (select * fromControls where Page = @PageName and ControlID = @ControlID) Insert into Controls (Page, ControlID) values (@PageName, @ControlID) if @@Error <> 0 gotoErrorHandler insert into ControlsToRoles (FKRole, FKPage, FKControlID, invisible, disabled) values (@RoleID, @PageName, @ControlID, @invisible, @disabled) if @@Error <> 0 gotoErrorHandler commit transaction return ErrorHandler: rollback transaction return END |
Note first that this stored procedure uses transactions to ensure that either the Control row is added (if needed) and the ControlsToRoles row is added, or neither is added. Second, the stored procedure checks whether the table already has an entry for this control/page combination and only attempts to insert one if it does not already exist.
The ControlsToRoles row does double duty; it manages the relation between a control and a role and it manages the state for that relationship (is invisible set? Is disabled set?). While this may be in some ways counterintuitive, it ensures that (1) a role can have only one relationship with any given control and (2) when you set a control invisible for two roles, and then set it visible for one of the roles you do not inadvertently set it visible for the other. That is, the relationship between a role and a control (and the state of that control) is atomic.
The code to call this stored procedure is shown here:
|
1 2 3 4 5 6 7 8 9 10 11 12 13 14 15 16 17 18 19 20 21 22 23 24 25 26 27 28 29 30 31 32 33 34 35 36 37 38 39 40 41 42 43 44 45 46 47 48 49 50 51 52 53 54 55 56 57 58 59 60 61 62 63 |
private void Save_Click( object sender, EventArgse ) { ConnectionStringSettingsCollectionconnectionStrings = ConfigurationManager.ConnectionStrings; SqlConnection conn = new SqlConnection( connString ); conn.Open(); SqlParameterparam; foreach ( String controlID inPageControls.SelectedItems ) { foreach ( DataRowView roleRow inPermissionRoles.SelectedItems ) { int roleID = Convert.ToInt32( roleRow["RoleID"] ); try { SqlCommand cmd = new SqlCommand(); cmd.Connection = conn; cmd.CommandText = "spInsertNewControlToRole"; cmd.CommandType = CommandType.StoredProcedure; param = cmd.Parameters.Add( "@RoleID", SqlDbType.Int ); param.Value = roleID; param.Direction = ParameterDirection.Input; param = cmd.Parameters.Add( "@PageName", SqlDbType.VarChar, 50 ); param.Value = workingForm.Name.ToString(); param.Direction = ParameterDirection.Input; param = cmd.Parameters.Add( "@ControlID", SqlDbType.VarChar, 50 ); param.Value = controlID; param.Direction = ParameterDirection.Input; param = cmd.Parameters.Add( "@invisible", SqlDbType.Int ); param.Value = InVisible.Checked ? 1 : 0; param.Direction = ParameterDirection.Input; param = cmd.Parameters.Add( "@disabled", SqlDbType.Int ); param.Value = Disabled.Checked ? 1 : 0; param.Direction = ParameterDirection.Input; introwsInserted = cmd.ExecuteNonQuery(); if( rowsInserted < 1 || rowsInserted > 2 ) { DisplayError( controlID, roleID, "Rows inserted = "+ rowsInserted.ToString() ); } } catch ( Exception ex ) { DisplayError( controlID, roleID, ex.Message ); } } } conn.Close(); PopulatePermissionTree(); } |
Once the new row(s) is inserted, we call PopulatePermissionTree to repopulate the permission tree to reflect the change and give positive feedback to the user.
Clean up on exit
When the administrator is finished setting restrictions, the ManagePermissions page is closed. An event is fired as the page is closed (FormClosing) which we trap, providing us an opportunity to reset the Tooltips for the form that we were setting permissions for:
|
1 2 3 4 5 6 7 8 9 10 11 12 13 14 15 |
private voidManagePermissions_FormClosing( object sender, FormClosingEventArgse) { foreach ( Control c inworkingForm.Controls ) { if ( c is MenuStrip) { MenuStrip ms = c as MenuStrip; RestoreMenuStripToolTips(ms.Items); } } formToolTip1.Active = true; formToolTip2.Active = false; } |
The menu item tool tips are restored through the recursive method RestoreMenuStripToolTips:
|
1 2 3 4 5 6 7 8 9 10 11 12 13 14 15 16 17 18 19 20 |
private void RestoreMenuStripToolTips( ToolStripItemCollection toolStripItems ) { foreach ( ToolStripMenuItem mi intoolStripItems ) { if( mi.DropDownItems.Count > 0 ) { RestoreMenuStripToolTips( mi.DropDownItems ); } if( oldMenuToolTips.ContainsKey( mi.Name ) ) { mi.ToolTipText = <span class="UserInput"><strong>oldMenuToolTips</strong></span>[mi.Name]; } else { mi.ToolTipText = string.Empty; } // end else } // end foreach } // end RestoreMenuStripToolTips |
RestoreMenuStripToolTips recurses down to leaf menu items and then retrieves their value from the dictionary into which we stashed them in ShowToolStipItems which we called from ShowControls which was called from the constructor.
Form closing then makes our special ToolTips object inactive and reactivates the normal ToolTips object and the form is back to normal. The database is fully updated and it is up to the form designer to check the ControlsToRoles table to ensure that the current user’s role does not prohibit displaying or enabling any given control.
The Debugger is your friend
Rather than creating the forms from scratch, an effective way to understand this project is to download the source and put it in the debugger. The focus is not on the two main forms (which are implemented only enough to provide a context for the control-based security) but rather on ManagePermissions.cs and ManageRoles.cs.
The interaction between the two Management forms and the underlying database (ControlSecurity) is where all the action is, and understanding the code-behind for these pages is critical. (The database and its stored procedure can be created by running ControlSecurity.sql)
Within ManagePermissions.cs, pay particular attention to the manipulation of the ToolTips and also to ShowControls and the invocation of the stored procedure spInsertNewControlToRow.
Similarly, in ManageRoles.cs, pay particular attention to the invocation of spInsertNewUserInRole and make sure you are comfortable with how these relationships are created and what they do.
Wrap-up
The goal of this article was not to provide a complete solution, but rather, to demonstrate an approach that utilizes the ability to find all the controls on the page, to assist in finding the names of each control at run time by taking over the tool tips, and by storing the permissions in a database. This is an approach I’ve used with some success for clients who need control-by-control security in their applications.
Since I’ve left you with work to do to create a full, working application, let me compensate by saying that I also leave you with support. Please post any questions you may, or difficulties that you encounter, in the comments at the end of this article and/or on the support forum to my web site (clicking on books, and then clicking on “Free Support Forum”).
This document contains proprietary information and is protected by copyright law.
Copyright © 2026 Red Gate Software Limited. All rights reserved
Load comments